This section tackles two issues. First, it shows how to reference items on a subform programmatically from the code behind a main form. This enables you to compute values based on subform fields or just extract a particular subform field value (which can eliminate the need to scroll a subform). Second, this section explains how to show pictures in a form when the table serving as the form's record source contains image file addresses instead of bound images.
Figure 12-4 shows an adaptation of the form depicted in Figure 12-3. The new form has the name frmEmployees1. The adaptation drops the Notes text box and adds two others in its place. The Notes text box in frmEmployees is bound to the Notes column in the Employees table. The two new text boxes are both unbound. Their captions are Total Freight and Last Order Date.
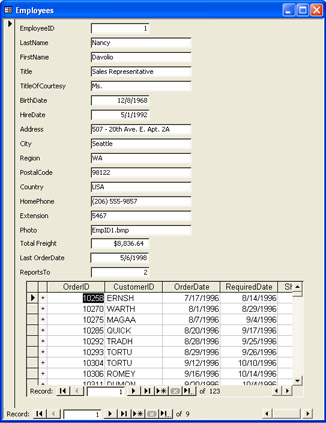
It's easy to edit the AutoForm-generated form in Figure 12-3 so that it adopts the design of the form in Figure 12-4. You use the same techniques as you would with standard Access database files. First select the Notes text box in Design view. Then click the Delete key on the keyboard to remove the form control and its corresponding label, which is a caption for the Notes text box. Second open the Toolbox. Third drag a couple of text boxes to the form from the Toolbox. Assign txtTotalFreight as the name for the first new text box and txtLastOrderDate as the name for the second new text box. Then select the label for each text box and assign its Caption property a name similar to the one in Figure 12-4. Finally align and size the labels and text boxes with the other controls already on the form.
After these steps, you will have two text boxes that appear blank in Form view. In Design view, the forms contain the word Unbound. You can insert values into the unbound text boxes using any of the standard form development techniques. For example, you can programmatically assign values to the text boxes. One of the most common places to insert code that programmatically modifies a form is in the event procedures behind a form and its controls.
The following sample uses two form events: Current and Open. The Current event fires whenever a form accesses a new record. The form can access a new record when a user opens the form, navigates from one record to the next, or requeries the form. The sample code populates the txtTotalFreight and txtLastOrderDate controls with the Current event procedure for the form. After a form event procedure populates a text box, it will have the default formatting unless you explicitly program another format. The sample uses an Open event procedure to assign formats to the two unbound controls that match the content developed by the Current event procedure. The Open event fires whenever a form opens. This can happen when a user opens a closed form or a developer switches from Design view to Form view. You can open a template for a form event procedure in an Access project just as you would for an Access database file. Select the form in Design view. (See Chapter 5 to review how to do this.) Then open its Properties dialog box. Select the Event tab on the dialog box. Then click the Build button (…) next to the Event property that matches the event procedure you want to program. For example, click the Build button for the On Current event property to open a template for the Current event. Choose Code Builder in the Choose Builder dialog box, and then click OK to open the template.
The next two VBA scripts show the Form_Current and Form_Open event procedures for the frmEmployees1 form. The Form_Current event procedure uses the ctl1 object reference to point at the sbfOrders control on the frmEmployees1 form. This control contains the subform. The procedure uses the Form property of the sbfOrders control to reference individual control values on the subform. For example, the event procedure points ctl2 at the Freight control on the subform.
Next the event procedure opens a loop on the recordset behind the subform. The syntax for pointing at the recordset behind a subform is ctl1.Form.Recordset. In this instance, ctl1 points at the subform control. Form displays the collection of form properties behind the subform control, and Recordset specifies the particular property of interest. The loop travels through the records behind the subform until it encounters an EOF flag. During each pass through the loop, the code accumulates the value of the Freight control in the cur1 local variable. The code within the loop also saves the current value of the OrderDate control in the dat1 local memory variable. During the last pass through the loop, dat1 receives the value of the last OrderDate value for the current employee. After exiting the loop, the procedure saves the values of cur1 and dat1 in the txtTotalFreight and txtLastOrderDate text boxes on the main form. This way, the procedure reflects subform control values on the main form.
The procedure makes the subform invisible during its operation. Setting the subform control's visibility property to False hides updates to the control at the procedure's start, and a closing property setting of True restores the visibility of the subform at the end of the procedure. In between, the procedure moves from one record to the next on the subform. Setting the subform control's Visible property to False hides this movement between records on the subform. Just before restoring the subform's visibility, the procedure moves the current record in the subform back to the first record in the recordset.
Private Sub Form_Current()
Dim ctl1 As Control
Dim ctl2 As Control
Dim cur1 As Currency
Dim dat1 As Date

'Set reference for subform control
Set ctl1 = Me.sbfOrders
ctl1.Visible = False

'Set reference to Freight control on subform
Set ctl2 = Me.sbfOrders.Form("Freight")

'Loop through subform rows in subform recordset.
'Accumulate total freight.
'Save OrderDate values for last subform row.
Do Until ctl1.Form.Recordset.EOF
    cur1 = cur1 + ctl2.Value
    dat1 = Me.sbfOrders.Form("OrderDate")
    ctl1.Form.Recordset.MoveNext
Loop
Me.txtTotalFreight = cur1
Me.txtLastOrderDate = dat1

'Reposition current record at top of recordset
ctl1.Form.Recordset.MoveFirst

ctl1.Visible = True

End Sub
The following Form_Open event procedure formats the two unbound controls added to frmEmployees1. The assignment of <;$QD>Currency<;$QD> to the Format property of the txtTotalFreight control represents its quantity as a currency. This assignment adds a leading currency sign, and it aligns the total value so that it appears on the box's right-hand side. The second assignment right-justifies the date in the txtLastOrderDate control. Access does not have enum members to represent the TextAlign formatting settings. Therefore, the procedure assigns a constant naming the correct value for right alignment. This makes the code easier to read and maintain. Without the TextAlign property assignment, the date value in txtLastOrderDate appears as a left-justified label.
One problem with the form shown in Figure 12-3 is that it displays the address of the photo image, but not the image itself. The AutoForm Wizard assigned the file address for the image to a control, but it didn't put code behind the form to display the image that corresponds to an address on each record. (It's fixing little things like this that helps you justify getting paid the big bucks by your clients.) This section takes two approaches to the task. First, it shows how to work with the addresses in the Employees table. These point at bitmap images. Although this image format is acceptable for many purposes, Web applications often use different image formats, such as files with a .gif or .jpg extension. The second sample in this section demonstrates the use of images with a .jpg format.
To use image files from the Employees table, I build a simple query statement in a view. The view's name is Employee_Pic_addresses. This view contains three fields: EmployeeID, EmployeeName, and Photo. The Photo column contains the image filenames. The EmployeeName field is computed as the FirstName field, plus a space, plus the LastName field. Notice from the following T-SQL statement that SQL Server syntax uses a plus sign (+) to concatenate strings:
SELECT EmployeeID, FirstName + ' ' + LastName AS EmployeeName, Photo
FROM dbo.Employees
To create a form that displays the three column values in the Employee_Pic_addresses view and the images corresponding to the filenames in the Photo column, you can create a form based on the view. Use the AutoForm Wizard to get off to a quick start. Then, in Design view, click the Image control in the Toolbox and select the location where you want the control in the form's top-left corner. When the Insert Image dialog box appears, choose EmpID1.eps. This file will reside in the folder where you store the image files. For example, Microsoft Office XP installs the image files for the Employees table by default at C:\program files\microsoft office\office11\samples\. When the form initially opens, it will automatically show this image. Any code you run from event procedures can substitute a new image. Assign pic_image to the Image control's Name property by using the Properties dialog box for the control. Insert the following script for the form's current event procedure. This procedure starts by assigning a value to a path, which represents the path to the image files. You can use any path you have for the image files. If the Photo column value is not Null, the procedure assigns the concatenation of the path and filename to the image control's Picture property. This branch of the If…Then…Else…End If statement also assigns a value of True to the image control's Visible property. This property is True by default, but the procedure assigns False to the property when the filename for the image is Null. Therefore, setting the Visible property to True when an image exists ensures that the employee's picture appears on the form.
Private Sub Form_Current()
'Assign a path for the image filename files
Const path _
    = "C:\program files\microsoft office\office11\samples\"

'If the image exists, assign the path and photo address
'to the pic_image's Picture property. Otherwise, make
'pic_image invisible.
If IsNull(Me.Photo) Then
    Me.pic_image.Visible = False
Else
    Me.pic_image.Picture = path & Me.Photo
    Me.pic_image.Visible = True
End If

End Sub
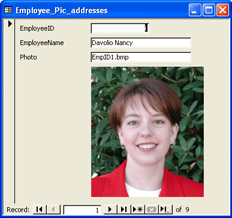
Figure 12-5 shows the frmEmployee_Pic_addresses form with the image of the first employee. Users can move through the records with the normal navigation controls at the bottom of the form. With each new record, the image changes. The table contains only nine records. As a developer, you can add new employees and photo addresses to the table to enable the form to show additional employee pictures. With a very modest amount of code, you can enable end users to add images for display on the form.
The next sample uses a very similar design. But instead of showing the employee photos from the Northwind database, this sample shows the photos for the Pic_Addresses table initially developed in Chapter 11. Recall that the table has three columns: PictureID, Pic_description, and Pic_address. These columns roughly correspond to those in the Employees table, with two important exceptions. First, the addresses in the Pic_address column include both the path and filename. Second, the addresses in Pic_Addresses point at .jpg files. This file type is popular for Web applications that show photo images. Therefore, bitmap files tend to have a larger file size for comparable images and resolutions. Using the Image control, you can display bitmap as well as JPEG files (those with a .jpg extension).