| [ Team LiB ] |
|
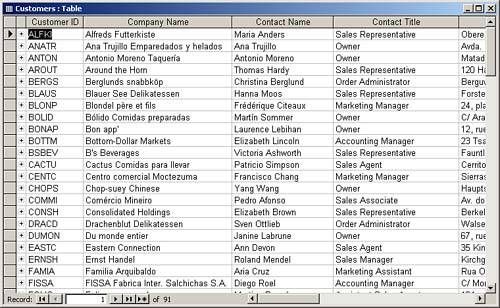
A Preview of the Database ComponentsAs mentioned previously, tables, queries, forms, reports, data access pages, macros, and modules combine to comprise an Access database. Each of these objects has a special function. The following sections take you on a tour of the objects that make up an Access database. Tables: A Repository for DataTables are the starting point for an application. Whether data is stored in an Access database or you are referencing external data by using linked tables, all the other objects in a database either directly or indirectly reference tables. To view all the tables that are contained in an open database, you click the Tables icon in the Objects list. (Note that you don't see any hidden tables unless you have checked the Hidden Objects check box in the Options dialog box's View page.) If you want to view the data in a table, you double-click the name of the table you want to view. (You can also select the table and then click the Open button.) Access displays the table's data in a datasheet that includes all the table's fields and records (see Figure 1.4). You can modify many of the datasheet's attributes and even search for and filter data from within the datasheet. If the table is related to another table (such as the Northwind Customers and Orders tables), you can also expand and collapse the subdatasheet to view data stored in child tables. Hour 2, "Tables Introduced," covers these techniques. Figure 1.4. Datasheet view of the Customers table in the Northwind database.
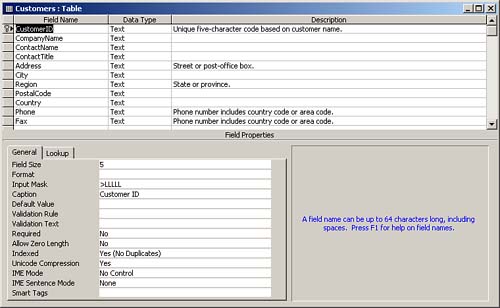
As an Access power user or developer, you will often want to view the table's design, which is the blueprint or template for the table. To view a table's design (see Figure 1.5), you click the Design icon with the table selected. In Design view, you can view or modify all the field names, data types, and field and table properties. Access gives you the power and flexibility you need to customize the design of tables. Hour 8, "Creating Tables," and Hour 14, "Power Table Techniques," cover these topics. Figure 1.5. The design of the Customers table.
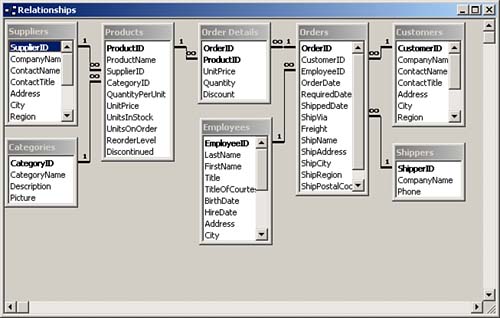
Relationships: Tying the Tables TogetherTo properly maintain data's integrity and ease the process of working with other objects in a database, you must define relationships among the tables in a database. You accomplish this by using the Relationships window. To view the Relationships window, with the Database window active, you select Tools | Relationships or you click Relationships on the toolbar. In this window, you can view and maintain the relationships in the database (see Figure 1.6). If you or a fellow user or developer have set up some relationships, but you don't see any in the Relationships window, you can select Relationships | Show All to unhide any hidden tables and relationships (you might need to click to expand the menu for this option to appear). Figure 1.6. The Relationships window, where you view and maintain the relationships in a database.
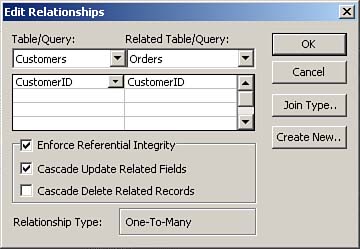
Notice that many of the relationships in Figure 1.6 have join lines between tables and show a number 1 on one side of the join and an infinity symbol on the other. This indicates a one-to-many relationship between the tables. If you double-click a join line, the Edit Relationships dialog box opens (see Figure 1.7). In this dialog box, you can specify the exact nature of the relationship between tables. The relationship between the Customers and Orders tables in Figure 1.7, for example, is a one-to-many relationship with referential integrity enforced. This means that the user cannot add orders for customers who don't exist. Notice in Figure 1.7 that the check box Cascade Update Related Fields is checked. This means that if the user updates a CustomerID field, Access updates all records containing that CustomerID value in the Orders table. Because Cascade Delete Related Records is not checked in Figure 1.7, the user cannot delete from the Customers table customers who have corresponding orders in the Orders table. Figure 1.7. The Edit Relationships dialog box, which lets you specify the nature of the relationships between tables.
Hour 9, "Creating Relationships," extensively covers the process of defining and maintaining relationships. It also covers the basics of relational database design. For now, you should remember that you should establish relationships both conceptually and literally as early in the design process as possible. Relationships are integral to successfully designing and implementing your application. Queries: Stored Questions or Actions You Apply to Data
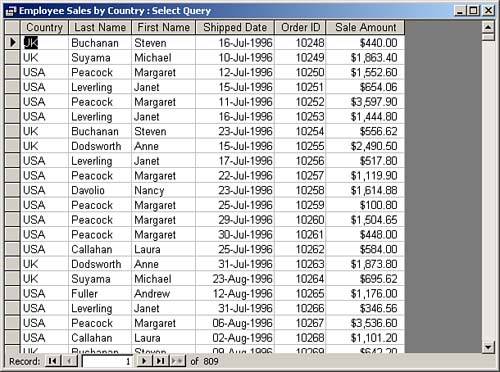
Figure 1.8. The result of running the Employee Sales by Country query.
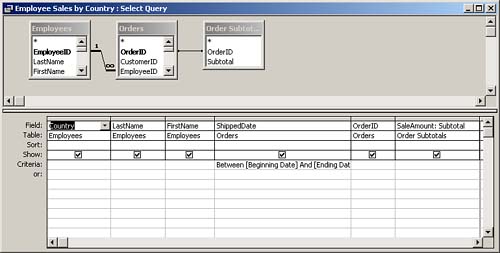
Figure 1.9. The design of a query that displays data from the Employees and Orders tables and the Order Subtotals query.
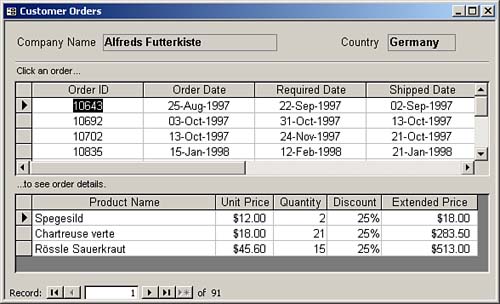
Forms: A Means of Displaying, Modifying, and Adding DataAlthough you can enter and modify data in a table's Datasheet view, you can't control the user's actions very well, nor can you do much to facilitate the data-entry process. This is where forms come in. Access forms can have many traits, and they're very flexible and powerful. To view a form, you select Forms from the Objects list. Then you double-click the form you want to view or click in the list of forms to select the form you want to view and then click Open. Figure 1.10 illustrates a form in Form view. This Customer Orders form is actually three forms in one: one main form and two subforms. The main form displays information from the Customers table, and the subforms display information from the Orders table and the Order Details table (tables that are related to the Customers table). As the user moves from customer to customer, the form displays the orders associated with that customer. When the user clicks to select an order, the form displays the products included on that order. Figure 1.10. The Customer Orders form, which includes customer, order, and order detail information.
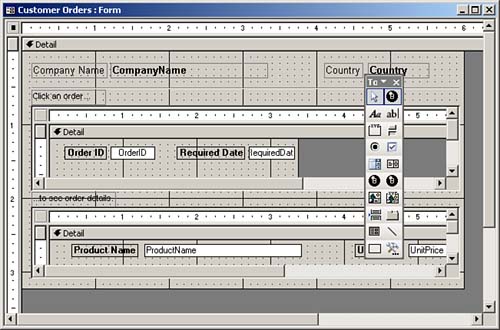
Like tables and queries, you can also view forms in Design view. The Design view provides tools you can use to edit the layout of a report. To view the design of a form, you select the Forms icon from the Objects list, choose the form whose design you want to modify, and then click Design. Figure 1.11 shows the Customer Orders form in Design view. Notice the two subforms within the main form. Hours 11, "Creating Forms," and 16, "Power Form Techniques," cover forms in more detail. Figure 1.11. The design of the Customer Orders form, showing two subforms.
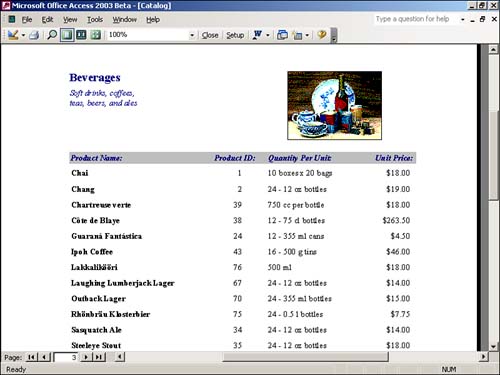
Reports: Turning Data into InformationForms allow you to enter and edit information, but with reports, you can display information, usually to a printer. Figure 1.12 shows a report in Preview mode. To preview any report, you select Reports from the Objects list. You double-click the report you want to preview or choose the report you want to preview from the list of reports in the Database window, and then you click Preview. Notice the graphic in the report in Figure 1.12, as well as other details, such as the shaded line. Like forms, reports can be elaborate and exciting, and they can contain valuable information. Figure 1.12. A preview of the Catalog report.
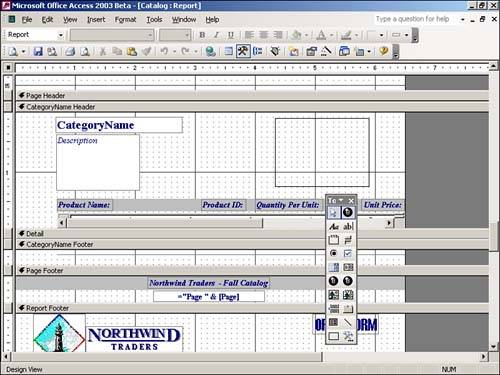
As you may have guessed, you can view reports in Design view, as shown in Figure 1.13. To view the design of a report, you select Reports from the Objects list, select the report you want to view, and click Design. Figure 1.13 illustrates a report with many sections; in the figure you can see the Page Header, CategoryName Header, Detail section, CategoryName Footer, Page Footer, and Report Footer sectionsjust a few of the many sections available on a report. Just as a form can contain subforms, a report can contain subreports. Hour 12, "Creating Reports," and Hour 17, "Power Report Techniques," cover the process of designing reports. Figure 1.13. Design view of the Catalog report.
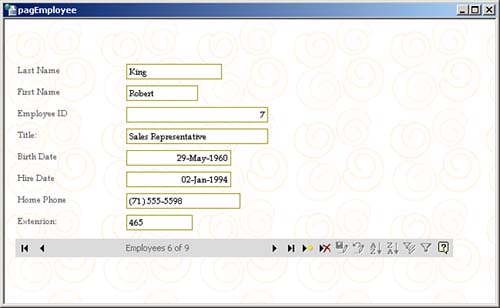
Pages: Forms Viewed in a BrowserData access pages, discussed earlier in this hour, first appeared in Access 2000. They allow you to view and update the data in a database from within a browser. Although Access stores them outside the Access database file (that is, the .MDB file), you create and maintain them similarly to the way you create and maintain forms. Figure 1.14 shows a data access page viewed within Access. Although Microsoft targets data access pages for use with a browser, you can preview them within the Access application environment. Figure 1.14. An example of a data access page based on the Employees table.
You can also view and modify data access pages in Design view. Figure 1.15 shows a data access page in Design view. As you can see, the Design view of a data access page is similar to that of a form in Design view. This makes working with data access pages, and the deployment of an application over an intranet, very easy. Figure 1.15. A data access page shown in Design view.
Macros: A Means of Automating a SystemMacros in Access aren't like the macros in other Office products. You can't record them, as you can in Microsoft Word or Excel, and Access does not save them as Visual Basic for Applications (VBA) code. With Access macros, you can perform most of the tasks that you can manually perform from the keyboard, menus, and toolbars. Macros allow you to build logic into your application flow. To run a macro, you select Macros from the Objects list, click the macro you want to run, and then click Run. Access then executes the actions in the macro. To view a macro's design, you select Macros from the Objects list, select the macro you want to modify, and click Design to open the Macro Design window (see Figure 1.16). The macro pictured in Figure 1.16 has four columns. The Macro Name column is where you can specify the name of a subroutine within a macro. The Condition column allows you to specify a condition. The Action column is where you specify an action for the macro. (The action in the macro's Action column won't execute unless the condition for that action evaluates to true.) The Comment column lets you document the macro. In the bottom half of the Macro Design window, you specify the arguments that apply to the selected action. In Figure 1.16, the selected action is MsgBox, which accepts four arguments: Message, Beep, Type, and Title. Figure 1.16. The design of the Customers macro, which contains macro names, conditions, actions, and comments.
Modules: The Foundation of the Application Development Process
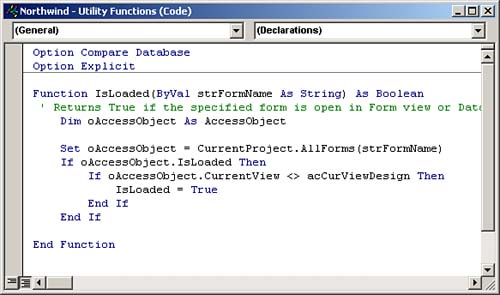
Figure 1.17. The global code module in Design view, showing the General Declarations section and the IsLoaded function.
|
| [ Team LiB ] |
|