[ Team LiB ] Previous Section Next Section

Using the Form Wizard to Build a Form

Using the Form Wizard gives you more flexibility than using the AutoForm feature to create forms. It also requires more knowledge on your part. Here's how you use it:

  1. Click Forms in the list of objects in the Database window.

  2. Double-click the Create Form by Using Wizard option.

  3. Select the table or query on which you want to base the form (see Figure 4.18).

    Figure 4.18. Selecting a table or query.

    graphics/04fig18.jpg

  4. Select the fields you want to include on the form (see Figure 4.19).

    Figure 4.19. Selecting fields.

    graphics/04fig19.jpg

  5. Click Next. Select a layout for the form (see Figure 4.20).

    Figure 4.20. Selecting a layout.

    graphics/04fig20.jpg

  6. Click Next. Select a style for the form (see Figure 4.21).

    Figure 4.21. Selecting a style.

    graphics/04fig21.jpg

  7. Click Next. Provide a title for the form (see Figure 4.22).

    Figure 4.22. Providing a title.

    graphics/04fig22.jpg

  8. Click Finish.

graphics/book_icon.gif

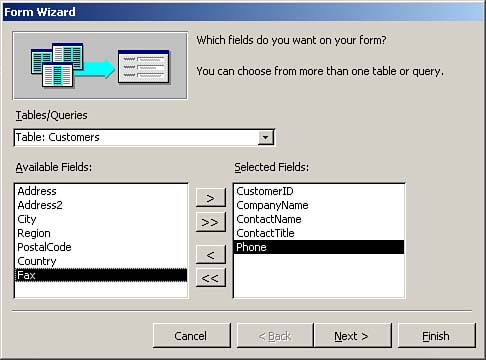
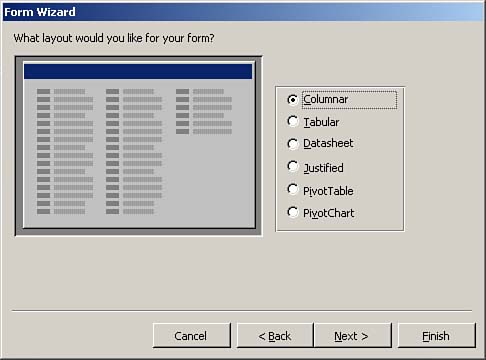
If you create a form by clicking the New button on the Database toolbar, you have choices about what kind of form you want to create:

  • The Columnar option places the fields on the left side of the screen.

  • The Tabular option displays the records in columns from left to right across the form.

  • The Datasheet option displays the records in Datasheet view.

  • Using the AutoForm feature lets Access design the form for you.

  • The Chart Wizard assists you in creating a form that contains a graph.

  • The Pivot Table Wizard assists you in creating a form that contains an embedded Excel PivotTable.


    [ Team LiB ] Previous Section Next Section