Establishing Relationships in Access
You use the Relationships window to establish relationships between Access tables, as shown in Figure 9.5. To open the Relationships window, you click Relationships on the toolbar with the Database window active or you choose Tools | Relationships. If you have not established any relationships, the Show Table dialog box appears. The Show Table dialog box allows you to add tables to the Relationships window.
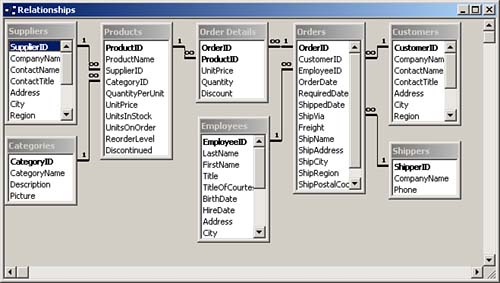
By looking at the Relationships window, you can see the types of relationships for each table. All the one-to-many and one-to-one relationships defined in a database are represented with join lines. If you enforce referential integrity between the tables involved in a one-to-many relationship, the join line between the tables appears with the number 1 on the "one" side of the relationship and with a link symbol ( ) on the "many" side of the relationship. A one-to-one relationship appears with a 1 on each end of the join line. ) on the "many" side of the relationship. A one-to-one relationship appears with a 1 on each end of the join line.
Establishing a Relationship Between Two Tables
To establish a relationship between two tables, you follow these steps:
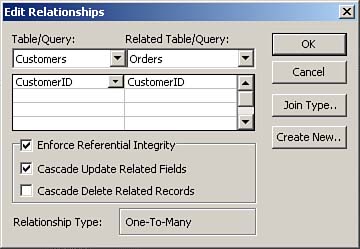
Open the Relationships window. If this is the first time that you've opened the Relationships window of a particular database, the Show Table dialog box appears. Select each table you want to relate and click Add. If you have already established relationships in the current database, the Relationships window appears. If the tables you want to include in the relationship do not appear, click the Show Table button on the toolbar or choose Relationships | Show Table. To add the desired tables to the Relationships window, select a table and then click Add. Repeat this process for each table you want to add. To select multiple tables at once, press Shift while clicking to select contiguous tables or press Ctrl while clicking to select noncontiguous tables; then click Add. Click Close when you are finished. Click and drag the field from one table to the matching field in the other table. The Edit Relationships dialog box appears. Determine whether you want to establish referential integrity and whether you want to cascade update related fields or cascade delete related records by enabling the appropriate check boxes (see Figure 9.6). These topics are covered later in this hour, in the section "Establishing Referential Integrity."
Click OK. The dialog box closes, and you return to the Relationships window.
Following Guidelines for Establishing Relationships
You must remember a few important things when establishing relationships. If you are not aware of these important gotchas, you could find yourself in some pretty hairy situations:
It is important to understand the correlation between the Relationships window and the actual relationships established within a database. The Relationships window lets you view and modify the existing relationships. When you establish relationships, Access creates the relationship the moment you click OK. You can delete the tables from the Relationships window (by selecting them and pressing Delete), but the relationships still exist. (The "Modifying an Existing Relationship" section of this hour covers the process of permanently removing relationships.) The Relationships window provides a visual blueprint of the relationships that are established. If you modify the layout of the window by moving around tables, adding tables to the window, or removing tables from the window, Access prompts you to save the layout after you close the Relationships window. Access is not asking whether you want to save the relationships you have established; it is simply asking whether you want to save the visual layout of the window. When you're adding tables to the Relationships window by using the Show Tables dialog box, it is easy to accidentally add a table to the window many times. This is because the tables you are adding can hide behind the Show Tables dialog box, or they can appear below the portion of the Relationships window that you are viewing. If this occurs, you see multiple occurrences of the same table when you close the Show Tables dialog box. Access gives each occurrence of the table a different alias, and you must remove the extra occurrences. You can add queries to the Relationships window by using the Show Tables dialog box. Although this method is rarely used, it might be useful if you regularly include the same queries within other queries and want to permanently establish relationships between them. If you remove tables from the Relationships window (remember that this does not delete the relationships) and you want to once again show all relationships that exist in the database, you can click Show All Relationships on the toolbar or choose Relationships | Show All. All existing relationships are then shown. To delete a relationship, you can click the join line and press Delete.
Modifying an Existing Relationship
Modifying an existing relationship is easy. Access gives you the capability to delete an existing relationship or to simply modify the nature of the relationship.
To permanently remove a relationship between two tables, you follow these steps:
With the Database window active, click Relationships on the toolbar. Click the line joining the two tables whose relationship you want to delete. Press Delete. Access prompts you to verify your actions. Click Yes.
You often need to modify the nature of a relationship rather than remove it. To modify a relationship, you follow these steps:
With the Database window active, click Relationships on the toolbar. Double-click the line joining the two tables whose relationship you want to modify. Make the required changes. Click OK. All the normal rules regarding the establishment of relationships apply.
Task: Establishing Relationships
 | Relationships are an extremely important aspect of any database that you build. Let's practice the process of creating a brand-new database. We'll add tables and then establish relationships between them. To begin, you create a new database and add a table called tblCustomers, another called tblOrders, and a third called tblOrderDetails. The tables should have the following fields: |
tblCustomers:  CustomerID,  CompanyName,  Address,  City,  State,  ZipCode

tblOrders:  OrderID,  CustomerID,  OrderDate,  ShipVIA

tblOrderDetails:  OrderID,  LineNumber,  ItemID,  Quantity,  Price
After you've built the necessary tables, you're ready to establish the relationships between them. First you need to set some important properties of the fields that you just added. Then you'll be ready to establish the actual relationships between the tables. Here's how this works:
In the tblCustomers table, make the CustomerID field a Text field. Designate the CustomerID field as the primary key. Set the size of the field to 5. Make all other fields Text fields and leave their default property values. In the tblOrders table, set OrderID to the AutoNumber field type. Make OrderID the primary key field. Make the CustomerID field a Text field with the field size of 5. Set the field type of the OrderDate field to Date and the field type of the ShipVIA field to Number, with a size of Long Integer. In the tblOrderDetails table, set the field type of the OrderID field to Number and make sure that the size is Long Integer. Set the field type of the LineNumber field to Number, with a size of Long Integer. Base the primary key of the table on the combination of the OrderID and LineNumber fields. Set the field type of the ItemID and Quantity fields to Number, with a size of Long Integer, and set the field type of the Price field to Currency. Open the Relationships window. With the tblCustomers table in the Show Table dialog box selected, hold down the Shift key and click to select the tblOrders table. Click Add. All three tables appear in the Relationships window. Click Close. Click and drag from the CustomerID field in the tblCustomers table to the CustomerID field in the tblOrders table. After the Edit Relationships dialog box appears, click OK. Repeat the process, clicking and dragging the OrderID field from the tblOrders table to the OrderID field in the tblOrderDetails table.
 |