| [ Team LiB ] |
|
Working with the Report Design WindowYou use the Report Design window to build and modify a report. Using this window, you can add objects to a report and modify their properties. Microsoft provides numerous Report, Report Grouping, and Control properties. These are described throughout the remainder of this hour and in Hour 17, "Power Report Techniques." By modifying these properties, you can create reports with diverse looks and functionality. Understanding the Report Design ToolsTo help you design reports, several report design tools are available, including the Properties, Toolbox, Field List, and Sorting and Grouping windows. Two toolbars are also available to make developing and customizing reports easier: the Report Design toolbar and the Formatting toolbar. The Report Design toolbar offers tools for saving, previewing, and printing a report and for cutting, copying, and pasting report objects. The Formatting toolbar is specifically designed to help you customize the look of a report. It includes tools for changing the font, font size, alignment, color, shading, and other physical attributes of the report objects. The Properties, Toolbox, Field List, and Sorting and Grouping windows are all designed as toggles. This means that buttons on the Report Design toolbar alternately hide and show these valuable windows. If you have a high-resolution monitor, you might want to leave the windows open at all times. If you have a low-resolution monitor, you need to get a feel for when it's most effective for each window to be opened or closed. Adding Fields to a ReportYou can most easily add fields to a report by using the Field List window. With the Field List window open, you click and drag a field from the field list onto the appropriate section of the report. You can add several fields at one time, just as you can in forms. You can use the Ctrl key to select noncontiguous fields (that is, fields not proximal to each other) and the Shift key to select contiguous fields (that is, fields immediately proximal to one another), or you can double-click the field list's title bar to select all the fields; then you click and drag them to the report as a unit. Selecting, Moving, Aligning, and Sizing Report ObjectsMicrosoft Access offers several techniques to help you select, move, align, and size report objects. Different techniques are most effective in different situations. Experience will tell you which technique you should use and when. Selecting, moving, aligning, and sizing report objects are quite similar to performing the same tasks with form objects. The techniques are covered briefly in the following sections; for a more detailed explanation of each technique, refer to Hour 11, "Creating Forms." Selecting Report ObjectsTo select a single report object, you click it; selection handles appear around the selected object. After you have selected the object, you can modify any of its attributes (properties), or you can size, move, or align it. To select multiple objects so that you can manipulate them as a unit, you can use any of the following techniques:
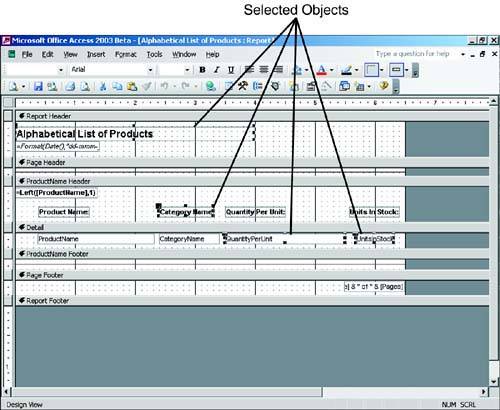
You need to make sure you understand which objects are actually selected; attached labels can cause some confusion. Figure 12.7 shows a report with four objects selected: the Alphabetical List of Products label, the Category Name label, the QuantityPerUnit text box, and the UnitsInStock text box. If you were to modify the properties of the selected objects, they would be the only objects affected. Figure 12.7. Selecting objects in an Access report.
Moving Report ObjectsIf you want to move a single control along with its attached label, you click the object and drag it to a new location. The object and the attached label move as a unit. To move multiple objects, you use one of the methods described in the previous section to select the objects you want to move. After you have selected the objects, you click and drag any of them; the selected objects and their attached labels move as a unit. Moving an object without its attached label is a trickier process. When the mouse pointer is placed over the center or border of a selected object (not on a sizing handle), the cursor looks like a hand with all five fingers pointing upward. This indicates that the selected object and its attached label move as a unit, maintaining their relationship to one another. However, if you place the mouse pointer directly over the selection handle in the object's upper-left corner, the cursor looks like a hand with only the index finger pointing upward. This indicates that the object and the attached label move independently of one another so that you can alter the distance between them. Aligning Objects with One AnotherTo align objects with one another, you must select them first. To do so, you choose Format | Align and then select Left, Right, Top, Bottom, or To Grid. The selected objects align themselves in relationship to each other. Using Snap to GridThe Snap to Grid feature is a toggle found under the Format menu. When Snap to Grid is selected, all objects that you're moving or sizing snap to the report's gridlines. To temporarily disable the Snap to Grid feature, you hold down the Ctrl key while sizing or moving an object. Using Power-Sizing TechniquesAccess offers many techniques to help you size report objects. A selected object has eight sizing handles, and you can use any of them, except for the upper-left handle, to size the object. You simply click and drag one of the sizing handles. If you selected multiple object to size at once, Access sizes them by the same percentage. To size objects, you can also select Format | Size and then To Fit, To Grid, To Tallest, To Shortest, To Widest, or To Narrowest. Hour 11 discusses these options in detail.
Controlling Object SpacingAccess makes it easy to control object spacing. You can make both the horizontal and vertical distances between selected objects equal. To do so, you select the objects and then choose Format | Horizontal Spacing | Make Equal or Format | Vertical Spacing | Make Equal. You can also maintain the relative relationship between selected objects while increasing or decreasing the space between them. To do this, you choose Format | Horizontal Spacing | Increase/Decrease or Format | Vertical Spacing | Increase/Decrease. |
| [ Team LiB ] |
|