| [ Team LiB ] |
|
Recipe 18.5 Exporting Selected Columns to an HTML Table18.5.1 ProblemYou'd like to export data from a table as XML and display it in an HTML table. However, you only want to display selected columns from the table, not the entire table. 18.5.2 SolutionIf you wish to export data using only selected columns, you can do so with a query, but you can also accomplish this by using an XSLT transform. Using a transform has the added benefit of allowing you to format the data as HTML. Follow these steps to export only the Make and Model data from the Car table and to format the data as an HTML table:
Figure 18-15. Selecting the output location and filename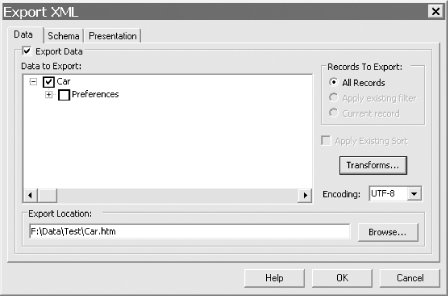
18.5.3 DiscussionThe 18-05.xsl file used to transform the data contains two templates. The dataroot template contains code for creating an HTML document with an HTML table. The Car template creates the rows in the HTML table and cells containing only the Make and Model data. This transform works against a hidden XML document that is created from all the data in the table: <?xml version="1.0" encoding="UTF-8"?>
<xsl:stylesheet
xmlns:xsl="http://www.w3.org/1999/XSL/Transform" version="1.0" >
<xsl:output method="html" version="4.0" indent="yes" />
<xsl:template match="dataroot">
<html>
<body>
<table>
<xsl:apply-templates select="Car" />
</table>
</body>
</html>
</xsl:template>
<xsl:template match="Car">
<tr>
<td><xsl:value-of select="Make" /></td>
<td><xsl:value-of select="Model" /></td>
</tr>
</xsl:template>
</xsl:stylesheet>
When you view Car.htm in a browser, you can see that the data is displayed in an HTML table, as shown in Figure 18-16. Figure 18-16. The output generated by the XSL transform when viewed in a browser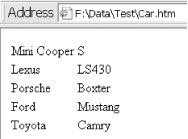 Choose View > Source from the menu and you'll see the following HTML: <html>
<body>
<table>
<tr>
<td>Mini Cooper</td>
<td>S</td>
</tr>
<tr>
<td>Lexus</td>
<td>LS430</td>
</tr>
<tr>
<td>Porsche</td>
<td>Boxter</td>
</tr>
<tr>
<td>Ford</td>
<td>Mustang</td>
</tr>
<tr>
<td>Toyota</td>
<td>Camry</td>
</tr>
</table>
</body>
</html>
This example is very simple and creates just a bare-bones table. You can modify the HTML sections of the XSLT to specify colors, borders, fonts, and so on to create whatever custom formatting you need. 18.5.4 See AlsoThe following W3C page contains links to many resources on XSLT: |
| [ Team LiB ] |
|