Creating a Form Using an AutoForm
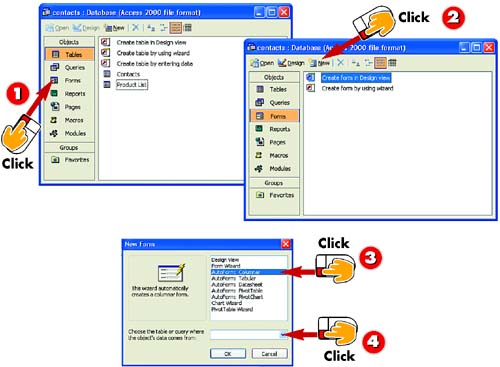
 | After you open the database for which you want to create a form, click the Forms option in the Objects bar. |
 | Click the New button in the database window's toolbar. |
 | The New Form dialog box opens. Click one of the available AutoForms to select it. A description of the selected AutoForm appears in the left side of the dialog box. |
 | Click the down arrow next to the Choose the table or query where the object's data comes from field. |
|
Access 2003 features several AutoForms, which are, essentially, predesigned forms set up in typical form layouts. For example, there's a columnar AutoForm, a tabular AutoForm, and a Datasheet AutoForm. You can use these AutoForms to create a new form for a particular table; the AutoForm includes all the fields in that table. |
|
Clicking the Forms Object
You must click the Forms option in the Objects bar to see the available commands and options for creating forms. If another object type is selected, you'll see commands for that type of object. |
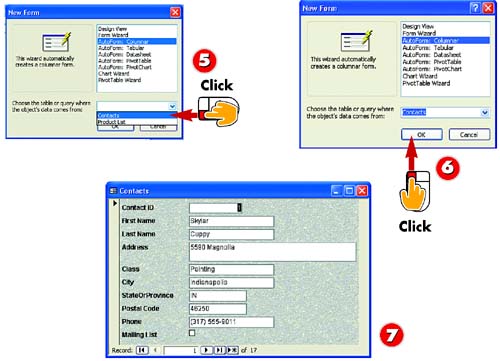
 | In the list that appears, click the table on which the form will be based. |
 | Click OK. |
 | Access creates the form (here, a columnar AutoForm) and displays the first record in the selected table in the form. |
|
Saving a Form
When you create a new form, you must save and name the form, just as you do when you create a new table, report, or query. See "Saving a Form" later in this part for help on saving the forms. |
|
Creating PivotTables and Charts
You can create special types of tables and charts that enable you to analyze data using different scenarios. You can also build forms for entering data for these types of analysis. These advanced tools are not covered in this book. For more information, consult Access's online help. |
|