To work on a version controlled package you must have the package checked out. When a package is checked out to a specific user other users cannot make changes to the package until it has been checked in again.
Check In/Check Out
| 1. | In the Project Browser window, right-click on the package icon. |
| 2. | Select the , or menu options, as appropriate. |
| 3. | If required, enter a comment when prompted to do so. |
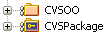
The package icon in the Project Browser window should change. When you check out a package this is represented by a figure 8 to the left of the package icon. When you check in a package the package icon is overlaid with a colored rectangle and key. In the example below, the upper package is checked out whilst the lower package is checked in.
Note: If you check out a version controlled package whilst offline, the package icon has a red figure 8 in front of it. See Offline Version Control.
Check In Branch
| 1. | In the Project Browser window, right-click on the package icon at the root of the model branch that is to be checked in. The Select Packages to Check-in dialog displays, listing all version controlled packages within the branch that you have checked out.
 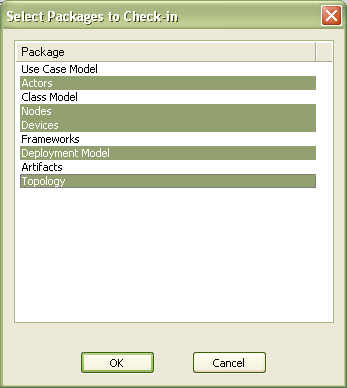
|
| 2. | Select the packages in the list, to check in. (Use click to add or remove several individual packages, use click to select a range of packages.) |
| 3. | Click on the button to check-in the selected packages. |
| 4. | If required, enter a comment when prompted to do so. (This comment applies to all packages that you have checked in.) |
| 5. | Each package icon changes to indicate that the packages have been checked-in. |


