Before you set up Enterprise Architect for use with OpenEdge, we recommend you run the project integrity check tool (select the menu option) on the base project to upsize to OpenEdge. This ensures the data is clean before uploading.
Note: You cannot move a model from a source .EAP file of a version earlier than 3.5.0.
Warning: Before proceeding, ensure MDAC 2.6 or 2.7 is installed on your system.
Upsizing Your Database
There are three stages to upsizing your database for OpenEdge. Work through them in the order defined below:
Stage One: Install OpenEdge Components
| 1. | Install OpenEdge, version 10.0B3 or higher. |
| 2. | Install OpenEdge ODBC 10.0B or higher driver. |
| 3. | Create a suitable ODBC Data Source to point to your new database. |
Note: See Setup a Progress OpenEdge ODBC Driver
Stage Two: Configure the Database
| 2. | Make sure the new database is selected as the current database. |
| 3. | Run the script to create all required data structures. |
Note: See Create a New OpenEdge Repository
Stage Three: Transfer the Data
| 1. | Open Enterprise Architect (click on the button on the Open Project screen to open with no project loaded). |
| 2. | Select the menu option. The Project Transfer dialog displays:
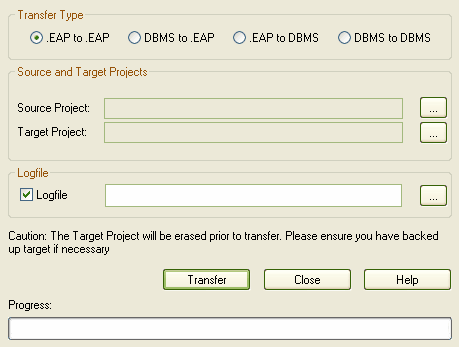
|
| 3. | In the Transfer Type panel, select .. |
| 4. | In the field, type the name of the .EAP file to upsize to OpenEdge. |
| 5. | At the right of the field, click on the [] (Browse) button. The Datalink Properties dialog displays. |
| 6. | Select from the list, then click on the button. |
| 7. | In the field, click on the drop-down arrow and select the ODBC Data Source you configured to point to your new database. |
Note: See Connect to a OpenEdge Data Repository for more information.
| 9. | If required, select the checkbox and enter a path and filename for the data transfer log file. |
| 10. | Click on the button to begin the data transfer process. |
When the process is complete, you have upsized your model to OpenEdge and can now open it from Enterprise Architect.


