As with all other programming languages, C# source code must be compiled before the program can be run. In this section, we'll present the basics of compiling and running C# programs.
The C# language gives us a fair amount of flexibility in naming C# source code files.
The recommended convention is to end source code file names with the extension .cs, but there is no requirement to do so; a source file could conceivably be named Person.boo, for example.
Similarly, the name of a C# source file doesn't have to match the name of the class or interface defined within that file. For example, the code defining the Professor class could be placed in a file named Blah.cs, but it's considered good practice for a source file name to match the name of the class or interface declared within the file.
The code for two or more class or interface definitions can be placed in the same source file; we don't generally do so, however, for it's much easier to manage C# source code when there is a one-to-one correspondence between the external file name and the internal C# class name. Classes and interfaces are also much easier to share/reuse when they are individually packaged one to a .cs file.
When we develop the SRS, we'll create one source code file for every class that we create. Specifically
We'll create one .cs file for each of the domain classes that we defined in our object model: for the SRS application, for example, we'll have eight:
Course.cs
Person.cs
Professor.cs
ScheduleOfClasses.cs
Section.cs
Student.cs
Transcript.cs
TranscriptEntry.cs
We'll also typically have a separate .cs file for each of the primary windows comprising the graphical user interface of our application, if any. For the SRS application, we'll eventually create two such classes:
MainForm.cs
PasswordForm.cs
(We'll talk about graphical user interfaces in depth in Chapter 16.)
We'll typically have a separate .cs file that declares the application's driver class, containing the "official" Main method as illustrated in Figure 13-1.
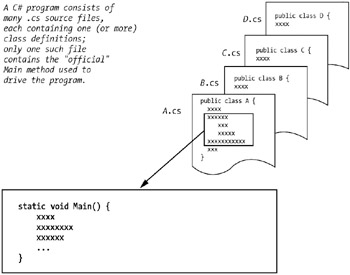
Figure 13-1: One "official" Main method will drive the SRS.
One of the primary responsibilities of this driver class's Main method is to instantiate the core objects needed to fulfill a system's mission. Actions taken by these objects, as well as by users as they interact with the application, will cause additional objects to be instantiated as the application executes.
The Main method is also responsible for displaying the startup window of the graphical user interface of an application, if any.
We'll name the driver class for our Student Registration System application SRS, contained in the file SRS.cs.
Finally, we often create other "helper" classes necessary for behind-the-scenes application support; with the SRS, we'll have a need for three such classes:
CollectionWrapper.cs
CourseCatalog.cs
Faculty.cs
All told, by the time we reach the end of Chapter 16, we'll have programmed a total of 14 classes, integrating them into a single SRS application with a GUI front-end and a way to persist data from one SRS application session to the next.
To illustrate the mechanics of compiling and running C# programs, we'll start with a very simple program. Assume that the following source code is stored in a file named SimpleProgram.cs:
// SimpleProgram.cs

using System;

public class SimpleProgram
{
  static void Main() {
    Console.WriteLine("Hello");
  }
}
Assuming that the .NET Framework SDK is properly installed as discussed in Appendix C, we can compile the SimpleProgram.cs source code file by opening a Command Prompt window from within Windows, using the DOS cd command to change our working directory to the directory in which our source code file is located; e.g.,
cd C:\MyCode
and then typing the following at the command line:
csc SimpleProgram.cs
This command invokes the C# compiler (its executable is named csc.exe). Assuming that the compiler is properly installed, and that no compiler errors arise from our code, this command produces an executable file named SimpleProgram.exe. The executable file will by default be placed in the same directory from which the compiler was invoked (which, in this example, will cause it to be collocated with the SimpleProgram.cs source code file).
To execute our program, we then type the name of the executable file (the .exe suffix is optional) at the command line:
SimpleProgram
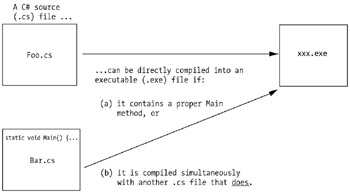
There are several different ways to compile an application involving multiple source code files (i.e., multiple class/interface definitions):
We can compile all of the source code (.cs) files simultaneously into an executable (.exe) file/application.
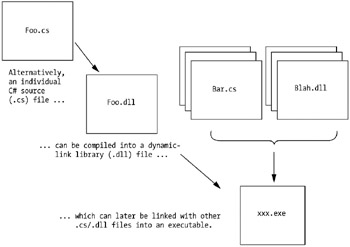
We can compile individual source code (.cs) files into an intermediate form called a dynamic-link library (.dll) file for later inclusion into an application.
We can combine the two preceding approaches.
We'll illustrate each of these scenarios in turn using the following simple multiclass application.
First, we'll rewrite the SimpleProgram application so that it instantiates a Person object and accesses a property on this object. The source code for the revised SimpleProgram2 class is contained in a file named SimpleProgram2.cs.
      // SimpleProgram2.cs

      using System;

      public class SimpleProgram2
      {
        static void Main() {
          Person p = new Person("Steve");
          Console.WriteLine("Our person's name is " + p.Name);
        }
      }
To support this program, we'll create a very simple Person class definition that has only one field (attribute), name; a constructor to initialize the name field; and a Name property with which to access the value of the field from client code. The source code for the Person class is contained in a separate file named Person.cs.
      // Person.cs

      public class Person
      {
        // Field.
        private string name;

        // Constructor.
        public Person(string n) {
          name = n;
        }

        // Property.
        public string Name {
          get {
            return name;
          }
          set {
            name = value;
          }
        }
      }
Let's now explore the various ways for producing an executable application (.exe file).
Let's assume that neither the SimpleProgram2.cs nor the Person.cs file has previously been compiled. If we were to try to compile the SimpleProgram2 class by itself, using the command
csc SimpleProgram2.cs
the following compiler error message would arise:
error CS0246: The type or namespace name "Person" could not be found
This error arises because the C# compiler doesn't automatically search for other files that it needs in order to compile those that we've explicitly directed it to compile. Since Person isn't a predefined C# type, the compiler will complain that it doesn't recognize the name "Person".
One simple solution for this problem is to introduce the Person.cs source file into the syntax of the compilation command:
csc SimpleProgram2.cs Person.cs
thereby compiling the entire application in a single step to produce an executable file named SimpleProgram2.exe (the default name for an .exe file matches the name of the first source (.cs) file specified by a compilation command).
This command syntax can be extended to include any number of source files. Wildcards can also be used; for example, the syntax
csc *.cs
will compile all of the .cs files in the working directory.
The previous compiler command
csc SimpleProgram2.cs Person.cs
is actually shorthand for the following slightly more complex command:
csc /t:exe SimpleProgram2.cs Person.cs
The /t (or alternatively, /target) compiler option specifies what type of output the compilation will produce. /t:exe indicates that the target for the compilation is a console application, i.e., one that will be run from the command line. As it turns out, /t:exe is a default compiler option, and thus doesn't have to be specified.
| Note?/td> |
It's possible to produce several other types of output, but we'll be sticking with console applications throughout the remainder of the book. |
In order to successfully compile one or more C# source code (.cs) files directly into an executable (.exe) application file, one of the source code files in the compile statement must contain a class that defines a proper Main method. If none of the .cs files contain such a method, a compilation error will arise; for example, if we were to try to compile the Person.cs file by itself with the following command:
csc Person.cs
the compiler would generate the following error message:
error CS5001: Program 'Person.exe' does not have an entry point defined.
There is indeed a way to compile stand-alone class files incrementally, however, which brings us to scenario #2.
An individual source code file such as Person.cs can optionally be compiled into an intermediate, nonexecutable form known as a dynamic-link library file (.dll)—a file that is intended for use as a shared library file, and which can be dynamically linked into one or more applications by the .NET runtime.
We produce a .dll file using the /t:library compiler option; for example, the compilation command
csc /t:library Person.cs
will produce a file named Person.dll.
We can also use the wildcard character, *, to assemble all of the local source code files into a single DLL (in this case, the name of the resulting DLL file will match that of the first source file compiled):
csc /t:library *.cs
Compiling a class or interface into a .dll file form is useful when the class in question is going to be used in multiple applications: we can compile it once as a .dll, and then link it into as many applications as desired without having to recompile it over and over again. The process of integrating .dll files into an application is discussed as scenario #3 in the next section.
Another advantage of creating a .dll version of a class or interface is to protect proprietary source code. DLL files may be shared with other programmers, who can in turn link them into their applications without being able to see how the code was written.
To make use of a previously compiled DLL file in the compilation of another C# program, the /r (or alternatively the /reference) compiler option can be specified. Returning to scenario #1, where we had run into a "roadblock" because we were trying to compile the SimpleProgram2.cs file by itself, let's now assume that the Person.cs file had been previously compiled into a Person.dll file. We could then use the /r compiler option, as illustrated in the following command, to compile the SimpleProgram2 source file and the Person.dll DLL file into a single executable named SimpleProgram2.exe:
csc SimpleProgram2.cs /r: Person.dll
| Note?/td> |
To incorporate multiple DLL files into an executable, separate the names of the files with semicolons: csc filename.cs /r:file1.dll;file2.dll;file3.dll |
Figures 13-2 and 13-3 summarize the different paths that a source file can take as it is compiled into an executable program.
The /out compiler option is used to specify what the name of the resulting .exe or .dll file will be. For example, the following command:
csc /out:MyApp.exe SimpleProgram2.cs Person.cs
would produce an executable file named MyApp.exe.
If the /out option isn't used, the default .exe or .dll file name will match the name of the first source (.cs) file specified by the compilation command, as mentioned previously. For example, if the compile command were to omit the /out option as follows:
csc Person.cs SimpleProgram2.cs
then the resulting executable file would be named Person.exe; or, if a wildcard character is used:
csc *.cs
then the resulting executable file name will match the name of the first .cs file of those that are compiled.
We know that every application must define at least one Main method to serve as the entry point/driver for program execution. However, it's also possible for an application to contain more than one Main method. One such circumstance might be that we've added a Main method to an arbitrary class so that we may test the features of that class in stand-alone fashion. As an example, let's modify the Person class introduced at the beginning of this section to include a Main method as illustrated here:
// Person.cs

using System;

public class Person
{
  // Field.
  private string name;
  // Constructor.
  public Person(string n) {
    name = n;
  }

  // Property.
  public string Name {
    get {
      return name;
    }
    set {
      name = value;
    }
  }

  // We're providing the Person class with its own Main method so that this class
  // can be unit tested in isolation from the application as a whole.
  static void Main() {
    // Instantiate a Person object ...
    Person p = new Person("Lisa");

    // ... and then display its name.
    Console.WriteLine("Name: " + p.Name);
  }
}
We could now compile the Person.cs file by itself into an executable file named Person.exe using the following command:
csc Person.cs
and could in turn execute the Person class's Main method by typing
Person
which would produce the output
Name: Lisa
However, if we now try to compile the SimpleProgram2.cs and modified Person.cs source files together using the compile command
csc SimpleProgram2.cs Person.cs
the compiler will generate the following error message:
error CS0017: Program 'SimpleProgram2.exe' has more than one entry
point defined.
because we've defined Main methods in both the SimpleProgram2 and Person classes, and hence the compiler doesn't know which one is intended to serve as the entry point for our application.
To solve this problem, we can use the /main compiler option to indicate which class is to serve as the application driver:
csc SimpleProgram2.cs Person.cs /main:SimpleProgram2
In this case, we've indicated that the Main method in SimpleProgram2 is to be the entry point for the application.
We'll use the /main compiler option in Chapters 15 and 16 because the SRS application developed in those chapters will define more than one Main method to test the features of various individual classes.
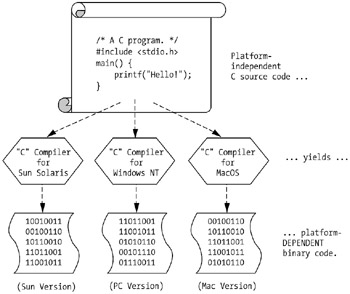
To appreciate how the "behind the scenes" mechanism for compiling and running C# programs differs from that of conventionally compiled programs, let's start with a review of the latter.
In order to execute a program written in a conventionally compiled language like C or C++, the source code of the program must first be compiled into an executable form known as binary code or machine code. Binary code, in essence, is a pattern of 1s and 0s understandable by the underlying hardware architecture of the computer on which the program is intended to run.
Even if the original (C, C++) source code is written to be platform-independent—that is, the program doesn't take advantage of any operating system–specific language extensions—the resultant executable version will nonetheless still be tied to a particular hardware architecture, and can therefore only be run on that architecture. That is, a version of a (C, C++) program compiled for a Sun workstation won't run on a Windows PC; a version compiled for Windows XP won't run on a Mac; and so forth (see Figure 13-4).
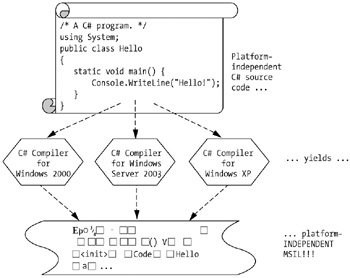
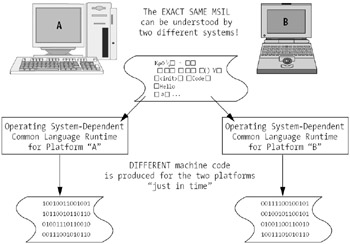
In contrast, the C# compiler doesn't produce machine code. Instead, C# programs are compiled into an intermediate form called Microsoft Intermediate Language (MSIL). MSIL is platform-independent code that contains instructions for a "virtual" processor. When a compiled C# program is actually executed, the .NET runtime environment converts the MSIL code "just in time" into machine code that is honed to the specific platform that the program is being run on, and then executes that machine code (see Figure 13-5). Thus, the same MSIL code can be executed on any platform that supports the common language runtime (see Figure 13-6).
| Note?/td> |
For those readers familiar with Java, MSIL is analogous to Java's byte code, and the .NET common language runtime is analogous to the Java Runtime Environment (JRE). |