In this section, I start with the most basic property of any of the controls derived from the Control base class, the Text property. If you are familiar with .NET, you know that everything is derived from some object and its lineage can be traced back to the original System. Object base class. This includes all the data entry controls.
For you VB 6.0 programmers who are new to .NET, this may seem a little daunting. After all, the TextBox is just there. The same is true for the Label and ComboBox. You probably never knew—or considered—that these controls derived from anything. VB 6.0 hides quite a bit of the plumbing from the programmer.
| Note |
The VB 6.0 label text field is the Caption property. The VB 6.0 text box text field is the Text property. The fact that these two are named differently yet serve the same purpose may lead you to believe that in VB 6.0 they are not the same control with slightly different behaviors (as in .NET). The TextBox and Label controls in .NET both have the same Text property. This is because they derive from the same base class. |
The .NET Framework has a particular base class called System.Windows.Forms.Control. This class is responsible for quite a bit of the functionality of the following derived controls:
Button
DataGrid
GroupBox
ListView
ListControl
TreeView
TextBox
DateTimePicker
MonthCalendar
ScrollableControl
These are just a few of the controls that derive from the base control. I cover some of the other controls, such as the PictureBox and Splitter controls, in Chapter 5.
What these controls give you that VB 6.0 does not is a sense of continuity and behavioral predictability. After all, they share many of the same properties, methods, and events.
So, now you know how the major controls are derived from a base control and how the Text property (and many others) is the same for all of these. If you scan the .NET help files on some of these controls, you will find properties that are inherited from the Control base class and some that are peculiar to the control itself. I encourage you to look at the help for a particular control. If you pick a property that is derived from a parent class, you will be able to trace the control through its lineage back to the Control class. You can go back further even to the base Object class.
If you are not familiar with inheritance and such, you will find this quite eye-opening. You may even wonder if you can make your own TextBox or Button controls. This is a good thing to wonder about because the answer is yes. As a matter of fact, I take you through how to extend one of these controls to make your own application-specific control in Chapter 8.
So far I have mentioned what I think simple data validation is. Pretty soon I present a small example that shows how to use some simple validation rules. In the next section, however, I want to touch on data entry.
When most people think of data entry, they think again of the TextBox. This is probably the most used control on a form. In fact, if you want to really make the user work at it, you could make the TextBox the only data entry control on a form. There are a few other controls, though, that you may not think of right away as data entry controls. I have already mentioned some of them in the list of controls derived from the Control class (see the sidebar "The Base Control").
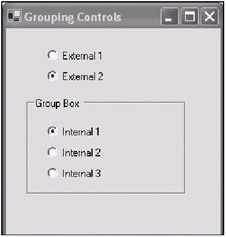
For instance, how about the GroupBox? How can you use this control for data entry? It doesn't do anything, right? Well, it can do two things. It can group controls together so that the user sees controls with common functionality in one place. It also does another important thing regarding RadioButtons.
Normally, RadioButtons are mutually exclusive controls with respect to each other. What do I mean by this? Suppose you have four RadioButtons on a form. Anytime one of the RadioButtons is clicked, its Checked property is set to true. When this happens, all the other RadioButtons on the form are automatically unchecked. Only one RadioButton can be checked at a time.
Putting a RadioButton in a GroupBox separates it programmatically from RadioButtons that are outside of the GroupBox. A RadioButton that is inside a GroupBox can be checked at the same time that a RadioButton outside the GroupBox is checked. Figure 1-1 shows how this looks.
While I'm on the subject of GroupBoxes and RadioButtons, the RadioButton is a great data entry control. You may not think of it in those terms, but judicious use of RadioButtons allows you to give valid choices to users that they can't screw up. As far as validation goes, this is the perfect control. The user can only choose what you want him or her to.
You will normally use the RadioButton when you know the data that the user will need to choose during design time. Its practicality is also limited to only a few choices on a page, really. Hundreds of RadioButtons on a single page can be rather overwhelming. I once tried out some software where the programmer was obviously enamored with the VB RadioButton. It was a terminal emulation program. Figure 1-2 shows what part of the modem configuration screen looked like.
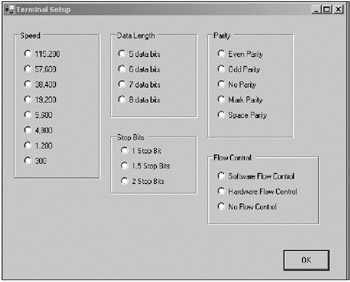
Figure 1-2 shows a partial screen as I remember it. Anyway, my point here is that this screen is overloaded with RadioButtons. The screen may be foolproof, but the number of choices seems daunting and it is difficult to tell at a glance just what the communications port is set for.
There is another problem with using RadioButtons in this manner. Can you guess what it is? The screen is hard-coded for only these values. Suppose, as a programmer, you wanted to use a serial port that was capable of speeds of 28.8Kbps. You would need to change the screen and recompile the program.
A better way to present these particular choices is via ComboBoxes. Figure 1-3 shows this same port configuration screen using ComboBoxes.
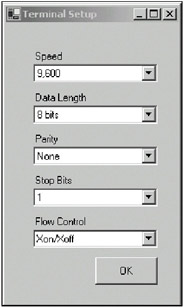
This is a much better way to present the various choices to the user. The screen is succinct and these controls do not allow the user to make strange choices.[1] When the user clicks the OK button, you can run some code that determines if the values the user chose make sense.
Now suppose your serial port was tweaked to provide greater speed than your choices allow. If you filled each ComboBox with entries from an external file such as an .ini file, there would be no screen changes necessary to add an entry to or delete an entry from one of these ComboBoxes. If you plan ahead and think about how each screen of your program works, you can usually make things easier for yourself down the line from a maintenance perspective.
So now you have your two terminal setup screens and the user has made his or her choices and has clicked the OK button. What now?
Let's start with the RadioButton screen. There is really no on-the-fly validation that you can effectively use for this screen. In the click event handler for the OK button, you will need to write some code to see if the choices the user made are correct. Usually this entails plenty of if-then blocks and various sanity checks. If something is wrong, you need to pop up an error message that tells the user what is wrong and how to fix it.
The problem with this approach is that you could go back and forth, with the user making changes and you rejecting them. Wouldn't it be better to force the user to choose only those values that make sense?
This is where the second form comes in. What you can do here is on-the-fly validation that is easy for you and unobtrusive to the user. Here are the basic steps:
Disable all the ComboBoxes except for the first one. Also disable the OK button.
When the user makes a choice, fill in the values for the next ComboBox and enable it.
Repeat step 2 until all the choices are made.
Enable the OK button.
By the time the user gets to click the OK button, you have already validated all the choices and there is probably no need to point out any errors to the user.
The best way to demonstrate this is to create an example. The example in this section is fairly simple, but it serves to explain how you can steer the user toward certain data choices. Once the choices are made, you can be sure they are correct and there is no need to validate them.
This example includes the coded screen shown in Figure 1-3. To make the process a little easier, I limit the scope of finished serial port setup choices to the following. They are shown here as speed, data length, parity, and stop bits.
9600, 7, odd, 1
9600, 7 even, 2
9600, 8, none, 1
4800, 6, mark, 1
4800, 7, space, 1
4800, 7, space, 2
2400, 5, odd, 1
2400, 5, even, 1
2400, 5, even, 1.5
2400, 6, odd, 1
In reality there are many more choices, but limiting this program to these choices serves the example's purposes.
First of all, start a new C# or VB program project and call it "SerialPort." Follow these steps to create the form:
Add a Label and change its text to Speed.
Add a ComboBox below the Label and name it cmbSpeed.
Add a Label below the ComboBox and change its text to Data Length.
Add a ComboBox below the preceding Label and name it cmbLen.
Add a Label below the preceding ComboBox and change its text to Parity.
Add a ComboBox below the preceding Label and name it cmbParity.
Add a Label below the preceding ComboBox and change its text to StopBits.
Add a ComboBox below the preceding Label and name it cmbStop.
Add a Label below the preceding ComboBox and change its text to Flow Control.
Add a ComboBox below the preceding Label and name it cmbFlow.
Add a Button to the bottom of the form and call it cmdClose. Change its text to Close.
Set the form's start-up position to Center Screen.
Figure 1-3 shows what this form looks like. Listings 1-1a and 1-1b contain the code for this terminal setup program.
| Note |
I usually do not show the Windows Form Designer–generated code for the C# examples. There is nothing extraordinary in this code. The VB examples show only the constructor and dispose methods contained in the "Windows Form Designer generated code" section of the code. The missing code is noted by ellipses on three consecutive lines. |
using System;
using System.Drawing;
using System.Collections;
using System.ComponentModel;
using System.Windows.Forms;
using System.Data;

namespace SerialPort
{
  /// <summary>
  /// For example purposes this is the list of possibilities.
  /// 9600,7,o,1
  /// 9600,7,e,2
  /// 9600,8,n,1
  /// 4800,6,m,1
  /// 4800,7,s,1
  /// 4800,7,s,2
  /// 2400,5,o,1
  /// 2400,5,e,1
  /// 2400,5,e,1.5
  /// 2400,6,o,1
  /// Any type of flow control
  /// </summary>

  public class Form1 : System.Windows.Forms.Form
  {
    private System.Windows.Forms.Label label1;
    private System.Windows.Forms.ComboBox cmbSpeed;
    private System.Windows.Forms.ComboBox cmbLen;
    private System.Windows.Forms.Label label2;
    private System.Windows.Forms.ComboBox cmbParity;
    private System.Windows.Forms.Label label3;
    private System.Windows.Forms.ComboBox cmbStop;
    private System.Windows.Forms.Label label4;
    private System.Windows.Forms.ComboBox cmbFlow;
    private System.Windows.Forms.Label label5;
    private System.Windows.Forms.Button cmdClose;

    private System.ComponentModel.Container components = null;

    public Form1()
    {

      InitializeComponent();

      this.StartPosition = FormStartPosition.CenterScreen;
      //Handle the click events for each combo box
      cmbSpeed.SelectedIndexChanged += new EventHandler(this.Speed);
      cmbLen.SelectedIndexChanged += new EventHandler(this.DataLen);
      cmbParity.SelectedIndexChanged += new EventHandler(this.Parity);
      cmdClose.Click                          += new EventHandler(this.CloseMe);

      cmbSpeed.DropDownStyle = ComboBoxStyle.DropDownList;
      cmbSpeed.Items.Add("9,600");
      cmbSpeed.Items.Add("4,800");
      cmbSpeed.Items.Add("2,400");
      cmbSpeed.SelectedIndex=0;

      cmbFlow.DropDownStyle = ComboBoxStyle.DropDownList;
      cmbFlow.Items.Add("NONE");
      cmbFlow.Items.Add("XON/XOFF");
      cmbFlow.Items.Add("HARDWARE");
      cmbFlow.SelectedIndex = 0;

    }

    protected override void Dispose( bool disposing )
    {
      if( disposing )
      {
        if (components != null)
        {
          components.Dispose();
        }
      }
      base.Dispose( disposing );
    }

    #region Windows Form Designer generated code
    ...
    ...
    ...
    #endregion
    [STAThread]
    static void Main()
    {
      Application.Run(new Form1());
    }

    private void Form1_Load(object sender, System.EventArgs e)
    {
    }

    #region Click events

    private void Speed(object sender, EventArgs e)
    {
      switch (cmbSpeed.Text)
      {
        case "9,600":
          cmbLen.Items.Clear();
          cmbLen.Items.Add("7 Bits");
          cmbLen.Items.Add("8 Bits");
          break;
        case "4,800":
          cmbLen.Items.Clear();
          cmbLen.Items.Add("6 Bits");
          cmbLen.Items.Add("7 Bits");
          break;
        case "2,400":
          cmbLen.Items.Clear();
          cmbLen.Items.Add("5 Bits");
          cmbLen.Items.Add("6 Bits");
          break;
        case "1,200":
          cmbLen.Items.Clear();
          cmbLen.Items.Add("8 Bits");
          break;
        }
        cmbLen.SelectedIndex = 0;
      }

      private void DataLen(object sender, EventArgs e)
      {
        switch (cmbLen.Text)
        {
          case "5 Bits":
            if (cmbSpeed.Text == "2,400")
            {
              cmbParity.Items.Clear();
              cmbParity.Items.Add("ODD");
              cmbParity.Items.Add("EVEN");
            }
            break;
        case "6 Bits":
          if (cmbSpeed.Text == "4,800")
          {
            cmbParity.Items.Clear();
            cmbParity.Items.Add("MARK");
          }
          if (cmbSpeed.Text == "2,400")
          {
            cmbParity.Items.Clear();
            cmbParity.Items.Add("ODD");
          }
          break;
        case "7 Bits":
          if (cmbSpeed.Text == "9,600")
          {
            cmbParity.Items.Clear();
            cmbParity.Items.Add("ODD");
            cmbParity.Items.Add("EVEN");
          }
          if (cmbSpeed.Text == "4,800")
          {
            cmbParity.Items.Clear();
            cmbParity.Items.Add("SPACE");
          }
          break;
        case "8 Bits":
          if (cmbSpeed.Text == "9,600")
          {
            cmbParity.Items.Clear();
            cmbParity.Items.Add("NONE");
          }
          break;
      }
      cmbParity.SelectedIndex = 0;
    }
      private void Parity(object sender, EventArgs e)
      {
        switch (cmbParity.Text)
        {
          case "NONE":
          if (cmbLen.Text == "8 Bits")
          {
            cmbStop.Items.Clear();
            cmbStop.Items.Add("1");
          }
          break;
        case "ODD":
          if (cmbLen.Text == "5 Bits")
          {
            cmbStop.Items.Clear();
            cmbStop.Items.Add("1");
          }
          if (cmbLen.Text == "6 Bits")
          {
            cmbStop.Items.Clear();
            cmbStop.Items.Add("1");
          }
          if (cmbLen.Text == "7 Bits")
          {
            cmbStop.Items.Clear();
            cmbStop.Items.Add("1");
          }
          break;
        case "EVEN":
          if (cmbLen.Text == "5 Bits")
          {
            cmbStop.Items.Clear();
            cmbStop.Items.Add("1");
            cmbStop.Items.Add("1.5");
          }
          if (cmbLen.Text == "7 Bits")
          {
            cmbStop.Items.Clear();
            cmbStop.Items.Add("2");
          }
          break;
        case "SPACE":
          if (cmbLen.Text == "7 Bits")
          {
            cmbStop.Items.Clear();
            cmbStop.Items.Add("1");
            cmbStop.Items.Add("2");
          }
          break;
        case "MARK":
          if (cmbLen.Text == "6 Bits")
          {
            cmbStop.Items.Clear();
            cmbStop.Items.Add("1");
          }
          break;
      }
      cmbStop.SelectedIndex = 0;
    }

    private void CloseMe(object sender, EventArgs e)
    {
      this.Close();
    }

    #endregion
  }
}
'/// For example purposes this is the list of possibilities.
'/// 9600,7,o,1
'/// 9600,7,e,2
'/// 9600,8,n,1
'/// 4800,6,m,1
'/// 4800,7,s,1
'/// 4800,7,s,2
'/// 2400,5,o,1
'/// 2400,5,e,1
'/// 2400,5,e,1.5
'/// 2400,6,o,1
'/// Any type of flow control
Public Class Form1
  Inherits System.Windows.Forms.Form

#Region " Windows Form Designer generated code "

  Public Sub New()
    MyBase.New()

    'This call is required by the Windows Form Designer.
    InitializeComponent()

    Me.StartPosition = FormStartPosition.CenterScreen

    'Handle the click events for each combo box
    AddHandler cmbSpeed.SelectedIndexChanged, AddressOf Speed
    AddHandler cmbLen.SelectedIndexChanged, AddressOf DataLen
    AddHandler cmbParity.SelectedIndexChanged, AddressOf Parity
    AddHandler cmdClose.Click, AddressOf CloseMe

    cmbSpeed.DropDownStyle = ComboBoxStyle.DropDownList
    cmbSpeed.Items.Add("9,600")
    cmbSpeed.Items.Add("4,800")
    cmbSpeed.Items.Add("2,400")
    cmbSpeed.SelectedIndex = 0

    cmbFlow.DropDownStyle = ComboBoxStyle.DropDownList
    cmbFlow.Items.Add("NONE")
    cmbFlow.Items.Add("XON/XOFF")
    cmbFlow.Items.Add("HARDWARE")
    cmbFlow.SelectedIndex = 0


End Sub

'Form overrides dispose to clean up the component list.
Protected Overloads Overrides Sub Dispose(ByVal disposing As Boolean)
  If disposing Then
    If Not (components Is Nothing) Then
      components.Dispose()
    End If
  End If
  MyBase.Dispose(disposing)
End Sub
...
...
...
#End Region

  Private Sub Form1_Load(ByVal sender As System.Object, _
                         ByVal e As System.EventArgs) Handles MyBase.Load
  End Sub

  Private Sub Speed(ByVal Sender As Object, ByVal e As EventArgs)

    Select Case (cmbSpeed.Text)
      Case "9,600"
        cmbLen.Items.Clear()
        cmbLen.Items.Add("7 Bits")
        cmbLen.Items.Add("8 Bits")
      Case "4,800"
        cmbLen.Items.Clear()
        cmbLen.Items.Add("6 Bits")
        cmbLen.Items.Add("7 Bits")
      Case "2,400"
        cmbLen.Items.Clear()
        cmbLen.Items.Add("5 Bits")
        cmbLen.Items.Add("6 Bits")
      Case "1,200"
        cmbLen.Items.Clear()
        cmbLen.Items.Add("8 Bits")
      End Select
      cmbLen.SelectedIndex = 0

  End Sub

  Private Sub DataLen(ByVal Sender As Object, ByVal e As EventArgs)

    Select Case (cmbLen.Text)

      Case "5 Bits"
        If cmbSpeed.Text = "2,400" Then
          cmbParity.Items.Clear()
          cmbParity.Items.Add("ODD")
          cmbParity.Items.Add("EVEN")
        End If
      Case "6 Bits"
        If cmbSpeed.Text = "4,800" Then
          cmbParity.Items.Clear()
          cmbParity.Items.Add("MARK")
        End If
        If cmbSpeed.Text = "2,400" Then
          cmbParity.Items.Clear()
          cmbParity.Items.Add("ODD")
        End If
      Case "7 Bits"
        If cmbSpeed.Text = "9,600" Then
          cmbParity.Items.Clear()
          cmbParity.Items.Add("ODD")
          cmbParity.Items.Add("EVEN")
        End If
        If cmbSpeed.Text = "4,800" Then
          cmbParity.Items.Clear()
          cmbParity.Items.Add("SPACE")
        End If
      Case "8 Bits"
        If cmbSpeed.Text = "9,600" Then
          cmbParity.Items.Clear()
          cmbParity.Items.Add("NONE")
        End If
    End Select
    cmbParity.SelectedIndex = 0

  End Sub

  Private Sub Parity(ByVal Sender As Object, ByVal e As EventArgs)

    Select Case (cmbParity.Text)
      Case "NONE"
        If cmbLen.Text = "8 Bits" Then
          cmbStop.Items.Clear()
          cmbStop.Items.Add("1")
        End If
      Case "ODD"
        If cmbLen.Text = "5 Bits" Then
          cmbStop.Items.Clear()
          cmbStop.Items.Add("1")
        End If
        If cmbLen.Text = "6 Bits" Then
          cmbStop.Items.Clear()
          cmbStop.Items.Add("1")
        End If
        If cmbLen.Text = "7 Bits" Then
          cmbStop.Items.Clear()
          cmbStop.Items.Add("1")
        End If
      Case "EVEN"
        If cmbLen.Text = "5 Bits" Then
          cmbStop.Items.Clear()
          cmbStop.Items.Add("1")
          cmbStop.Items.Add("1.5")
        End If
        If cmbLen.Text = "7 Bits" Then
          cmbStop.Items.Clear()
          cmbStop.Items.Add("2")
        End If
      Case "SPACE"
        If cmbLen.Text = "7 Bits" Then
          cmbStop.Items.Clear()
          cmbStop.Items.Add("1")
          cmbStop.Items.Add("2")
        End If
      Case "MARK"
        If cmbLen.Text = "6 Bits" Then
          cmbStop.Items.Clear()
          cmbStop.Items.Add("1")
        End If
    End Select
    cmbStop.SelectedIndex = 0

  End Sub

  Private Sub CloseMe(ByVal Sender As Object, ByVal e As EventArgs)

    Me.Close()

  End Sub
End Class
You can see from the code that I set up the form such that the user can choose any type of flow control he or she wants. It is a different story, however, when it comes to the other choices.
Starting with the chosen speed, I fill in the other drop-down boxes according to only what is allowed considering the other values. This is a great way to handle both data input and data validation at the same time. When the user finishes making his or her choices and clicks the Close button, I already know that the user's choices are valid. There is no need for any error messages or corrections by the user because he or she is allowed to choose only what I allow.
Be careful when you create a form that is validated on the fly in this manner. If you have more than a few ComboBoxes and quite a large choice matrix, you will soon enter programmers' hell.
At the start of this chapter I wrote that the TextBox is a control that I use very often for data input. I imagine that you have also used it for all kinds of data input tasks. Here are a few things I can think of that I have used the TextBox for:
Alpha input only
Numeric input only
Alphanumeric input with some restrictions
Date input
Copy/paste input from the Clipboard
Fortunately, the TextBox control has quite a few properties that you can use to set up data validation as the user is typing in values. For instance, you can limit the length of the string that this box will hold. This validation property is an easy one and requires no length validation by you. Another easy one is AcceptsReturn.
Now this AcceptsReturn property is one that I wish were in the VB 6.0 TextBox control. What this allows you to do is tell the TextBox to accept the Enter key as a valid character (in a MultiLine TextBox) or activate the default button on the form. Many times in VB 6.0 I have written code to automatically click the OK button on a form if the user presses the Enter key while typing in a TextBox. The AcceptsReturn property in the .NET TextBox means I do not have to write any code anymore to do this.
Here is a list of properties that you can assign to a TextBox to help in data entry and validation:
AcceptsReturn
AcceptsTab
AllowDrop
CanFocus
CharacterCasing
MaxLength
MultiLine
PasswordChar
TextAlign
WordWrap
Now these are just values you can set that frame the TextBox for your particular use. You can take advantage of quite a few other properties, methods, and events for data entry restriction purposes. Before I get into using the TextBox events for data entry restriction and validation, I want to demonstrate some simple things you can do with a TextBox to encourage or force data entry restrictions on the user.
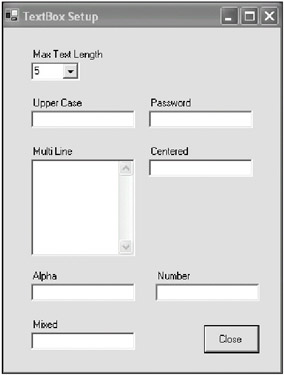
Listings 1-2a and 1-2b show a form with several TextBoxes, a ComboBox, and a Button. The only thing I do as far as the code is concerned is change some properties of the TextBoxes to alter their behavior a little. This example shows how easy .NET makes this type of task.
First, create a new C# or VB project. Mine is called "TextBox_c" for C# users and "TextBox_VB" for VB users. You should note that using a keyword as a namespace can wreak havoc with your program. Be careful what you call your programs. Add the following controls:
Add a Label and change its text to Max Text Length.
Add a ComboBox below the Label and name it cmbMaxLen.
Add a Label and change its text to Upper Case.
Add a TextBox and call it txtUpper.
Add a Label and change its text to Password.
Add a TextBox and call it txtPassword.
Add a Label and change its text to Centered.
Add a TextBox and call it txtCentered.
Add a Label and change its text to Multi Line.
Add a TextBox and call it txtMultiLine. Set its MultiLine parameter to true and make it big enough to handle a few lines of text.
Add a Button and call it cmdClose. Change its text to Close.
Your form should look like the one shown in Figure 1-4.
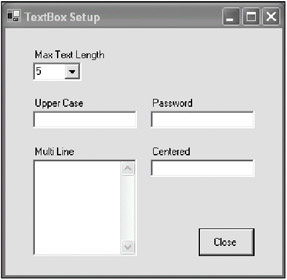
Listings 1-2a and 1-2b show the code for this example. The only thing I make note of during the running of the program is the text length. You are able to choose the text length and it will be applied to all the TextBoxes except for the MultiLine TextBox.
using System;
using System.Drawing;
using System.Collections;
using System.ComponentModel;
using System.Windows.Forms;
using System.Data;

namespace TextBox_c
{
  /// <summary>
  /// This project shows how to set up the TextBox to perform some elementary
  /// text entry validation
  /// </summary>
  public class Form1 : System.Windows.Forms.Form
  {
    private System.Windows.Forms.Label label1;
    private System.Windows.Forms.ComboBox cmbMaxLen;
    private System.Windows.Forms.Button cmdClose;
    private System.Windows.Forms.Label label5;
    private System.Windows.Forms.Label label6;
    private System.Windows.Forms.Label label7;
    private System.Windows.Forms.TextBox txtUpper;
    private System.Windows.Forms.TextBox txtPassword;
    private System.Windows.Forms.TextBox txtCentered;
    private System.Windows.Forms.Label label8;
    private System.Windows.Forms.TextBox txtMultiLine;

    private System.ComponentModel.Container components = null;


    public Form1()
    {
      InitializeComponent();

      cmbMaxLen.Items.Clear();
      cmbMaxLen.Items.Add("5");
      cmbMaxLen.Items.Add("10");
      cmbMaxLen.Items.Add("15");
      cmbMaxLen.Items.Add("20");
      cmbMaxLen.SelectedIndexChanged += new EventHandler(this.ChangeLen);
      cmbMaxLen.SelectedIndex = 0;

      txtUpper.CharacterCasing = CharacterCasing.Upper;
      txtPassword.PasswordChar = '*';
      txtCentered.TextAlign = HorizontalAlignment.Center;
      txtMultiLine.Multiline = true;
      txtMultiLine.ScrollBars = ScrollBars.Vertical;
      txtMultiLine.WordWrap = true;
      txtMultiLine.AcceptsReturn = true;
      txtMultiLine.AcceptsTab = true;

      this.AcceptButton = cmdClose;
      cmdClose.Click += new EventHandler(this.CloseMe);

    }

  protected override void Dispose( bool disposing )
  {
    if( disposing )
    {
      if (components != null)
      {
        components.Dispose();
      }
    }
    base.Dispose( disposing );
  }

#region Windows Form Designer generated code
...
...
...
#endregion

    [STAThread]
    static void Main()
    {
      Application.Run(new Form1());
    }

    private void Form1_Load(object sender, System.EventArgs e)
    {
    }

    #region control events

    private void ChangeLen(object sender, EventArgs e)
    {
      txtUpper.MaxLength = Convert.ToInt32(cmbMaxLen.Text);
      txtPassword.MaxLength = txtUpper.MaxLength;
      txtCentered.MaxLength = txtUpper.MaxLength;
    }

    private void CloseMe(object sender, EventArgs e)
    {
      this.Close();
    }

    #endregion

  }
}
Public Class Form1
    Inherits System.Windows.Forms.Form
#Region " Windows Form Designer generated code "

    Public Sub New()
    MyBase.New()

    'This call is required by the Windows Form Designer.
    InitializeComponent()

    cmbMaxLen.Items.Clear()
    cmbMaxLen.Items.Add("5")
    cmbMaxLen.Items.Add("10")
    cmbMaxLen.Items.Add("15")
    cmbMaxLen.Items.Add("20")
    AddHandler cmbMaxLen.SelectedIndexChanged, AddressOf Me.ChangeLen
    cmbMaxLen.SelectedIndex = 0

    txtUpper.CharacterCasing = CharacterCasing.Upper
    txtPassword.PasswordChar = "*"c
    txtCentered.TextAlign = HorizontalAlignment.Center
    txtMultiLine.Multiline = True
    txtMultiLine.ScrollBars = ScrollBars.Vertical
    txtMultiLine.WordWrap = True
    txtMultiLine.AcceptsReturn = True
    txtMultiLine.AcceptsTab = True

    Me.AcceptButton = cmdClose
    AddHandler cmdClose.Click, AddressOf Me.CloseMe

    End Sub

#End Region

  Private Sub Form1_Load(ByVal sender As System.Object, _
                         ByVal e As System.EventArgs) Handles MyBase.Load
  End Sub

#Region "control events"

  Private Sub ChangeLen(ByVal sender As Object, ByVal e As EventArgs)
    txtUpper.MaxLength = Convert.ToInt32(cmbMaxLen.Text)
    txtPassword.MaxLength = txtUpper.MaxLength
    txtCentered.MaxLength = txtUpper.MaxLength
  End Sub
  Private Sub CloseMe(ByVal sender As Object, ByVal e As EventArgs)
    Me.Close()
  End Sub

#End Region

End Class
Start fooling around with the fields in this form and you will see that certain restrictions have been placed on data entry. Click in the Centered TextBox and then press the Enter key. You will see that the form unloads. This is because I made the form's default AcceptButton the Close button. Each TextBox has its AcceptsReturn value set to false except for the MultiLine TextBox. I set this TextBox in the constructor to accept the Enter key. Normally in VB 6.0, I would have had to write code to do this.
| Note |
By the way, did you try tabbing through the controls? You should because this is a very common way to get from one control to another without using the mouse. Why allow for no mouse? After all, we are in the twenty-first century here and Windows programs have been out for many years now. The answer is speed. Anyone who uses a program for any length of time tends to find the easiest way to enter data. It is your job to facilitate that. Correct tab order of controls is one way to do this. |
When I tab through my program, I go from one control to another, but not in the order I want. Add the following code to the constructor of your program.
C#
    cmbMaxLen.TabIndex = 0;
    txtUpper.TabIndex = 1;
    txtPassword.TabIndex = 2;
    txtMultiLine.TabStop = false;
    txtCentered.TabIndex = 3;
    cmdClose.TabIndex = 4;
    cmbMaxLen.TabIndex = 0
    txtUpper.TabIndex = 1
    txtPassword.TabIndex = 2
    txtMultiLine.TabStop = False
    txtCentered.TabIndex = 3
    cmdClose.TabIndex = 4
Note that I turned off the tab stop for the MultiLine control. This is because I want the tab to be used as a real tab in this TextBox. Because it would be impossible to tab out of it, there is no reason to tab into it.
OK, that was admittedly easy. What you will do now is enhance the form with validation code that is contained in event handlers. This lets you extend the data entry restrictions on the fly. You can prevent the user from typing in just about anything you want while he or she is typing. This takes a little more know-how and also a little more thought.
Add a few more controls to your TextBox project form:
Add a Label and change its text to Alpha.
Add a TextBox and call it txtAlpha.
Add a Label and change its text to Number.
Add a TextBox and call it txtNumber.
Add a Label and change its text to Mixed.
Add a TextBox and call it txtMixed.
Your newly redecorated form should look like Figure 1-5.
As you can probably guess, you are allowing only letters (uppercase) in the Alpha box and only numbers in the Number box. The Mixed box will contain the following:
A–F
0–9
<
>
=
The way to do this is to capture the KeyPress event of the TextBox. You can also do this with the KeyDown event if you want. In your constructor, add the following lines of code.
C#
    //Event based input restricted controls
    txtAlpha.CharacterCasing = CharacterCasing.Lower;
    txtMixed.CharacterCasing = CharacterCasing.Upper;
    txtAlpha.KeyPress += new KeyPressEventHandler(this.InputValidator);
    txtNumber.KeyPress += new KeyPressEventHandler(this.InputValidator);
    txtMixed.KeyPress += new KeyPressEventHandler(this.InputValidator);
    'Event based input restricted controls
    txtAlpha.CharacterCasing = CharacterCasing.Lower
    txtMixed.CharacterCasing = CharacterCasing.Upper
    AddHandler txtAlpha.KeyPress, AddressOf Me.InputValidator
    AddHandler txtNumber.KeyPress, AddressOf Me.InputValidator
    AddHandler txtMixed.KeyPress, AddressOf Me.InputValidator
Add the following code to the ChangeLen delegate.
C#
    txtAlpha.MaxLength = txtUpper.MaxLength;
    txtNumber.MaxLength = txtUpper.MaxLength;
    txtMixed.MaxLength = txtUpper.MaxLength;
VB
    txtMixed.MaxLength = txtUpper.MaxLength
    txtNumber.MaxLength = txtUpper.MaxLength
    txtAlpha.MaxLength = txtUpper.MaxLength
Now add the following event handler to the bottom of your form's code.
C#
    private void InputValidator(object sender, KeyPressEventArgs e)
    {
      TextBox t;
      if(sender is TextBox)
      {
        t = (TextBox)sender;
        if (t.Name == txtAlpha.Name)
        {
          //If it is not a letter then disallow the character
          if(!Char.IsLetter(e.KeyChar) && e.KeyChar != (char)8 )
            e.Handled = true;
        }
        if (t.Name == txtNumber.Name)
        {
          //If it is not a letter then disallow the character
          if(!Char.IsNumber(e.KeyChar) && e.KeyChar != (char)8 )
            e.Handled = true;
        }
        if (t.Name == txtMixed.Name)
        {
          //Allow only 0-9,A-F,<>?=
          if(Char.IsNumber(e.KeyChar))
            e.Handled = false;
          else if(Char.ToUpper(e.KeyChar)>='A' && Char.ToUpper(e.KeyChar)<='F' )
            e.Handled = false;
          else if(e.KeyChar=='<' || e.KeyChar=='>' ||
           e.KeyChar=='?' || e.KeyChar=='=')
            e.Handled = false;
          else
            e.Handled = true;
        }
      }
    }
VB
  Private Sub InputValidator(ByVal sender As Object, _
                             ByVal e As KeyPressEventArgs)
    Dim t As TextBox
    If sender.GetType() Is GetType(TextBox) Then
      t = CType(sender, TextBox)
      If t.Name = txtAlpha.Name Then
        'If it is not a letter then disallow the character
        If (Not Char.IsLetter(e.KeyChar) And _
                e.KeyChar <> Microsoft.VisualBasic.ChrW(8)) Then
          e.Handled = True
        End If
      End If
      If t.Name = txtNumber.Name Then
        'If it is not a letter then disallow the character
        If (Not Char.IsNumber(e.KeyChar) And _
                e.KeyChar <> Microsoft.VisualBasic.ChrW(8)) Then
          e.Handled = True
        End If
      End If
      If t.Name = txtMixed.Name Then
        'Allow only 0-9,A-F,<>?=
        If (Char.IsNumber(e.KeyChar)) Then
          e.Handled = False
        ElseIf (Char.ToUpper(e.KeyChar) >= "A"c And _
                Char.ToUpper(e.KeyChar) <= "F"c) Then
          e.Handled = False
        ElseIf (e.KeyChar = "<"c Or e.KeyChar = ">"c Or _
                e.KeyChar = "?" Or e.KeyChar = "="c) Then
          e.Handled = False
        Else
          e.Handled = True
        End If
      End If
    End If
  End Sub
You can see that you are allowing only uppercase letters in the mixed TextBoxes. You can also see that you are assigning the same delegate to handle each control's KeyPress events.
| Tip |
You can handle events from many different sources with one delegate. That is why the delegate definition includes the Sender object. You use this object as I have to find out who sent the event. |
If you read the code carefully, you will find what seems to be redundant code. Do you see it?
You are setting the CharacterCasing for the Mixed control to uppercase. However, in the delegate you are converting the character to uppercase before you test to see if it is between "A" and "F" inclusive. Why should you change case twice? The answer is because you are handling the key press before Windows is. The .NET control has not had a chance to change the case of the key press to uppercase yet, so you need to. Setting the Handled property of the KeyPressEventArgs object to true tells .NET not to bother with this key press. In essence, it throws it away. VB 6.0 had this same type of functionality by setting its KeyAscii value in the KeyPress event to 0.
I think that you will see as I do that restricting data entry is often the best way to actually validate user input. No error checking or error messages are needed.
So far you have been introduced to the ComboBox and TextBox controls. You have seen how to control input specifications from one control by what is chosen in another. You have also been introduced to some of the TextBox properties and events to control what the user inputs.
You may be thinking that this is all you need. Although you could obviously make some simple data entry screens with just these two controls, you would be missing out on providing a much richer user experience by using other data entry controls.
I think an introduction to the other controls is in order here.
You see this control all the time. Usually, it is relegated to calling up help, canceling a process, or completing a process. So what are its data entry uses?
You can put a picture on a Button and use it as a way to let the user jump to another data screen. An example would be a zip code lookup table.
You can use a Button as an intermediate acceptance device. If the user clicks the Button, some fields may become disabled or enabled depending on the value in another field.
Often you have very complicated validation rules that preclude on-the-fly validation. You can use a Button to start the validation process.
Though the Button can be a multipurpose control, you may want the user to see some visual cues when he or she clicks it. The folks at Microsoft took a good look at the CheckBox and RadioButton and saw that these two controls are really buttons with some fancier display properties. If you look at the MSDN help, you will see that both the CheckBox and the RadioButton derive from the Button class.
You can use this control in a list to allow the user to choose values within that list. CheckBoxes are not mutually exclusive within the same parent control.
Suppose you have a set of nicely segregated data entry screens in a program. If the program is fairly complex, you will probably want to allow some users to have access to some screens and other users to have access to other screens. You could easily use CheckBoxes to allow an administrator to check off which screens are allowed for which users.
You can also use a CheckBox to indicate a binary property. Such a property would be true/false, yes/no, default/unique, and so on. Using a CheckBox in this manner allows you to use a single control for two states of a property. This is not the case for the RadioButton, however.
This control is very similar to a CheckBox in that it provides a visual cue to the user as to just what he or she has chosen. The similarities end there, though. The RadioButton is a mutually exclusive device within the same parent control.
Remember Figure 1-1, where I showed a grouping of controls? I placed several RadioButtons on the form. Some of them, however, are within a GroupBox. The RadioButtons that are outside the GroupBox are mutually exclusive with each other but not with those contained in the GroupBox. The same is true for the RadioButtons within the GroupBox.
RadioButtons should always come in multiples. This is because clicking a RadioButton always sets its value to true. You can never turn it off by clicking it again. The only way to do this is to choose another RadioButton.
Although you can use two RadioButtons to indicate a binary choice, this is a waste of a control. You are better off using a CheckBox.
These two controls go hand in hand. Many times you will need to ask for a date from a user. Perhaps you will need a way to activate and deactivate an alarm system using a PC program.
The MonthCalendar control is actually pretty cool. You can change its look to suit your needs, and you can personalize it to display certain dates in bold. The main reason for using the MonthCalendar is to allow the user to visually select a date or range of dates. Of course, selecting a range of dates can be somewhat problematic because it requires quite a bit more validation. For those times when you need the user to select only a single date, the DateTimePicker is a better choice.
You can configure the DateTimePicker to show either time or date, or some custom format. If you configure it as a date control, you can have a drop-down calendar appear for the user to select from. If you configure it as a time control, you can have the user click an integrated spin button to choose the time. Of course, the user can also type in the date or time if he or she wants.
One thing to note about the calendar controls is that they are locale sensitive. This means that if you have the current thread's culture set to Russian, then your calendar will show dates in Russian also. This is pretty cool. Figure 1-6 shows what these controls look like to the user.

These controls are what the user uses as his or her first attempt at navigating your program. These controls also represent the user's first shot at trying to find out how to do something. A good portion of your design process should be involved with setting up the menu and toolbar (if you have them).
If you are a VB 6.0 veteran, you know how frustrating menu design can be. There is no chance to create a menu at runtime, and right-click pop-up menus (context menus) are a real pain to work with in multiple-document interface (MDI) forms. .NET has a really nice menu system that you can add to, delete from, and change at runtime. Also, the context menu system is a breath of fresh air for VB programmers.
To my mind, all good programs include at least a basic toolbar. The toolbar takes the most common tasks a user will perform and assigns them to buttons. These buttons have pictures on them so the user can see at a glance what each button does.
I expand on the menu and toolbar issue in a later chapter on user interface design. I do want to say this, though: If you are writing a Windows program, your menu system should follow the Windows generic menu layout as much as possible. The person who uses your program will expect to find certain functionality in certain areas in the menu. For instance, if you were to put the top-level Help menu choice at the far left of the screen and the top-level File menu choice at the far right of the screen, you would confuse and anger more than a few people.
These are some of my favorite data entry controls. I know what you are thinking: These controls are just a neat way to display data and they are not good for much else, right? Wrong.
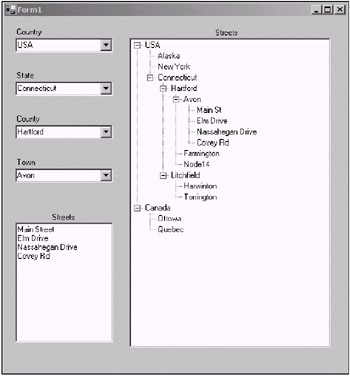
Let's take the TreeView. Used wisely, this control can show an enormous amount of information in a very compact space. It shows data in a hierarchical manner that helps you easily see relationships between different objects. For instance, suppose you want to show a list of streets in a town. You could have five drop-down boxes starting with country, then state, then county, then town, and then street. You could do this easily on a form, but switching between locations is not so intuitive.
Now think about showing this information in a hierarchical fashion using a TreeView control. What the user sees is pretty much the whole database of streets on one screen. Traversing the tree to a different street is very intuitive. Figure 1-7 shows two ways to view streets.
You can use the ListView control to show data in one of several formats. You can show data via icons (large or small), in single-line record format, or in table format. Just like in Windows Explorer, where you can change the data display format, the ListView allows you to change its format at runtime.
Now so far I have explained the TreeView and ListView controls from a data display point of view. However, they also make excellent data entry devices. Suppose Figure 1-7 showed names of people who lived in a certain town instead of streets in a town. Using the left side of the screen, how would you move someone's name from one town to another? I can tell you it would not be intuitive and it might involve another control.
Using the TreeView, I can drag a person's name from one town to another very easily, and all the while I can still see the whole picture. Drag and drop is a powerful data entry tool. It is even easy to do drop validation on the fly while the user drags his or her mouse over certain nodes.
I go into much more detail on ListViews, TreeViews, and drag and drop in Chapter 10.
The DataGrid control displays tables that are accessed via ADO.NET directly into a grid format. VB programmers should be quite familiar with this. The DataGrid control is certainly a powerful data access tool.
Other types of data binding are included with many of the other controls that I have already mentioned in this chapter. You are able to bind a property of a control to a property of an object. The word "object" is important here. You can bind a property of a control to a field in a data set, for example. A data set is an object. Another type of object is a control. You can bind a property of one control to another. For instance, you can bind the Text property of a TextBox to the Text property of a ComboBox. No code is necessary to explicitly transfer data from one object to another whenever that data changes. This is way cool!
So where would you use data binding from a property of one control to the property of another? Well, suppose you have a series of tabs with a bunch of fields that you need to fill in or choose values from. Next to this tab section, you have a summary section. This summary section includes several TextBoxes (or other controls) whose Text property is bound to the Text property of some important controls within the tabs. You could make this a sort of running total.
Perhaps a small example is needed here to graphically explain how this would work. I have a passion for wines, and I want to make a wine stock program. First of all, I create a new C# or VB project called "DataBound."
This project contains one screen with quite a few controls. I use a TabControl, a Button, and several Label and TextBox controls. There are two tabs on the tab control. The first one is shown in Figure 1-8.
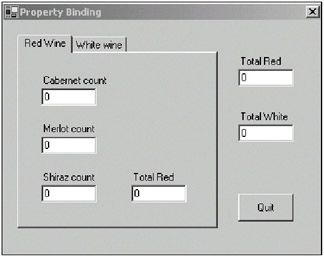
As you can see in Figure 1-8, you will need two tab pages on the tab control. You will also need to name the TextBoxes on the Red Wine tab as follows:
Name the Cabernet count txtCab.
Name the Merlot count txtMerlot.
Name the Shiraz count txtShiraz.
Name the Total Red txtRed.
Name the Total Red TextBox that is on the form itself txtTotRed. Name the Total White TextBox that is on the form itself txtTotWhite. Name the Button cmdQuit.
Now click over to the White wine tab, and you should add the controls shown in Figure 1-9.
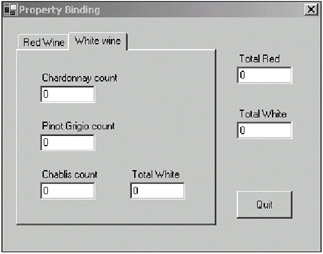
Name the TextBoxes on the White wine tab as follows:
Name the Chardonnay count txtChardonnay.
Name the Pinot Grigio count txtPino.
Name the Chablis count txtChablis.
Can you guess what I am trying to accomplish here?
As I put numbers in each of the wine count boxes, I want the total to add up automatically and transfer over to the totals section off the tab control. This totals section gives me a running summary of the important values on each tab without having to refer back to the tab all the time. The summation of all the wine totals is done using the validating events, and the transfer of data from each tab to the totals section is done via property data binding.
Not only do I want the addition and data transfer to happen automatically, but I also want to limit the input TextBoxes to numbers only. You already know how to restrict the input of the TextBoxes. I add to that knowledge with simple validating events and data transfer.
Listings 1-3a and 1-3b show the code for this project. It is not very difficult to understand, but I explain the important bits after the code listings.
using System;
using System.Drawing;
using System.Collections;
using System.ComponentModel;
using System.Windows.Forms;
using System.Data;

namespace DataBound_c
{
  /// <summary>
  /// Summary description for Form1.
  /// </summary>
  public class Form1 : System.Windows.Forms.Form
  {
    private System.Windows.Forms.TabControl tc;
    private System.Windows.Forms.TabPage t1;
    private System.Windows.Forms.TabPage t2;
    private System.Windows.Forms.Label label1;
    private System.Windows.Forms.TextBox txtCab;
    private System.Windows.Forms.Label label2;
    private System.Windows.Forms.Label label3;
    private System.Windows.Forms.Label label4;
    private System.Windows.Forms.Label label5;
    private System.Windows.Forms.Label label6;
    private System.Windows.Forms.Label label7;
    private System.Windows.Forms.Label label8;
    private System.Windows.Forms.Label label9;
    private System.Windows.Forms.Label label10;
    private System.Windows.Forms.Button cmdQuit;
    private System.Windows.Forms.TextBox txtRed;
    private System.Windows.Forms.TextBox txtTotRed;
    private System.Windows.Forms.TextBox txtWhite;
    private System.Windows.Forms.TextBox txtChablis;
    private System.Windows.Forms.TextBox txtPino;
    private System.Windows.Forms.TextBox txtChardonnay;
    private System.Windows.Forms.TextBox txtTotWhite;
    private System.Windows.Forms.TextBox txtShiraz;
    private System.Windows.Forms.TextBox txtMerlot;

    private System.ComponentModel.Container components = null;

    public Form1()
    {
      InitializeComponent();

      cmdQuit.Click += new EventHandler(this.CloseMe);

      //This is the tab for the red wines
      txtCab.CausesValidation = true;
      txtCab.Validating += new CancelEventHandler(this.ValidateRed);
      txtCab.KeyPress += new KeyPressEventHandler(this.InputValidator);

      txtMerlot.CausesValidation = true;
      txtMerlot.Validating += new CancelEventHandler(this.ValidateRed);
      txtMerlot.KeyPress += new KeyPressEventHandler(this.InputValidator);

      txtShiraz.CausesValidation = true;
      txtShiraz.Validating += new CancelEventHandler(this.ValidateRed);
      txtShiraz.KeyPress += new KeyPressEventHandler(this.InputValidator);

      txtCab.Text = "0";
      txtMerlot.Text = "0";
      txtShiraz.Text = "0";

      //This is the tab for the white wines
      //This is the tab for the white wines
      txtChardonnay.CausesValidation = true;
      txtChardonnay.Validating += new CancelEventHandler(this.ValidateWhite);
      txtChardonnay.KeyPress   += new KeyPressEventHandler(this.InputValidator);
      txtPino.CausesValidation = true;
      txtPino.Validating += new CancelEventHandler(this.ValidateWhite);
      txtPino.KeyPress += new KeyPressEventHandler(this.InputValidator);

      txtChablis.CausesValidation = true;
      txtChablis.Validating += new CancelEventHandler(this.ValidateWhite);
      txtChablis.KeyPress += new KeyPressEventHandler(this.InputValidator);

      txtChardonnay.Text = "0";
      txtPino.Text = "0";
      txtChablis.Text = "0";

      //Do the data binding summaries
      txtTotRed.DataBindings.Add("Text",txtRed,"Text");
      txtTotWhite.DataBindings.Add("Text",txtWhite,"Text");

      //Call the delegate to start totals
      ValidateRed(new object(), new CancelEventArgs());
      ValidateWhite(new object(), new CancelEventArgs());

    }

    protected override void Dispose( bool disposing )
    {
      if( disposing )
      {
        if (components != null)
        {
          components.Dispose();
        }
      }
      base.Dispose( disposing );
    }

    #region Windows Form Designer generated code
...
...
...
    #endregion
  [STAThread]
  static void Main()
  {
    Application.Run(new Form1());
  }

  private void Form1_Load(object sender, System.EventArgs e)
  {
  }

  #region events

  private void CloseMe(object sender, EventArgs e)
  {
    this.Close();
  }

  private void ValidateRed(object sender, CancelEventArgs e)
  {
    int reds = 0;
    TextBox t;
    string msg;

    //Remember we call this once with a generic object
    if(sender is TextBox)
    {
      t = (TextBox)sender;
      msg = t.Name + " Needs a number.";
    }
    else
      msg = "Wine count cannot be blank";

    if(txtCab.Text == "" ||
      txtMerlot.Text == "" ||
      txtShiraz.Text == "")
    {
      MessageBox.Show(msg);
      e.Cancel = true;
      return;
    }
      reds = Convert.ToInt32(txtCab.Text);
      reds += Convert.ToInt32(txtMerlot.Text);
      reds += Convert.ToInt32(txtShiraz.Text);

      txtRed.Text = reds.ToString();
    }

    private void ValidateWhite(object sender, CancelEventArgs e)
    {
      int whites = 0;

      if(txtChardonnay.Text == "" ||
        txtPino.Text == "" ||
        txtChablis.Text == "")
      {
        e.Cancel = true;
        return;
      }

      whites = Convert.ToInt32(txtChardonnay.Text);
      whites += Convert.ToInt32(txtPino.Text);
      whites += Convert.ToInt32(txtChablis.Text);

      txtWhite.Text = whites.ToString();
    }

    private void InputValidator(object sender, KeyPressEventArgs e)
    {
      if(!Char.IsNumber(e.KeyChar) && e.KeyChar != (char)8 )
        e.Handled = true;
    }

    #endregion
  }
}
Public Class Form1
    Inherits System.Windows.Forms.Form

#Region " Windows Form Designer generated code "
Public Sub New()
    MyBase.New()

    'This call is required by the Windows Form Designer.
InitializeComponent()

AddHandler cmdQuit.Click, AddressOf Me.CloseMe

'This is the tab for the red wines
txtCab.CausesValidation = True
AddHandler txtCab.Validating, AddressOf Me.ValidateRed
AddHandler txtCab.KeyPress, AddressOf Me.InputValidator

txtMerlot.CausesValidation = True
AddHandler txtMerlot.Validating, AddressOf Me.ValidateRed
AddHandler txtMerlot.KeyPress, AddressOf Me.InputValidator

txtShiraz.CausesValidation = True
AddHandler txtShiraz.Validating, AddressOf Me.ValidateRed
AddHandler txtShiraz.KeyPress, AddressOf Me.InputValidator

txtCab.Text = "0"
txtMerlot.Text = "0"
txtShiraz.Text = "0"

'This is the tab for the white wines
txtChardonnay.CausesValidation = True
AddHandler txtChardonnay.Validating, AddressOf Me.ValidateWhite
AddHandler txtChardonnay.KeyPress, AddressOf Me.InputValidator

txtPino.CausesValidation = True
AddHandler txtPino.Validating, AddressOf Me.ValidateWhite
AddHandler txtPino.KeyPress, AddressOf Me.InputValidator

txtChablis.CausesValidation = True
AddHandler txtChablis.Validating, AddressOf Me.ValidateWhite
AddHandler txtChablis.KeyPress, AddressOf Me.InputValidator

txtChardonnay.Text = "0"
txtPino.Text = "0"
txtChablis.Text = "0"
    'Do the data binding summaries
    txtTotRed.DataBindings.Add("Text", txtRed, "Text")
    txtTotWhite.DataBindings.Add("Text", txtWhite, "Text")

    'Call the delegate to start totals
    ValidateRed(New Object(), New System.ComponentModel.CancelEventArgs())
    ValidateWhite(New Object(), New System.ComponentModel.CancelEventArgs())

    End Sub

...
...
...

#End Region

  Private Sub Form1_Load(ByVal sender As System.Object, _
                         ByVal e As System.EventArgs) Handles MyBase.Load
  End Sub

#Region "events"

  Private Sub CloseMe(ByVal sender As Object, ByVal e As EventArgs)
    Me.Close()
  End Sub

  Private Sub ValidateRed(ByVal sender As Object, _
                          ByVal e As System.ComponentModel.CancelEventArgs)
    Dim reds As Int32 = 0
    Dim t As TextBox
    Dim msg As String

    'Remember we call this once with a generic object
    If (sender.GetType() Is GetType(TextBox)) Then
      t = CType(sender, TextBox)
      msg = t.Name + " Needs a number."
    Else
      msg = "Wine count cannot be blank"
    End If
    If (txtCab.Text = "" Or _
       txtMerlot.Text = "" Or _
       txtShiraz.Text = "") Then
      MessageBox.Show(msg)
      e.Cancel = True
      Return
    End If

    reds = Convert.ToInt32(txtCab.Text)
    reds += Convert.ToInt32(txtMerlot.Text)
    reds += Convert.ToInt32(txtShiraz.Text)

    txtRed.Text = reds.ToString()
  End Sub

  Private Sub ValidateWhite(ByVal sender As Object, _
                            ByVal e As System.ComponentModel.CancelEventArgs)
    Dim whites As Int32 = 0

    If (txtChardonnay.Text = "" Or _
       txtPino.Text = "" Or _
       txtChablis.Text = "") Then

      e.Cancel = True
      Return
    End If

    whites = Convert.ToInt32(txtChardonnay.Text)
    whites += Convert.ToInt32(txtPino.Text)
    whites += Convert.ToInt32(txtChablis.Text)

    txtWhite.Text = whites.ToString()
  End Sub

  Private Sub InputValidator(ByVal sender As Object, ByVal e As KeyPressEventArgs)
    If (Not Char.IsNumber(e.KeyChar) And e.KeyChar <> "8"c) Then
      e.Handled = True
    End If
  End Sub

#End Region
End Class
Compile and run the program. Enter some values in the count fields and then move to different fields. You will notice that as you try to move to another field, the validating events for these various TextBoxes are being invoked and are adding up totals. As soon as the total field in each tab is filled in, the data is immediately transferred to the summation fields outside the tab control. Let's look at some of the code.
    txtCab.CausesValidation = true;
    txtCab.Validating += new CancelEventHandler(this.ValidateRed);
    txtCab.KeyPress += new KeyPressEventHandler(this.InputValidator);
In the preceding code, I assign a delegate to the Validating event that is of type CancelEventHandler. The CancelEvent object contains a Cancel argument that if set to true stops the control from losing focus. The ValidateRed delegate is shown here:
    private void ValidateRed(object sender, CancelEventArgs e)
    {
      int reds = 0;
      TextBox t;
      string msg;

      //Remember we call this once with a generic object
      if(sender is TextBox)
      {
        t = (TextBox)sender;
        msg = t.Name + " Needs a number.";
      }
      else
        msg = "Wine count cannot be blank";

      if(txtCab.Text == "" ||
        txtMerlot.Text == "" ||
        txtShiraz.Text == "")
      {
        MessageBox.Show(msg);
        e.Cancel = true;
        return;
      }

      reds = Convert.ToInt32(txtCab.Text);
      reds += Convert.ToInt32(txtMerlot.Text);
      reds += Convert.ToInt32(txtShiraz.Text);

      txtRed.Text = reds.ToString();
    }
My error checking consists of seeing if the TextBox has a value. If it is blank, I do not let the user go on. Notice that I have a different error message if I know who sent the event than if I did not. You should always show the most explicit error messages that you can.[2]
You will see that at the end of the constructor I call each of the validation routines with a blank Sender object and an empty CancelEventArgs object. This is to get the ball rolling at start-up.
The code that does the data transfer is as follows:
    //Do the data binding summaries
    txtTotRed.DataBindings.Add("Text",txtRed,"Text");
    txtTotWhite.DataBindings.Add("Text",txtWhite,"Text");
All I do is tell the DataBinding property of the control which field to bind to which field of the source control. It is that easy, and as you can see from running the program, it is that cool.
| Tip |
Study the MSDN help for the .NET controls carefully. You'll often find programming gems there that you can take advantage of. This is so different from VB 6.0. |
So what is not in this code? It seems like you have everything you need, right? Well, for one thing, I have virtually no error checking, just validation code. If I did not restrict the input TextBoxes to numbers, I could easily crash the program. As now it is not too hard to crash it. In addition, the way I handle the validation events is very simple. Chapter 7 goes into much more detail on this topic.
You will also notice that I have structured the example to be simple enough that each Validation event depends on only one control. Add a few more tabs and a few dozen more interdependent input fields and you can have a mess that is not so easily handled. I cover this in much more detail in Chapter 7.
Try to enter anything other than numbers in the input fields of the previous program and the validation code stops you. Or does it? Want to crash this program? Copy some text to the Clipboard and paste it into one of the input fields. Now leave that field and your program falls over. Bang! Big hole in the validation code here.
Cut and paste is something that I am always on the lookout for because I have been caught before with that trick. Of course, a good test engineer will catch it before a customer ever does, but still, you do not want that kind of bug to escape. What to do?
Try setting the AllowDrop property of one of the input TextBoxes to false. This does nothing. The AllowDrop property is for actual drag-and-drop operations. What you have to do here is catch another event. After all, the control must know this is happening. You just have to let it tell you.
There is an event called TextChanged that you can hook into to detect and correct this type of thing. Try this with the txtCab control. I show this in C# only, as it is easy enough to convert to VB. Enter the following code in the constructor:
txtCab.TextChanged += new EventHandler(this.Pastings);
Now enter the following method at the bottom of your form code:
  private void Pastings(object sender, EventArgs e)
  {
    TextBox t;
    if(sender is TextBox)
    {
      t = (TextBox)sender;
      if (t.Name == txtCab.Name)
      {
        for (int x =0; x<txtCab.TextLength; x++)
        {
          if (!char.IsNumber(txtCab.Text,x))
          {
            txtCab.Text = "";
          break;
        }
      }
    }
  }
}
What happens here is that I catch the pasting operation and clear the TextBox if I detect a nonnumeric character.
There are a few different ways to handle this situation, but the example I present here shows you the easiest. If you want to be more sophisticated, you could save the text in a separate variable while you are typing. Then when the user pastes something illegal into the control, you can delete the existing text and replace it with known good text from your variable. This is what I would do in a real program. I would also notify the user via an error message with something to the effect of "Don't do that!"
Quite a few times when you enter data, you will need to go back and edit existing fields. To facilitate editing of fields in which you have already edited data, you can highlight the text that is already in that field. Of course, this applies to controls with an editable text property.
What does this do for a user? Well, if the user wants to completely replace the information in a TextBox, it saves him or her a few keystrokes. If the text is not selected, the user must use the mouse to select it. This can be a pain, especially if the text runs beyond the visible scope of the TextBox. It certainly slows down editing and navigation.
It is interesting to note what the TextBox does for you during navigation. Open up a new C# project and put several TextBoxes on the screen. Run the program and tab through each control. You will notice that the text in each control is selected automatically. Now click your mouse in one of the controls. The text in this control should not be selected anymore. Start tabbing again and all the controls will have their text selected except for the control you visited with the mouse before.
I think this is a neat little feature of the .NET TextBox control. You may want to expand this functionality. As you have seen, once you visit a control with the mouse, the text deselects and does not get automatically selected again for you. However, you can do this yourself.
This next quick example is the last one in this chapter. It shows not only how to programmatically select text in a TextBox, but also how to connect and disconnect events and their delegates. Perhaps the user does not want to have all previous visited fields selected. It would be nice to provide the user with a way to turn this off. This is a usability issue that you should be aware of. When you create a fairly complicated program, it is fine to have defaults for certain things, but they should be considered just that: defaults. If you can, you should provide for some kind of configuration screen that allows the user to override these defaults.
Start a new C# or VB program. Mine is called "SelectText." Add the following controls:
Add a TextBox below the Unlimited Text Label and call it t1. Add The quick brown fox jumps over the lazy dog as its text.
Add a Label and change its text to 10 characters.
Add a TextBox and call it t2. Change its text to 1-10.
Add a Label and change its text to 10 characters.
Add a TextBox and call it t3. Change its text to 1-10.
Add a CheckBox called chkSelect. Change its text to Select.
Add a Button called cmdQuit. Change its text to Quit.
Make the form appear in the center of the screen upon start-up. Your screen should look like the one shown in Figure 1-10. By the way, because this is a small program, I allow you to go ahead and double-click the Quit button to have .NET create the delegate for you. I allow it just this once, though—don't make it a habit!
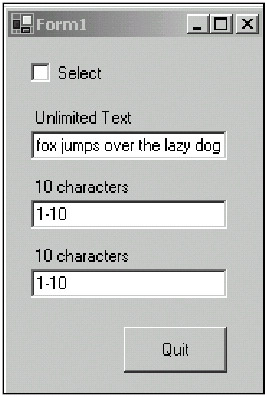
You can see from Figure 1-10 that the text in the first box overruns the length of the box. If this text were not selected upon entry, it would take some seconds for you to overwrite this text with a single word. A few seconds may not seem like much, but it can add up not only in time but also in frustration.
Listings 1-4a and 1-4b show the code for this small program. The code is fairly easy, but if you think about it, it is also very powerful.
using System;
using System.Drawing;
using System.Collections;
using System.ComponentModel;
using System.Windows.Forms;
using System.Data;

namespace SelectText_c
{
  /// <summary>
  /// This project shows how to connect/disconnect delegates and events.
  /// It also shows how to programmatically select text
  /// </summary>
  public class Form1 : System.Windows.Forms.Form
  {
    private System.Windows.Forms.Label label1;
    private System.Windows.Forms.Label label2;
    private System.Windows.Forms.Label label3;
    private System.Windows.Forms.Button cmdQuit;
    private System.Windows.Forms.TextBox t1;
    private System.Windows.Forms.TextBox t2;
    private System.Windows.Forms.TextBox t3;
    private System.Windows.Forms.CheckBox chkSelect;

    private System.ComponentModel.Container components = null;

    public Form1()
    {
    InitializeComponent();

      chkSelect.CheckedChanged += new EventHandler(this.FlipSelect);

    }

    protected override void Dispose( bool disposing )
    {
      if( disposing )
      {
        if (components != null)
        {
          components.Dispose();
        }
      }
      base.Dispose( disposing );
    }

    #region Windows Form Designer generated code
...
...
...
    #endregion

    [STAThread]
    static void Main()
    {
      Application.Run(new Form1());
    }

    private void cmdQuit_Click(object sender, System.EventArgs e)
    {
      this.Close();
    }

    private void Form1_Load(object sender, System.EventArgs e)
    {
    }

    #region events

    private void FlipSelect(object sender, EventArgs e)
    {
      if (chkSelect.Checked)
      {
        t1.GotFocus += new EventHandler(this.SelectMe);
        t2.GotFocus += new EventHandler(this.SelectMe);
        t3.GotFocus += new EventHandler(this.SelectMe);
      }
      else
      {
        t1.GotFocus -= new EventHandler(this.SelectMe);
        t2.GotFocus -= new EventHandler(this.SelectMe);
        t3.GotFocus -= new EventHandler(this.SelectMe);
      }
    }
    private void SelectMe(object sender, EventArgs e)
    {
      t1.Select(0,t1.TextLength);
      t2.Select(0,t2.TextLength);
      t3.Select(0,t3.TextLength);
    }

    #endregion
  }
}
Public Class Form1
    Inherits System.Windows.Forms.Form

#Region " Windows Form Designer generated code "

  Public Sub New()
    MyBase.New()

    'This call is required by the Windows Form Designer.
    InitializeComponent()

    AddHandler chkSelect.CheckedChanged, AddressOf FlipSelect


  End Sub

  'Form overrides dispose to clean up the component list.
  Protected Overloads Overrides Sub Dispose(ByVal disposing As Boolean)
    If disposing Then
      If Not (components Is Nothing) Then
        components.Dispose()
      End If
    End If
    MyBase.Dispose(disposing)
  End Sub

...
...
...
#End Region

  Private Sub Form1_Load(ByVal sender As System.Object, _
                         ByVal e As System.EventArgs) Handles MyBase.Load

  End Sub

#Region "events"

  Private Sub FlipSelect(ByVal sender As Object, ByVal e As EventArgs)
    If chkSelect.Checked Then
      AddHandler t1.GotFocus, AddressOf Me.SelectMe
      AddHandler t2.GotFocus, AddressOf Me.SelectMe
      AddHandler t3.GotFocus, AddressOf Me.SelectMe
    Else
      RemoveHandler t1.GotFocus, AddressOf Me.SelectMe
      RemoveHandler t2.GotFocus, AddressOf Me.SelectMe
      RemoveHandler t3.GotFocus, AddressOf Me.SelectMe
    End If

  End Sub

  Private Sub SelectMe(ByVal sender As Object, ByVal e As EventArgs)
    t1.Select(0, t1.TextLength)
    t2.Select(0, t2.TextLength)
    t3.Select(0, t3.TextLength)
  End Sub

#End Region

  Private Sub cmdQuit_Click(ByVal sender As System.Object, _
                            ByVal e As System.EventArgs) Handles cmdQuit.Click
    Me.Close()
  End Sub
End Class
Remember back in the Introduction when I said that I prefer to roll my own delegates instead of letting .NET create them for me? Well, this is the main reason. Notice that the VB delegate for the Quit button uses the Handles keyword after the argument list. I cannot programmatically unhandle this delegate. However, the delegates that I assigned using the AddHandler method can be unhandled. And I do just that in this program with the delegate that selects text.
What is really neat about removing the connection between the event and the delegate is that there is no code in the delegate that tests to see if I need to select the text according to the CheckBox value. If I need to select text, I connect the delegate; if not, I disconnect the delegate. This can make for far less code in a complicated scenario. Less code means fewer potential bugs.