This is probably the most important aspect of designing data entry screens. The goal here is to present information in such a way that the data flow makes sense. For instance, you saw from the last section on inconsistent screens that some of the employee's car information was on one page and some was on another page. This does not make sense.
Along with data flow comes navigation flow, which consists of the following:
How many screens should the program have?
How should the user get from one field to another?
How is the data structured? Is it hierarchical or disparate?
Does it make sense to use a menu or toolbar?
What are the ease-of-use issues?
What are the usability issues?
These last two points are very important indeed. How easy the program is to use plays to the casual and unsophisticated user. How usable the program is plays to the power user and people who are very computer literate. Although it may seem as if these two points are diametrically opposed, they are not. In fact, the best programs have all aspects of both.
Here is a list of items that enhance ease of use:
Menus
Toolbars
Simple layout
Context-sensitive help
Preselected fields based upon already selected entries
Visual cues such as icons and pictures
Explicit error messages and verbose directions
Autocompletion of data
The power user looks for features such as the following:
Easy tabbing between fields
Hot keys
Speed keys
Consistency between screens
Context menus
Macro capability
Of course, the power user looks for all the items in the preceding list as additions to the basic ease-of-use items.
To see how ease of use and usability can go hand in hand, you will set up a simple single screen that has aspects of both. This program will detail how to use the following controls:
Menu control
Context menu
ListView
Toolbar
Hot keys
Speed keys
DateTimePicker
Elementary graphics
The following data editing example is fairly complicated in its setup. What I try to show you is how to set the stage for data entry. You will find no validation code here, as this program does not really do anything. All the values are canned.
What you will find are controls that make navigation easy. You will find an intuitive interface with related data fields all in the same place. You will also find ways to improve navigation speed. I have included keyboard shortcuts that greatly enhance the experience for the power user.
This is a fairly long example, so you may want to download the code from the Downloads section of the Apress Web site if you get tired of entering in the code by hand.
| Tip |
Whenever possible, you should try to enter code by hand. Making mistakes is half the process of learning. Whenever I read a computer book, I always try to enter all the code myself. I gain a lot of insight that way. |
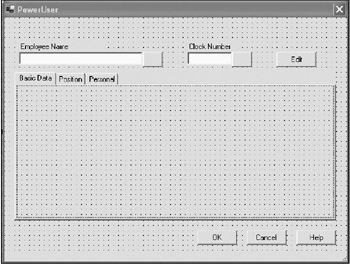
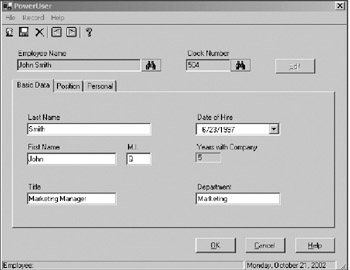
This example is a rewrite of the employee record form. Start a new project in C# or VB. Mine is called "PowerUser." There are two forms in this project. Here is what you need to do to set up the first form:
Add a TabControl and call it tc1.
Using the Properties window of the TabControl, add the following three tab pages: tp1 with the text Basic Data; tp2 with the text Position; and tp3 with the text Personal.
Add an ImageList control to the form and call it imgToolBar.
Add a Button to the form called cmdOK. Change the text to OK.
Add a Button to the form called cmdCancel. Change the text to Cancel.
Add a Button to the form called cmdHelp. Change the text to Help.
Add a Button to the form called cmdEdit. Change the text to Edit.
Add a StatusBar to the form and call it sb1.
Add a Button to the form called cmdListByEmp. Make the text blank.
Add a Button to the form called cmdListByNum. Make the text blank.
Add a Label to the form and change its text to Employee Name.
Add a TextBox to the form called txtEmp.
Add a Label to the form and change its text to Clock Number.
Add a TextBox to the form called txtNum.
Your screen should look like the one shown in Figure 2-5.
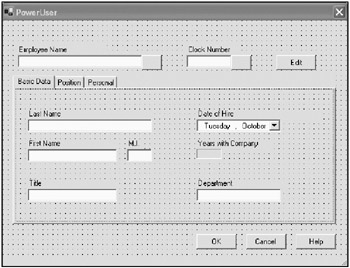
Now it is time to put some controls on the tab pages. Perform the following steps in the controls on this (Basic Data) page:
Add a Label whose text reads Last Name.
Add a TextBox called txtLast.
Add a Label whose text reads First Name.
Add a TextBox called txtFirst.
Add a Label whose text reads M.I.
Add a TextBox called txtMI.
Add a Label whose text reads Title.
Add a TextBox called txtTitle.
Add a Label whose text reads Department.
Add a TextBox called txtDept.
Add a Label called lblYears. Change its border style to Fixed3D.
Add a Label whose text reads Date of Hire.
Add a DateTimePicker control called dtHire.
Your form should now look like the one shown in Figure 2-6.
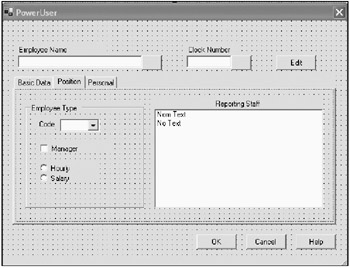
Now add the following controls to the second tab. This is the Position tab.
Add a GroupBox whose text reads Employee Type.
Add a Label inside the GroupBox whose text reads Code.
Add a ComboBox inside the GroupBox called cmbPay.
Add a CheckBox inside the GroupBox called chkManager. Its text should read Manager.
Add a RadioButton inside the GroupBox called optHourly. Its text should read Hourly.
Add a RadioButton inside the GroupBox called optSalary. Its text should read Salary.
Add a Label to the tab page whose text reads Reporting Staff.
Add a ListView to the tab page called lstEmps.
The second page of the tab should look like Figure 2-7.
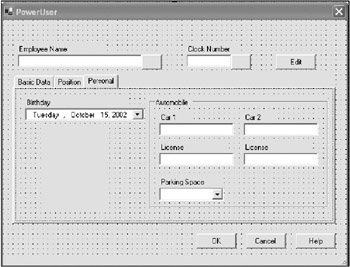
Now for the third and final tab. Add the following controls to the Personal tab:
Add a Label whose text reads Birthday.
Add a DateTimePicker control called dtBirthday.
Add a PictureBox called pic.
Add a GroupBox whose text reads Automobile.
Add a Label inside the GroupBox whose text reads Car 1.
Add a Label inside the GroupBox whose text reads Car 2.
Add a TextBox inside the GroupBox called txtCar2.
Add a Label inside the GroupBox whose text reads License.
Add a TextBox inside the GroupBox called txtLic1.
Add a Label inside the GroupBox whose text reads License.
Add a TextBox inside the GroupBox called txtLic2.
Add a Label inside the GroupBox whose text reads Parking Space.
Add a ComboBox inside the GroupBox called cmbParking.
The third tab page should look like Figure 2-8.
Whew! Now that you have that out of the way, it is time to add the code. You will add the second form later.
The code for this form has several main sections. They are the form's constructor, the form's Load event handler, and several delegates that handle various events.
Enter the form's code and put the following variable declarations just above the constructor.
C#
    #region Class Local Variables

    ToolBar tb1;
    MainMenu mnu;

    #endregion
VB
#Region "Class Local Variables"

  Dim tb1 As ToolBar
  Dim mnu As MainMenu

#End Region
As you can see here, I have a ToolBar and a Menu as an internal variable. Later, I will add these two controls to the form. I could have decided to add them in the form designer itself, but I wanted to show you that it is not always necessary to do that.
In fact, you can use some of these controls to your advantage in some unusual situations. Suppose you want to have a data structure that holds a list of people's names and their photographs. You also want this list to be in sorted order regardless of the order in which you add people's names. You could make a class or a structure to do this for you, but you could also use a control to handle this.
You can declare a ListView as an internal variable and add people's names to it in any order you want. You can set the ListView control up to hold its list in an ascending sort order. Using a control this way gives you the capabilities of the control without your ever having to add it to any other visible controls list. Although there are ready-made collections for this sort of thing in .NET, there may be a specialized data structure you need that you can realize using a normally visible control. Anyway, it is something to think about.
Listings 2-1a and 2-1b show the code for the constructor of this form.
    public Form1()
    {
      InitializeComponent();

      //Close the program when OK/Cancel/Help buttons are clicked
      cmdOK.Text        = "&OK";
      cmdOK.Enabled     = false;
      cmdOK.Click      += new EventHandler(this.ApplyChanges);
      cmdCancel.Text    = "&Cancel";
      cmdCancel.Enabled = false;
      cmdCancel.Click += new EventHandler(this.ApplyChanges);
      cmdHelp.Text     = "&Help";
      cmdEdit.Text     = "&Edit";
      cmdEdit.Click   += new EventHandler(this.EditFields);

      //Do the menu
      mnu = new MainMenu();
      this.Menu = mnu;
      MenuItem Top = new MenuItem("&File");
      mnu.MenuItems.Add(Top);
      MenuItem Next = new MenuItem("&New", new EventHandler(this.MenuHandler));
      Next.Shortcut = Shortcut.F5;
      Top.MenuItems.Add(Next);
      Next = new MenuItem("&Save", new EventHandler(this.MenuHandler));
      Next.Shortcut = Shortcut.F6;
      Top.MenuItems.Add(Next);
      Next = new MenuItem("-");
      Top.MenuItems.Add(Next);
      Next = new MenuItem("E&xit", new EventHandler(this.MenuHandler));
      Next.Shortcut = Shortcut.F12;
      Top.MenuItems.Add(Next);

      Top = new MenuItem("&Record");
      mnu.MenuItems.Add(Top);
      Next = new MenuItem("&Previous", new EventHandler(this.MenuHandler));
      Next.Shortcut = Shortcut.F7;
      Top.MenuItems.Add(Next);
      Next = new MenuItem("N&ext", new EventHandler(this.MenuHandler));
      Next.Shortcut = Shortcut.F8;
      Top.MenuItems.Add(Next);
      Top = new MenuItem("&Help");
      mnu.MenuItems.Add(Top);
      Next = new MenuItem("&Help", new EventHandler(this.MenuHandler));
      Next.Shortcut = Shortcut.F1;
      Top.MenuItems.Add(Next);
      Next = new MenuItem("&About", new EventHandler(this.MenuHandler));
      Top.MenuItems.Add(Next);

      //Do the images for the toolbar and buttons
      imgToolBar.Images.Clear();
      imgToolBar.Images.Add(Image.FromFile("new.ico"));
      imgToolBar.Images.Add(Image.FromFile("save.ico"));
      imgToolBar.Images.Add(Image.FromFile("delete.ico"));
      imgToolBar.Images.Add(Image.FromFile("prev.ico"));
      imgToolBar.Images.Add(Image.FromFile("next.ico"));
      imgToolBar.Images.Add(Image.FromFile("help.ico"));
      imgToolBar.Images.Add(Image.FromFile("search.ico"));

      //Do the toolbar
      tb1 = new ToolBar();
      this.Controls.Add(tb1);
      tb1.ImageList = imgToolBar;
      tb1.Appearance = ToolBarAppearance.Flat;
      tb1.ButtonClick += new ToolBarButtonClickEventHandler(this.ToolBarHandler);

      //Make a space that we can add when we want to
      ToolBarButton btnSpacer = new ToolBarButton();
      btnSpacer.Style = ToolBarButtonStyle.Separator;

      ToolBarButton btn = new ToolBarButton();
      btn.ImageIndex = 0;
      btn.ToolTipText = "New Employee";
      btn.Tag = 'N';
      tb1.Buttons.Add(btn);

      btn = new ToolBarButton();
      btn.ImageIndex = 1;
      btn.ToolTipText = "Save Record";
      btn.Tag = 'S';
      tb1.Buttons.Add(btn);
      btn = new ToolBarButton();
      btn.ImageIndex = 2;
      btn.ToolTipText = "Delete Employee";
      btn.Tag = 'D';
      tb1.Buttons.Add(btn);
      tb1.Buttons.Add(btnSpacer);

      btn = new ToolBarButton();
      btn.ImageIndex = 3;
      btn.ToolTipText = "Previous Record";
      btn.Tag = 'P';
      tb1.Buttons.Add(btn);

      btn = new ToolBarButton();
      btn.ImageIndex = 4;
      btn.ToolTipText = "Next Record";
      btn.Tag = 'E';
      tb1.Buttons.Add(btn);
      tb1.Buttons.Add(btnSpacer);

      btn = new ToolBarButton();
      btn.ImageIndex = 5;
      btn.ToolTipText = "Help";
      btn.Tag = 'H';
      tb1.Buttons.Add(btn);

      //Set up the list view of employees
      lstEmps.SmallImageList = imgToolBar;
      lstEmps.View = View.List;

      //Do the buttons
      cmdListByEmp.FlatStyle = FlatStyle.Popup;
      cmdListByEmp.Height = txtEmp.Height;
      cmdListByEmp.Top = txtEmp.Top;
      cmdListByEmp.ImageList = imgToolBar;
      cmdListByEmp.ImageIndex = 6;
      cmdListByEmp.ImageAlign = ContentAlignment.MiddleCenter;
      cmdListByEmp.Tag = true;
      cmdListByEmp.Click += new EventHandler(this.CallEmployees);

      cmdListByNum.FlatStyle = FlatStyle.Popup;
      cmdListByNum.Height = txtNum.Height;
      cmdListByNum.Top = txtNum.Top;
      cmdListByNum.ImageList = imgToolBar;
      cmdListByNum.ImageIndex = 6;
      cmdListByNum.ImageAlign = ContentAlignment.MiddleCenter;
      cmdListByNum.Tag = false;
      cmdListByNum.Click += new EventHandler(this.CallEmployees);

      //Do the status bar
      StatusBarPanel sb = new StatusBarPanel();
      sb.AutoSize = StatusBarPanelAutoSize.Spring;
      sb.BorderStyle = StatusBarPanelBorderStyle.Sunken;
      sb.Text = "Employee:";
      sb1.Panels.Add(sb);

      sb = new StatusBarPanel();
      sb.AutoSize = StatusBarPanelAutoSize.Contents;
      sb.Text = DateTime.Today.ToLongDateString();
      sb1.Panels.Add(sb);
      sb1.ShowPanels = true;

      txtEmp.ReadOnly = true;
      txtNum.ReadOnly = true;

      dtHire.Format = DateTimePickerFormat.Short;
      dtHire.MaxDate = DateTime.Today;
      dtHire.ValueChanged += new EventHandler(this.CalcTime);

      //Do the tabindexes on the form itself
      txtEmp.TabIndex = 0;
      cmdListByEmp.TabIndex = 1;
      txtNum.TabIndex = 2;
      cmdListByNum.TabIndex = 3;
      cmdEdit.TabIndex = 4;
      tc1.TabIndex = 5;    //Doing this starts the tabbing on the tab page
      cmdOK.TabIndex = 6;
      cmdCancel.TabIndex = 7;
      cmdHelp.TabIndex = 8;
      //Do the tabindexes on the first tab page
      txtLast.TabIndex = 0;
      txtFirst.TabIndex = 1;
      txtMI.TabIndex = 2;
      dtHire.TabIndex = 3;
      txtDept.TabIndex = 4;
      //Do the tabindexes on the second tab page
      cmbPay.TabIndex = 0;
      chkManager.TabIndex = 1;
      optHourly.TabIndex = 2;
      optSalary.TabIndex = 3;
      lstEmps.TabIndex = 4;
      //Do the tabindexes on the third tab page
      dtBirthday.TabIndex = 0;
      txtCar1.TabIndex = 1;
      txtLic1.TabIndex = 2;
      txtCar2.TabIndex = 3;
      txtLic2.TabIndex = 4;
      cmbParking.TabIndex = 5;

      }
  Public Sub New()
    MyBase.New()

    'This call is required by the Windows Form Designer.
    InitializeComponent()

    'Close the program when OK/Cancel/Help buttons are clicked
    cmdOK.Text = "&OK"
    cmdOK.Enabled = False
    AddHandler cmdOK.Click, AddressOf ApplyChanges
    cmdCancel.Text = "&Cancel"
    cmdCancel.Enabled = False
    AddHandler cmdCancel.Click, AddressOf ApplyChanges
    cmdHelp.Text = "&Help"
    cmdEdit.Text = "&Edit"
    AddHandler cmdEdit.Click, AddressOf EditFields

    'Do the menu
    mnu = New MainMenu()
    Me.Menu = mnu
    Dim Top As MenuItem = New MenuItem("&File")
    mnu.MenuItems.Add(Top)
    Dim Nxt As MenuItem = New MenuItem("&New", _
                          New EventHandler(AddressOf MenuHandler))
    Nxt.Shortcut = Shortcut.F5
    Top.MenuItems.Add(Nxt)
    Nxt = New MenuItem("&Save", New EventHandler(AddressOf MenuHandler))
    Nxt.Shortcut = Shortcut.F6
    Top.MenuItems.Add(Nxt)
    Nxt = New MenuItem("-")
    Top.MenuItems.Add(Nxt)
    Nxt = New MenuItem("E&xit", New EventHandler(AddressOf MenuHandler))
    Nxt.Shortcut = Shortcut.F12
    Top.MenuItems.Add(Nxt)

    Top = New MenuItem("&Record")
    mnu.MenuItems.Add(Top)
    Nxt = New MenuItem("&Previous", New EventHandler(AddressOf MenuHandler))
    Nxt.Shortcut = Shortcut.F7
    Top.MenuItems.Add(Nxt)
    Nxt = New MenuItem("N&ext", New EventHandler(AddressOf MenuHandler))
    Nxt.Shortcut = Shortcut.F8
    Top.MenuItems.Add(Nxt)

    Top = New MenuItem("&Help")
    mnu.MenuItems.Add(Top)
    Nxt = New MenuItem("&Help", New EventHandler(AddressOf MenuHandler))
    Nxt.Shortcut = Shortcut.F1
    Top.MenuItems.Add(Nxt)
    Nxt = New MenuItem("&About", New EventHandler(AddressOf MenuHandler))
    Top.MenuItems.Add(Nxt)

    'Do the images for the toolbar and buttons
    imgToolBar.Images.Clear()
    imgToolBar.Images.Add(Image.FromFile("new.ico"))
    imgToolBar.Images.Add(Image.FromFile("save.ico"))
    imgToolBar.Images.Add(Image.FromFile("delete.ico"))
    imgToolBar.Images.Add(Image.FromFile("prev.ico"))
    imgToolBar.Images.Add(Image.FromFile("next.ico"))
    imgToolBar.Images.Add(Image.FromFile("help.ico"))
    imgToolBar.Images.Add(Image.FromFile("search.ico"))

    'Do the toolbar
    tb1 = New ToolBar()
    Me.Controls.Add(tb1)
    tb1.ImageList = imgToolBar
    tb1.Appearance = ToolBarAppearance.Flat
    AddHandler tb1.ButtonClick, AddressOf ToolBarHandler

    'Make a space that we can add when we want to
    Dim btnSpacer As ToolBarButton = New ToolBarButton()
    btnSpacer.Style = ToolBarButtonStyle.Separator
    Dim btn As ToolBarButton = New ToolBarButton()
    btn.ImageIndex = 0
    btn.ToolTipText = "New Employee"
    btn.Tag = "N"c
    tb1.Buttons.Add(btn)

    btn = New ToolBarButton()
    btn.ImageIndex = 1
    btn.ToolTipText = "Save Record"
    btn.Tag = "S"c
    tb1.Buttons.Add(btn)

    btn = New ToolBarButton()
    btn.ImageIndex = 2
    btn.ToolTipText = "Delete Employee"
    btn.Tag = "D"c
    tb1.Buttons.Add(btn)
    tb1.Buttons.Add(btnSpacer)

    btn = New ToolBarButton()
    btn.ImageIndex = 3
    btn.ToolTipText = "Previous Record"
    btn.Tag = "P"c
    tb1.Buttons.Add(btn)

    btn = New ToolBarButton()
    btn.ImageIndex = 4
    btn.ToolTipText = "Next Record"
    btn.Tag = "E"c
    tb1.Buttons.Add(btn)
    tb1.Buttons.Add(btnSpacer)

    btn = New ToolBarButton()
    btn.ImageIndex = 5
    btn.ToolTipText = "Help"
    btn.Tag = "H"c
    tb1.Buttons.Add(btn)

    'Set up the list view of employees
    lstEmps.SmallImageList = imgToolBar
    lstEmps.View = View.List
    'Do the buttons
    cmdListByEmp.FlatStyle = FlatStyle.Popup
    cmdListByEmp.Height = txtEmp.Height
    cmdListByEmp.Top = txtEmp.Top
    cmdListByEmp.ImageList = imgToolBar
    cmdListByEmp.ImageIndex = 6
    cmdListByEmp.ImageAlign = ContentAlignment.MiddleCenter
    cmdListByEmp.Tag = True
    AddHandler cmdListByEmp.Click, AddressOf CallEmployees

    cmdListByNum.FlatStyle = FlatStyle.Popup
    cmdListByNum.Height = txtNum.Height
    cmdListByNum.Top = txtNum.Top
    cmdListByNum.ImageList = imgToolBar
    cmdListByNum.ImageIndex = 6
    cmdListByNum.ImageAlign = ContentAlignment.MiddleCenter
    cmdListByNum.Tag = False
    AddHandler cmdListByNum.Click, AddressOf CallEmployees

    'Do the status bar
    Dim sb As StatusBarPanel = New StatusBarPanel()
    sb.AutoSize = StatusBarPanelAutoSize.Spring
    sb.BorderStyle = StatusBarPanelBorderStyle.Sunken
    sb.Text = "Employee:"
    sb1.Panels.Add(sb)

    sb = New StatusBarPanel()
    sb.AutoSize = StatusBarPanelAutoSize.Contents
    sb.Text = DateTime.Today.ToLongDateString()
    sb1.Panels.Add(sb)
    sb1.ShowPanels = True

    txtEmp.ReadOnly = True
    txtNum.ReadOnly = True

    dtHire.Format = DateTimePickerFormat.Short
    dtHire.MaxDate = DateTime.Today
    AddHandler dtHire.ValueChanged, AddressOf CalcTime

    'Do the tabindexes on the form itself
    txtEmp.TabIndex = 0
    cmdListByEmp.TabIndex = 1
    txtNum.TabIndex = 2
    cmdListByNum.TabIndex = 3
    cmdEdit.TabIndex = 4
    tc1.TabIndex = 5    'Doing this starts the tabbing on the tab page
    cmdOK.TabIndex = 6
    cmdCancel.TabIndex = 7
    cmdHelp.TabIndex = 8
    'Do the tabindexes on the first tab page
    txtLast.TabIndex = 0
    txtFirst.TabIndex = 1
    txtMI.TabIndex = 2
    dtHire.TabIndex = 3
    txtDept.TabIndex = 4
    'Do the tabindexes on the second tab page
    cmbPay.TabIndex = 0
    chkManager.TabIndex = 1
    optHourly.TabIndex = 2
    optSalary.TabIndex = 3
    lstEmps.TabIndex = 4
    'Do the tabindexes on the third tab page
    dtBirthday.TabIndex = 0
    txtCar1.TabIndex = 1
    txtLic1.TabIndex = 2
    txtCar2.TabIndex = 3
    txtLic2.TabIndex = 4
    cmbParking.TabIndex = 5
  End Sub
There is quite a bit of code in this constructor. In fact, much of this code could have been dispensed with by setting the properties of the controls at design time. Often that is just what I do for small programs.
I must say this, though, about using the design-time property pages: When working in a team situation, I have found it is best to set up as many of the properties programmatically as I can. It is very easy for one person to screw up a nice setup by resetting some property in code that you have previously set via the property page. By the same token, anyone who accidentally sets a property using a property page will have the control set up the way it should be via code.
Anyway, regardless of how you decide to set up controls, if all your coding team members use the same design philosophy regarding the UI, you should be OK.
So, back at the ranch, our coding hero is busy entering in setup parameters for this small project. Let's discuss some of what's going on here. First of all, I get the code for the Buttons out of the way. I assign a delegate to each Button's click events. I also assign the text to the Buttons. I am doing this in code here to show you how the hot key system works.
The hot key system gives you the ability to underline a single letter in a word. This single letter then becomes the hot key, and when the user presses the Alt key plus this underlined letter the default action for that control will occur. This means that for a Button, it will be clicked; for a Tab page, that page will get the focus; for a menu item, the code for that choice will be invoked; and so on.
Look at any decent program and you will see hot keys for all the menu choices and all the buttons on the screen. This is vital to speeding up the user interface. The average user who uses your program once in a while will probably not use the hot keys, but someone who is proficient in your program will.
The next thing I do in the constructor is set up the menu system. Notice that I assign hot key–based text to the menu and I also assign delegates to handle the menu choices. I could assign a different delegate for each choice, but a single one is all that is needed. The delegate signature includes a sender object that I can use to figure out which menu item was clicked. These hot keys are called access keys in .NET parlance.
By the way, for you VB programmers new to .NET, notice that each menu choice is an object. This is very important to realize. In VB 6.0, each menu choice is just that: a choice. It is impossible using native VB 6.0 commands to add or delete menu items programmatically. In .NET, when the delegate is called, the object that is defined as the sender is the MenuItem object. In VB 6.0, each menu choice has its own click event. In .NET, you can combine all the click events into one delegate.
Because I add the menu to the project via code rather than adding it at design time, I need a way to add it to the list of controls that the form knows about. Usually, adding the control object to the control's collections of the form does that. The menu is different. You need to tell the form explicitly which menu to use. You can do so with the following bit of code.
C#
      mnu = new MainMenu();
      this.Menu = mnu;
VB
      Dim mnu as MainMenu = new MainMenu()
      me.Menu = mnu
One reason to add the menu in this way is that it makes it easy to change menus midstream. Suppose you have two levels of administrative users. One level is the superuser and the other level is the everyday user. You could have a complete menu system for each. One line of code is all it takes to show the superuser menu as opposed to the normal menu. I am using this feature in a program I am writing for work right now.
One more thing about the menu system for this project: I use speed keys to enhance the menu. A speed key is similar to a hot key in that you can invoke code by pressing it. However, it is not necessary for a speed key to be visible, whereas a hot key is visible.
I have assigned a hot key of Alt-X to the Exit menu choice. The user cannot press Alt-X any time to exit the program—the Exit menu choice must be visible on the screen first. I have assigned the speed key F12 to the same Exit menu choice. I can now press F12 at any time in this program and it will exit immediately. You can also assign speed keys to a menu and an accessibility object. I cover accessibility in Chapter 3. Speed keys are called shortcuts in .NET.
| Caution |
Be careful that you do not assign the same hot key to multiple visible controls. You will not get the functionality you expect. Also, do not assign multiple hot keys within the same text. If I had done "E&x&it" instead of "E&xit", the letter i would be underlined, but Alt-X would be the trigger. This would definitely be undesirable. |
Once the menu is done, I set up the ToolBar. This is interesting in that the ToolBar needs two objects to work properly. The first is the ToolBar itself (not too hard to figure that one out), and the second is an ImageList object. This ImageList holds all the icons I will use for the ToolBar. Using an ImageList does two things:
An ImageList is fast because the images are stored in one place in memory in a binary format.
An ImageList is necessary for localization. You can have several ImageLists, where each one contains images appropriate for a particular culture. You would then assign the proper ImageList to the ToolBar according to the culture setting.
The ImageList is assigned to the ToolBar so that you can reference the number of the image with the ToolBar rather than load a specific picture. No ToolBar code changes are necessary to change the picture shown to the user.
The ToolBar I set up is similar to the menu. I set each button's ToolTip text and assign a delegate to handle the click events. Notice that I assign a letter to each ToolBar button's Tag property. This letter corresponds with the hot key letter I assigned to each MenuItem. Doing this makes it easy for me to identify which Button was clicked, and because the Button Tag is the same as the Menu mnemonic, I can use the same code for the Button as the Menu.
There is one thing wrong with assigning a letter to the ToolBarButton Tag. This assignment is hard-coded, which makes it virtually impossible for me to localize both the menu and the ToolBar and still use the same parsing code for both. After all, the text for Exit in German does not contain an x, so the MenuItem mnemonic would be different. I would need to change the tag for each ToolBarButton for each culture I need.
| CROSS-REFERENCE |
I cover localization concerns in Chapter 3. I show you a better way to synchronize the ToolBar and Menu code that is independent of text. |
Adding the ToolBar to the form is simply a matter of adding to the form's controls collection as follows.
C#
      tb1 = new ToolBar();
      this.Controls.Add(tb1);
VB
      tb1 = new ToolBar()
      me.Controls.Add(tb1)
The last thing I would like to talk about in this section of code is the tab order. Now in VB 6.0, tab order is sometimes a tricky thing. If you have a situation like this project, with controls that are hidden inside tab pages, you can really get screwed up. In VB 6.0, each control on a form must have a unique tab index. This means that while you are tabbing through the controls on the first tab page, you could suddenly be taken to a control that is on another page but is invisible to the user at the moment. Suppose that control is a button that reformats your hard drive and the user pressed the Enter key. Your system would be toast!
The .NET controls work differently with regard to tab order. Each control can have the same tab index. The control that is in focus is determined by both the tab order index and the z-order. This allows me to give the controls that are the first page of the tab the same tab indexes as those on any other page. Because the controls on the current page have higher z-order that those on the other pages, the tab order works as I intended it to.
This is a great step forward in the history of tab orderdom. In VB 6.0, I would need to constantly turn on and off each control's TabStop property depending on if the control was visible at that moment or not. It is a pain in the neck and subject to bugs. Coding tab order in .NET is comparatively easy.
Now that you are done with this constructor code, let's move on to the next order of business.
Listings 2-2a and 2-2b show the code for the form's Load event handler and a helper function. First double-click the form, and then put the helper function below the Load event handler.
   private void Form1_Load(object sender, System.EventArgs e)
   {
     FillList();

     foreach (TabPage p in tc1.TabPages)
     {
       foreach (Control c in p.Controls)
       {
         c.Enabled = false;
       }
     }
   }

   private void FillList()
   {
     txtEmp.Text = "John Smith";
     txtNum.Text = "504";
     txtLast.Text = "Smith";
     txtFirst.Text = "John";
     txtMI.Text = "Q";
     txtTitle.Text = "Marketing Manager";
     txtDept.Text = "Marketing";
     dtHire.Value = DateTime.Parse("6/23/97");

     cmbPay.Items.Clear();
     cmbPay.Items.Add("W01");
     cmbPay.Items.Add("W02");
     cmbPay.Items.Add("W03");
     cmbPay.Items.Add("W04");
     cmbPay.Items.Add("B01");
     cmbPay.SelectedIndex = 0;
     lstEmps.Items.Clear();
     lstEmps.Items.Add("Grunt 1", 0);
     lstEmps.Items.Add("Grunt 2", 0);
     lstEmps.Items.Add("Grunt 3", 0);

     txtCar1.Text = "Pickup Truck";
     txtLic1.Text = "NOBUGS";

     cmbParking.Items.Clear();
     cmbParking.Items.Add("A1");
     cmbParking.Items.Add("A2");
     cmbParking.Items.Add("A3");
     cmbParking.Items.Add("A4");
     cmbParking.Items.Add("B1");
     cmbParking.Items.Add("B2");
     cmbParking.Items.Add("B3");
     cmbParking.Items.Add("B4");
     cmbParking.Items.Add("-NA-");
     cmbParking.SelectedIndex = 0;

     chkManager.Checked = true;
     optSalary.Checked = true;

     pic.SizeMode = PictureBoxSizeMode.StretchImage;
     pic.Image = Image.FromFile("nick symmonds.jpg");
   }
  Private Sub Form1_Load(ByVal sender As System.Object, _
                         ByVal e As System.EventArgs) Handles MyBase.Load
    Dim p As TabPage
    Dim c As Control

    FillList()

    For Each p In tc1.TabPages
      For Each c In p.Controls
        c.Enabled = False
      Next
    Next

  End Sub
  Private Sub FillList()
    txtEmp.Text = "John Smith"
    txtNum.Text = "504"
    txtLast.Text = "Smith"
    txtFirst.Text = "John"
    txtMI.Text = "Q"
    txtTitle.Text = "Marketing Manager"
    txtDept.Text = "Marketing"
    dtHire.Value = DateTime.Parse("6/23/97")

    cmbPay.Items.Clear()
    cmbPay.Items.Add("W01")
    cmbPay.Items.Add("W02")
    cmbPay.Items.Add("W03")
    cmbPay.Items.Add("W04")
    cmbPay.Items.Add("B01")
    cmbPay.SelectedIndex = 0

    lstEmps.Items.Clear()
    lstEmps.Items.Add("Grunt 1", 0)
    lstEmps.Items.Add("Grunt 2", 0)
    lstEmps.Items.Add("Grunt 3", 0)

    txtCar1.Text = "Pickup Truck"
    txtLic1.Text = "NOBUGS"

    cmbParking.Items.Clear()
    cmbParking.Items.Add("A1")
    cmbParking.Items.Add("A2")
    cmbParking.Items.Add("A3")
    cmbParking.Items.Add("A4")
    cmbParking.Items.Add("B1")
    cmbParking.Items.Add("B2")
    cmbParking.Items.Add("B3")
    cmbParking.Items.Add("B4")
    cmbParking.Items.Add("-NA-")
    cmbParking.SelectedIndex = 0

    chkManager.Checked = True
    optSalary.Checked = True

    pic.SizeMode = PictureBoxSizeMode.StretchImage
    pic.Image = Image.FromFile("nick symmonds.jpg")

  End Sub
There is not much to talk about here except to say that because this is an example, I need to stuff some fake entries in some of the controls. One thing to note here is the use of the DateTime structure. If you are wondering why I do not create an instance of this structure (you should be wondering this), it is because this structure has several static methods. One of these is the Parse method that I use here.
| Tip |
.NET has quite a few classes and structures with static methods. You should know by now what static methods are and how to use them. Making your own static classes and methods can be very useful. |
The next section of code deals with the event handlers for this form. Listings 2-3a and 2-3b show the code for the various delegates that handle the events I am interested in.
    #region Events

    private void CalcTime(object sender, EventArgs e)
    {
      lblYears.Text = (DateTime.Today.Year - dtHire.Value.Year).ToString();
    }

    private void CallEmployees(object sender, EventArgs e)
    {
    }

    private void ApplyChanges(object sender, EventArgs e)
    {
      foreach (TabPage p in tc1.TabPages)
      {
        foreach (Control c in p.Controls)
        {
          c.Enabled = false;
        }
      }
      cmdEdit.Enabled = true;
      cmdOK.Enabled = false;
      cmdCancel.Enabled = false;
    }

    private void EditFields(object sender, EventArgs e)
    {
      foreach (TabPage p in tc1.TabPages)
      {
        foreach (Control c in p.Controls)
        {
          c.Enabled = true;
        }
      }
      cmdEdit.Enabled = false;
      cmdOK.Enabled = true;
      cmdCancel.Enabled = true;
    }

    private void ToolBarHandler(object sender, ToolBarButtonClickEventArgs e)
    {
      switch ((char)e.Button.Tag)
      {
        case 'N': //New
          //Your code here.
          break;
        case 'S': //Save
          //Your code here.
          break;
        case 'D': //Delete
          //Your code here.
          break;
        case 'X': //Exit
          this.Close();
          break;
        case 'P': //Previous
          //Your code here.
          break;
        case 'E': //Next
          //Your code here.
          break;
        case 'H': //Help
          //Your code here.
          break;
        case 'A': //About
          //Your code here.
          break;
      }
    }

    private void MenuHandler(object sender, EventArgs e)
    {
      MenuItem m;
      if(sender is MenuItem)
        m = (MenuItem)sender;
      else
        return;

      switch (m.Mnemonic)
      {
        case 'N': //New
          //Your code here.
          break;
        case 'S': //Save
          //Your code here.
          break;
        case 'D': //Delete
          //Your code here.
          break;
        case 'X': //Exit
          this.Close();
          break;
        case 'P': //Previous
          //Your code here.
          break;
        case 'E': //Next
          //Your code here.
          break;
        case 'H': //Help
          //Your code here.
          break;
        case 'A': //About
          //Your code here.
          break;
      }
    }
    #endregion
#Region "Events"

  Private Sub CalcTime(ByVal sender As Object, ByVal e As EventArgs)
    lblYears.Text = (DateTime.Today.Year - dtHire.Value.Year).ToString()
  End Sub

  Private Sub CallEmployees(ByVal sender As Object, ByVal e As EventArgs)
  End Sub

  Private Sub ApplyChanges(ByVal sender As Object, ByVal e As EventArgs)
    Dim p As TabPage
    Dim c As Control

    For Each p In tc1.TabPages
      For Each c In p.Controls
        c.Enabled = False
      Next
    Next
    cmdEdit.Enabled = True
    cmdOK.Enabled = False
    cmdCancel.Enabled = False
  End Sub

  Private Sub EditFields(ByVal sender As Object, ByVal e As EventArgs)
    Dim p As TabPage
    Dim c As Control

    For Each p In tc1.TabPages
      For Each c In p.Controls
        c.Enabled = True
      Next
    Next
    cmdEdit.Enabled = False
    cmdOK.Enabled = True
    cmdCancel.Enabled = True
  End Sub

  Private Sub ToolBarHandler(ByVal sender As Object, _
                             ByVal e As ToolBarButtonClickEventArgs)
    Select Case (CType(e.Button.Tag, Char))
      Case "N"c 'New
        'Your code here.
      Case "S"c 'Save
        'Your code here.
      Case "D" 'Delete
        'Your code here.
      Case "X" 'Exit
        Me.Close()
      Case "P" 'Previous
        'Your code here.
      Case "E" 'Next
        'Your code here.
      Case "H" 'Help
        'Your code here.
      Case "A" 'About
        'Your code here.
    End Select

  End Sub

  Private Sub MenuHandler(ByVal sender As Object, ByVal e As EventArgs)
    Dim m As MenuItem
    If (sender.GetType Is GetType(MenuItem)) Then
      m = CType(sender, MenuItem)
    Else
      Return
    End If

    Select Case m.Mnemonic
      Case "N" 'New
        'Your code here.
      Case "S 'Save"
        'Your code here.
      Case "D" 'Delete
        'Your code here.
      Case "X" 'Exit
        Me.Close()
      Case "P" 'Previous
        'Your code here.
      Case "E" 'Next
        'Your code here.
      Case "H" 'Help
        'Your code here.
      Case "A" 'About
        'Your code here.
    End Select

  End Sub
#End Region
Let's look at the menu delegate. This is the only one where I test to see if a MenuItem actually called it. Note that the C# code is more straightforward for this task than the VB code.
C#
      MenuItem m;
      if(sender is MenuItem)
        m = (MenuItem)sender;
      else
        return;
VB
      Dim m As MenuItem

      If (sender.GetType Is GetType(MenuItem)) Then
        m = CType(sender, MenuItem)
      Else
        Return
      End If
The C# code is easy to read in that it just asks the system: "Is the sender a MenuItem?" The VB code needs to explicitly check object types by using a method of one object and a .NET native method to get the type of a built-in object. Also note the type change. If I am to work with the methods and properties of an object, .NET must know what that object is. Changing type in C# is (to my mind) easier than in VB.
There are two delegates in this section that change the state of the Edit, OK, and Cancel buttons. Perhaps I should explain why you need to enable or disable these buttons at all. Basically it is to prevent the user from doing anything he or she should not be able to do.
At start-up, all the controls on the tab pages are disabled. This means that the user cannot make any changes. Because the user cannot make changes, there is no point in allowing the user to click OK or Cancel. This eliminates any sanity-checking code in the delegates that determine if the user should even be here. This has advantages to you in that potential bugs are fewer. It also has advantages for the user in that the user knows he or she cannot click OK or Cancel because those options are grayed-out. This is called "leading the user by the nose."
The user must click the Edit button to enable the controls for editing. Doing this also enables the Cancel and OK buttons, and at the same time disables the Edit button. After all, the user knows he or she is editing the record; there is no reason to allow the user to click it twice in the same session. Again, this eliminates potential bugs and state variables. Once the user clicks the OK or Cancel button, the screen reverts to its normal view-only mode.
This kind of user interface programming is quite common in database applications. Opening a database as read-only is much easier and faster than opening it up as read/write. Also, read/write involves record locking which, if not necessary, can cause program slowdowns.
It is always best to make sure that the user explicitly knows what he or she is doing. By clicking the Edit button, the user knows he or she is editing the record. The user is not allowed to leave the record until the edit is complete, either by clicking OK or Cancel.
Now, can you find the bug in these two routines? It is actually a problem of omission. I do not disable the buttons that allow the user to change records. These buttons, menu choices, and toolbar buttons relating to changing the record should all be disabled while the record is being edited. Either that or you should include code that notifies the user of unsaved changes when a record is changed without explicitly saving it.
Here is another point about the difference between C# and VB syntax. Consider the following lines of code.
C#
      foreach (TabPage p in tc1.TabPages)
      {
        foreach (Control c in p.Controls)
        {
          c.Enabled = true;
        }
      }
VB
      Dim p As TabPage
      Dim c As Control

      For Each p In tc1.TabPages
        For Each c In p.Controls
          c.Enabled = False
        Next
      Next
Notice the similarities. Both code snippets do the same thing using the same .NET constructs. However, the C# code is a little more compact in that you are able to (in fact, you must) declare and use a variable within the foreach clause. VB does not allow this; the variable must be declared on a separate line before use.
Notice that the CallEmployees delegate is empty. This delegate is used to call up the Employees form. You will fill this in later when I go over the second form.
Try compiling and running this project. Your initial form when running should look like the one shown in Figure 2-9.

Select each tab and you will see all the controls are disabled. Now click the Edit button and your form should look like Figure 2-10.
Notice that all the editable controls are enabled. Also notice that the OK and Cancel buttons are enabled, but the Edit button is not.
Start tabbing through the form as it is and the tab order will make sense. Even though many of the controls on the tab control have the same tab order index, only those at the top of the z-order (in this case, the first tab page) are being tabbed through. You now have a working employee record editing form. There is one last thing to add to this project, though: a shortcut to editing any record you want. You can do this via the search buttons next to the Employee Name and Clock Number fields.
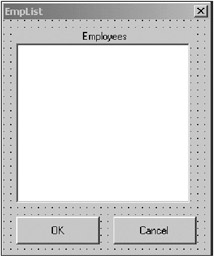
Now it is time to add a second form. This new form will be called up when the user clicks the cmdListByEmp and cmdListByNum buttons. These two buttons are used as a speedy way to call up a particular employee either by name or clock number. To set up the employee list form, follow these steps:
Make this form a fixed dialog box with no minimize or maximize buttons showing. Also make it start in the center of the screen.
Add a label to this screen whose text is centered and reads Employees.
Add a ListView control to the form called lstEmps.
Add a Button called cmdOK whose text reads OK.
Add a Button called cmdCancel whose text reads Cancel.
That's it for this form. It is pretty simple, as you can see from Figure 2-11.
Now it is time to add code to this form. The code is short enough to show here in its entirety. Listings 2-4a and 2-4b show the complete code for the EmpList form.
using System;
using System.Drawing;
using System.Collections;
using System.ComponentModel;
using System.Windows.Forms;

namespace PowerUser_c
{
  public class EmpList : System.Windows.Forms.Form
  {
    private System.Windows.Forms.Button cmdOK;
    private System.Windows.Forms.Label label1;
    private System.Windows.Forms.Button cmdCancel;
    private System.Windows.Forms.ListView lstEmps;

    private System.ComponentModel.Container components = null;

    #region class local variables

    string[,] Employees = new string[,] {{"Person A", "500"},
                                        {"Person B", "502"},
                                        {"Person C", "501"},
                                        {"Person D", "503"}};

    #endregion

    public EmpList( bool ByEmployee )
    {
      InitializeComponent();
      cmdOK.Click += new EventHandler(this.UnloadMe);
      cmdCancel.Click += new EventHandler(this.UnloadMe);
      lstEmps.Items.Clear();
      lstEmps.View = View.Details;
      lstEmps.GridLines = true;
      lstEmps.FullRowSelect = true;
      lstEmps.Sorting = SortOrder.Ascending;
      lstEmps.Scrollable = true;

      //Add column headers
      lstEmps.Columns.Add(ByEmployee ? "Name" : "Clock #", -2,
                          HorizontalAlignment.Center);
      lstEmps.Columns.Add(ByEmployee ? "Clock #" : "Name", -2,
                          HorizontalAlignment.Center);

      //Add some people
      for(int k=0; k<Employees.GetLength(0); k++)
      {
        ListViewItem main = new ListViewItem(Employees[k, ByEmployee ? 0 : 1]);
        main.SubItems.Add(Employees[k, ByEmployee ? 1 : 0]);
        lstEmps.Items.Add(main);
      }
      lstEmps.ColumnClick += new ColumnClickEventHandler(this.ChangeSortOrder);
    }

    protected override void Dispose( bool disposing )
    {
      if( disposing )
      {
        if(components != null)
        {
          components.Dispose();
        }
      }
      base.Dispose( disposing );
    }

    #region Windows Form Designer generated code
...
...
...
    #endregion

    private void EmpList_Load(object sender, System.EventArgs e)
    {
    }

    private void UnloadMe(object sender, EventArgs e)
    {
      this.Close();
    }

    private void ChangeSortOrder(object sender, ColumnClickEventArgs e)
    {
      if(lstEmps.Sorting == SortOrder.Ascending)
        lstEmps.Sorting = SortOrder.Descending;
      else
        lstEmps.Sorting = SortOrder.Ascending;
    }
  }
}
Public Class EmpList
    Inherits System.Windows.Forms.Form

#Region "class local variables"

   dim Employees(,) as string = new string(,) {{"Person A", "500"}, _
                                         {"Person B", "502"}, _
                                         {"Person C", "501"}, _
                                         {"Person D", "503"}}

#End Region

#Region " Windows Form Designer generated code "

  Public Sub New(ByVal ByEmployee As Boolean)
    MyBase.New()

    InitializeComponent()

    AddHandler cmdOK.Click, AddressOf UnloadMe
    AddHandler cmdCancel.Click, AddressOf UnloadMe

    lstEmps.Items.Clear()
    lstEmps.View = View.Details
    lstEmps.GridLines = True
    lstEmps.FullRowSelect = True
    lstEmps.Sorting = SortOrder.Ascending
    lstEmps.Scrollable = True

    'Add column headers
    lstEmps.Columns.Add(IIf(ByEmployee, "Name", "Clock #"), -2, _
                            HorizontalAlignment.Center)
    lstEmps.Columns.Add(IIf(ByEmployee, "Clock #", "Name"), -2, _
                            HorizontalAlignment.Center)

    'Add some people
    Dim k As Int32
    For k = 0 To Employees.GetLength(0) - 1
      Dim main As ListViewItem = _
               New ListViewItem(Employees(k, IIf(ByEmployee, 0, 1)))
      main.SubItems.Add(Employees(k, IIf(ByEmployee, 1, 0)))
      lstEmps.Items.Add(main)
    Next
      AddHandler lstEmps.ColumnClick, AddressOf ChangeSortOrder

    End Sub

...
...
...
#End Region

  Private Sub EmpList_Load(ByVal sender As System.Object, _
                           ByVal e As System.EventArgs) Handles MyBase.Load

  End Sub

  Private Sub UnloadMe(ByVal sender As Object, ByVal e As EventArgs)
    Me.Close()
  End Sub

  Private Sub ChangeSortOrder(ByVal sender As Object,
                              ByVal e As ColumnClickEventArgs)
    If (lstEmps.Sorting = SortOrder.Ascending) Then
      lstEmps.Sorting = SortOrder.Descending
    Else
      lstEmps.Sorting = SortOrder.Ascending
    End If
  End Sub

End Class
Now that you have entered this code, you will need to go back to the main form and fill in the CallEmployees function.
C#
    private void CallEmployees(object sender, EventArgs e)
    {
      Button b = (Button)sender;

      EmpList frm = new EmpList((bool)b.Tag);
      frm.ShowDialog();
    }
  Private Sub CallEmployees(ByVal sender As Object, ByVal e As EventArgs)
    Dim b As Button = CType(sender, Button)

    Dim frm As EmpList = New EmpList(CType(b.Tag, Boolean))
    frm.ShowDialog()
  End Sub
I use the same form when the user clicks either of the two search buttons located on the first form. What I want to do is to allow sorting of the employee list either by name or by clock number. I could use two forms but that is a waste. An object-oriented approach would be better.
Programmers who work in C++ have always had access to overloaded methods. VB programmers have not. I am betting, though, that even though the majority of VB programmers may not know about overloading, they wish they had it.
In short, overloading methods means that you can have more than one function with the same name but with different arguments. The classic example here is adding two numbers. In VB 6.0, if you wanted to add two longs and also add two singles, you would need two functions. One would be called AddLong with long integer arguments. The other would be called AddSingle with single type arguments.
Wouldn't it be better to have a single method called Add that took either type of argument? Overloading allows you to do that. You can have a method called Add that takes longs, and another method called Add that takes floats. This is called polymorphism, and it's a big part of object-oriented programming.
VB 6.0 programmers, rejoice! You can now overload functions.
One of the methods in a class that you can overload is the constructor. In C# the constructor is defined as having the same name as the class. In VB .NET the constructor is defined as having the name "New". Because constructors can be overloaded, this means that they can take arguments. This is very important in .NET. Look at the help for the Bitmap class. It has 12 overloaded constructors. I dare say that most of the classes in .NET have more than one constructor. And, hey, if they can do it, why shouldn't you?
This form has a single constructor, but it does have arguments. The argument denotes how the form should appear and how the sorting should happen. If the user clicks the button next to the employee's name, then the list is shown and sorted by employee. If the user clicks the button next to the clock number, then the list is shown and sorted by clock number.
Notice that I have a delegate assigned to the column header click event. This allows me to change the sort order every time the user clicks the column header. It does not matter which header is clicked, I still sort according to the first column. There is nothing explicit that says this is what will happen, and the novice user will probably not know this is available. The power user, however, will have seen this trick in another program and will expect it here.
It is very important to include as many common power-user tricks as possible in your data entry program. I have said it before, but these little things that allow the user to speed his or her way through your program will make the program a success.
So how would you improve this form? I can think of a few things that I would add to a professional program:
Allow the user to move columns.
Make the first column the sort column. If another column is moved here, then the list is re-sorted according to that column.
Allow the user to print a quick columnar report based on the column setup and sort order the user created in this form.
You can implement these improvements fairly easily. The .NET help is pretty comprehensive and is much better than previous versions.
There are a whole host of things that you can add to this example to make it a real program. But, of course, I leave the coding up to you.