The last section dealt with making your program accessible to the international market. But what about making your program accessible to people with disabilities? This section touches on this subject as it relates to data entry screens. This topic deserves a more thorough treatment, though, and I recommend you research it further through the numerous books and Web sites devoted to the subject.
If you are running Windows, you will be able to change how your program works via the Accessibility Options area in the Control Panel. You can enable such features as StickyKeys, which enables you to use the Ctrl, Alt, or Shift key combinations by typing one key at a time. You can also enable a visual cue based on sound alerts.
The Windows accessibility options apply systemwide. What can you do to make your program more accessible? Here are some general guidelines to help you along:
Allow the user to change to a larger font programwide if desired.
Keep control clutter to a minimum. Do not overload screens with as many controls as you can fit on them.
Keep the program flow simple and logical.
Group data logically and keep related data in one place.
Use color and shading to emphasize important parts of the screen.
If you are writing for children, be cognizant of the text you use. Keep things simple.
Consider programming for low-resolution screens for those with visual impairments.
Allow the user to assign sounds to certain actions. This is easy to do programmatically.
These general guidelines apply to accessibility, but they also make sense for most regular programming tasks.
The controls in .NET allow you to present accessibility information to any accessible client. What do I mean by this? Suppose you have a text-to-speech processor. As the user moves his or her mouse over the screen, the computer indicates what control the user's mouse is currently hovering over and what the control means. Now, this is easy for something like a TextBox that has a Text property, but what about a picture?
Four properties and one object deal with accessibility in any control. The properties are as follows:
AccessibleDefaultActionDescription
AccessibleDescription
AccessibleName
AccessibleRole
The descriptions are strings that you can assign to a control that can be read by accessibility clients. These strings could be something like "This button exits the program." The name could be something like "Exit Button."
The AccessibleRole property is an enumeration that describes what the control is. This role is a bit more than just the .NET name of the control. For instance, for a PictureBox, I would choose AccessibleRole.Graphic. For a RichTextBox, I would choose AccessibleRole.Document. Are you starting to get the idea here? These properties allow you to provide meaningful information to an accessible client (such as a text-to-speech processor) so it can help the user to work with your program.
Each control can also be assigned an AccessibleObject. This object has quite a few more properties and methods to help you provide more information to the user.
The example I present in this section will give you an idea how an accessibility client can get information about your data entry program. You need to first make sure that you fill in all the pertinent information for the AccessibleRole property and the AccessibleDescription property at a minimum. If you take the time to put this information in each of your controls, you enable an accessibility client to provide an alternate method of relaying information about the control to the user.
This example has two forms. One is a main form that has a few controls on it. You can pretend that this is your complicated data entry form. The second form is an accessibility client. You can pretend that because the user has enabled accessibility for your program, this form has popped up to help the user along.
Start out with a new VB or C# project. Mine is called "Accessibility." You will need to perform the following steps to get going:
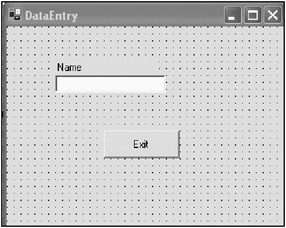
Place a Button on the form whose text reads Exit.
Place a Label on the form whose text reads Name.
Place a TextBox under the Label.
This is it for controls on this form. It is enough to show you what goes on. Figure 3-18 shows this form.
Click the Exit button and in the Properties window choose PushButton for the AccessibleRole. Type in Program Exit Button for the AccessibleDescription. Figure 3-19 shows the Properties window.

Click the TextBox and choose Text for the AccessibleRole and type in Name of Employee for the AccessibleDescription. Leave the AcessibleRole for the Label as is.
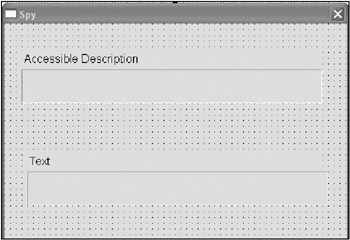
Now add a new Windows form to the project called "Spy." Add the following controls:
Add a Label whose text reads Accessible Description. Make the font Arial, 12 points.
Below the Accessible Description label add another Label called lblDesc. Change its border style to Fixed3D and its font to Arial, 30 points.
Add a Label whose text reads Text. Make the font Arial, 12 points.
Below the Text label add another Label called lblText. Change its border style to Fixed3D and its font to Arial, 30 points.
Add a reference to the Microsoft.VisualBasic runtime DLL (C# only).
Your Spy form should look like the one shown in Figure 3-20.
Add the following code to your Spy form.
C#
    private void Spy_Load(object sender, System.EventArgs e)
    {
      //This precludes menus because a menu is a component
      foreach(Control c in this.Owner.Controls)
      {
        c.MouseEnter += new EventHandler(this.AccessibleEnter);
        c.MouseLeave += new EventHandler(this.AccessibleLeave);
      }

    }

    private void AccessibleEnter(object sender, EventArgs e)
    {
      Control c;
      //This precludes menus. You can include menus if you like
      //by testing for a component.
      if(sender is Control)
        c = (Control)sender;
      else
        return;

      //Don't bother with incidental controls
      if(c.AccessibleRole == AccessibleRole.Default)
        return;

      //Yes, folks, you can use VB commands inside C#
      Microsoft.VisualBasic.Interaction.Beep();

      lblDesc.Text = c.AccessibleDescription;
      lblText.Text = c.Text;
    }

    private void AccessibleLeave(object sender, EventArgs e)
    {

      lblDesc.Text = "";
      lblText.Text = "";
    }
VB
  Private Sub Spy_Load(ByVal sender As System.Object, _
                       ByVal e As System.EventArgs) Handles MyBase.Load

    'This precludes menus because a menu is a component
    Dim c As Control
    For Each c In Me.Owner.Controls
      AddHandler c.MouseEnter, AddressOf AccessibleEnter
      AddHandler c.MouseLeave, AddressOf AccessibleLeave
    Next

  End Sub

  Private Sub AccessibleEnter(ByVal sender As Object, ByVal e As EventArgs)
    Dim c As Control

    'This precludes menus. You can include menus if you like
    'by testing for a component.
    'I cannot test for lineage like in C#
    c = CType(sender, Control)

    'Don't bother with incidental controls
    If c.AccessibleRole = AccessibleRole.Default Then
      Return
    End If

    Beep()

    lblDesc.Text = c.AccessibleDescription
    lblText.Text = c.Text
  End Sub

  Private Sub AccessibleLeave(ByVal sender As Object, ByVal e As EventArgs)

    lblDesc.Text = ""
    lblText.Text = ""
  End Sub
Now go back to the main form and add the following code.
C#
    #region class local variables

    Spy SpyForm;

    #endregion

...
...
...

    private void Form1_Load(object sender, System.EventArgs e)
    {
      SpyForm = new Spy();
      SpyForm.Owner = this;

      SpyForm.Show();
    }
  Private SpyForm As Spy

  Private Sub dataentry_Load(ByVal sender As System.Object, _
                             ByVal e As System.EventArgs) Handles MyBase.Load
    SpyForm = New Spy()
    SpyForm.Owner = Me

    SpyForm.Show()
  End Sub
Run the project and move your mouse over the controls on the main form. The Spy form should pick this up and give you information about each of the controls on the main form. I used large fonts on the Spy form to help people with visual disabilities.
As you move your mouse over the main form, notice that you are not spying on the Label. Let's look at the code.
The main form instantiates the Spy form and gives it a reference back to itself through the Owner property of the Spy form. Once the Spy form is instantiated I scan the main form for all controls. I then chain a delegate to the MouseEnter and MouseLeave events of each control. The code for this is as follows:
    //This precludes menus because a menu is a component
    foreach(Control c in this.Owner.Controls)
    {
      c.MouseEnter += new EventHandler(this.AccessibleEnter);
      c.MouseLeave += new EventHandler(this.AccessibleLeave);
    }
The code is pretty simple but very effective. The MouseEnter delegate detects the AccessibleRole and shows the Accessible properties on the screen, as shown here:
    private void AccessibleEnter(object sender, EventArgs e)
    {
      Control c;

      //This precludes menus. You can include menus if you like
      //by testing for a component.
      if(sender is Control)
        c = (Control)sender;
      else
        return;

      //Don't bother with incidental controls
      if(c.AccessibleRole == AccessibleRole.Default)
        return;

      //Yes, folks, you can use VB commands inside C#
      Microsoft.VisualBasic.Interaction.Beep();

      lblDesc.Text = c.AccessibleDescription;
      lblText.Text = c.Text;
    }
This is how I ignore the Label on the main form. It has an AccessibleRole of Default.
When I wrote the C# code for this example, I wanted to sound a beep whenever I entered a control. After spending about 30 seconds looking for a C# Beep command, I decided to use the VB one.
| Tip |
It is not well known that C# programmers can use VB commands if they have a reference to the VB runtime DLL. You will most often use this technique to access the VB string manipulation commands. |
Figure 3-21 shows this program in action.
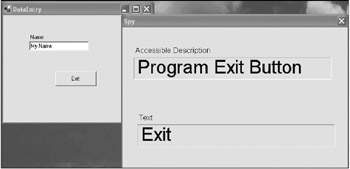
As you can see, it does not take much effort to make the main program (your data entry program) accessible for disabled users. I think the Spy program is kind of neat, and I can see all kinds of ways to make it much better.