I guess the first place to start with this topic is design. I have localized many programs after the fact, and quite a few of them needed some major cosmetic surgery. This is mainly due to the differences in the size of a string from one language to another. In general, a control that holds a text string needs to be about twice as long as it normally would. For example, if you have a label on a form whose text reads "Employee Form," it needs to be sized so it can hold 26 letters instead of just 13. This is because in general you need twice as many letters for a string in another language as you do in English. Table 3-1 shows approximately how much a string will grow when translated.
|
English |
Other Language |
|---|---|
|
1 to 5 |
100% |
|
6 to 20 |
70% |
|
20 to 50 |
30% |
|
> 50 |
15% |
I suppose I could be cynical in analyzing this table by saying that English is terse when using few words, but it is long-winded when speaking volumes. Anyway, I have found that in general this is true.
Internationalizing your program requires that you make the label (or text) longer than normal. Your program may not look as tight graphically when you leave room for internationalization, but it will not have clipped and wrapped text when it is translated, either. If you do not plan correctly, your program could look like a complete mess when you add another language.
Before I get into the specifics of how to localize a program, I first need to go over how to identify your locale. For the purposes of this book, a "locale" is the same as the "culture."
There are two ways to identify a culture. The first is by the language and the country/region. .NET follows International Organization for Standardization (ISO) standards to identify a culture. The language code is a two-letter identifier derived from the ISO 639-1 standard. The region code, which is also a two-letter identifier, is derived from the ISO 3166 standard. The whole ID for a culture is written, for instance, as "es-ES" for Spanish used in Spain or as "en-US" for English used in the United States.
The second way to identify a culture is by the locale identifier (LCID). The LCID is a number that is made up of a primary language identifier, a sublanguage identifier, and a sort order.
You will use both forms of culture identification whenever you deal with localization.
.NET has the capability to create many versions of the same form. Which version gets displayed depends upon the current thread's CultureInfo setting. I know I have not covered CultureInfo yet, but hang on.
This is a really neat and little-known feature of Windows forms. I like this feature for some reasons and dislike it for others. Here are the pros and cons as I see them.
Pros:
You can tailor all forms to a particular culture.
You can insert the correct text in the correct language at design time.
You can rearrange a form's controls for different cultures at design time.
The process can be unmanageable if many cultures are to be supported.
The forms may look different between cultures, which makes them harder to support (there is no common interface).
So how does this feature work? Start a new project in either C# or VB. Add some controls to the form so that it looks like the one shown in Figure 3-6.
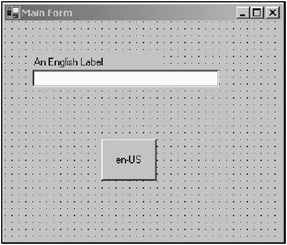
As you can see, there is not much here. Now for the fun part. Go into the Properties screen of the form and change the Localizable property to true. While you are at it, change the Language property to English (United States). See Figure 3-7.
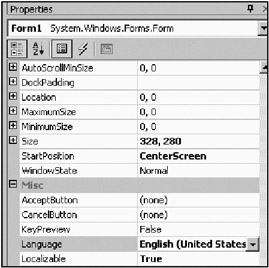
When you changed the Language property, you got a chance to see that .NET supports literally dozens of cultures. Microsoft really did a thorough job with the internationalization features.
You still see what is shown in Figure 3-7. That's fine.
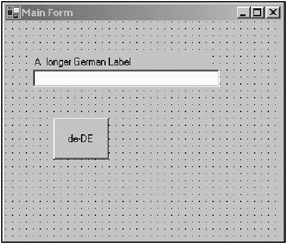
Now change the language to German (Germany). Go to the form, change some of the text, and move the Button over to the left a little. Your form should now look something like the one shown in Figure 3-8.
OK, what now? Compile and run the program. You should see the English form (assuming that this is how your computer is set up).
How do you show one form over the other? Go into the code of the form and before the InitializeComponent call in the constructor, type in the following lines.
C#
    Thread.CurrentThread.CurrentUICulture = new CultureInfo("de-DE");
    Thread.CurrentThread.CurrentCulture = new CultureInfo("de-DE");
VB
    Thread.CurrentThread.CurrentUICulture = new CultureInfo("de-DE")
    Thread.CurrentThread.CurrentCulture = new CultureInfo("de-DE")
What this does is change the culture of the current thread from English (assuming it was originally that) to German. You will see on the screen the German version of the form.
Cool! How did that happen?
When you create a form and its Localizable property is set to false, the string that you give to a control's Text property is hard-coded directly into the InitializeComponent method that is generated by the IDE wizard. I am sure you have seen this when digging through .NET code already.
As soon as you set the Localizable property of the form to true and choose a language, things change. Behind the scenes, .NET creates a resource file and puts the string in there. The InitializeComponent method no longer has hard-coded strings. Instead, it uses the Resources.GetString method to extract the string from the resource file.
When I told you to type in the code to change the culture, I said to put it before the InitializeComponent call. If you put this code after the call, you will not see the German version of the form. This is because the resource file that the Resources.GetString method uses is tied to the current culture of the thread you are working in.
So, you may ask, where are these resource files?
Go to the Solution Explorer window and click the Show All Files icon. You will see the resource files appear under the Form1.cs entry, as shown in Figure 3-9.

Notice the name of the files. They are named after the official designation for the languages/regions that you chose: English and German.
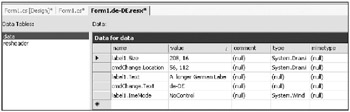
Want to change the label text for the German form? Double-click the Form1.de-DE.resx file. You should see the resource editor screen shown in Figure 3-10.
Pretty neat, huh? I am sure you are burning to know where these files are stored. If you know that, you can open them with a text editor such as Notepad and try to figure out the format. I will tell you all that and more next.
Resource files come in three flavors: binary, text, and XML. Yes, I know XML is text, but if you have ever read XML, you know it is not anything the casual observer can digest.
Externalizing resources means that all pictures, cursors, fonts, and strings should be stored in a resource file. Most people think of only strings as needing to be externalized. You have to be very careful about pictures, though. Many cultures other than English may find some common icons confusing or even offensive. You need to do some research and find out what is appropriate.
On the confusing front, suppose you are in England writing a shipping and receiving program of some kind. You could have a toolbar with an icon showing a pillar box. Now, in the United States, very few people know what a pillar box is; thus, they would be confused by the picture. A pillar box is a British mailbox. Figure 3-11 shows these two different icons for the same device side-by-side.
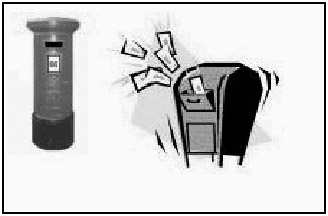
The point here is that if you externalize this icon to a resource file, you will be able to put a different icon in each resource file. This allows you to change the look of your program without changing any code at all.
The basic resource file is the text resource file. It has the name <program name>.txt. You can include only strings in the text resource file. You can create a text resource file with Notepad. The format is like this:
EXIT            = Exit
FILE            = File
OPEN            = Open
QUIT            = Quit
TEXT            = Text
SAVE            = Save
CREATE TEXT     = Create Text file for translator
CREATE XML      = Create XML file
Each resource is in the form of a key/value pair.
This type of resource file is not very useful, because it can contain only strings. It cannot contain objects such as pictures, cursors, fonts, and so forth. These are the purview of XML and binary resource files.
This resource file has the name <program name>.resx. Hey! Isn't that the extension of the resource files for the previous German/English form example? Yup. The editor you see is an XML resource file editor provided by .NET. This type of file looks like this:
<?xml version="1.0" encoding="utf-8"?>
<root>
  <xsd:schema id="root" targetNamespace="" xmlns=""
 xmlns:xsd=http://www.w3.org/2001/XMLSchema
 xmlns:msdata="urn:schemas-microsoft-com:xml-msdata">
    <xsd:element name="root" msdata:IsDataSet="true">
      <xsd:complexType>
        <xsd:choice maxOccurs="unbounded">
          <xsd:element name="data">
            <xsd:complexType>
              <xsd:sequence>
                <xsd:element name="value" type="xsd:string"
 minOccurs="0" msdata:Ordinal="1" />
                <xsd:element name="comment" type="xsd:string"
 minOccurs="0" msdata:Ordinal="2" />
             </xsd:sequence>
             <xsd:attribute name="name" type="xsd:string" />
             <xsd:attribute name="type" type="xsd:string" />
             <xsd:attribute name="mimetype" type="xsd:string" />
           </xsd:complexType>
         </xsd:element>
         <xsd:element name="resheader">
           <xsd:complexType>
             <xsd:sequence>
               <xsd:element name="value" type="xsd:string"
minOccurs="0" msdata:Ordinal="1" />
              </xsd:sequence>
              <xsd:attribute name="name" type="xsd:string" use="required" />
            </xsd:complexType>
          </xsd:element>
        </xsd:choice>
      </xsd:complexType>
    </xsd:element>
  </xsd:schema>
  <data name="APPEND">
    <value>Append</value>
  </data>
  <data name="BASICS">
    <value>Basics</value>
  </data>
  <data name="OUTPUT">
    <value>Build Output File(s)</value>
  </data>
  <data name="RESKEY">
    <value>Resource Key</value>
  </data>
  <data name="REMOVE">
    <value>Remove</value>
  </data>
  <data name="BASE NAME">
    <value>Base Name</value>
  </data>
  <data name="RESTEXT">
    <value>Resource Text</value>
  </data>
  <data name="ADD">
    <value>Add</value>
  </data>
  <data name="KEY">
    <value>Key</value>
  </data>
  <data name="FINAL">
    <value>Final</value>
  </data>
  <data name="PICTURES">
    <value>Pictures</value>
  </data>
  <data name="COMMENT">
    <value>Comment</value>
  </data>
  <data name="INPUT FNAME">
    <value>Input Filename</value>
  </data>
  <data name="CULTURE">
    <value>Choose Culture</value>
  </data>
  <data name="PIC COUNT">
    <value>Picture Count</value>
  </data>
  <data name="DATA ERR">
    <value>Data Table was not defined</value>
  </data>
  <data name="STRING COUNT">
    <value>String Count</value>
  </data>
  <data name="EXIT">
    <value>Exit</value>
  </data>
  <data name="FILE">
    <value>File</value>
  </data>
  <data name="OPEN">
    <value>Open</value>
  </data>
  <data name="QUIT">
    <value>Quit</value>
  </data>
  <data name="TEXT">
    <value>Text</value>
  </data>
  <data name="SAVE">
    <value>Save</value>
  </data>
  <data name="CREATE TEXT">
    <value>Create Text file for translator</value>
  </data>
  <data name="CREATE XML">
    <value>Create XML file</value>
  </data>
  <data name="CREATE BIN">
    <value>Create Binary File</value>
You can read it if you really try. This is only part of the resource file. The rest contains a text representation of a picture. Pretty neat if you ask me.
Describing XML is beyond the scope of this book, but you should become very familiar with it. .NET uses XML extensively for many things. XML is even used to replace COM in client/server applications.
This file has the name format of <program name>.resources. It is not a file that you can create directly like the XML file or the text file. It is a compiled version of these two types of files.
| Note |
You can create this binary resource file directly using code. My localization book has an extensive example of how to do this. Look at the online help for the ResXResourceWriter class if you are interested. |
The .resources file is actually an intermediate step along the way to creating a satellite resource DLL assembly.
So where are these resource files, how do you make them, and how do you get information out of them? You can make resource files either via the IDE or by hand. I recommend the by-hand method for string resource files for this reason: If you use the IDE to make and edit a resource file, it will be an XML resource file. Most companies do not have the resources to translate a program internally. This means that you will need to send out your resource file to a translation company, which will know nothing about XML.
If you make a text resource file and send it out, it is easy to read and translate. Later on, you can combine the text resource file with the XML resource file to create a single XML or binary resource file.
There is a .NET utility that you should become familiar with called ResGen.exe. It allows you to convert a resource file to and from any of its three forms. It also allows you to perform batch processing and combine several resource files into one. This last part is important when you have an XML file that contains pictures and a text-based resource file that contains the strings.
| Tip |
The online help explains very well how to use ResGen.exe.. |
In order for .NET to properly use your resource files, the files must be in the form of a satellite assembly. This is a DLL. Getting the .resources binary file to a DLL is easy. You use the external program AL.exe. Like the ResGen.exe program, the AL.exe program and satellite assemblies are covered pretty well in the online help.[3]
.NET uses a fallback mechanism to locate resources. Here is how it works:
Look in the <language>-<country/region> subdirectory.
Look in the <language> subdirectory.
Look in the assembly itself.
Throw an error.
The folks at Microsoft have tried to make the process of finding resources as error-free as possible. If .NET cannot find a resource in one place, it looks in another and on down the line until it has exhausted all possibilities. Normally, your program will include an embedded resource file that contains all the resources for the program's native language. Because all native strings are here, the program should at least find the base untranslated string. This fallback method works very well.
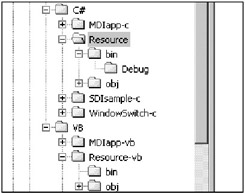
Open up Windows Explorer and look in the directory where your last example resides. This is the one that has the German and English screens. If you expand your directory structure, you will see something like the structure shown in Figure 3-12.

Look in each of these directories and you will find a single file called WindowSwitch-c.resources.dll (this is the name of my file, which is based on the name of my program). This file is the satellite resource file.
Notice the names of the directories. They correspond to the the steps in the fallback scheme.
Obviously, when you release your program it will not have the intervening Bin and Debug directories, so make sure that the resource directories are located directly under the program directory.
If you want to add another language to your program, just make another DLL and create another resource directory to hold it. If the user's computer is changed to the new language, .NET will automatically find the new resource file and you are good to go.
Once you changed the Localizable property of the form to true and added another language, the .NET wizard went ahead and changed the wizard-generated code on you. Open up the code pane for this example and look in the wizard-generated code section. The following is the code that the wizard generated for the label.
C#
    //
    // label1
    //
    this.label1.AccessibleDescription =
              ((string)(resources.GetObject("label1.AccessibleDescription")));
    this.label1.AccessibleName =
              ((string)(resources.GetObject("label1.AccessibleName")));
    this.label1.Anchor = ((System.Windows.Forms.AnchorStyles)
                                     (resources.GetObject("label1.Anchor")));
    this.label1.AutoSize = ((bool)(resources.GetObject("label1.AutoSize")));
    this.label1.Dock = ((System.Windows.Forms.DockStyle)
                                 (resources.GetObject("label1.Dock")));
    this.label1.Enabled = ((bool)(resources.GetObject("label1.Enabled")));
    this.label1.Font =
               ((System.Drawing.Font)(resources.GetObject("label1.Font")));
    this.label1.Image =
               ((System.Drawing.Image)(resources.GetObject("label1.Image")));
    this.label1.ImageAlign = ((System.Drawing.ContentAlignment)
                                   (resources.GetObject("label1.ImageAlign")));
    this.label1.ImageIndex = ((int)(resources.GetObject("label1.ImageIndex")));
    this.label1.ImeMode = ((System.Windows.Forms.ImeMode)
                                    (resources.GetObject("label1.ImeMode")));
    this.label1.Location = ((System.Drawing.Point)
                                    (resources.GetObject("label1.Location")));
    this.label1.Name = "label1";
    this.label1.RightToLeft = ((System.Windows.Forms.RightToLeft)
                  (resources.GetObject("label1.RightToLeft")));
    this.label1.Size =
                  ((System.Drawing.Size)(resources.GetObject("label1.Size")));
    this.label1.TabIndex = ((int)(resources.GetObject("label1.TabIndex")));
    this.label1.Text = resources.GetString("label1.Text");
    this.label1.TextAlign = ((System.Drawing.ContentAlignment)
                                  (resources.GetObject("label1.TextAlign")));
    this.label1.Visible = ((bool)(resources.GetObject("label1.Visible")));
What you see here is that all nonstring resources are obtained using the resources.GetObject method. The string is obtained using the resources.GetString method. As a matter of fact, everything about this label is stored in the resource file. That is how the label can move from one form to another. This is very cool and very flexible.
The Globalization namespace contains all the classes you need for localization. I cover the basics of the Globalization namespace here, but you need to know that this namespace is huge. If you start digging into it, you will find that just about anything in .NET can be localized and quite a bit of the localization work is done for you. If you are going to write an international-aware program, you need to spend some quality time with this namespace.
If you want to localize your program, you will need to include three namespaces: System.Globalization, System.Resources, and System.Threading. Including the other two namespaces precludes you from having to fully qualify every method's name. Table 3-2 shows you the classes included in the System.Globalization namespace.
|
Class |
Description |
|---|---|
|
Calendar |
Abstract base class that defines time divisions |
|
CompareInfo |
Allows you to compare strings in a culture-sensitive manner |
|
CultureInfo |
Major class that represents everything about a particular culture |
|
DateTimeFormatInfo |
Represents different time/date formats |
|
DaylightTime |
Defines daylight saving time around the world |
|
GregorianCalendar |
Self-explanatory |
|
HebrewCalendar |
Self-explanatory |
|
HijriCalendar |
Self-explanatory |
|
JapaneseCalendar |
Self-explanatory |
|
JulianCalendar |
Self-explanatory |
|
KoreanCalendar |
Self-explanatory |
|
TaiwanCalendar |
Self-explanatory |
|
ThaiBuddistCalendar |
Self-explanatory |
|
NumberFormatInfo |
Represents different numerical formats, including currency |
|
RegionInfo |
Major class that includes information about a region/country |
|
SortKey |
Defines how strings and so forth are sorted |
|
StringInfo |
Allows you to parse and iterate strings |
|
TextElementEnumerator |
Allows you to enumerate a string |
|
TextInfo |
Contains information about specific writing styles |
I include the System.Threading namespace so that I can get at the current thread's information.
Before I take you through a simple localized project, I wanted to make you aware that you have a few other things to consider.
Earlier I showed you a couple of lines that changed the culture that your program was running in. Normally, your program would detect this from the computer's system settings. Often, you will want to let the user choose the language of his or her choice. It makes your program a little slicker.
You change the current culture through the current thread. You need to create a new culture and assign it to the thread's CurrentUICulture property as follows.
C#
    CultureInfo DE_culture = new CultureInfo("de-DE");
    Thread.CurrentThread.CurrentCulture = DE_culture;
    Thread.CurrentThread.CurrentUICulture = DE_culture;
VB
    Dim DE_culture As CultureInfo = New CultureInfo("de-DE")
    Thread.CurrentThread.CurrentCulture = DE_culture
    Thread.CurrentThread.CurrentUICulture = DE_culture
You could have an array of cultures as a variable. You could let the user choose a language from a menu (built up from this array) to change the displayed strings. If you want to get fancy, you can do a directory search and build up the language list from the resource files that you find. This way, you can download a new language to the host computer, and as soon as you are finished, the program will be able to convert into the new language.
There is one thing you need to do besides changing the thread's culture, though: You need to reinitialize the strings of all the controls. It is a good idea to have a control initialization procedure that you can call to do that.
Here is some sample code I took from one of the chapters of my book Internationalization and Localization Using Microsoft .NET (Apress, 2002). This sample routine initializes the strings and some icons by getting them from a resource file. This code is in C#.
   private void InitStrings()
    {
     ResUtilConsts.rm = new ResourceManager("ResEditor", this.GetType().Assembly);
     sbStatus.Panels[2].Text = DateTime.Now.ToString();
     sbStatus.Panels[1].Width = 100;

     //Tab Pages
     tcResources.TabPages[TEXT_TAB].Text = ResUtilConsts.rm.GetString("TEXT");
     tcResources.TabPages[GRAPHICS_TAB].Text =
ResUtilConsts.rm.GetString("PICTURES");
     tcResources.TabPages[FINAL_TAB].Text = ResUtilConsts.rm.GetString("FINAL");

     //Form Controls
     cmdQuit.Text = ResUtilConsts.rm.GetString("QUIT");
     mnuFile.Text = ResUtilConsts.rm.GetString("FILE");
     mnuOpen.Text = ResUtilConsts.rm.GetString("OPEN");
     mnuAppend.Text = ResUtilConsts.rm.GetString("APPEND");
     mnuExit.Text = ResUtilConsts.rm.GetString("EXIT");

     //do picture tab
     lblPicKey.Text = ResUtilConsts.rm.GetString("KEY");
     lblPictures.Text = ResUtilConsts.rm.GetString("PICTURES");
     cmdAddPic.Text = ResUtilConsts.rm.GetString("ADD");
     cmdDelPic.Text = ResUtilConsts.rm.GetString("REMOVE");

     //Do Final tab
     fraBasics.Text = ResUtilConsts.rm.GetString("BASICS");
     lblInputFname.Text = ResUtilConsts.rm.GetString("INPUT FNAME");
     lblStrCnt.Text = ResUtilConsts.rm.GetString("STRING COUNT");
     lblPicCnt.Text = ResUtilConsts.rm.GetString("PIC COUNT");
     lblCulture.Text = ResUtilConsts.rm.GetString("CULTURE");
     fraOutput.Text = ResUtilConsts.rm.GetString("OUTPUT");
     lblBaseName.Text = ResUtilConsts.rm.GetString("BASE NAME");
     cmdSave.Text = ResUtilConsts.rm.GetString("SAVE");
     chkCreateText.Text = ResUtilConsts.rm.GetString("CREATE TEXT");
     chkCreateXML.Text = ResUtilConsts.rm.GetString("CREATE XML");
     chkCreateBin.Text = ResUtilConsts.rm.GetString("CREATE BIN");

     this.Icon = (Icon)ResUtilConsts.rm.GetObject("Flag");
}
People in the United States write the date as month/day/year. The rest of the world does it differently. This has major ramifications for data entry programs. If you only allow a person to input date values in mm/dd/yyyy format, you will get errors when someone in England puts in a birth date of 23/08/68. Make sure your validation code handles this.
Of course, along with the date there is time. Again, the United States is different from the rest of the world. People in the United States use AM/PM to denote the noontime crossover. Most of the rest of the world uses what Americans call military time. This is based on a 24-hour clock. So a time of 3:15 PM in the United States is 15:15:00 everywhere else.
Again, your ability to handle time is very important. This is why you should always display dates and time using either the DateTimeFormatInfo specifiers (see the online help) or the methods provided by the DateTime class.
The DateTime class has several methods that format the output of date and time for you:
ToShortDateString
ToShortTimeString
ToLongTimeString
ToLongDateString
You will find the actual specifier for how these dates and times look by clicking the Start button and selecting Settings ![]() Control Panel
Control Panel ![]() Regional Options.
Regional Options.
What about input of dates and times? The answer to that is to use either the provided DateTime picker control, the Calendar control, or some kind of MaskedEdit control. The less freedom that the user has to enter wrong information, the better off you are. The DateTimePicker and Calendar controls are both culture sensitive.
The DateTimePicker normally takes its format information from the system settings. Changing the current thread's culture does not change the way this control displays data. There is a way to do this, though, on a culture-by-culture basis. It takes only a few lines of code on your part, but the manipulations that go on behind the scenes are impressive. Here is some code to make the DateTimePicker display its value depending upon the current thread's culture.
    DateTimePicker dtp = new DateTimePicker();
    DateTimeFormatInfo dt = Thread.CurrentThread.CurrentCulture.DateTimeFormat;
    dtp.CustomFormat = dt.ShortDatePattern;
    dtp.Format = DateTimePickerFormat.Custom;
VB
   Dim dtp As DateTimePicker = New DateTimePicker()
   Dim dt As DateTimeFormatInfo = _
                 Thread.CurrentThread.CurrentCulture.DateTimeFormat()
   dtp.CustomFormat = dt.ShortDatePattern
   dtp.Format = DateTimePickerFormat.Custom
I suggest you look at the help for the DateTimeInfo class. It is very instructive.
So you can display date and time. What about numbers? Here's the scoop:
The United States uses a period as the decimal separator. Most of the rest of the world uses a comma.
The United States uses a comma as the thousands separator. Most of the rest of the world uses a period.
When you are allowing input of numbers, you will need to allow for a comma and a period as both the thousands separator and the decimal separator. I have been burned by programs that allow only a period for the decimal separator.
There is a class in the Globalization namespace called NumberFormatInfo. This is similar to the DateTimeFormatInfo class in that it holds all the relevant information for a culture's formatting of numbers and currency.
If you want to print a string representation of a number, you would normally use the ToString method of the object's base class. How many of you know that this method is overloaded? Look at this line of code:
MessageBox.Show(123456.ToString("N"));
This gives the result 123,456.00.
Now change the culture to German and run the same code:
     Thread.CurrentThread.CurrentCulture = new CultureInfo("de-DE");
     MessageBox.Show(123456.ToString("N"));
This gives the result 123.456,00. Notice that the decimal separator and thousands separator are appropriate for the current culture.
You could also do the following to force the output to be different from the current culture:
     Thread.CurrentThread.CurrentCulture = new CultureInfo("de-DE");
     MessageBox.Show(123456.ToString("N", new CultureInfo("en-US")));
The output of this is 123,456.00. The ToString method looks at the NumberFormatInfo class contained in the supplied culture for clues as to how to display this number.
When you ask for input of numbers and display this output, you will need to be aware of what methods are culture sensitive.
You saw from Table 3-2 that there are eight different calendars that .NET knows about. Coverage of converting dates from one calendar to another and back again is beyond the scope of this book, but know that there are ways to do so. The calendars presented in Table 3-2 are the most common ones in use throughout the world today. It is a safe bet that you can find one to fit your target country.
Here is something that most programmers are unaware of: Different languages have different sort orders. .NET has different sort orders as well. There is the international sort order, which is case insensitive. In this case, A, b, and C would be sorted as AbC. Normal ASCII sort order would sort this list as ACb.
But what about Finnish sort order? In Finland, V is considered the same level as W. Suppose you have the following list:
Victory
Wake
Woman
Yak
The Finnish sort order would sort the list as follows:
Wake
Victory
Woman
Yak
Look in the SortKey class under the System.Globalization namespace to see the sort order for your language.
This example makes use of two language resource files for text. It also makes use of culture-aware features of some common controls.
| Note |
This example includes a few pictures. They are included in the code source you can obtain from the Downloads section of the Apress Web site (http://www.apress.com). |
The example is an expense report for car mileage. It is a bit simplistic, but you will see some interesting validation code. It is supposed to work in English and in French.
Start a new project in either C# or VB. Follow these steps to put the required controls on the form:
Make the form FixedSingle with no minimize or maximize buttons. Name the form Multilingual and set the text to Car Mileage Expense.
Add a PictureBox to the top left of the form and size it to be 32×32. Call it picUSA.
Add a PictureBox to the top left of the form and size it to be 32×32. Call it picFRA.
Add a Label called lblName whose text reads Name. Make the width of the control about 160 pixels.
Add a Label called lblBirth whose text reads Date of Birth. Make the width of the control about 160 pixels.
Add a DateTimePicker called dtBirth.
Add a GroupBox called gb1 whose text reads Address.
Inside the GroupBox, add a Label called lblAddr1 whose text reads Address 1. Right-justify the text and make the width of the label about 96 pixels.
Inside the GroupBox, next to the Label add a TextBox called txtAddr1.
Inside the GroupBox, add a Label called lblAddr2 whose text reads Address 2. Right-justify the text and make the width of the label about 96 pixels.
Inside the GroupBox, next to the Label add a TextBox called txtAddr2.
Inside the GroupBox, add a Label called lblAddr3 whose text reads Address 3. Right-justify the text and make the width of the label about 96 pixels.
Inside the GroupBox, next to the Label add a TextBox called txtAddr3.
Add a Label called lblStart whose text reads Travel start time. Make the width of the control about 160 pixels.
Add a DateTimePicker called dtStart.
Add a Label called lbEnd whose text reads Travel end time. Make the width of the control about 160 pixels.
Add a DateTimePicker called dtEnd.
Add a Label called lbMiles whose text reads Miles Traveled. Make the width of the control about 160 pixels.
Add a TextBox called txtMiles.
Add a Label whose text reads * .35 =. Make the font 12 point and bold.
Add a Label called lbOwed whose text reads Amount Owed. Make the width of the control about 160 pixels.
Add a Label called lbCash. Make the border FixedSingle and the BackColor Linen.
In case you were wondering where to put all this stuff, see Figure 3-13.
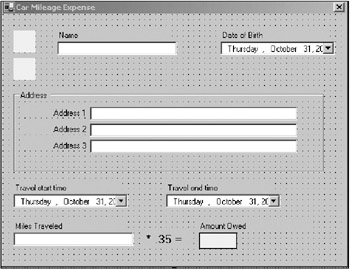
You sized the text controls so that any translated text will fit in them without being truncated or wrapped. It's a good idea to do this so you won't have to redesign the whole form when you go to another language.
The next thing you are going to do is compile the form. This sets up the necessary directory structure for the resource files. Because you will be working in the debugger, the resource files need to be in the current directory, which is the Debug directory for C# users and the Bin directory for you VB fans.
Your directory structure should look like the one shown in Figure 3-14, which displays both the VB and C# directory structures.
Make two text files in these working directories:
French.txt
English.txt
These two files are the text-based resource files for this project. Edit the French.txt file and type in the following lines of text:
NAME=(french)Name
DOB=(french)Date of birth
ADDR=(french)Address
ADDR1=(french)Address 1
ADDR2=(french)Address 2
ADDR3=(french)Address 3
STARTTIME=(french)Start Time
ENDTIME=(french)End Time
MILES=(french)Miles
CASHBACK=(french)Cash
CAPTION=(french)Car Milage Expense
Save the file. Now open up the English.txt file and type in the following text:
NAME=Name
DOB=Date of birth
ADDR=Address
ADDR1=Address 1
ADDR2=Address 2
ADDR3=Address 3
STARTTIME=Start Time
ENDTIME=End Time
MILES=Miles
CASHBACK=Cash
CAPTION=Car Milage Expense
Save this file. As you can see, I don't speak French. However, I'm sure you catch the drift of what I'm doing here.
Whenever you use one of the .NET ancillary console mode programs (there are a whole host of them), you will need to set up the environment properly. Microsoft has provided you with a batch file called CorVars.bat. Find this batch file and put it in the working directory.
Now make your own batch file called ResBuild.bat in this directory. Type the following lines in this new batch file:
call corvars.bat
resgen french.txt
resgen english.txt
Very simple. Double-click this program and you should see the French.resources and English.resources files appear. Figure 3-15 shows my directory after running this ResBuild.bat program.
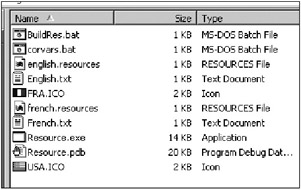
Notice that along with the resource files, I have a couple of icons.[4]
Now it is time for the code. Listings 3-3a and 3-3b show the code for this form. There is not much actual code here, but some of it is complicated. I cover the code in detail in a bit.
using System;
using System.Threading;
using System.Globalization;
using System.Resources;
using System.Drawing;
using System.Collections;
using System.ComponentModel;
using System.Windows.Forms;
using System.Data;

namespace Resource
{
  /// <summary>
  /// Multilingual expense form chapter 3
  /// </summary>
  public class Multilingual : System.Windows.Forms.Form
  {
    #region class local variables

    private enum LANG
    {
      LANG_USA,
      LANG_FRA
    };

    float cash = 0.0f;
    float miles = 0.0f;

    #endregion

    private System.Windows.Forms.Label lblName;
    private System.Windows.Forms.TextBox txtName;
    private System.Windows.Forms.DateTimePicker dtBirth;
    private System.Windows.Forms.Label lblDOB;
    private System.Windows.Forms.TextBox txtAddr1;
    private System.Windows.Forms.Label lblAddr1;
    private System.Windows.Forms.TextBox txtAddr2;
    private System.Windows.Forms.Label lblAddr2;
    private System.Windows.Forms.TextBox txtAddr3;
    private System.Windows.Forms.Label lblAddr3;
    private System.Windows.Forms.Label lblStart;
    private System.Windows.Forms.DateTimePicker dtStart;
    private System.Windows.Forms.DateTimePicker dtEnd;
    private System.Windows.Forms.TextBox txtMiles;
    private System.Windows.Forms.Label lblMiles;
    private System.Windows.Forms.Label lblOwed;
    private System.Windows.Forms.Label lblCash;
    private System.Windows.Forms.PictureBox picUSA;
    private System.Windows.Forms.PictureBox picFRA;
    private System.Windows.Forms.GroupBox gb1;
    private System.Windows.Forms.Label lblEnd;
    private System.Windows.Forms.Label label1;
    private System.ComponentModel.Container components = null;

    public Multilingual()
    {
      InitializeComponent();

      txtMiles.KeyPress += new KeyPressEventHandler(this.InputValidator);
      txtMiles.KeyUp += new KeyEventHandler(this.CalculateCash);

      picUSA.BackColor = Color.Transparent;
      picUSA.SizeMode = PictureBoxSizeMode.StretchImage;
      picUSA.Image = Image.FromFile("usa.ico");
      picUSA.Click += new EventHandler(this.NewLanguage);

      picFRA.BackColor = Color.Transparent;
      picFRA.SizeMode = PictureBoxSizeMode.StretchImage;
      picFRA.Image = Image.FromFile("fra.ico");
      picFRA.Click += new EventHandler(this.NewLanguage);

    }

    protected override void Dispose( bool disposing )
    {
      if( disposing )
      {
        if (components != null)
        {
          components.Dispose();
        }
      }
      base.Dispose( disposing );
    }

    #region Windows Form Designer generated code ...
...
...
    #endregion

    [STAThread]
    static void Main()
    {
      Application.Run(new Multilingual());
    }

    private void Form1_Load(object sender, System.EventArgs e)
    {
      InitStrings();
    }

    private void InitStrings()
    {
      ResourceSet rs;

      if(Thread.CurrentThread.CurrentCulture.Name == "fr-FR")
        rs = new ResourceSet("French.resources");
      else
        rs = new ResourceSet("English.resources");

      this.Text      = rs.GetString("CAPTION");
      lblName.Text   = rs.GetString("NAME");
      lblDOB.Text    = rs.GetString("DOB");
      gb1.Text       = rs.GetString("ADDR");
      lblAddr1.Text  = rs.GetString("ADDR1");
      lblAddr2.Text  = rs.GetString("ADDR2");
      lblAddr3.Text  = rs.GetString("ADDR3");
      lblStart.Text  = rs.GetString("STARTTIME");
      lblEnd.Text    = rs.GetString("ENDTIME");
      lblMiles.Text  = rs.GetString("MILES");
      lblOwed.Text   = rs.GetString("CASHBACK");

      rs.Close();
      rs.Dispose();

      //Adjust the date and time displayed in the pickers
      DateTimeFormatInfo dtf = new DateTimeFormatInfo();
      dtf = Thread.CurrentThread.CurrentCulture.DateTimeFormat;

      dtBirth.CustomFormat = dtf.ShortDatePattern;
      dtBirth.Format = DateTimePickerFormat.Custom;

      dtStart.CustomFormat = dtf.ShortTimePattern;
      dtStart.Format = DateTimePickerFormat.Custom;
      dtStart.ShowUpDown = true;

      dtEnd.CustomFormat = dtf.ShortTimePattern;
      dtEnd.Format = DateTimePickerFormat.Custom;
      dtEnd.ShowUpDown = true;

      lblCash.Text = cash.ToString("N", Thread.CurrentThread.CurrentCulture);
      txtMiles.Text = miles.ToString("N", Thread.CurrentThread.CurrentCulture);

      this.Refresh();
    }

    #region events

    private void NewLanguage(object sender, EventArgs e)
    {
      LANG l = LANG.LANG_USA;
      if (sender is PictureBox)
        if (sender == picFRA)
          l = LANG.LANG_FRA;

      if (l == LANG.LANG_FRA)
      {
        Thread.CurrentThread.CurrentCulture = new CultureInfo("fr-FR");
        Thread.CurrentThread.CurrentUICulture = new CultureInfo("fr-FR");
      }
      else
      {
        Thread.CurrentThread.CurrentCulture = new CultureInfo("en-US");
        Thread.CurrentThread.CurrentUICulture = new CultureInfo("en-US");
      }
        InitStrings();
      }

      private void InputValidator(object sender, KeyPressEventArgs e)
      {
        TextBox t;
        NumberFormatInfo nf = Thread.CurrentThread.CurrentCulture.NumberFormat;

        if(sender is TextBox)
        {
          t = (TextBox)sender;
          if (t == txtMiles)
          {
            //Allow only 0-9 and decimal separator
            if(Char.IsNumber(e.KeyChar))
              e.Handled = false;
            else if(e.KeyChar == Convert.ToChar(nf.NumberDecimalSeparator))
            {
              if(t.Text.IndexOf(Convert.ToChar(nf.NumberDecimalSeparator)) >=0)
                e.Handled = true;
              else
                e.Handled = false;
            }
            else
              e.Handled = true;
          }
        }
    }

    private void CalculateCash(object sender, KeyEventArgs e)
    {
      TextBox t;
      if(sender is TextBox)
      {
        t = (TextBox)sender;
        if (t == txtMiles)
        {
          try
          {
            miles = float.Parse(txtMiles.Text);
            cash = miles * 0.35f;
            lblCash.Text=cash.ToString("N",Thread.CurrentThread.CurrentCulture);
          }
          catch
          {
            lblCash.Text = "";
          }
        }
      }
    }
    #endregion
  }
}
Option Strict On

Imports System
Imports System.Resources
Imports System.Threading
Imports System.Globalization

Public Class Multilingual
  Inherits System.Windows.Forms.Form

#Region "class local variables"

  Private Enum LANG
    LANG_USA
    LANG_FRA
  End Enum

  Dim cash As Single = 0.0F
  Dim miles As Single = 0.0F

#End Region

#Region " Windows Form Designer generated code "

  Public Sub New()
    MyBase.New()

    InitializeComponent()
    AddHandler txtMiles.KeyPress, AddressOf InputValidator
    AddHandler txtMiles.KeyUp, AddressOf CalculateCash

    picUSA.BackColor = Color.Transparent
    picUSA.SizeMode = PictureBoxSizeMode.StretchImage
    picUSA.Image = Image.FromFile("usa.ico")
    AddHandler picUSA.Click, AddressOf NewLanguage

    picFRA.BackColor = Color.Transparent
    picFRA.SizeMode = PictureBoxSizeMode.StretchImage
    picFRA.Image = Image.FromFile("fra.ico")
    AddHandler picFRA.Click, AddressOf NewLanguage

  End Sub

...
...
...
#End Region

  Private Sub Form1_Load(ByVal sender As System.Object, _
                         ByVal e As System.EventArgs) Handles MyBase.Load
  End Sub

  Private Sub InitStrings()
    Dim rs As ResourceSet

    If Thread.CurrentThread.CurrentCulture.Name = "fr-FR" Then
      rs = New ResourceSet("French.resources")
    Else
      rs = New ResourceSet("English.resources")
    End If

    Me.Text = rs.GetString("CAPTION")
    lblName.Text = rs.GetString("NAME")
    lblDOB.Text = rs.GetString("DOB")
    gb1.Text = rs.GetString("ADDR")
    lblAddr1.Text = rs.GetString("ADDR1")
    lblAddr2.Text = rs.GetString("ADDR2")
    lblAddr3.Text = rs.GetString("ADDR3")
    lblStart.Text = rs.GetString("STARTTIME")
    lblEnd.Text = rs.GetString("ENDTIME")
    lblMiles.Text = rs.GetString("MILES")
    lblOwed.Text = rs.GetString("CASHBACK")

    rs.Close()
    rs.Dispose()

    'Adjust the date and time displayed in the pickers
    Dim dtf As DateTimeFormatInfo = New DateTimeFormatInfo()
    dtf = Thread.CurrentThread.CurrentCulture.DateTimeFormat

    dtBirth.CustomFormat = dtf.ShortDatePattern
    dtBirth.Format = DateTimePickerFormat.Custom

    dtStart.CustomFormat = dtf.ShortTimePattern
    dtStart.Format = DateTimePickerFormat.Custom
    dtStart.ShowUpDown = True

    dtEnd.CustomFormat = dtf.ShortTimePattern
    dtEnd.Format = DateTimePickerFormat.Custom
    dtEnd.ShowUpDown = True

    lblCash.Text = cash.ToString("N", Thread.CurrentThread.CurrentCulture)
    txtMiles.Text = miles.ToString("N", Thread.CurrentThread.CurrentCulture)

    Refresh()
  End Sub

#Region "events"

  Private Sub NewLanguage(ByVal sender As Object, ByVal e As EventArgs)
    Dim l As LANG = LANG.LANG_USA

    If sender.GetType() Is GetType(PictureBox) Then
      If sender Is picFRA Then
        l = LANG.LANG_FRA
      End If
    End If
      If l = LANG.LANG_FRA Then
        Thread.CurrentThread.CurrentCulture = New CultureInfo("fr-FR")
        Thread.CurrentThread.CurrentUICulture = New CultureInfo("fr-FR")
      Else
        Thread.CurrentThread.CurrentCulture = New CultureInfo("en-US")
        Thread.CurrentThread.CurrentUICulture = New CultureInfo("en-US")
      End If

      InitStrings()
    End Sub

    Private Sub InputValidator(ByVal sender As Object, _
                               ByVal e As KeyPressEventArgs)
      Dim t As TextBox
      Dim nf As NumberFormatInfo = _
                Thread.CurrentThread.CurrentCulture.NumberFormat

      If sender.GetType() Is GetType(TextBox) Then
        t = CType(sender, TextBox)
        If t Is txtMiles Then
          'Allow only 0-9 and decimal separator
          If (Char.IsNumber(e.KeyChar)) Then
            e.Handled = False
          ElseIf (e.KeyChar = Convert.ToChar(nf.NumberDecimalSeparator)) Then
            If (t.Text.IndexOf(Convert.ToChar _
                               (nf.NumberDecimalSeparator)) >= 0) Then
              e.Handled = True
            Else
              e.Handled = False
            End If
          Else
            e.Handled = True
          End If
        End If
      End If
    End Sub

    Private Sub CalculateCash(ByVal sender As Object, ByVal e As KeyEventArgs)
      Dim t As TextBox

      If sender.GetType() Is GetType(TextBox) Then
        t = CType(sender, TextBox)
        If t Is txtMiles Then
          Try
            miles = Single.Parse(txtMiles.Text)
          cash = miles * 0.35F
          lblCash.Text = cash.ToString("N", Thread.CurrentThread.CurrentCulture)
        Catch
          lblCash.Text = ""
        End Try
      End If
    End If

  End Sub
#End Region
End Class
Finished? Compile and run the program. The first screen you see should look like Figure 3-16.
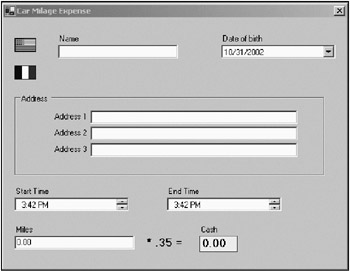
Enter a value (you can use decimals) in the Miles field. You should see that I only allow numbers (and decimal points) and the cash value is calculated automatically. Notice that the calendar and the time controls show the date and time according to U.S. standards.
Click the French flag. Your screen now should look like Figure 3-17.
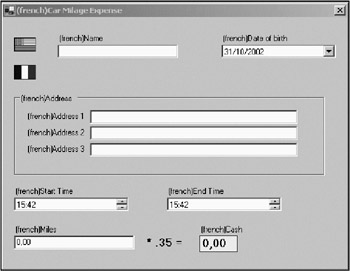
The date format has changed to reflect the norm for France. So has the time. Look at the Miles field and the Cash field. The decimal separator has changed according to the French culture.
Enter in a value in the Miles field. You will not be able to enter in a period anymore for the decimal separator. Only the comma is allowed for this.
Notice that all the text strings have changed to their French equivalents.[5] Click back and forth between the French and English forms. Everything changes as it is supposed to. Well, almost everything. The drop-down calendar is not translated. To get a translated calendar, use the Calendar control instead.
Now to dissect the code. Let's start with the InitStrings method. The first thing I do is to create a resource set that lets me extract resources from a resource file.
| Note |
I am not using the approved fallback scheme for this example. Instead, I am using what are called loose resources. There is no inherent error protection in this method, and it is nowhere near as robust as the fallback method. However, it has the advantage of being very simple to implement. |
Here is the C# code:
    ResourceSet rs;

    if(Thread.CurrentThread.CurrentCulture.Name == "fr-FR")
      rs = new ResourceSet("French.resources");
    else
      rs = new ResourceSet("English.resources");
I detect the current culture and open the appropriate resource file. I did not rely on knowing which icon was clicked. If you do that, you will get confused when your program gets French resources when the culture is still English. Always rely on the culture setting for stuff like this.
Next, I use the GetString method of the ResoureSet class to fill all the controls' text strings.
Finally, I adjust the DateTimePickers according to the current culture, as follows:
    //Adjust the date and time displayed in the pickers
    DateTimeFormatInfo dtf = new DateTimeFormatInfo();
    dtf = Thread.CurrentThread.CurrentCulture.DateTimeFormat;

    dtBirth.CustomFormat = dtf.ShortDatePattern;
    dtBirth.Format = DateTimePickerFormat.Custom;

    dtStart.CustomFormat = dtf.ShortTimePattern;
    dtStart.Format = DateTimePickerFormat.Custom;
    dtStart.ShowUpDown = true;

    dtEnd.CustomFormat = dtf.ShortTimePattern;
    dtEnd.Format = DateTimePickerFormat.Custom;
    dtEnd.ShowUpDown = true;

    lblCash.Text = cash.ToString("N", Thread.CurrentThread.CurrentCulture);
    txtMiles.Text = miles.ToString("N", Thread.CurrentThread.CurrentCulture);
The CurrentCulture class has classes that describe number formats and date/time formats, among other things. I retrieve the date/time format string and apply the short version of it to the DateTimePickers. Notice that I also convert an internal floating-point variable to a string based on the current culture. This is how you see the comma or period when appropriate.
The last thing I do in this method is refresh the form and its controls. Nowhere in this function am I depending upon any state variables. This is important.
So, what happens when you click the icons? Here is the delegate code:
    private void NewLanguage(object sender, EventArgs e)
    {
      LANG l = LANG.LANG_USA;
      if (sender is PictureBox)
        if (sender == picFRA)
          l = LANG.LANG_FRA;

      if (l == LANG.LANG_FRA)
      {
        Thread.CurrentThread.CurrentCulture = new CultureInfo("fr-FR");
        Thread.CurrentThread.CurrentUICulture = new CultureInfo("fr-FR");
      }
      else
      {
        Thread.CurrentThread.CurrentCulture = new CultureInfo("en-US");
        Thread.CurrentThread.CurrentUICulture = new CultureInfo("en-US");
      }

      InitStrings();
    }
I detect which PictureBox is clicked and change the culture accordingly. If I got here some other way, I automatically change back to US culture. Because I wrote the code, I should only get here if a PictureBox was clicked. After changing the culture, I call the InitStrings function I just went over. Because I used the DateTimePicker for data and time entries, there is no need for me to write any validation code. It works in all cultures known to .NET.
Now for the data validation part that is not known to .NET. I am referring to entering in the mileage for the day's trip. Here is the code:
    private void InputValidator(object sender, KeyPressEventArgs e)
    {
      TextBox t;
      NumberFormatInfo nf = Thread.CurrentThread.CurrentCulture.NumberFormat;

      if(sender is TextBox)
      {
        t = (TextBox)sender;
        if (t == txtMiles)
      {
        //Allow only 0-9 and decimal separator
        if(Char.IsNumber(e.KeyChar))
          e.Handled = false;
        else if(e.KeyChar == Convert.ToChar(nf.NumberDecimalSeparator))
        {
          if(t.Text.IndexOf(Convert.ToChar(nf.NumberDecimalSeparator)) >=0)
            e.Handled = true;
          else
            e.Handled = false;
        }
        else
          e.Handled = true;
        }
      }
    }
First off, I obtain the number format of the current culture. I need this to determine what the decimal separator is. Once I know this, I can check for it. This is how I allow only what is culturally appropriate to be entered via the keyboard. If the key that is pressed is not a number or the allowed separator, it gets thrown away. This is validation on the fly with an international twist.
This extra piece of code may be confusing you here:
        if(t.Text.IndexOf(Convert.ToChar(nf.NumberDecimalSeparator)) >=0)
          e.Handled = true;
        else
          e.Handled = false;
This code is very important and without it I open up a major bug. I leave it up to you to figure out what it does.
In the constructor for this example, I attached a delegate to both the KeyPress and KeyUp events. I did this so I could calculate the money owed on the fly. As the user types in mileage values in the Miles field, the Cash field changes accordingly. Here is the code:
    private void CalculateCash(object sender, KeyEventArgs e)
    {
      TextBox t;
      if(sender is TextBox)
      {
        t = (TextBox)sender;
        if (t == txtMiles)
        {
          try
          {
            miles = float.Parse(txtMiles.Text);
            cash = miles * 0.35f;
            lblCash.Text=cash.ToString("N",Thread.CurrentThread.CurrentCulture);
          }
          catch
          {
            lblCash.Text = "";
          }
        }
      }
    }
This is the only place where I use error protection. I have not used error protection so far because these are examples and the code sometimes obscures what I want to show. I use exception handling in subsequent chapters quite a bit, though.
So, here I convert the text representation of a number to an actual number. This Parse method is culturally aware. I then do some simple math and convert the result to a string. If I get here without typing a number, I clear the Cash field. The only way I can get here without typing a number is by typing in a comma or a period as the first digit. If you want, you can make sure you never get to this routine unless you have a valid number by not allowing the decimal separator as the first character in the Miles field. This is what I would do in a real program. Avoid bad programming if you can.
Any questions? No? Good.
[3]I also cover them extensively in my book Internationalization and Localization Using Microsoft .NET (Apress, 2002).
[4]These icons are on your system somewhere, but if you download the source code from the Downloads section of the Apress Web site (http://www.apress.com), you'll get them supplied to you.
[5]As near as I can do, anyway.