Now you are an expert on handling incoming messages from the keyboard. The next device I cover in this chapter is the mouse.
You may be thinking that using a mouse is just a side effect of a data entry program. Perhaps you would use the mouse to just move from one field to another. You could also use it to select tabs in a TabControl. Neither of these uses requires any mouse-based code from you. In fact, you can write a perfectly good data entry program without writing any mouse-based code at all. You would, however, be cheating yourself and your customer out of a richer user interface.
You can handle six events concerning the mouse. Table 4-2 shows these events.
|
Event |
Argument |
Use |
|---|---|---|
|
MouseDown |
MouseEventArgs |
Reacts to any mouse button press |
|
MouseUp |
MouseEventArgs |
Fires when the button is let up |
|
MouseEnter |
EventArgs |
Fires when the mouse enters a control's boundary |
|
MouseLeave |
EventArgs |
Fires when the mouse leaves a control's boundary |
|
MouseHover |
EventArgs |
Fires when the mouse hovers within a control's boundary |
|
MouseMove |
MouseEventArgs |
Fires every time the mouse moves |
Notice that three of these events use the MouseEventArgs class and the others use a plain old EventArgs class. This is because there is no reason for you to know anything about the Enter, Leave, and Hover events, other than the mouse is here. The Move, Down, and Up events let the programmer know what the user was doing with the mouse.
Rather than hash over all the mouse events and what they can do, I think an example is in order. This is a fairly complex example. It is what I consider one of the better types of data entry methods. I say this because the user can accomplish a lot on this screen without ever typing in anything. In fact, the only key I let the user enter is the Delete key.
The first part of this example includes everything you have learned so far about basic controls, keyboard event handling, and mouse event handling. The second part of this example, however, extends the mouse-handling capability by adding some GDI+ capability. As an end result, you will see a familiar interface (these days) and you will also know how to program this type of interface.
Start with a new C# or VB project. Mine is called "MouseTrap."
Size the main form to be around 488×424.
Change the form's name to frmMouse.
Make the form start up centered and change the text to Mouse Event Handlers.
Make the form FixedSingle with no maximize or minimize buttons.
Add a StatusBar and call it sb.
Add a ListBox and call it lstPics.
Add a Button and call it cmdAdd. Change the text to read Add to Panel.
Add a Panel called P1. Make its border style Fixed3D.
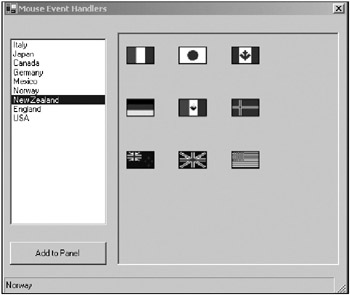
Figure 4-6 shows what the form looks like.

As you can see, there is not much here. Using these controls, however, you can accomplish more than a fleet of TextBoxes.
| Tip |
This project uses quite a few pictures. You can find them in this book's code, which you can download from the Downloads section of the Apress Web site (http://www.apress.com). |
Here is what this example will do:
Load some pictures of flags into an array and display the text values in the ListBox. The user can multiselect any of the text values in the ListBox.
When the user clicks the Add button, the pictures will transfer to the Panel. The pictures will be arranged in the Panel similar to a thumbnail view in Windows Explorer.
When the user passes the mouse over a flag in the Panel, the flag's name will appear on the StatusBar and the cursor will change to a hand.
The user can select flags for deletion in the Panel by left-clicking them with the mouse. Flags marked for deletion will have a border around them. When the user presses the Delete key, the marked flags are deleted and the remaining flags are rearranged.
This example involves quite a bit of code, so let's get started.
First of all, you will need a class local structure that holds the picture of the flag and its name. You will notice that this structure looks identical to a class. Do you know what the difference is? I suggest you look it up in the online help. The reason I am using a structure is because it is value based and is held on the stack (these are two hints as to the difference between a class and a structure).
C#
    #region Class Local Variables

    //Structs get created on the stack
    private struct Symbols
    {
      private Image mflag;
      private string mDispName;
      public Symbols(string DispName, Image flag)
      {
        mflag = flag;
        mDispName = DispName;
      }
      public Image Flag
      {
        get{return mflag;}
      }
      public string Name
      {
        get{return mDispName;}
      }
    };

    #endregion
VB
#Region "Class Local Variables"

  'Structs get created on the stack
  Private Structure Symbols
    Private mflag As Image
    Private mDispName As String
    Public Sub New(ByVal DispName As String, ByVal flag As Image)
      mflag = flag
      mDispName = DispName
    End Sub
    Public ReadOnly Property Flag() As Image
      Get
        Return mflag
      End Get
    End Property
    Public ReadOnly Property Name() As String
      Get
        Return mDispName
      End Get
    End Property
  End Structure

#End Region
In Chapter 1, I introduced you to a simple way to link one control to another by using the DataSource property. Visual Studio 6.0 allowed you to connect a Data-Source only to a database.
My goal in using the ListBox is to show a list of country names that I have flags for. Now I could have an array of flags and hard-code the names into the ListBox. Then I could extract the flag from the array according to the index of the entry chosen in the ListBox. This works but it is so 1990s.
The more elegant thing to do is use the DataSource property of the ListBox to directly link to an internal array. This internal array, of course, holds a collection of "Symbols" structures I just defined. Look carefully at the constructor code.
C#
    public frmMouse()
    {
      InitializeComponent();

      //Need to use arraylist here.
      ArrayList Pics = new ArrayList();
      Pics.Add(new Symbols("Italy",       Image.FromFile("Italy.ico")));
      Pics.Add(new Symbols("Japan",       Image.FromFile("japan.ico")));
      Pics.Add(new Symbols("Canada",      Image.FromFile("canada.ico")));
      Pics.Add(new Symbols("Germany",     Image.FromFile("germany.ico")));
      Pics.Add(new Symbols("Mexico",      Image.FromFile("mexico.ico")));
      Pics.Add(new Symbols("Norway",      Image.FromFile("norway.ico")));
      Pics.Add(new Symbols("New Zealand", Image.FromFile("nz.ico")));
      Pics.Add(new Symbols("England",     Image.FromFile("england.ico")));
      Pics.Add(new Symbols("USA",         Image.FromFile("usa.ico")));

      lstPics.SelectionMode = SelectionMode.MultiExtended;
      lstPics.DataSource = Pics;
      lstPics.DisplayMember = "Name";
      lstPics.ValueMember = "Flag";

      //Set up the status bar
      sb.Panels.Add("Flag = ");
      sb.Panels[0].AutoSize = StatusBarPanelAutoSize.Spring;
      sb.ShowPanels = true;

      //Transfer the data over.
      cmdAdd.Click += new EventHandler(this.MoveFlags);

      //Make sure the user can see all flags
      P1.AutoScroll = true;

      //Intercept all keyboard strokes before they get to the controls
      this.KeyPreview = true;
      this.KeyDown += new KeyEventHandler(this.DeleteFlags);

    }
  Public Sub New()
    MyBase.New()

    InitializeComponent()

    'Need to use arraylist here.
    Dim Pics As ArrayList = New ArrayList()
    Pics.Add(New Symbols("Italy", Image.FromFile("Italy.ico")))
    Pics.Add(New Symbols("Japan", Image.FromFile("japan.ico")))
    Pics.Add(New Symbols("Canada", Image.FromFile("canada.ico")))
    Pics.Add(New Symbols("Germany", Image.FromFile("germany.ico")))
    Pics.Add(New Symbols("Mexico", Image.FromFile("mexico.ico")))
    Pics.Add(New Symbols("Norway", Image.FromFile("norway.ico")))
    Pics.Add(New Symbols("New Zealand", Image.FromFile("nz.ico")))
    Pics.Add(New Symbols("England", Image.FromFile("england.ico")))
    Pics.Add(New Symbols("USA", Image.FromFile("usa.ico")))

    lstPics.SelectionMode = SelectionMode.MultiExtended
    lstPics.DataSource = Pics
    lstPics.DisplayMember = "Name"
    lstPics.ValueMember = "Flag"

    'Set up the status bar
    sb.Panels.Add("Flag = ")
    sb.Panels(0).AutoSize = StatusBarPanelAutoSize.Spring
    sb.ShowPanels = True

    'Transfer the data over.
    AddHandler cmdAdd.Click, New EventHandler(AddressOf MoveFlags)

    'Make sure the user can see all flags
    P1.AutoScroll = True

    'Intercept all keyboard strokes before they get to the controls
    Me.KeyPreview = True
    AddHandler Me.KeyDown, New KeyEventHandler(AddressOf DeleteFlags)

  End Sub
As far as the ListBox goes, this code sets it up for MultiSelect and sets the DataSource to the internal ArrayList. Here is what happens when the ListBox is displayed. The string that is displayed in the ListBox is taken from the ListBox's DisplayMember property. This property is the name of the property of the DataSource that holds the actual string that is displayed. Notice that the Symbols structure has a property called "Name." The value that is associated with that name is pointed to by the ValueMember property of the ListBox. The Symbols structure has a "Flag" property that holds the image associated with the name.
Personally, I think this capability is incredibly cool and saves quite a bit of table lookup code.
The rest of the constructor sets up the status bar and some event handlers. Back in Chapter 3 I said there was no way for a form to get focus once there was a single control on it that allowed the user to do something. This was why I could not use the Focus event on a filled form in the SDI project to signal that the window list should change. Well, the same type of thing applies here. Once I have a control that accepts keystrokes, I cannot normally get a keystroke event from the form. What I need to do is use the KeyPreview property.
This KeyPreview property intercepts all keystrokes destined for controls on that form. I use it here to intercept the Delete key. This way, I can press the Delete key on any part of the form (and its controls) and I can handle it.
Listings 4-2a and 4-2b show the rest of the code. The code contains a helper function that arranges controls in the Panel and the delegates for mouse events and keyboard events.
    #region Helper functions

    private void ArrangeImages()
    {
      int x        = 0;
      int y        = 0;
      int PICSPACE = 10;
      int PICSIZE  = 64;

      //Number of pictures in a row.
      //Do not show a picture if it means we get a horizontal
      //scroll bar
      int NumPicsInWidth = (P1.Size.Width - PICSPACE) /
        (PICSIZE + PICSPACE);
      for (int k = 0; k<= P1.Controls.Count - 1; k++)
      {
        //determine if we are in a new row
        if (k % (NumPicsInWidth) == 0 )
          x = PICSPACE;
        else
          x = P1.Controls[k - 1].Location.X + PICSIZE + PICSPACE;

        if (k < NumPicsInWidth )
          y = PICSPACE;
        else if (k % (NumPicsInWidth) == 0 )
          y = P1.Controls[k - 1].Location.Y + PICSIZE + PICSPACE;

        P1.Controls[k].Location = new Point(x, y);
      }

    }

    #endregion

    #region events

    private void MoveFlags(object sender, EventArgs e)
    {
      foreach(Symbols flg in lstPics.SelectedItems)
      {
        PictureBox p = new PictureBox();
        p.Size       = new Size(40, 40);
        p.SizeMode   = PictureBoxSizeMode.StretchImage;
        p.MouseDown  += new MouseEventHandler(this.PicMouseDown);
        p.MouseEnter += new EventHandler(this.PicMouseEnter);
        p.MouseLeave += new EventHandler(this.PicMouseLeave);
        p.Cursor     = Cursors.Hand;
        p.Image      = flg.Flag;
        p.Tag        = flg.Name;
        P1.Controls.Add(p);
      }

      ArrangeImages();

      }

      private void DeleteFlags(object sender, KeyEventArgs e)
      {
        if(e.KeyCode == Keys.Delete)
        {
          //Try this shortcut. It will not work. Do you know why?
  //        foreach(PictureBox p in P1.Controls)
  //        {
  //          if(p.BorderStyle == BorderStyle.FixedSingle)
  //            P1.Controls.Remove(p);
  //        }

          PictureBox p;
          bool deleted = true;
          while (deleted)
          {
            deleted = false;
            for(int k=0; k<P1.Controls.Count; k++)
            {
              if(P1.Controls[k] is PictureBox)
              {
                p = (PictureBox)P1.Controls[k];
                if(p.BorderStyle == BorderStyle.FixedSingle)
                {
                  P1.Controls.RemoveAt(k);
                  deleted = true;
                  //Controls.count has changed. Reinitialize the "for" loop
                  break;
                }
              }
            }
          }

          ArrangeImages();
        }
      }

      private void PicMouseDown(object sender, MouseEventArgs e)
      {
        PictureBox P;
        if (sender is PictureBox)
          P = (PictureBox)sender;
        else
          return;

        if(e.Button == MouseButtons.Left)
        {
          if(P.BorderStyle == BorderStyle.FixedSingle)
            P.BorderStyle = BorderStyle.None;
        else
          P.BorderStyle = BorderStyle.FixedSingle;
      }
    }

    private void PicMouseEnter(object sender, EventArgs e)
    {
      if (sender is PictureBox)
      {
        PictureBox P = (PictureBox)sender;
        sb.Panels[0].Text = P.Tag.ToString();
      }
    }

    private void PicMouseLeave(object sender, EventArgs e)
    {
      sb.Panels[0].Text = "";
    }

    #endregion
#Region "Helper functions"

  Private Sub ArrangeImages()
    Dim x As Int32 = 0
    Dim y As Int32 = 0
    Dim k As Int32
    Dim PICSPACE As Int32 = 10
    Dim PICSIZE As Int32 = 64

    'Number of pictures in a row.
    'Do not show a picture if it means we get a horizontal
    'scroll bar
    Dim NumPicsInWidth As Int32 = (P1.Size.Width - PICSPACE) \ _
                                    (PICSIZE + PICSPACE)
    'Control collections are zero based.
    'VB type collections are 1 based.
    For k = 0 To P1.Controls.Count - 1
      'determine if we are in a new row
      If k Mod (NumPicsInWidth) = 0 Then
        x = PICSPACE
      Else
        x = P1.Controls(k - 1).Location.X + PICSIZE + PICSPACE
      End If

      If k < NumPicsInWidth Then
        y = PICSPACE
      ElseIf k Mod (NumPicsInWidth) = 0 Then
        y = P1.Controls(k - 1).Location.Y + PICSIZE + PICSPACE
      End If

      P1.Controls(k).Location = New Point(x, y)
    Next
  End Sub

#End Region

#Region "events"

  Private Sub MoveFlags(ByVal sender As Object, ByVal e As EventArgs)
    Dim flg As Symbols

    For Each flg In lstPics.SelectedItems
      Dim p As PictureBox = New PictureBox()
      p.Size = New Size(40, 40)
      p.SizeMode = PictureBoxSizeMode.StretchImage
      AddHandler p.MouseDown, New MouseEventHandler(AddressOf PicMouseDown)
      AddHandler p.MouseEnter, New EventHandler(AddressOf PicMouseEnter)
      AddHandler p.MouseLeave, New EventHandler(AddressOf PicMouseLeave)
      p.Cursor = Cursors.Hand
      p.Image = flg.Flag
      p.Tag = flg.Name
      P1.Controls.Add(p)
    Next

    ArrangeImages()
  End Sub

  Private Sub DeleteFlags(ByVal sender As Object, ByVal e As KeyEventArgs)

    If e.KeyCode = Keys.Delete Then

      'Try this shortcut. It will not work. Do you know why?
      'Dim p As PictureBox
      'For Each p In P1.Controls
    ' If p.BorderStyle = BorderStyle.FixedSingle Then
    '   P1.Controls.Remove(p)
    ' End If
    'Next

    Dim p As PictureBox
    Dim deleted As Boolean = True
    Dim k As Int32
    While (deleted)
      deleted = False
      For k = 0 To P1.Controls.Count - 1
        If P1.Controls(k).GetType() Is GetType(PictureBox) Then
          p = DirectCast(P1.Controls(k), PictureBox)
          If p.BorderStyle = BorderStyle.FixedSingle Then
            P1.Controls.RemoveAt(k)
            deleted = True
            'Controls.count has changed. Reinitialize the "for" loop
            Exit For
          End If
        End If
      Next
    End While

    ArrangeImages()
  End If
End Sub

Private Sub PicMouseDown(ByVal sender As Object, ByVal e As MouseEventArgs)
  Dim P As PictureBox

  If sender.GetType() Is GetType(PictureBox) Then
    P = DirectCast(sender, PictureBox)
  Else
    Return
  End If

  If e.Button = MouseButtons.Left Then
    If P.BorderStyle = BorderStyle.FixedSingle Then
      P.BorderStyle = BorderStyle.None
    Else
      P.BorderStyle = BorderStyle.FixedSingle
    End If
  End If
End Sub
  Private Sub PicMouseEnter(ByVal sender As Object, ByVal e As EventArgs)

    If sender.GetType() Is GetType(PictureBox) Then
      Dim P As PictureBox = CType(sender, PictureBox)
      sb.Panels(0).Text = P.Tag.ToString()
    End If

  End Sub

  Private Sub PicMouseLeave(ByVal sender As Object, ByVal e As EventArgs)
    sb.Panels(0).Text = ""
  End Sub

#End Region
Perhaps I should analyze this code a bit. First of all, I like the Panel control a lot. It serves as a great container and has automatic scroll bars. It can hold any type of control and as many controls as you want to put in it.
When you get into some advanced data entry programs, you will find yourself using images quite a bit. Anyway, you will need to arrange whatever controls you put in there in some fashion. The ArrangeImages method has a vertical scroll bar only. Personally, I like this better than two scroll bars on a control—but that is me. Notice that I decide how many controls can fit in the Panel horizontally by first finding out how big the Panel actually is. I do this because I often use a Panel in a form that is sizable. If you anchor the Panel to all sides of its container, you will find that the Panel will grow and shrink in size as its container size changes. This means that you may be able to fit more (or fewer) images horizontally inside the Panel. If this form was sizable (it is not in this example), then I would call the ArrangeImages method during the form's Resize event.
So what happens when the user chooses some flags named in the ListBox and then clicks the Add button? Here is the C# code again:
    private void MoveFlags(object sender, EventArgs e)
    {
      foreach(Symbols flg in lstPics.SelectedItems)
      {
        PictureBox p = new PictureBox();
        p.Size       = new Size(40, 40);
        p.SizeMode   = PictureBoxSizeMode.StretchImage;
        p.MouseDown  += new MouseEventHandler(this.PicMouseDown);
        p.MouseEnter += new EventHandler(this.PicMouseEnter);
        p.MouseLeave += new EventHandler(this.PicMouseLeave);
        p.Cursor     = Cursors.Hand;
        p.Image      = flg.Flag;
        p.Tag        = flg.Name;
        P1.Controls.Add(p);
      }
      ArrangeImages();
    }
Remember how the ListBox was set up to use the ArrayList as its DataSource? The DisplayMember was the name property of the Symbols structure and the ValueMember was the image property of the Symbols structure.
As I iterate through the selected items in the ListBox,[1] I create a new PictureBox and assign the ValueMember of the selected item as the image. Very simple but very powerful.
I also assign some standard delegates to each PictureBox I make. When I have done all this, I call the ArrangeImages method, and violá—instant flags! Figure 4-7 shows this example with all the flags in the Panel.
[1]Try doing that in VB 6.0!