OK, so now you know the basics of the keyboard and the mouse. As you saw from the last example, using graphics can make for a more visually descriptive data entry program. I can see this kind of ListBox/images screen in a hospital-supply program. The list could be the complicated Latin names of surgical instruments and the images could be pictures of the instruments. The images would be a verification of what the user thinks the word means. The Panel could represent the set of instruments a surgeon would need in an operating room. You could also use something like this in an online-store checkout screen.
Anyway, moving on to the GDI+ enhancement: marquis selection. The purpose of this enhancement is to allow the user to drag a rectangle around some of the flags shown in the Panel, thereby selecting them. This is a common enough thing to do in data entry programs that you should learn how to do it.
The method that you will use to draw a rectangle is (funnily enough) Graphics.DrawRectangle. There is one caveat with this method, though: The Rectangle data type argument needs its starting point to be at the top left of the rectangle. It also needs its ending point to be below and to the right of the starting point. Consider the following rectangles as defined in C#:
      Rectangle r1 = new Rectangle(100, 100, 100, 50);
      Rectangle r2 = new Rectangle(100, 100, -100, 50);
      Rectangle r3 = new Rectangle(100, 100, 100, -50);
      Rectangle r4 = new Rectangle(100, 100, -100, -50);
Each of these rectangles is perfectly legal; however, only the first one is valid for the DrawRectangle method. When the user drags the mouse, there is no guarantee that she will start at the top left and end at the bottom right. In fact, all things being equal, there is only a 25% chance of this happening. What you need to do as a programmer is convert the bottom three rectangles to the proper form so that all four values are positive. This is not so easy.
The best way I have found to accomplish this is to create a static class with a method that takes a rectangle and returns a corrected one. Now this class is quite small, as it has no constructor and the single method is short. However, I made it a class because I can see adding a few other static methods to it to handle such things as adding a method to return a rounded version of a sharp-cornered rectangle. Of course, in this case, the return data type would be a region, not a rectangle.
Add a new class to your MouseTrap project and call it "RectangleC." You will need to include the System.Drawing namespace at the top of this class. This class has no constructor and only one static (shared in VB) method. Listings 4-3a and 4-3b show the code for the whole class.
using System;
using System.Drawing;

namespace MouseTrap_c
{
  /// <summary>
  /// Converts a rectangle that starts at any corner into one that can be drawn by
  /// the Graphics object.
  /// </summary>
  public class RectangleC
  {
    public static Rectangle Convert(Rectangle rect)
    {
      rect.X = rect.X - (Math.Abs(rect.Width) - rect.Width)/2;
      rect.Y = rect.Y - (Math.Abs(rect.Height) - rect.Height)/2;
      rect.Size = new Size(Math.Abs(rect.Width), Math.Abs(rect.Height));

      return rect;
    }
  }
}
Option Strict On

Imports System.Drawing

Public Class RectangleC

  Public Shared Function Convert(ByVal rect As Rectangle) As Rectangle

    rect.X = rect.X - CInt((Math.Abs(rect.Width) - rect.Width) / 2)
    rect.Y = rect.Y - CInt((Math.Abs(rect.Height) - rect.Height) / 2)
    rect.Size = New Size(Math.Abs(rect.Width), Math.Abs(rect.Height))

    Return rect
  End Function
End Class
Not much here, is there? When I first made this class I had all kinds of math in here. With some patience and advice from friends, I managed to boil it down to what you see here.
Unless you have worked with the GDI+ namespaces before, this may be your first introduction to the Point and Size structures. They are extremely useful and necessary in just about all GDI+ code. It is beyond the scope of this book to fully explain the Point and Size structures and their uses, so I encourage you to look in the online help for more information.
Compile your project and correct any errors you may have. You need this class to compile cleanly before you go any further.
Add the following variable to your class local variables section in the main form.
C#
    //This is added for marquis selection of flags in the Panel
    Rectangle Marquis = Rectangle.Empty;
VB
  'This is added for marquis selection of flags in the Panel
  Dim Marquis As Rectangle = Rectangle.Empty
I use the static Empty method to create a rectangle of no size. When the Paint delegate sees this, it skips past trying to render this rectangle and choose flags.
Speaking of Paint delegates, you will need to create one for the Panel. Because this is a small example, I use a delegate for the Paint event rather than override it.
Include the following method in your main form's code.
C#
    private void PanelPaint(object sender, PaintEventArgs e)
    {
      Rectangle r = RectangleC.Convert(Marquis);

      if(Marquis != Rectangle.Empty)
      {
        e.Graphics.DrawRectangle(Pens.Red, r);
        foreach(PictureBox P in P1.Controls)
        {
          if(r.Contains(P.Bounds))
            P.BorderStyle = BorderStyle.FixedSingle;
          else
            P.BorderStyle = BorderStyle.None;
        }
      }
    }
  Private Sub PanelPaint(ByVal sender As Object, ByVal e As PaintEventArgs)
    Dim P As PictureBox
    Dim r As Rectangle = RectangleC.Convert(Marquis)

    If Not Marquis.Equals(Rectangle.Empty) Then
      e.Graphics.DrawRectangle(Pens.Red, r)
      For Each P In P1.Controls
        If r.Contains(P.Bounds) Then
          P.BorderStyle = BorderStyle.FixedSingle
        Else
          P.BorderStyle = BorderStyle.None
        End If
      Next
    End If
  End Sub
The first thing I do here is to create a rectangle that has the correct starting and ending points. I use the new static RectangleC class to do this.
If the rectangle is not empty, I draw it on the Panel. I then iterate through each of the PictureBoxes in the Panel, looking for those that are completely contained in the bounding rectangle. If I find any, I mark them for deletion. If there are any outside this bounding rectangle, they are unmarked.
You need to know that GDI+ erases the drawing surface before it draws the rectangle. This is one reason that GDI+ is so much easier to use than the direct Windows GDI. You have to do far less to accomplish much more.
Well, you now have a Paint delegate. The trick now is to create the bounding rectangle and make sure this Paint delegate gets called when needed. Add the following three delegates below the Paint delegate.
C#
    private void PanelMouseDown(object sender, MouseEventArgs e)
    {
      if (e.Button != MouseButtons.Left)
        return;

      Marquis = new Rectangle(new Point(e.X, e.Y), Size.Empty);
    }
    private void PanelMouseMove(object sender, MouseEventArgs e)
    {
      if (e.Button != MouseButtons.Left)
        return;

      Marquis.Size = new Size(e.X-Marquis.X, e.Y-Marquis.Y);
      P1.Invalidate();
    }

    private void PanelMouseUp(object sender, MouseEventArgs e)
    {
      Marquis = Rectangle.Empty;
      P1.Invalidate();
    }
VB
  Private Sub PanelMouseDown(ByVal sender As Object, ByVal e As MouseEventArgs)

    If e.Button <> MouseButtons.Left Then Return
    Marquis = New Rectangle(New Point(e.X, e.Y), Size.Empty)
  End Sub

  Private Sub PanelMouseMove(ByVal sender As Object, ByVal e As MouseEventArgs)

    If e.Button <> MouseButtons.Left Then Return

    Marquis.Size = New Size(e.X - Marquis.X, e.Y - Marquis.Y)
    P1.Invalidate()
  End Sub

  Private Sub PanelMouseUp(ByVal sender As Object, ByVal e As MouseEventArgs)

    Marquis = Rectangle.Empty
    P1.Invalidate()
  End Sub
Notice that I make use of the MouseEventArgs argument to determine if I am currently painting. I can't tell you how many examples I've seen where the programmer used a global variable to determine if painting was going on.
The MouseDown delegate creates a new rectangle that begins where the user pressed the left mouse button. It has no size to start with.
The MouseMove delegate changes the size of the rectangle according to the current X and Y position of the mouse. There is no need for a variable to tell me if I am drawing; the fact that the left mouse button is down while I am moving it implies this. At the end of this method I invalidate the Panel. This fires the Paint event, which gets handled by the Paint delegate.
The MouseUp delegate simply resets the rectangle and invalidates the screen, which makes the rectangle disappear. All that is left are the flags, some of which may be marked for deletion.
Now to wire the mouse delegates up to the Panel. Add the following code to the constructor.
C#
      //These delegates are added to facilitate marquis selection
      P1.MouseMove += new MouseEventHandler(this.PanelMouseMove);
      P1.MouseDown += new MouseEventHandler(this.PanelMouseDown);
      P1.MouseUp += new MouseEventHandler(this.PanelMouseUp);
      P1.Paint += new PaintEventHandler(this.PanelPaint);
VB
    'These delegates are added to facilitate marquis selection
    AddHandler P1.MouseMove, New MouseEventHandler(AddressOf PanelMouseMove)
    AddHandler P1.MouseDown, New MouseEventHandler(AddressOf PanelMouseDown)
    AddHandler P1.MouseUp, New MouseEventHandler(AddressOf PanelMouseUp)
    AddHandler P1.MouseMove, New MouseEventHandler(AddressOf PanelMouseMove)
    AddHandler P1.Paint, New PaintEventHandler(AddressOf PanelPaint)
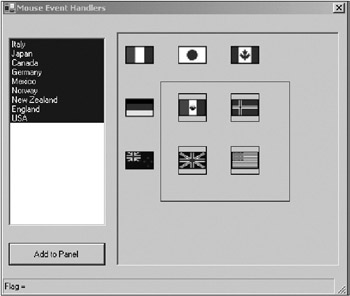
That's it. Compile and run the program. Figure 4-8 shows marquis selection in action.
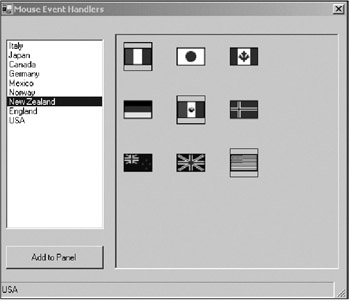
The other mouse-handling delegates for the images are simple enough. As the user left-clicks the picture, I change its border to make it stand out as being selected. When the mouse is run over the picture, I show the name of the flag on the StatusBar. This name comes from the Tag property of the PictureBox. This is also shown in Figure 4-7.
Figure 4-9 shows the screen with four of the flags marked for deletion.
The user presses the Delete key and the marked flags are deleted. After the deletion, the rest of the flags are rearranged to fill the voids. Here is the C# code for this KeyDown delegate:
    private void DeleteFlags(object sender, KeyEventArgs e)
    {
      if(e.KeyCode == Keys.Delete)
      {

        //Try this shortcut. It will not work. Do you know why?
//        foreach(PictureBox p in P1.Controls)
//        {
//          if(p.BorderStyle == BorderStyle.FixedSingle)
//            P1.Controls.Remove(p);
//        }

        PictureBox p;
        bool deleted = true;
        while (deleted)
        {
          deleted = false;
          for(int k=0; k<P1.Controls.Count; k++)
          {
            if(P1.Controls[k] is PictureBox)
            {
              p = (PictureBox)P1.Controls[k];
              if(p.BorderStyle == BorderStyle.FixedSingle)
              {
                P1.Controls.RemoveAt(k);
                deleted = true;
                //Controls.count has changed. Reinitialize the "for" loop
                break;
              }
            }
          }
        }
        ArrangeImages();
      }
    }
I left in some code that I commented out. This code (if it worked) would be more elegant than the code below it. However, it does not work. Your homework is to read up on collections and find out why.
| Tip |
Collections are a big part of the .NET Framework. It would behoove you to learn as much about them as you can. |
The ability to remove an object from a collection while iterating over that collection would sure be nice. However, sometimes the brute-force way is best.