Suppose you have an auto parts store, and you use a program to handle the front counter sales. Now, I have been to many auto parts stores, and their programs are all pretty much the same. They all look like UNIX dumb terminal leftovers. The screens are text-based and quite often parts are mish-mashed together as if they were all the same. It is obvious that these programs are not programmed in an object-oriented way, and they are not presented in an object-oriented way.
Here's my version of an object-oriented auto parts program:
The user chooses which car the customer is referring to in a hierarchical list of some kind.
A wire-frame picture of the car appears with major sections outlined in different colors.
The user clicks a major section and is able to drill down into subassemblies and finally individual parts.
The customer watches this, points to a section, and says, "I don't know the name, but that doohickey over there is what broke."
There can be a few different ways to present this kind of data as you drill down. Probably the final list of parts within a section would be a ListView, as many parts fit multiple cars.
Anyway, you can see that showing information like this is very intuitive. Programming it is actually fairly easy. Each part is an object, which in turn belongs to collections, which represent the sections of the car. Each object would have self-knowledge such as inventory, price, suggested sister parts, and so on. As the inventory of the part is at the reorder stage, it could automatically color itself red or perhaps change its icon to something else. This way, when the user drills down into the parts list, the user can instantly know the status of that part. As each object communicates with the sales portion of the program, it is also communicating with the inventory portion of the program.
You can see that presenting an object-oriented GUI also requires that you program in an object-oriented way. Which controls would you use for this kind of GUI?
The .NET IDE contains quite a few controls, most of which I am sure you have used. But have you used them to present data in an object-oriented fashion? Here are some of the controls I use for modern data entry programs:
ContextMenu
Floating ToolBar
ListView
TreeView
PictureBox
Panel
Splitter
Graphical Calendar
I use the ContextMenu because it is a common way for an object to allow the user to tell it to do something. A ContextMenu can be part of an object; it does not need to belong to a form.
| Note |
Yes, a form is an object. It is a special kind of object, though, and most programmers (especially VB 6.0 programmers) do not think of it this way. Everyone knows that a form can contain a MainMenu and a ToolBar, but not many people extend this idea to a simple class as well. |
A floating, dockable ToolBar can look to the user to be a separate object that can be acted on. A ToolBar does not necessarily need to be attached to any particular form.
You'll often use the TreeView, ListView, Panel, and PictureBox together to show more graphical views of the data. Oftentimes, you'll add a Splitter to enable the user to resize controls on a particular form.
Let's take some of these controls and play around with them. I think that once you see some examples, you'll better understand what I'm talking about.
The first control you will use is the ContextMenu. Now, as you probably know, you can make a pop-up menu and attach it to any visible control. For instance, you can have a TreeView or ListView control that has a pop-up menu attached to it. The problem with this, though, is that you may want different menu choices and actions based on the node that is currently selected (I cover nodes shortly). If you have a control that contains nodes that represent different objects, you are forced to either have the same choices for all objects (perhaps some would be grayed-out) or reprogram the pop-up menu based on the node that is active. Either way, you are not using the full capability of .NET to both program and present data in an object-oriented manner.
Suppose you want to present different views of an object. These views could take the form of a node in a TreeView in one screen and a CheckBox in another, and perhaps an Image in yet another screen. If you create a pop-up menu that allows actions on that object in one view, the user will expect the same functionality in all views. In the auto parts store scenario, such an action could be to display the price of the part the object represents. Attaching the pop-up menu to a control is not the best choice in this scenario. The best choice is to have the object know what it needs to do when the user wants a pop-up menu.
Start a new VB or C# project. Mine is called "ContainedControls." This project includes the default form and one additional class. This project shows you how to have an object use its own pop-up menu instead of your having to program one for each control that will contain this object.
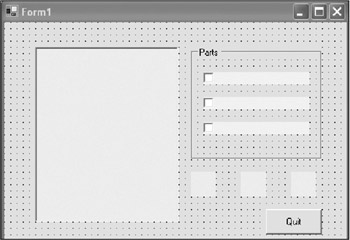
For discussion purposes, this object is a part in an auto parts store. The idea is to have this part get all its own information from a database (a pretend database, in this case) and present itself to the user in different forms. You will see from the example that the main form contains very little code. Most of the code is in the object's class. Start out by putting the following controls on the form:
Add a TreeView and call it Tree.
Add a GroupBox whose text reads Parts.
Add three check boxes inside the GroupBox. Name them chkP1, chkP2, and chkP3, respectively.
Add three PictureBoxes below the GroupBox. Name them picA, picB, and picC, respectively.
Add a button called cmdQuit whose text reads Quit.
Your form should look like the one shown in Figure 5-1.
Before you start entering the code for this form, you will need a class that represents the parts that this form will show. Add a new class called "SomePart." Even for a class that does virtually nothing real, it needs to use classes from quite a few different namespaces. Make sure you have the following namespaces in this class.
C#
using System;
using System.Collections;
using System.Drawing;
using System.Drawing.Drawing2D;
using System.Windows.Forms;
VB
Option Strict On

Imports System
Imports System.Drawing
Imports System.Drawing.Drawing2D
Imports System.Collections
Imports System.Windows.Forms
I love collections, and Microsoft has heeded my wishes and made a lot more specific collection classes.[1] I use the ArrayList in this class, which needs the Collections namespace. I also use some imaging classes, which need the Drawing namespaces.
You may be wondering why I use the Forms namespace. The answer is that I need it to reference the ContextMenu class.
| Note |
Including the namespaces at the top of the file does not add any extra code to the program. A namespace is not a library. You can think of a namespace as local calling area. It lets you reference classes within the namespace without using the fully qualified name of the class. It is similar to dialing a number without the area code. |
This class has the ability to provide its name, its price, and a picture of itself. To accomplish this, you need some internal variables.
    private ContextMenu mnu = new ContextMenu();
    private Decimal     mPrice;
    private string      mIdentifier;
    private string      mToolsNeeded;
    private ArrayList   mAr;
    private Image       mImg;
    static int          mPartsCount=0;

    private struct menu_item
    {
      public MenuItem m;
      public string s;
      public void DoSomething(string Title)
      {
        if(s != null)
          MessageBox.Show(s, Title);
        else
          MessageBox.Show("No Action", Title);
      }
    }
VB
    Private mnu As ContextMenu = New ContextMenu()
    Private mPrice As Decimal
    Private mIdentifier As String
    Private mToolsNeeded As String
    Private mAr As ArrayList
    Private mImg As Image
    Shared mPartsCount As Int32 = 0

    Private Structure menu_item
      Public m As MenuItem
      Public s As String
      Public Sub DoSomething(ByVal Title As String)
        If Not s Is Nothing Then
          MessageBox.Show(s, Title)
        Else
          MessageBox.Show("No Action", Title)
        End If
      End Sub
    End Structure
The structure holds both the MenuItem and a string. The string is used in the DoSomething method. If this were a real application, the DoSomething method would perhaps do something real such as talk back to the inventory software and decrease the count of this item when the customer bought it. Right now, this method just displays some string in a message box.
The constructor for this class initializes data and initializes individual MenuItem objects. Each MenuItem and its associated string are kept in a menu_item structure that is added to a collection of menu_items. The constructor and setup code follows.
C#
    public SomePart()
    {
      mPartsCount += 1;
      GetData();
      InitMenu();
    }

    // This private function is supposed to get the record for
    // this part from the database and set up whatever fields are necessary
    private void GetData()
    {
      //Fake getting this from the database
      mPrice = 54.952M + mPartsCount;
      mToolsNeeded = "Linemans pliers\n Phillips screwdriver\n Half a brain";
      mIdentifier = "Some Part #" + mPartsCount.ToString();

      mImg = Image.FromFile(mPartsCount.ToString() + ".ico");

    }

    private void InitMenu()
    {
      mAr = new ArrayList();
      menu_item m;

      m = new menu_item();
      m.m = new MenuItem("Customer Price", new EventHandler(this.MenuHandler));
      m.s = "Customer Price = " + mPrice.ToString("C");
      mAr.Add(m);
      m = new menu_item();
      m.m = new MenuItem("Tools Needed", new EventHandler(this.MenuHandler));
      m.s = "Suggested Tools = " + mToolsNeeded;
      mAr.Add(m);

      for(int k=0; k<mPartsCount; k++)
      {
        m = new menu_item();
        m.m = new MenuItem("Item #" + k.ToString(),
                                 new EventHandler(this.MenuHandler));
        mAr.Add(m);
      }

      mAr.TrimToSize();

    }

    private void MenuHandler(object sender, EventArgs e)
    {
      MenuItem m = (MenuItem)sender;

      foreach(menu_item menu in mAr)
      {
        if (menu.m == m)
          menu.DoSomething(mIdentifier);
      }
    }
VB
  Public Sub New()
    mPartsCount += 1
    GetData()
    InitMenu()
  End Sub

  ' This private function is supposed to get the record for
  ' this part from the database and set up whatever fields are necessary
  Private Sub GetData()
    'Fake getting this from the database
    mPrice = CType(54.952, Decimal) + mPartsCount
    mToolsNeeded = "Linemans pliers\n Phillips screwdriver\n Half a brain"
    mIdentifier = "Some Part #" + mPartsCount.ToString()
    mImg = Image.FromFile(mPartsCount.ToString() + ".ico")

  End Sub

  Private Sub InitMenu()
    mAr = New ArrayList()
    Dim m As menu_item
    Dim k As Int32

    m = New menu_item()
    m.m = New MenuItem("Customer Price", New EventHandler(AddressOf MenuHandler))
    m.s = "Customer Price = " + mPrice.ToString("C")
    mAr.Add(m)

    m = New menu_item()
    m.m = New MenuItem("Tools Needed", New EventHandler(AddressOf MenuHandler))
    m.s = "Suggested Tools = " + mToolsNeeded
    mAr.Add(m)

    For k = 0 To mPartsCount - 1
      m = New menu_item()
      m.m = New MenuItem("Item #" + k.ToString(), _
                         New EventHandler(AddressOf MenuHandler))
      mAr.Add(m)
    Next

    mAr.TrimToSize()

  End Sub

  Private Sub MenuHandler(ByVal sender As Object, ByVal e As EventArgs)
    Dim m As MenuItem = DirectCast(sender, MenuItem)
    Dim menu As menu_item

    For Each menu In mAr
      If Object.Equals(menu.m, m) Then
        menu.DoSomething(mIdentifier)
      End If
    Next
  End Sub
Note that in the MenuHandler code, the C# version is able to use the double equals sign (= =) to detect if the MenuItem chosen is the same as one in the array of menu_items. The VB code has no such construct. You need to use the Object.Equals method.
The last pieces of code in this class are the properties and a method that actually displays the menu.
C#
    public void ShowMenu(Control c, Point p)
    {
      foreach(menu_item m in mAr)
      {
        mnu.MenuItems.Add(m.m);
      }

      mnu.Show(c, p);
      mnu.MenuItems.Clear();
    }

    public Decimal Price { get{ return mPrice; } }
    public string ID { get{ return mIdentifier; } }
    public Image img { get{ return mImg; } }
VB
  Public Sub ShowMenu(ByVal c As Control, ByVal p As Point)
    Dim m As menu_item

    For Each m In mAr
      mnu.MenuItems.Add(m.m)
    Next

    mnu.Show(c, p)
    mnu.MenuItems.Clear()

  End Sub

  Public ReadOnly Property Price() As Decimal
    Get
      Return mPrice
    End Get
  End Property

  Public ReadOnly Property ID() As String
    Get
      Return mIdentifier
    End Get
  End Property
  Public ReadOnly Property img() As Image
    Get
      Return mImg
    End Get
  End Property
Note here also how the C# code is much more compact than the VB code for the same functionality.
When I show the menu, I enumerate through all the menu_item structures held in the ArrayList. Each MenuItem found is added to the ContextMenu, which is then displayed at the position passed in.
Building the menu in this manner allows me to use code that is independent of how many menu items this object wants to show. As you can see from the InitMenu method, each object has a different menu with different choices. This is to simulate object initialization from a database.
Note the static (shared in VB) variable that is used as a cross-object counter. This is a handy way to count instances of a class. I suggest you read up on it in the online help.
Now it is time to program the form that uses this class. The first thing to do is to double-click the Quit button and add some code in the generated delegate to close out the application. Use the form's Close method for this.
Because this example is intended to show how an object can pop up a menu that is tailored to itself, you will need some way to notify the object that it must do this. Normally the user would right-click a control to invoke the pop-up menu.
When you create each object you will place it in a TreeView, a CheckBox, and an image control. When the user right-clicks any of these controls, he or she should see the same pop-up menu for an object no matter where the object is.
First, add a class local variable to the form that represents the class.
C#
SomePart Engine;
VB
Dim Engine As SomePart
Add the following code to the form that handles the right-click event for any control that holds an instance of the SomePart class.
    #region Mouse Events

    private void RightClick(object sender, MouseEventArgs e)
    {
      if(e.Button != MouseButtons.Right)
        return;

      if(sender is TreeView)
        Engine = (SomePart)Tree.SelectedNode.Tag;
      else if(sender is PictureBox)
      {
        PictureBox p = (PictureBox)sender;
        Engine = (SomePart)p.Tag;
      }
      else if(sender is CheckBox)
      {
        CheckBox c = (CheckBox)sender;
        Engine = (SomePart)c.Tag;
      }

      Engine.ShowMenu((Control)sender, new Point(e.X, e.Y) );

    }

    #endregion
VB
#Region "Mouse Events"

  Private Sub RightClick(ByVal sender As Object, ByVal e As MouseEventArgs)

    If e.Button <> MouseButtons.Right Then Return

    If sender.GetType() Is GetType(TreeView) Then
      Engine = CType(Tree.SelectedNode.Tag, SomePart)
    ElseIf sender.GetType() Is GetType(PictureBox) Then
      Dim p As PictureBox = CType(sender, PictureBox)
      Engine = CType(p.Tag, SomePart)
    ElseIf sender.GetType() Is GetType(CheckBox) Then
      Dim c As CheckBox = CType(sender, CheckBox)
      Engine = CType(c.Tag, SomePart)
    End If
    Engine.ShowMenu(CType(sender, Control), New Point(e.X, e.Y))

  End Sub

#End Region
You can see from this delegate that I check for the type of control that invoked this method. Once I know that information, I create a reference to the object that is associated with that control. In this case, the Tag property of each control holds the object.
The last thing I do here is tell the object to show its pop-up menu at the current mouse position. If the object had no pop-up menu, this method would still run just fine. This code works for all instances of the SomeParts object.
Now that you have the delegate coded, it is time to add the constructor code.
C#
    public Form1()
    {
      InitializeComponent();

      Tree.MouseDown += new MouseEventHandler(this.RightClick);
      chkP1.MouseDown += new MouseEventHandler(this.RightClick);
      chkP2.MouseDown += new MouseEventHandler(this.RightClick);
      chkP3.MouseDown += new MouseEventHandler(this.RightClick);
      picA.MouseDown += new MouseEventHandler(this.RightClick);
      picB.MouseDown += new MouseEventHandler(this.RightClick);
      picC.MouseDown += new MouseEventHandler(this.RightClick);

      SomePart part;

      //Put the first part in the tree and the checkbox and the image
      part = new SomePart();
      TreeNode Node = new TreeNode();
      Node.Text = part.ID;
      Node.Tag = part;
      Tree.Nodes.Add(Node);
      chkP1.Text=part.ID;
      chkP1.Tag = part;
      picA.Image = part.img;
      picA.Tag = part;
      part = new SomePart();
      Node = new TreeNode();
      Node.Text = part.ID;
      Node.Tag = part;
      Tree.Nodes.Add(Node);
      chkP2.Text=part.ID;
      chkP2.Tag = part;
      picB.Image = part.img;
      picB.Tag = part;

      part = new SomePart();
      Node = new TreeNode();
      Node.Text = part.ID;
      Node.Tag = part;
      Tree.Nodes.Add(Node);
      chkP3.Text=part.ID;
      chkP3.Tag = part;
      picC.Image = part.img;
      picC.Tag = part;
    }
VB
  Public Sub New()
    MyBase.New()

    'This call is required by the Windows Form Designer.
    InitializeComponent()

    AddHandler Tree.MouseDown, AddressOf RightClick
    AddHandler chkP1.MouseDown, AddressOf RightClick
    AddHandler chkP2.MouseDown, AddressOf RightClick
    AddHandler chkP3.MouseDown, AddressOf RightClick
    AddHandler picA.MouseDown, AddressOf RightClick
    AddHandler picB.MouseDown, AddressOf RightClick
    AddHandler picC.MouseDown, AddressOf RightClick
    Dim part As SomePart

    'Put the first part in the tree and the checkbox and the image
    part = New SomePart()
    Dim Node As TreeNode = New TreeNode()
    Node.Text = part.ID
    Node.Tag = part
    Tree.Nodes.Add(Node)
    chkP1.Text = part.ID
    chkP1.Tag = part
    picA.Image = part.img
    picA.Tag = part

    part = New SomePart()
    Node = New TreeNode()
    Node.Text = part.ID
    Node.Tag = part
    Tree.Nodes.Add(Node)
    chkP2.Text = part.ID
    chkP2.Tag = part
    picB.Image = part.img
    picB.Tag = part

    part = New SomePart()
    Node = New TreeNode()
    Node.Text = part.ID
    Node.Tag = part
    Tree.Nodes.Add(Node)
    chkP3.Text = part.ID
    chkP3.Tag = part
    picC.Image = part.img
    picC.Tag = part

  End Sub
Each control gets assigned the same delegate for the MouseDown event. I create three different engine parts and add each one to the TreeView, CheckBox, and Image controls. Note that I use the Tag property of each control to hold the object's instance. I also get all information, such as the name of the object and its picture, directly from each object.
The code in this form has no idea what object is called or what its image is. This is the way it should be to provide the most programming flexibility.
This is all the code you need for the form. Compile and run the project. Your initial screen should look like Figure 5-2.
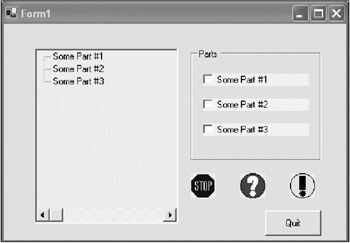
The images you see here are included with the code for this book, which you can get from the Downloads section of the Apress Web site (http://www.apress.com). Right-click the representation of each object and you will see the appropriate popup menu. Figure 5-3 shows the pop-up menu for Some Part #1 in the TreeView.
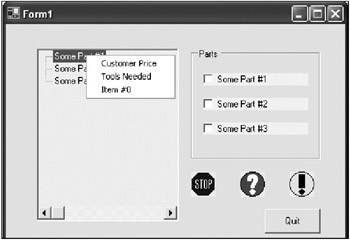
Figure 5-4 shows the pop-up menu for Some Part #2 in the Image view. You can see that the objects behave differently by the number of menu items in the menu.
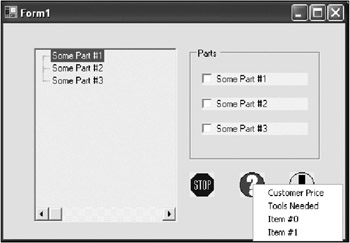
Figure 5-5 shows what happens when you click the second CheckBox and choose the customer price.
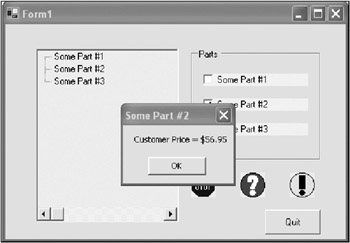
The code that activates this message box is not in the form but in the object itself. As you start activating the pop-up menu for each object, you will find that each behaves as it should, no matter where the object resides. This is the object-oriented way of displaying information. The user expects this kind of behavior. Until .NET came along, it was difficult to program this kind of behavior without all kinds of code.
Nowhere in the form's code do I change the behavior of the object based on which object was chosen or on where the object was shown. This is the object-oriented way of programming this kind of code. If the object has no pop-up menu, so be it. It just does not show.
By the way, the SomePart class was constructed so that you can easily change out the MessageBox displayed here with some more meaningful action. This is important down the line as you add database or other functionality. Adding other functionality does not require you to change the form's code at all.
[1]I'm sure they didn't know anything of my wishes, but I'm pleased by the result anyway.