The TreeView control is my favorite one to use in data entry programs. It allows you to present data in a hierarchical format. It also allows the user to see quite a bit of data in a small space or, if needed, the user can filter what he or she sees by collapsing parent nodes. It has the capability to move data within itself hierarchically, and it also supports drag and drop.
The TreeView control used in conjunction with the ListView control can make for a very powerful and intuitive data entry screen. You can think of the TreeView control as a detail view of the ListView control, only turned 90 degrees vertically. Here is what I mean.
Suppose you set up a ListView control with four columns. The first column is the ListViewItems and the other three columns are SubItems of the first one. You can do the same thing with a TreeView control. The first column would equate to a root node. The SubItems of the ListView would equate to child nodes of the parent root node.
Sometimes it is worthwhile to present different views of data to the user. After all, data entry programs are not only about entering data into some screen. They also encompass ways to present data to the user.
This next example uses a TreeView, a PictureBox, and a ListView control to present a mock photo album screen. It allows transfer of data from the ListView control to the TreeView control while the PictureBox is used to view the actual photo.
You may be wondering where the data entry part comes in. After all, the only thing I allow is transfer of a ListView control item over to a TreeView. If you think about it, this is a form of data entry. The TreeView is used to categorize the photographs. The ListView shows you all the photos in no particular order. You could easily make a form that pops up based on a right-click on the ListView item. This form would then require input from the user as to which category or categories the picture should belong. This kind of form is classic data entry. I think it is more intuitive, however, for the user to drag his or her picture over to a TreeView that contains a hierarchical list of categories.
| Note |
Keep in mind that although this form of drag and drop is intuitive and requires little training, it can be slow. When you design your program, the TreeView drag-and-drop data entry could be your main form of data entry. You could also include a "speed screen" form that allows the more advanced user to do the same thing only with more traditional (and sometimes faster) data entry forms. You will need to balance usability with ease of use. |
This example uses quite a few external bitmaps and icons that you can download from the Downloads section of the Apress Web site (http://www.apress.com).
Start a new C# or VB project. Mine is called "Photo." You will need to perform the following steps to set up your project:
Size the main form to be 700×500. Make the form start at Center Screen, and set the FormBorderStyle to FixedSingle.
Add a Label that reads Photo Classifications. Center this text in the Label.
Below the Photo Classifications Label, add a TreeView control called tvPics.
Add a Label that reads All photos. Center this text in the Label.
Below the All photos Label, add a ListView control called lvPics.
Below the lvPics ListView control, add a PictureBox called pic.
Your form should look like Figure 5-9.

As you can see, there is not much here. Even though this screen may look sparse, an awful lot of information will be presented here. Quite a bit of data validation goes on in the background too.
You will need to add the following classes to your project:
ListViewSorter
Photo
PhotoList
Your Solution Explorer should look like Figure 5-10.
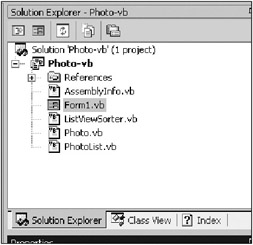
The C# screen shot would have the .cs extension instead of the .vb extension. But you know that already, don't you?
Anyway, did you notice some similarities in the classes I include here? They are essentially the same as in the previous MovieView project. In fact, the ListViewSorter class is identical.
| Caution |
Code reuse at work here! |
Here is the ListViewSorter code.
C#
using System;
using System.Windows.Forms;
using System.Collections;

namespace Photo_c
{
  /// <summary>
  /// This class sorts a ListView control by column
  /// </summary>
  public class ListViewSorter: IComparer
  {
    private int mCol;
    private SortOrder mOrder;
    public ListViewSorter(int column, SortOrder order)
    {
      mCol=column;
      mOrder = order;
    }
    public int Compare(object x, object y)
    {
      int returnVal = String.Compare(((ListViewItem)x).SubItems[mCol].Text,
        ((ListViewItem)y).SubItems[mCol].Text);
      if(mOrder == SortOrder.Descending)
        return (returnVal *= -1);
      else
        return returnVal;
      }
    }
  }
VB
Option Strict On

Imports System.Windows.Forms
Imports System.Collections

Public Class ListViewSorter
  Implements IComparer

  Dim mCol As Integer
  Dim mOrder As SortOrder

  Public Sub New(ByVal column As Integer, ByVal order As SortOrder)
    mCol = column
    mOrder = order
  End Sub

  Public Function Compare(ByVal x As Object, ByVal y As Object) As Integer _
                          Implements System.Collections.IComparer.Compare
    Dim returnVal As Integer = String.Compare( _
                                (CType(x, ListViewItem)).SubItems(mCol).Text, _
                                (CType(y, ListViewItem).SubItems(mCol).Text))
    If mOrder = SortOrder.Descending Then
      returnVal *= -1
      Return returnVal
    Else
      Return returnVal
    End If
  End Function
End Class
I went through this code in the last example, so I won't repeat myself here. I will say this, however: This class is handy to have around whenever you work with ListView controls. You can easily change it to accommodate different cultures' sorting styles.
The Photo class code follows.
C#
using System;
using System.IO;
using System.Drawing;

namespace Photo_c
{
  /// <summary>
  /// class that has a photographic memory :)
  /// </summary>
  public class Photo
  {
    Image mPic;
    string mName;
    string mLocation;
    string mDateShot;

    public Photo(string picname)
    {
      mPic = Image.FromFile(picname);
      mName = Path.GetFileNameWithoutExtension(picname);
      mDateShot = DateTime.Today.ToShortDateString();
      mLocation = mName;
    }
    public override string ToString(){ return "Photo"; }

    public string Location { get {return mLocation;} }
    public string Name     { get {return mName;} }
    public string Date     { get {return mDateShot;} }
    public Image Picture   { get {return mPic;} }
  }
}
VB
Option Strict On

Imports System.IO
Imports System.Drawing

Public Class Photo

  Dim mPic As Image
  Dim mName As String
  Dim mLocation As String
  Dim mDateShot As String

  Public Sub New(ByVal picname As String)
    mPic = Image.FromFile(picname)
    mName = Path.GetFileNameWithoutExtension(picname)
    mDateShot = DateTime.Today.ToShortDateString()
    mLocation = mName
  End Sub

  Public Overrides Function ToString() As String
    Return "Photo"
  End Function

  Public ReadOnly Property Location() As String
    Get
      Return mLocation
    End Get
  End Property

  Public ReadOnly Property Name() As String
    Get
      Return mName
    End Get
  End Property

  Public ReadOnly Property DateShot() As String
    Get
      Return mDateShot
    End Get
  End Property

  Public ReadOnly Property Picture() As Image
    Get
      Return mPic
    End Get
  End Property
End Class
This class, when instantiated, creates an object that holds an image. It has a few properties and overrides the ToString method. Obviously, a real application would need quite a few more properties. In fact, some of the properties you may want to expose are properties of the image itself.
| Tip |
Refer to my book GDI+ Programming in C# and VB .NET (Apress, 2002) for a detailed discussion on what properties you can get from a .jpg, .gif, or other type of image file. You'll be surprised at the wealth of information these image standards afford.[3] |
Remember that I overrode the ToString method in the last example. Here I do it for a different reason.
The last class to be filled in is the PhotoList class.
using System;
using System.Drawing;
using System.Collections;
using System.Windows.Forms;

namespace Photo_c
{
  /// <summary>
  /// Class that holds all photographs regardless of classification
  /// </summary>

  public class PhotoList
  {
    ArrayList mPics;

    public PhotoList()
    {
      mPics = new ArrayList();

      //Normally you would detect these pictures and load them.
      mPics.Add(new Photo("desert1.jpg"));
      mPics.Add(new Photo("desert2.jpg"));
      mPics.Add(new Photo("desert3.jpg"));
      mPics.Add(new Photo("fields1.jpg"));
      mPics.Add(new Photo("fields2.jpg"));
      mPics.Add(new Photo("flowers1.jpg"));
      mPics.Add(new Photo("flowers2.jpg"));
      mPics.Add(new Photo("flowers3.jpg"));
      mPics.Add(new Photo("flowers4.jpg"));
      mPics.Add(new Photo("sea1.jpg"));
      mPics.Add(new Photo("sea2.jpg"));
      mPics.Add(new Photo("sea3.jpg"));
      mPics.Add(new Photo("sea4.jpg"));
      mPics.Add(new Photo("spring1.jpg"));
      mPics.Add(new Photo("spring2.jpg"));
      mPics.Add(new Photo("spring3.jpg"));
      mPics.TrimToSize();
    }

    /// <summary>
    /// Gets an Image array
    /// </summary>
    public ListViewItem[] Items
    {
      get
      {
        mPics.TrimToSize();
        ListViewItem[] lst = new ListViewItem[mPics.Count];

        ArrayList aList = new ArrayList();
        foreach(Photo p in mPics)
        {
          ListViewItem l = new ListViewItem(p.Name);
          l.Tag = p;
          l.SubItems.Add(p.Date);
          l.SubItems.Add(p.Location);
          l.SubItems.Add("JPG");

          aList.Add(l);
        }
        aList.TrimToSize();
        aList.CopyTo(lst, 0);
        return lst;
      }
    }
  }
}
VB
Option Strict On

Imports System.Drawing
Imports System.Collections
Imports System.Windows.Forms

Public Class PhotoList

  Dim mPics As ArrayList
  Public Sub New()
    mPics = New ArrayList()

    'Normally you would detect these pictures and load them.
    mPics.Add(New Photo("desert1.jpg"))
    mPics.Add(New Photo("desert2.jpg"))
    mPics.Add(New Photo("desert3.jpg"))
    mPics.Add(New Photo("fields1.jpg"))
    mPics.Add(New Photo("fields2.jpg"))
    mPics.Add(New Photo("flowers1.jpg"))
    mPics.Add(New Photo("flowers2.jpg"))
    mPics.Add(New Photo("flowers3.jpg"))
    mPics.Add(New Photo("flowers4.jpg"))
    mPics.Add(New Photo("sea1.jpg"))
    mPics.Add(New Photo("sea2.jpg"))
    mPics.Add(New Photo("sea3.jpg"))
    mPics.Add(New Photo("sea4.jpg"))
    mPics.Add(New Photo("spring1.jpg"))
    mPics.Add(New Photo("spring2.jpg"))
    mPics.Add(New Photo("spring3.jpg"))
    mPics.TrimToSize()
  End Sub

  '/// <summary>
  '/// Gets an Image array
  '/// </summary>
  Public ReadOnly Property Items() As ListViewItem()
    Get
      mPics.TrimToSize()
      Dim lst(mPics.Count - 1) As ListViewItem
      Dim aList As ArrayList = New ArrayList()
      Dim p As Photo
      For Each p In mPics
        Dim l As ListViewItem = New ListViewItem(p.Name)
        l.Tag = p
        l.SubItems.Add(p.DateShot)
        l.SubItems.Add(p.Location)
        l.SubItems.Add("JPG")
        aList.Add(l)
      Next
      aList.TrimToSize()
      aList.CopyTo(lst, 0)
      Return lst
    End Get
  End Property
End Class
The constructor for this class instantiates some Photo objects, which contain photographs.
Because I use this class only in conjunction with a ListView control, I have a single Items property that returns an array of ListViewItem objects. If I decide to use this class to fill the TreeView as well, I turn this property into a function and overload it with another version that returns an array of nodes. I could even return an array of images if I like. You are not limited by what I do here.[4]
Compile your program and fix any errors you may have. (You should not have any errors.)
The code for the main form is pretty extensive. You will work your way through it from the bottom of the code on up to the constructor. First, though, add the following class local variable.
C#
PhotoList Piclist;
VB
Dim Piclist As PhotoList
This is the only class local variable you will need. The next thing to add is the delegate code for the ListView control. They consist of drag and drop, column sort, and row select methods.
    #region ListView Delegates

    private void RowSelect(object sender, EventArgs e)
    {
      Debug.Assert(sender == lvPics,
                 "Only the lvPics ListView control can activate this delegate");
      Debug.Assert(lvPics.SelectedIndices.Count <= 1,
                 "only one item can be selected");

      if(lvPics.SelectedIndices.Count == 1)
      {
        Photo p = (Photo)lvPics.SelectedItems[0].Tag;
        pic.Image = p.Picture;
      }
    }

    private void ColumnSort(object sender, ColumnClickEventArgs e)
    {
      ListView lvw = (ListView)sender;
      ArrayList SortList = (ArrayList)lvw.Tag;
      SortList[e.Column] = (SortOrder)SortList[e.Column] ==
                            SortOrder.Ascending ?
                            SortOrder.Descending :
                            SortOrder.Ascending;
      lvw.Sorting = (SortOrder)SortList[e.Column];

      lvw.BeginUpdate();
      lvw.ListViewItemSorter = new ListViewSorter(e.Column, lvw.Sorting);
      lvw.Sort();
      lvw.EndUpdate();
    }

    private void PhotoStartDrag(object sender, ItemDragEventArgs e)
    {
      if(sender == lvPics)
        lvPics.DoDragDrop(e.Item, DragDropEffects.Move );
    }

    private void PhotoDragAcross(object sender, DragEventArgs e)
    {
      if(sender == lvPics)
        e.Effect = DragDropEffects.Move;
    }

    #endregion
VB
#Region "ListView Delegates"

  Private Sub RowSelect(ByVal sender As Object, ByVal e As EventArgs)
    Debug.Assert(sender Is lvPics, _
                 "Only the lvPics ListView control can activate this delegate")
    Debug.Assert(lvPics.SelectedIndices.Count <= 1, _
                 "only one item can be selected")
    If lvPics.SelectedIndices.Count = 1 Then
      Dim p As Photo = DirectCast(lvPics.SelectedItems(0).Tag, Photo)
      pic.Image = p.Picture
    End If
  End Sub

  Private Sub ColumnSort(ByVal sender As Object, _
                         ByVal e As ColumnClickEventArgs)
    Dim lvw As ListView = CType(sender, ListView)
    Dim SortList As ArrayList = CType(lvw.Tag, ArrayList)
    SortList(e.Column) = IIf(DirectCast(SortList(e.Column), SortOrder) = _
                                                     SortOrder.Ascending, _
                                                     SortOrder.Descending, _
                                                     SortOrder.Ascending)
    lvw.Sorting = DirectCast(SortList(e.Column), SortOrder)

    lvw.BeginUpdate()
    lvw.ListViewItemSorter = New ListViewSorter(e.Column, lvw.Sorting)
    lvw.Sort()
    lvw.EndUpdate()
  End Sub

  Private Sub PhotoStartDrag(ByVal sender As Object, _
                             ByVal e As ItemDragEventArgs)
    If sender Is lvPics Then
      lvPics.DoDragDrop(e.Item, DragDropEffects.Move)
    End If
  End Sub

  Private Sub PhotoDragAcross(ByVal sender As Object, ByVal e As DragEventArgs)
    If sender Is lvPics Then
      e.Effect = DragDropEffects.Move
    End If
  End Sub

#End Region
The RowSelect delegate has the following code in it:
    Debug.Assert(sender == lvPics,
               "Only the lvPics ListView control can activate this delegate");
    Debug.Assert(lvPics.SelectedIndices.Count <= 1,
               "only one item can be selected");
I have mentioned this before, but I will reiterate it here: If you have code that is supposed to run only under certain conditions, you should use assertion code to detect any wrongdoing. The assertion code is compiled out of the released version to increase speed. Now, I could have added code to make sure that the sender is the correct type, but that would only really be needed if this were a multicast delegate. That is, it would only be needed if this delegate were designed to be used by more than one control. In this case, I designed this delegate to be used only by the lvPics ListView control. My test-engineering department would find an error in usage by seeing the assertion.
Also note that I allow only one item to be selected. I take care of this in the initialization routine by setting the MultiSelect property to false. If I forgot to do this, the test engineer would undoubtedly try to select multiple items and he or she would get an assertion error. Getting this error would alert me (the programmer) to the fact that I made a boneheaded omission.
Even though the ListView control does not accept drop operations, I still attach a delegate to the DragEnter event. I do this so I can set the drag effects to something that represent copying an object. This is strictly a cosmetic thing and adds no real functionality to the code.
The following code is the delegate code for the TreeView control.
    #region TreeView Delegates

    private void NodeSelect(object sender, TreeViewEventArgs e)
    {
      Debug.Assert(sender == tvPics,
                 "Only the tvPics TreeView control can activate this delegate");
      if(e.Node.Tag != null)
      {
        Photo p = (Photo)e.Node.Tag;
        pic.Image = p.Picture;
      }
      else
        pic.Image = null;
    }

    private void TreeDragInto(object sender, DragEventArgs e)
    {
      e.Effect = DragDropEffects.All;
    }

    private void TreeDragDrop(object sender, DragEventArgs e)
    {
      //The x and y values are in form coordinates
      tvPics.SelectedNode = tvPics.GetNodeAt(tvPics.PointToClient
                                             (new Point(e.X, e.Y)));
      if(tvPics.SelectedNode == null)
      {
        MessageBox.Show("You need to drop this item on a node.");
        return;
      }

      //Normally you would detect the source data against the drop node
      //If the source data did not belong there then flag an error
      if(tvPics.SelectedNode.Parent == null)
      {
        MessageBox.Show("You cannot drop this item on the root node.");
        return;
      }

      if(tvPics.SelectedNode.Tag != null)
      {
        MessageBox.Show("You cannot drop a photo on a photo.");
        return;
      }

      //Get the object being passed.
      //I use a ListView object as the carrier since Photo is not serializable
      //A serializable object must be able to serialize all data within
      object o = e.Data.GetData(DataFormats.Serializable);
      ListViewItem l = (ListViewItem)o;
      Photo snap = (Photo)l.Tag;

      tvPics.BeginUpdate();
      TreeNode n = new TreeNode(snap.Name);
      n.Tag = snap;
      n.SelectedImageIndex = 2;
      n.ImageIndex = 2;
      tvPics.SelectedNode.Nodes.Add(n);
      tvPics.SelectedNode.Expand();
      tvPics.EndUpdate();

    }

    private void TreeExpandCollapse(object sender, TreeViewEventArgs e)
    {
      if(e.Action == TreeViewAction.Expand)
        e.Node.SelectedImageIndex = 1;

      if(e.Action == TreeViewAction.Collapse)
        e.Node.SelectedImageIndex = 0;

    }
    #endregion
VB
#Region "TreeView Delegates"

  Private Sub NodeSelect(ByVal sender As Object, ByVal e As TreeViewEventArgs)
    Debug.Assert(sender Is tvPics, _
                 "Only the tvPics TreeView control can activate this delegate")
    If Not e.Node.Tag Is Nothing Then
      Dim p As Photo = DirectCast(e.Node.Tag, Photo)
      pic.Image = p.Picture
    Else
      pic.Image = Nothing
    End If
  End Sub

  Private Sub TreeDragInto(ByVal sender As Object, ByVal e As DragEventArgs)
    e.Effect = DragDropEffects.All
  End Sub

  Private Sub TreeDragDrop(ByVal sender As Object, ByVal e As DragEventArgs)
    'The x and y values are in form coordinates
    tvPics.SelectedNode = tvPics.GetNodeAt(tvPics.PointToClient _
                                          (New Point(e.X, e.Y)))
    If tvPics.SelectedNode Is Nothing Then
      MessageBox.Show("You need to drop this item on a node.")
      Return
    End If

    'Normally you would detect the source data against the drop node
    'If the source data did not belong there then flag an error
    If tvPics.SelectedNode.Parent Is Nothing Then
      MessageBox.Show("You cannot drop this item on the root node.")
      Return
    End If

    If Not tvPics.SelectedNode.Tag Is Nothing Then
      MessageBox.Show("You cannot drop a photo on a photo.")
      Return
    End If

    'Get the object being passed.
    'I use a ListView object as the carrier since Photo is not serializable
    'A serializable object must be able to serialize all data within
    Dim o As Object = e.Data.GetData(DataFormats.Serializable)
    Dim l As ListViewItem = DirectCast(o, ListViewItem)
    Dim snap As Photo = DirectCast(l.Tag, Photo)
    tvPics.BeginUpdate()
    Dim n As TreeNode = New TreeNode(snap.Name)
    n.Tag = snap
    n.SelectedImageIndex = 2
    n.ImageIndex = 2
    tvPics.SelectedNode.Nodes.Add(n)
    tvPics.SelectedNode.Expand()
    tvPics.EndUpdate()

  End Sub

  Private Sub TreeExpandCollapse(ByVal sender As Object, _
                                 ByVal e As TreeViewEventArgs)
    If e.Action = TreeViewAction.Expand Then
      e.Node.SelectedImageIndex = 1
    End If

    If e.Action = TreeViewAction.Collapse Then
      e.Node.SelectedImageIndex = 0
    End If
  End Sub
#End Region
There is quite a bit of complicated code here.
The TreeDragDrop routine checks to see if it is permissible to drop a photo on a particular node. If not, I flag an error with a message box and abort the operation. If the operation is allowed to proceed, I create a new node, add it to the drop node, and set the new node's Tag property to hold the Photo object.
The NodeSelect routine checks the current node for a tag. If the current node's tag is null, I clear the PictureBox. If the current node is not null, I cast the Tag object into the Photo object and display the photo in the PictureBox. This is simple enough, but it has its problems, as I will show soon.
The TreeExpandCollapse routine changes the icon shown at the node being expanded or collapsed. I use an open folder icon for expanded nodes and a closed folder icon for collapsed nodes. This gives the user some visual feedback in the TreeView.
Now on to the initialization code for the form. Add the following code region to your main form.
    #region Setup routines

    private void SetupListView()
    {
      //Set up the photo ListView
      lvPics.View = View.Details;
      lvPics.AllowColumnReorder = true;
      lvPics.GridLines = true;
      lvPics.FullRowSelect = true;
      lvPics.AllowDrop = true;
      lvPics.MultiSelect = false;
      lvPics.SelectedIndexChanged += new EventHandler(this.RowSelect);
      lvPics.ItemDrag     += new ItemDragEventHandler(this.PhotoStartDrag);
      lvPics.DragEnter    += new DragEventHandler(this.PhotoDragAcross);
      lvPics.Columns.Add("Name",     -2, HorizontalAlignment.Center);
      lvPics.Columns.Add("Date",     -2, HorizontalAlignment.Center);
      lvPics.Columns.Add("Location", -2, HorizontalAlignment.Center);
      lvPics.Columns.Add("Format",   -2, HorizontalAlignment.Center);
      //Account for extra pixel created by column separator
      int width = (lvPics.Width - lvPics.Columns.Count) / lvPics.Columns.Count;
      foreach(ColumnHeader c in lvPics.Columns)
        c.Width = width;

      //Make something that will hold the current
      //sort order for the current column
      ArrayList order = new ArrayList();
      for(int k=0; k<lvPics.Columns.Count; k++)
        order.Insert(k, SortOrder.Ascending);
      order.TrimToSize();
      lvPics.Tag = order;
      lvPics.ColumnClick += new ColumnClickEventHandler(ColumnSort);

      //Fill the ListView
      lvPics.BeginUpdate();
      lvPics.Items.Clear();
      lvPics.Items.AddRange(Piclist.Items);
      lvPics.EndUpdate();

    }

    private void SetupTree()
    {
      ImageList iList = new ImageList();
      iList.Images.Add(Image.FromFile("closed.ico"));
      iList.Images.Add(Image.FromFile("open.ico"));
      iList.Images.Add(Image.FromFile("camera.ico"));

      tvPics.AllowDrop = true;
      tvPics.ImageList = iList;
      tvPics.HideSelection = false;
      tvPics.HotTracking = true; //This is limiting
      tvPics.AfterSelect   += new TreeViewEventHandler(NodeSelect);
      tvPics.AfterExpand   += new TreeViewEventHandler(TreeExpandCollapse);
      tvPics.AfterCollapse += new TreeViewEventHandler(TreeExpandCollapse);
      tvPics.DragEnter     += new DragEventHandler(TreeDragInto);
      tvPics.DragDrop      += new DragEventHandler(TreeDragDrop);

      //Add some root nodes
      TreeNode root = new TreeNode("All Photos");
      root.Nodes.Add("Seascapes");
      root.Nodes.Add("Desert Scenes");
      root.Nodes.Add("Flowers");
      root.Nodes.Add("Spring");
      root.Expand();
      tvPics.Nodes.Add(root);
    }
VB
#Region "Setup routines"

  Private Sub SetupListView()
    'Set up the photo ListView
    lvPics.View = View.Details
    lvPics.AllowColumnReorder = True
    lvPics.GridLines = True
    lvPics.FullRowSelect = True
    lvPics.AllowDrop = True
    lvPics.MultiSelect = False
    AddHandler lvPics.SelectedIndexChanged, _
                     New EventHandler(AddressOf RowSelect)
    AddHandler lvPics.ItemDrag, _
                     New ItemDragEventHandler(AddressOf PhotoStartDrag)
    AddHandler lvPics.DragEnter, _
                     New DragEventHandler(AddressOf PhotoDragAcross)
    lvPics.Columns.Add("Name", -2, HorizontalAlignment.Center)
    lvPics.Columns.Add("Date", -2, HorizontalAlignment.Center)
    lvPics.Columns.Add("Location", -2, HorizontalAlignment.Center)
    lvPics.Columns.Add("Format", -2, HorizontalAlignment.Center)
    'Account for extra pixel created by column separator
    Dim c As ColumnHeader
    Dim width As Integer
    width = (lvPics.Width - lvPics.Columns.Count) \ lvPics.Columns.Count
    For Each c In lvPics.Columns
      c.Width = width
    Next

    'Make something that will hold the current sort order for the current column
    Dim order As ArrayList = New ArrayList()
    Dim k As Integer
    For k = 0 To lvPics.Columns.Count - 1
      order.Insert(k, SortOrder.Ascending)
    Next
    order.TrimToSize()
    lvPics.Tag = order
    AddHandler lvPics.ColumnClick, _
                     New ColumnClickEventHandler(AddressOf ColumnSort)

    'Fill the ListView
    lvPics.BeginUpdate()
    lvPics.Items.Clear()
    lvPics.Items.AddRange(Piclist.Items)
    lvPics.EndUpdate()

  End Sub

  Private Sub SetupTree()
    Dim iList As ImageList = New ImageList()
    iList.Images.Add(Image.FromFile("closed.ico"))
    iList.Images.Add(Image.FromFile("open.ico"))
    iList.Images.Add(Image.FromFile("camera.ico"))
    tvPics.AllowDrop = True
    tvPics.ImageList = iList
    tvPics.HideSelection = False
    tvPics.HotTracking = True 'This is limiting
    AddHandler tvPics.AfterSelect, _
                     New TreeViewEventHandler(AddressOf NodeSelect)
    AddHandler tvPics.AfterExpand, _
                     New TreeViewEventHandler(AddressOf TreeExpandCollapse)
    AddHandler tvPics.AfterCollapse, _
                     New TreeViewEventHandler(AddressOf TreeExpandCollapse)
    AddHandler tvPics.DragEnter, _
                     New DragEventHandler(AddressOf TreeDragInto)
    AddHandler tvPics.DragDrop, _
                     New DragEventHandler(AddressOf TreeDragDrop)

    'Add some root nodes
    Dim root As TreeNode = New TreeNode("All Photos")
    root.Nodes.Add("Seascapes")
    root.Nodes.Add("Desert Scenes")
    root.Nodes.Add("Flowers")
    root.Nodes.Add("Spring")
    root.Expand()
    tvPics.Nodes.Add(root)

  End Sub
#End Region
First, I'll pick apart the ListView setup. This is pretty much the same as the setup for the previous MovieList example. I set up the number of columns, change the width to match each column to be evenly divided across the width of the control, and fill it with ListViewItems from the PhotoList object. Notice that I also add the necessary code to sort based on the column chosen.
I set up the TreeView with static nodes that represent photograph categories. Normally, you would make this tree with perhaps only the root node. The user would set up the categories in a different screen. It is best if the user can have as much control over a program like this as possible.
The TreeView uses three icons. One represents an expanded node, one represents a collapsed node, and one represents a picture. I hook into the AfterExpand and AfterCollapse events to change these icons accordingly. This is a nicety that makes your program just a little better. Because I want to do drag-and-drop operations, I hook into the appropriate events for this functionality.
The constructor should look like the following.
    public Form1()
    {

      InitializeComponent();

      Piclist = new PhotoList();

      pic.SizeMode = PictureBoxSizeMode.StretchImage;
      SetupListView();
      SetupTree();
    }
VB
  Public Sub New()
    MyBase.New()

    'This call is required by the Windows Form Designer.
    InitializeComponent()

    Piclist = New PhotoList()

    pic.SizeMode = PictureBoxSizeMode.StretchImage
    SetupListView()
    SetupTree()

  End Sub
Now your program is complete. Compile and run the program. Your initial screen should look like the one shown in Figure 5-11.
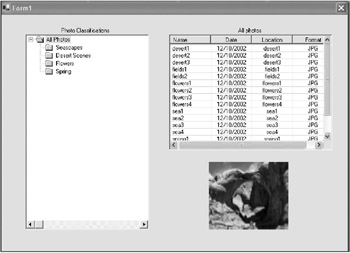
Here you see each photograph and some associated properties. If you have been reading the code, you should know that I am hard-coding the format field. As I mentioned, though, you can obtain this information and much more from the file itself.
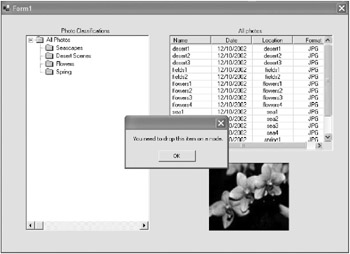
Try dragging a photograph over to the TreeView without dropping it on a node. Figure 5-12 is what you should see.
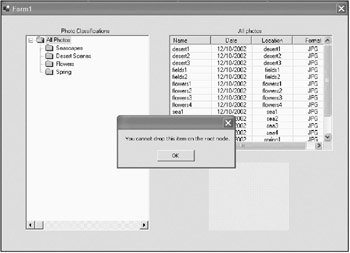
Now try dropping a photograph on the root node All Photos. You should see the message in Figure 5-13.
What do you notice about the drag-and-drop operation? As you drag and drop onto a tree node, there is no feedback to tell you that you are on a node. There is also no feedback to tell you that you cannot drop onto a node before you release the mouse button.
| Cross-Reference |
I cover the TreeView control in great detail in Chapter 9 and also in Chapter 10. Chapter 10 covers using the TreeView in a multithreaded way. |
As I said (and demonstrated) before, if you can steer the user along a data entry path, you should do so.
There's actually no need at all for these two error messages. Wouldn't it be nice if while you were dragging the photograph over the tree, the node under the mouse would highlight? Wouldn't it also be nice to highlight only the nodes that can accept the photographs? If you were able to do these two things, you could get rid of some postdrop validation code and an annoying error message for the user. Try adding the following delegate to the TreeView delegate region.
C#
    private void TreeDragOver(object sender, DragEventArgs e)
    {
      //Stop this from happening when over a node that
      //is not allowed to be dropped on
      TreeNode node = tvPics.GetNodeAt(tvPics.PointToClient
                                       (new Point(e.X, e.Y)));
      if(node.Tag == null)
      {
        tvPics.Focus(); //Problem with this is that it fires an event
        tvPics.SelectedNode = node;
        e.Effect = DragDropEffects.All;
      }
      else e.Effect = DragDropEffects.None;
    }
VB
  Private Sub TreeDragOver(ByVal sender As Object, ByVal e As DragEventArgs)
    'Stop this from happening when over a node that
    'is not allowed to be dropped on
    Dim node As TreeNode = tvPics.GetNodeAt(tvPics.PointToClient _
                                     (New Point(e.X, e.Y)))
    If node.Tag Is Nothing Then
      tvPics.Focus() 'Problem with this is that it fires an event
      tvPics.SelectedNode = node
      e.Effect = DragDropEffects.All
    Else
      e.Effect = DragDropEffects.None
    End If
  End Sub
In this code, I first instantiate a new TreeNode based on the position of the mouse. If the node has a valid tag, I set the focus to the TreeView control and set the selected node to the new node under the mouse. This means that I allow you to only drop a photograph on a node that is not a photograph. If the drop node is not valid, I set the drop effects to none so it is impossible to drop the photo. Thus, the drop zone error message never gets run.
Add the following delegate hook in the SetupTree code.
C#
tvPics.DragOver += new DragEventHandler(TreeDragOver);
VB
AddHandler tvPics.DragOver, New DragEventHandler(AddressOf TreeDragOver)
Also, add this line of code in the same method.
C#
root.Tag = "Root Node";
VB
root.Tag = "Root Node"
You need to change one last thing. Change the code in the NodeSelect delegate to accommodate the new tag for the root node when showing pictures. This will blank out the PictureBox when a nonpicture node is selected. Here is the new delegate.
C#
    private void NodeSelect(object sender, TreeViewEventArgs e)
    {
      Debug.Assert(sender == tvPics,
                 "Only the tvPics TreeView control can activate this delegate");
      if(e.Node.Tag != null && e.Node.Tag.ToString() == "Photo")
      {
        Photo p = (Photo)e.Node.Tag;
        pic.Image = p.Picture;
      }
      else
        pic.Image = null;
    }
  Private Sub NodeSelect(ByVal sender As Object, ByVal e As TreeViewEventArgs)
    Debug.Assert(sender Is tvPics, _
                 "Only the tvPics TreeView control can activate this delegate")
    If (Not e.Node.Tag Is Nothing) AndAlso e.Node.Tag.ToString() = "Photo" Then
      '     If Not e.Node.Tag Is Nothing Then
      Dim p As Photo = DirectCast(e.Node.Tag, Photo)
      pic.Image = p.Picture
    Else
      pic.Image = Nothing
    End If
  End Sub
There is a very important point in this VB code. All you VB 6.0 programmers, pay attention!
You must use the AndAlso operator when comparing the tag here. In VB 6.0 the "and" operator does not mean the same thing as in C or C++, or C# or any other "C" family language. In VB 6.0 the whole line gets evaluated, even if the first logical test is not satisfied. In other languages, you are allowed to have an illegal test for the second half of the IF statement if the first half does not pass. This is because in other languages the evaluation of the IF statement is stopped when one of the tests is invalid. This technique is called "short-circuiting the expression" and programmers use it all the time.
Unfortunately, Microsoft decided to carry this quirk/bug/aggravation of VB 6.0 with them into VB .NET. In a nod to good programming, though, Microsoft did include the AndAlso operator, which acts like the "and" operator in C# and other languages.
Anyway, if you did not use the AndAlso operator here, your program would crash inexplicably and I would get all the blame.[5]