In Chapter 5 you looked at data entry programs from a GUI point of view. You already knew the basics of text and simple form-based data entry screens. Chapter 5 expanded on this knowledge by introducing some more advanced data entry screens.
This chapter aims to do the same sort of thing with the data itself. So far you have seen raw data in the form of user-entered text or a file on the hard drive. You should not be complacent in thinking that that all data is either from a database or a keyboard, however. There are other kinds of data you should be aware of. Identifying and handling different forms of data is what this chapter is all about.
So, where does data come from? Like most people, I know where babies come from, and I even know some of the biology involved. I am not an obstetrician, however. Well, as with babies, I know some things about databases such as how to connect to them, extract data from them, and save data to them. I even know a few things about how databases work. I am not an ODBC expert, however.
When most people think of data entry programs, they think of databases. The usual question then becomes, "Is it Oracle or SQL?" Most of the tragically uninformed also have very strong opinions on which database is best or fastest. You know the kind of people I'm talking about.
To me, a database is somewhere to store data to and retrieve data from. I can set up a pretty good structure and I can write some SQL code, but I leave performance to the experts. As far as experts go, there are many books on the subject, the better of which come from Apress, the publisher of this book.
Because the database is tied so closely to the data entry program, I thought it wise to take you through how to use the database in your data entry program. Indepth coverage of all the nuances of ADO.NET is beyond the scope of this book, but I think you will get a good feeling of how it is done from this chapter.
ADO.NET consists of basically four layers:
Command object: This object executes commands (usually SQL) on the data source.
DataReader object: This object provides a high-speed, forward read-only access to your data.
DataAdapter object: This object populates a DataSet and also allows you to update a data source.
The Connection object connects with the data source in two ways. The first is a highly optimized provider called the SQL Server .NET Data Provider. The second is a more general provider called the OLE DB .NET Data Provider.
The general OLE DB provider will work with just about any modern database out there. If you were to use Oracle or some other powerful database, you would get a specialized provider just for that.
| Note |
There are more than a few wizards and such to help you set up database access in .NET. In this chapter, however, I stick to doing it from code only. If you want to see these wizards and data controls at work, I suggest you look through the online help files. |
Here is how you set up the Connection object.
C#
    string Provider = "Provider=Microsoft.Jet.OLEDB.4.0;Data Source=MyDB.MDB";
    OleDbConnection myConn = new OleDbConnection(Provider);
VB
    Dim Provider As String
    Provider = "Provider=Microsoft.Jet.OLEDB.4.0;Data Source=MyDB.MDB"
    Dim myConn As OleDbConnection = New OleDbConnection(Provider)
This code sets up a connection to a Microsoft Access database using the Jet database engine. Until recently, Access was the database provided by Microsoft in its Office package. Access is commonly used and actually does very well for most applications.
So, after the connection comes the command. You need to add the following to your code to set up the Command object and have it execute.
    string strSQL = "SELECT * FROM autoparts" ;
    OleDbCommand myCmd = new OleDbCommand( strSQL, myConn );
    OleDbDataReader datareader = null;
    myConn.Open();
    datareader = myCmd.ExecuteReader();
VB
    Dim myConn As OleDbConnection = New OleDbConnection(Provider)
    Dim myCmd As OleDbCommand = New OleDbCommand(strSQL, myConn)
    Dim datareader As OleDbDataReader = Nothing
    myConn.Open()
    datareader = myCmd.ExecuteReader()
You can see from this code snippet that I am associating a SQL statement with the Connection object. I then create a DataReader object, open the connection, and invoke the Command object. There is one object left in this list: the DataSet object. I cover that object in detail shortly. For now, you will generate a small example to populate a ListBox that uses the code I just showed you.
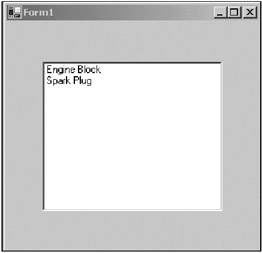
This example is compact and very speedy. It uses the forward read-only DataReader to get data from the database and then put it in the table. It is enough to get you going if you are new to ADO.NET.
Start a new project in VB or C#. Mine is called "DB_data." You will need to download this book's code from the Downloads section of the Apress Web site (http://www.apress.com) to get the database.
Add a ListBox to your form and make the form start in the center of the screen. Listings 6-1a and 6-2b show the code for the form's load event for this project. Before that, however, you need to add some namespaces.
C#
using System;
using System.Diagnostics;
using System.Drawing;
using System.Collections;
using System.ComponentModel;
using System.Windows.Forms;
using System.Data;
using System.Data.OleDb;
Imports System
Imports System.Diagnostics
Imports System.Drawing
Imports System.Collections
Imports System.ComponentModel
Imports System.Windows.Forms
Imports System.Data
Imports System.Data.OleDb
There is no initialization of variables or controls, so let's jump straight to the form's load event in Listings 6-1a and 6-1b.
    private void Form1_Load(object sender, System.EventArgs e)
    {
      string Provider = "Provider=Microsoft.Jet.OLEDB.4.0;Data Source=MyDB.MDB";
      // create Objects of ADOConnection and ADOCommand
      OleDbConnection myConn = new OleDbConnection(Provider);
      string strSQL = "SELECT * FROM autoparts" ;
      OleDbCommand myCmd = new OleDbCommand( strSQL, myConn );
      OleDbDataReader datareader = null;
      try
      {
        myConn.Open();
        datareader = myCmd.ExecuteReader();
        while (datareader.Read() )
        {
          lstParts.Items.Add(datareader["au_PartName"]);
        }
      }
      catch (Exception ex)
      {
        MessageBox.Show("Database Error: {0}", ex.Message);
      }
      finally
      {
        myConn.Close();
      }
    }
  Private Sub Form1_Load(ByVal sender As System.Object, _
                         ByVal e As System.EventArgs) Handles MyBase.Load
    Dim Provider As String

    Provider = "Provider=Microsoft.Jet.OLEDB.4.0;Data Source=MyDB.MDB"
    Dim strSQL As String = "SELECT * FROM autoparts"
    ' create Objects of ADOConnection and ADOCommand
    Dim myConn As OleDbConnection = New OleDbConnection(Provider)
    Dim myCmd As OleDbCommand = New OleDbCommand(strSQL, myConn)
    Dim datareader As OleDbDataReader = Nothing

    Try
      myConn.Open()
      datareader = myCmd.ExecuteReader()
      While datareader.Read()
        lstParts.Items.Add(datareader("au_PartName"))
      End While
    Catch ex As Exception
      MessageBox.Show("Database Error: {0}", ex.Message)
    Finally
      myConn.Close()
    End Try
  End Sub
You open and read the database inside a Try-Catch block. You should always do any data access from within an error-handling block.
Notice that the read loop does not test for end-of-file and it also does not increment the database cursor. This is a big change from ADO, where you had to increment the cursor within the loop. I can't tell you how many times over the years I forgot to increment the cursor and got stuck in an endless loop. Figure 6-1 shows the result of this example.
So, is this the best way to get data from a database? For some cases, maybe it is. However, there is a DataGrid control that allows you to connect it as a direct view into the database table. You would use this control for smaller monolithic programs for direct manipulation of your database.
The DataGrid control is very powerful indeed. In fact, it is not too hard to write a program that uses the DataGrid control as a complete front-end for any number of databases. You could write your own Microsoft SQL Server database GUI. In this chapter, I do not go this far, though. What I will do is show you the basics, and if you want to take it further you can consult the online help.
The DataGrid control is a control that lets you look into a database via a DataSet. You can think of a DataSet as a collection of DataTables. These DataTables represent the tables in your database.
When most people think of the DataGrid, they think only of databases. This control is much more powerful than that, though. It can also view data from XML files. In addition, you can fill it with data from any other source you can think of. All you need to do is create a table, get your data from someplace, and create new rows from this data. Once you put the table in a DataSet, you set the DataSource property of the grid to this DataSet and you are done—instant GUI.
So what else can a basic DataGrid control do? How about this:
It can read data from just about any database.
It can update, insert, and delete data in the database.
It can provide drill-down capabilities to view hierarchical tables.
It can provide validation capabilities for data and for referential integrity.
It would not be hard to write a small book just on the DataGrid control and its capabilities.
I would like to extend the previous example a little by replacing the ListBox with the DataGrid control. I will also add another table to the MyDB.mdb Access database. If you download the code for this example from the Downloads section of the Apress Web site (http://www.apress.com), you will also get the new database file.
Start a new project in VB or C#. Mine is called "DB_Grid."
Add a DataGrid control called dg1.
Add a Button called cmdParts to the form. Change its text to read Parts.
Add a Button called cmdInventory to the form. Change its text to read Inventory.
Add a Button called cmdBoth to the form. Change its text to read Both.
Add a Button called cmdCommit to the form. Change its text to read Commit.
Your form should look like the one shown in Figure 6-2.

One of the neat things about ADO.NET is the disconnected recordset. What this means is that you can get data from a source, put it into the DataSet, and then disconnect the DataSet from the source. This allows you to have a nonpersistent connection to a database. Where is this handy? How about in client/server applications? You can do hit-and-run data gathering from different sources without keeping the TCP/IP connection open. How about ASP.NET? You can get data from a Web site, and if the connection goes down, you can still work with the data at hand. I think this is really cool.
I show you in the code for this example how to use a disconnected recordset. I then change the program slightly so you can change data in the database. This requires a persistent DataSet connection.
First, add some namespaces so you can get all the correct classes and methods without having to use fully qualified names.
C#
using System;
using System.Drawing;
using System.Collections;
using System.ComponentModel;
using System.Windows.Forms;
using System.Data;
using System.Data.SqlClient;
using System.Data.OleDb;
VB
Imports System
Imports System.Drawing
Imports System.Collections
Imports System.ComponentModel
Imports System.Windows.Forms
Imports System.Data
Imports System.Data.SqlClient
Imports System.Data.OleDb
Now add the class variables.
    #region class local variables

    string Provider = "Provider=Microsoft.Jet.OLEDB.4.0;Data Source=MyDB.MDB";
    OleDbConnection MyDB_Conn;
    OleDbDataAdapter SQL_parts;
    OleDbDataAdapter SQL_inv;
    OleDbCommandBuilder OLE_Parts;
    OleDbCommandBuilder OLE_Inv;

    #endregion
VB
#Region "class local variables"

  Dim Provider As String = _
                  "Provider=Microsoft.Jet.OLEDB.4.0;Data Source=MyDB.MDB"
  Dim MyDB_Conn As OleDbConnection
  Dim SQL_parts As OleDbDataAdapter
  Dim SQL_inv As OleDbDataAdapter
  Dim OLE_Parts As OleDbCommandBuilder
  Dim OLE_Inv As OleDbCommandBuilder

#End Region
What I have here is a connection to the database, a couple of adapters that connect directly to tables in the database, a couple of SQL command builders, and a connection string. You can see from the connection string that the database is an Access database and that I use the Jet database engine to connect.
I could easily change this to a SQL server database by using a SQLDataAdapter object and changing the provider string to
    string Provider =
      " Data Source=localhost;Integrated
      Security=SSPI;Initial Catalog=MyDB";
I would also need to change the OleDbConnection to SQLDbConnection and the OleDbCommandBuilder to SQLDbCommandBuilder.
If you are starting to think about this, you will see that you could build a database connection class that takes data from any database based upon an enumeration. This enumeration would include values such as DB_ORACLE, DB_MSACCESS, and DB_SQL.[1]
Next, add the following delegates that correspond to the buttons.
C#
    #region events

    private void ViewParts(object sender, EventArgs e)
    {
      dg1.SetDataBinding(dg1.DataSource, "AutoParts");
    }

    private void ViewInventory(object sender, EventArgs e)
    {
      dg1.SetDataBinding(dg1.DataSource, "Inventory");
    }

    private void ViewBoth(object sender, EventArgs e)
    {
      //Setting this to a null string forces the top
      //level view.
      dg1.SetDataBinding(dg1.DataSource, "");
      dg1.Expand(-1);
    }

    private void CommitChanges(object sender, EventArgs e)
    {

    }

    #endregion
VB
#Region "events"

  Private Sub ViewParts(ByVal sender As Object, ByVal e As EventArgs)
    dg1.SetDataBinding(dg1.DataSource, "AutoParts")
  End Sub
  Private Sub ViewInventory(ByVal sender As Object, ByVal e As EventArgs)
    dg1.SetDataBinding(dg1.DataSource, "Inventory")
  End Sub

  Private Sub ViewBoth(ByVal sender As Object, ByVal e As EventArgs)
    'Setting this to a null string forces the top
    'level view.
    dg1.SetDataBinding(dg1.DataSource, "")
    dg1.Expand(-1)
  End Sub

  Private Sub CommitChanges(ByVal sender As Object, ByVal e As EventArgs)

  End Sub

#End Region
These methods may seem a bit confusing right now, but basically they swap out the table that is currently being displayed. I left the CommitChanges method blank for now. You will fill it in later.
The last piece of code to add is the initialization code in the constructor. Here it is.
| Note |
I intentionally left out any Try-Catch blocks to make the code easier to read. In a real program, you would need to add exception handling to any database manipulation code. |
C#
    public Form1()
    {
      InitializeComponent();

      cmdParts.Click     += new EventHandler(this.ViewParts);
      cmdInventory.Click += new EventHandler(this.ViewInventory);
      cmdBoth.Click      += new EventHandler(this.ViewBoth);
      cmdCommit.Click    += new EventHandler(this.CommitChanges);
      cmdCommit.Enabled  = false;
      //First thing to do is establish the connection
      MyDB_Conn          = new OleDbConnection(Provider);

      //Now create some SQL statements that get data from different tables
      SQL_parts = new OleDbDataAdapter( "SELECT * FROM AutoParts", MyDB_Conn );
      SQL_parts.SelectCommand =
                  new OleDbCommand("SELECT * FROM AutoParts", MyDB_Conn );
      OLE_Parts = new OleDbCommandBuilder(SQL_parts);

      SQL_inv = new OleDbDataAdapter( "SELECT * FROM Inventory", MyDB_Conn );
      SQL_inv.SelectCommand =
                  new OleDbCommand("SELECT * FROM Inventory", MyDB_Conn );
      OLE_Inv = new OleDbCommandBuilder(SQL_inv);

      //You now have your SQL statements that get all data from both
      //tables in the database. Create a data set and add 2 tables
      DataSet DS = new DataSet();
      DataTable Parts = new DataTable("AutoParts");
      DataTable Inv = new DataTable("Inventory");
      DS.Tables.Add(Parts);
      DS.Tables.Add(Inv);

      MyDB_Conn.Open();

      //Use the SQL data adapters to fill the tables via the SQL statements
      SQL_parts.Fill(DS, "AutoParts");
      SQL_inv.Fill(DS, "Inventory");

      //Normally I would put this at the end. I put it here
      //to prove a point... The data set is disconnected and you
      //can still work with it after the connection is gone.
      //If you need to update the database you will need to keep
      //this connection.
     MyDB_Conn.Close();
     MyDB_Conn.Dispose();

      //Once I have the data tables filled in the data set I can manipulate the
      //existing columns.
      Parts.Columns[0].Caption = "ID";
      Parts.Columns[0].ColumnName = "ID";
      Parts.Columns[1].Caption = "Name";
      Parts.Columns[1].ColumnName = "Name";
      Parts.Columns[2].Caption = "Vehicle ID";
      Parts.Columns[2].ColumnName = "Vehicle ID";
      Parts.Columns[3].Caption = "Notes";
      Parts.Columns[3].ColumnName = "Notes";
      //Make the last 2 columns invisible
      Parts.Columns[4].ColumnMapping = MappingType.Hidden;
      Parts.Columns[5].ColumnMapping = MappingType.Hidden;

      Inv.Columns[0].Caption    = "Part Num";
      Inv.Columns[0].ColumnName = "Part Num";
      Inv.Columns[1].Caption    = "Current Count";
      Inv.Columns[1].ColumnName = "Current Count";
      Inv.Columns[2].Caption    = "Reorder Count";
      Inv.Columns[2].ColumnName = "Reorder Count";

      //Bind the table in the data source to the grid display
      dg1.SetDataBinding(DS, "AutoParts");

      //This object takes up space. Get rid of it.
      DS.Dispose();
    }
VB
  Public Sub New()
    MyBase.New()

    InitializeComponent()

    AddHandler cmdParts.Click, New EventHandler(AddressOf ViewParts)
    AddHandler cmdInventory.Click, New EventHandler(AddressOf ViewInventory)
    AddHandler cmdBoth.Click, New EventHandler(AddressOf ViewBoth)
    AddHandler cmdCommit.Click, New EventHandler(AddressOf CommitChanges)
    cmdCommit.Enabled = False

    'First thing to do is establish the connection
    MyDB_Conn = New OleDbConnection(Provider)

    'Now create some SQL statements that get data from different tables
    SQL_parts = New OleDbDataAdapter("SELECT * FROM AutoParts", MyDB_Conn)
    SQL_parts.SelectCommand = _
                New OleDbCommand("SELECT * FROM AutoParts", MyDB_Conn)
    OLE_Parts = New OleDbCommandBuilder(SQL_parts)
    SQL_inv = New OleDbDataAdapter("SELECT * FROM Inventory", MyDB_Conn)
    SQL_inv.SelectCommand = _
              New OleDbCommand("SELECT * FROM Inventory", MyDB_Conn)
    OLE_Inv = New OleDbCommandBuilder(SQL_inv)

    'You now have your SQL statements that get all data from both
    'tables in the database. Create a data set and add 2 tables
    Dim DS As DataSet = New DataSet()
    Dim Parts As DataTable = New DataTable("AutoParts")
    Dim Inv As DataTable = New DataTable("Inventory")
    DS.Tables.Add(Parts)
    DS.Tables.Add(Inv)

    MyDB_Conn.Open()

    'Use the SQL data adapters to fill the tables via the SQL statements
    SQL_parts.Fill(DS, "AutoParts")
    SQL_inv.Fill(DS, "Inventory")

    'Normally I would put this at the end. I put it here
    'to prove a point... The data set is disconnected and you
    'can still work with it after the connection is gone.
    'If you need to update the database you will need to keep
    'this connection.
    MyDB_Conn.Close()
    MyDB_Conn.Dispose()

    'Once I have the data tables filled in the data set I can manipulate the
    'existing columns.
    Parts.Columns(0).Caption = "ID"
    Parts.Columns(0).ColumnName = "ID"
    Parts.Columns(1).Caption = "Name"
    Parts.Columns(1).ColumnName = "Name"
    Parts.Columns(2).Caption = "Vehicle ID"
    Parts.Columns(2).ColumnName = "Vehicle ID"
    Parts.Columns(3).Caption = "Notes"
    Parts.Columns(3).ColumnName = "Notes"
    'Make the last 2 columns invisible
    Parts.Columns(4).ColumnMapping = MappingType.Hidden
    Parts.Columns(5).ColumnMapping = MappingType.Hidden
    Inv.Columns(0).Caption = "Part Num"
    Inv.Columns(0).ColumnName = "Part Num"
    Inv.Columns(1).Caption = "Current Count"
    Inv.Columns(1).ColumnName = "Current Count"
    Inv.Columns(2).Caption = "Reorder Count"
    Inv.Columns(2).ColumnName = "Reorder Count"

    'Bind the table in the data source to the grid display
    dg1.SetDataBinding(DS, "AutoParts")

    'This object takes up space. Get rid of it.
    DS.Dispose()
  End Sub
This code does a lot of things. Let's dissect it. Get out the scalpel and hemostat.
After some initialization of the buttons, I connect to the database, prepare the data adapters, and set some SQL commands. Here's the C# code:
      //First thing to do is establish the connection
      MyDB_Conn = new OleDbConnection(Provider);

      //Now create some SQL statements that get data from different tables
      SQL_parts = new OleDbDataAdapter( "SELECT * FROM AutoParts", MyDB_Conn );
      SQL_parts.SelectCommand =
                  new OleDbCommand("SELECT * FROM AutoParts", MyDB_Conn );
      OLE_Parts = new OleDbCommandBuilder(SQL_parts);

      SQL_inv = new OleDbDataAdapter( "SELECT * FROM Inventory", MyDB_Conn );
      SQL_inv.SelectCommand =
                new OleDbCommand("SELECT * FROM Inventory", MyDB_Conn );
      OLE_Inv = new OleDbCommandBuilder(SQL_inv);
You can see from this code that I have the simplest of SQL commands: Get everything from a particular table. There are two tacks you can take here. One is to get all information and selectively show it. The other is to get only the information you want to show by using more selective SQL statements. I take the first approach here in order to show how to hide data in the DataGrid.
Be aware that when you get all data from a table, the process will be slower and take more memory than a selective data retrieval. If you need to show pieces of data based on changing criteria (such as login rights or data filtering), however, you would be better off getting all the data and hiding what is not necessary. Like everything, though, you may have to adjust your data-gathering scheme if you are working with really huge databases.
I go into detail regarding the CommandBuilder object in a bit. So, here I have a connection to the database and data adapters for individual tables in the database. Next, I create the tables, add them to the database, get the data, and end the connection. Here is the C# code:
      //You now have your SQL statements that get all data from both
      //tables in the database. Create a data set and add 2 tables
      DataSet DS = new DataSet();
      DataTable Parts = new DataTable("AutoParts");
      DataTable Inv = new DataTable("Inventory");
      DS.Tables.Add(Parts);
      DS.Tables.Add(Inv);

      MyDB_Conn.Open();

      //Use the SQL data adapters to fill the tables via the SQL statements
      SQL_parts.Fill(DS, "AutoParts");
      SQL_inv.Fill(DS, "Inventory");

      //Normally I would put this at the end. I put it here
      //to prove a point... The data set is disconnected and you
      //can still work with it after the connection is gone.
      //If you need to update the database you will need to keep
      //this connection.
      MyDB_Conn.Close();
      MyDB_Conn.Dispose();
I have a parts table and an inventory table whose contents I bring into DataTables. I then add the DataTables to the DataSet collection.
After I open the connection to the database, I fill the tables using the SQL statements in the respective data adapters. I then kill the connection. The rest of the code in the constructor simply changes some column names and sets the table that is displayed first. The fact that I can manipulate and show the DataSet proves after killing the connection to the database that this is indeed a disconnected DataSet.
You are starting to work with objects now that take up appreciable amounts of memory. Although it is good practice to dispose of unused objects, it is especially important to get rid of memory hogs if they are not needed. Change the Dispose method of your form to reflect what I have here.
    protected override void Dispose( bool disposing )
    {
      if( disposing )
      {
        if (components != null)
        {
          components.Dispose();
        }
        if(MyDB_Conn != null)
        {
          MyDB_Conn.Close();
          MyDB_Conn.Dispose();
        }
        if(SQL_inv != null)
          SQL_inv.Dispose();
        if(SQL_parts != null)
          SQL_parts.Dispose();
      }
      base.Dispose( disposing );
    }
VB
  Protected Overloads Overrides Sub Dispose(ByVal disposing As Boolean)
    If disposing Then
      If Not (components Is Nothing) Then
        components.Dispose()
      End If
      If Not MyDB_Conn Is Nothing Then
        MyDB_Conn.Close()
        MyDB_Conn.Dispose()
      End If
      If Not SQL_inv Is Nothing Then
        SQL_inv.Dispose()
      End If
      If Not SQL_parts Is Nothing Then
        SQL_parts.Dispose()
      End If
    End If
    MyBase.Dispose(disposing)
  End Sub
Compile and run your program. Figure 6-3 shows the form after the Parts button is clicked.
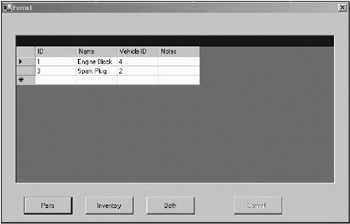
The column headers are not the actual field names in the table because I changed them in the code.
Figure 6-4 shows the form after the Inventory button is clicked.
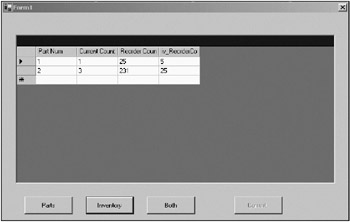
You can see that I did not change the last field column here. The column header shows the actual field name in the table.
Figure 6-5 shows the form when the Both button is clicked.
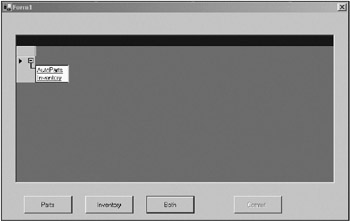
If you click the hyperlink you will drill down into the individual tables. When you do this you will also be able to come back to this screen by using the navigation icon on the DataGrid.
OK. That was pretty cool and not too complicated. Of course, this is the DataGrid at its simplest. In a real auto parts application, I may have several more tables that provide links into other tables. I could then use these links to make parent/child references in the DataGrid control for drill-down capability.
So what about the grayed-out Commit button? In the constructor I killed the connection after getting the data to prove that the DataSet was really disconnected. I am now going to ask you to reverse that code and add some more code to the Commit button delegate to enable updating of the data. Here is the corrected constructor.
    public Form1()
    {
      InitializeComponent();
      cmdParts.Click      += new EventHandler(this.ViewParts);
      cmdInventory.Click  += new EventHandler(this.ViewInventory);
      cmdBoth.Click       += new EventHandler(this.ViewBoth);
      cmdCommit.Click     += new EventHandler(this.CommitChanges);
//      cmdCommit.Enabled = false;

      //First thing to do is establish the connection
      MyDB_Conn = new OleDbConnection(Provider);

      //Now create some SQL statements that get data from different tables
      SQL_parts = new OleDbDataAdapter( "SELECT * FROM AutoParts", MyDB_Conn );
      SQL_parts.SelectCommand =
                  new OleDbCommand("SELECT * FROM AutoParts", MyDB_Conn );
      OLE_Parts = new OleDbCommandBuilder(SQL_parts);

      SQL_inv = new OleDbDataAdapter( "SELECT * FROM Inventory", MyDB_Conn );
      SQL_inv.SelectCommand =
                new OleDbCommand("SELECT * FROM Inventory", MyDB_Conn );
      OLE_Inv = new OleDbCommandBuilder(SQL_inv);

      //You now have your SQL statements that get all data from both
      //tables in the database. Create a data set and add 2 tables
      DataSet DS = new DataSet();
      DataTable Parts = new DataTable("AutoParts");
      DataTable Inv = new DataTable("Inventory");
      DS.Tables.Add(Parts);
      DS.Tables.Add(Inv);

      MyDB_Conn.Open();

      //Use the SQL data adapters to fill the tables via the SQL statements
      SQL_parts.Fill(DS, "AutoParts");
      SQL_inv.Fill(DS, "Inventory");
//    //Normally I would put this at the end. I put it here
//    //to prove a point... The data set is disconnected and you
//    //can still work with it after the connection is gone.
//    //If you need to update the database you will need to keep
//    //this connection.
//    MyDB_Conn.Close();
//    MyDB_Conn.Dispose();

      //Once I have the data tables filled in the data set I can manipulate the
      //existing columns.
      Parts.Columns[0].Caption = "ID";
      Parts.Columns[0].ColumnName = "ID";
      Parts.Columns[1].Caption = "Name";
      Parts.Columns[1].ColumnName = "Name";
      Parts.Columns[2].Caption = "Vehicle ID";
      Parts.Columns[2].ColumnName = "Vehicle ID";
      Parts.Columns[3].Caption = "Notes";
      Parts.Columns[3].ColumnName = "Notes";
      //Make the last 2 columns invisible
      Parts.Columns[4].ColumnMapping = MappingType.Hidden;
      Parts.Columns[5].ColumnMapping = MappingType.Hidden;

//      Inv.Columns[0].Caption = "Part Num";
//      Inv.Columns[0].ColumnName = "Part Num";
//      Inv.Columns[1].Caption = "Current Count";
//      Inv.Columns[1].ColumnName = "Current Count";
//      Inv.Columns[2].Caption = "Reorder Count";
//      Inv.Columns[2].ColumnName = "Reorder Count";

      //Bind the table in the data source to the grid display
      dg1.SetDataBinding(DS, "AutoParts");

      //This object takes up space. Get rid of them.
      DS.Dispose();
    }
  Public Sub New()
    MyBase.New()

    InitializeComponent()

    AddHandler cmdParts.Click, New EventHandler(AddressOf ViewParts)
    AddHandler cmdInventory.Click, New EventHandler(AddressOf ViewInventory)
    AddHandler cmdBoth.Click, New EventHandler(AddressOf ViewBoth)
    AddHandler cmdCommit.Click, New EventHandler(AddressOf CommitChanges)
    'cmdCommit.Enabled = False

    'First thing to do is establish the connection
    MyDB_Conn = New OleDbConnection(Provider)

    'Now create some SQL statements that get data from different tables
    SQL_parts = New OleDbDataAdapter("SELECT * FROM AutoParts", MyDB_Conn)
    SQL_parts.SelectCommand = _
                New OleDbCommand("SELECT * FROM AutoParts", MyDB_Conn)
    OLE_Parts = New OleDbCommandBuilder(SQL_parts)

    SQL_inv = New OleDbDataAdapter("SELECT * FROM Inventory", MyDB_Conn)
    SQL_inv.SelectCommand = _
              New OleDbCommand("SELECT * FROM Inventory", MyDB_Conn)
    OLE_Inv = New OleDbCommandBuilder(SQL_inv)

    'You now have your SQL statements that get all data from both
    'tables in the database. Create a data set and add 2 tables
    Dim DS As DataSet = New DataSet()
    Dim Parts As DataTable = New DataTable("AutoParts")
    Dim Inv As DataTable = New DataTable("Inventory")
    DS.Tables.Add(Parts)
    DS.Tables.Add(Inv)

    MyDB_Conn.Open()

    'Use the SQL data adapters to fill the tables via the SQL statements
    SQL_parts.Fill(DS, "AutoParts")
    SQL_inv.Fill(DS, "Inventory")
    "Normally I would put this at the end. I put it here
    "to prove a point... The data set is disconnected and you
    "can still work with it after the connection is gone.
    "If you need to update the database you will need to keep
    "this connection.
    'MyDB_Conn.Close()
    'MyDB_Conn.Dispose()

    'Once I have the data tables filled in the data set I can manipulate the
    'existing columns.
    Parts.Columns(0).Caption = "ID"
    Parts.Columns(0).ColumnName = "ID"
    Parts.Columns(1).Caption = "Name"
    Parts.Columns(1).ColumnName = "Name"
    Parts.Columns(2).Caption = "Vehicle ID"
    Parts.Columns(2).ColumnName = "Vehicle ID"
    Parts.Columns(3).Caption = "Notes"
    Parts.Columns(3).ColumnName = "Notes"
    'Make the last 2 columns invisible
    Parts.Columns(4).ColumnMapping = MappingType.Hidden
    Parts.Columns(5).ColumnMapping = MappingType.Hidden

    'Inv.Columns(0).Caption = "Part Num"
    'Inv.Columns(0).ColumnName = "Part Num"
    'Inv.Columns(1).Caption = "Current Count"
    'Inv.Columns(1).ColumnName = "Current Count"
    'Inv.Columns(2).Caption = "Reorder Count"
    'Inv.Columns(2).ColumnName = "Reorder Count"

    'Bind the table in the data source to the grid display
    dg1.SetDataBinding(DS, "AutoParts")

    'This object takes up space. Get rid of them.
    DS.Dispose()
  End Sub
Add the following code to your Commit delegate.
    private void CommitChanges(object sender, EventArgs e)
    {
      DataSet DS = (DataSet)dg1.DataSource;
      DataSet DS_Change = DS.GetChanges(DataRowState.Modified);
      //If no changes then obviously no new data set is formed
      if(DS_Change != null)
      {
        if(!DS_Change.HasErrors)
        {
          //get the data adapter and call update
          try
          {
            SQL_inv.Update(DS_Change, "Inventory");
            MessageBox.Show("Saving Inventory data successful!");
          }
          catch (Exception ex)
          {
            MessageBox.Show("Error Saving Inventory data\n{0}", ex.Message);
          }
        }
      }
    }
VB
  Private Sub CommitChanges(ByVal sender As Object, ByVal e As EventArgs)
    Dim DS As DataSet = CType(dg1.DataSource, DataSet)
    Dim DS_Change As DataSet = DS.GetChanges(DataRowState.Modified)
    If Not DS_Change Is Nothing Then
      If Not DS_Change.HasErrors Then
        'get the data adapter and call update
        Try
          SQL_inv.Update(DS_Change, "Inventory")
          MessageBox.Show("Saving Inventory data successful!")
        Catch ex As Exception
          MessageBox.Show("Error Saving Inventory data\n{0}", ex.Message)
        End Try
      End If
    End If
  End Sub
In the constructor I commented out the code that changes the column headers for the Inventory table. If you look at the new delegate code, you will see that I tell the data adapter to update the table with the new modified DataSet. There are no explicit SQL statements in here that do this.
The data adapter has the ability to generate common SQL statements for you, such as Update and Insert, based upon the table you are accessing. This is really cool and convenient. Some requirements need to be met first, though:
The table you are updating must have a unique primary key. An autoincrement key is best.
The column names must match the field names in the table you are updating.
Now these restrictions are not too bad, as quite a few DataGrid applications would have tables with primary keys and it may be OK to display the raw field name. However, what do you do in the case where you want to update a free-form table and your grid is nicely formatted with user-friendly names and such? What then?
You see in this example that the OleDbDataAdapter (and any data adapter) can automatically generate its own SQL commands for deleting, updating, and inserting data. If you are not willing to live with the restrictions, then you must provide your own SQL commands to perform these tasks. Table 6-1 shows the properties you must set in order for the Update method to work when you do not use the OleDbCommandBuilder.
|
OleDbAdapter Property |
How to Use |
|---|---|
|
DeleteCommand |
Provide a SQL command to delete records from a table. |
|
UpdateCommand |
Provide a SQL command to update records in a table. |
|
InsertCommand |
Provide a SQL command to insert records in a table. |
|
SelectCommand |
Provide a SQL command to get records form a table. |
When you get a changed DataSet from the DataSet.GetChanges method and then call the OleDbDataAdapter.Update command, the appropriate Delete, Update, and Insert commands will be used to reconcile these changes with the actual table. To me this seems a logical, step-by-step approach to working with databases. It is much more fun than the old ADO I used in VB 6.0.
Please note that in this example I allowed for updates only to the inventory table. I provided an OleDbCommandBuilder object for the parts table but never called the Update method. It seemed, though, to the user, that this table could be updated and changes saved. This is because I did not include any data or field restriction code. As I said before, this DataGrid can be a complicated beast when used to its fullest extent. The next section covers some of the data validation and data restriction capabilities of the DataGrid.
All the examples I see for grids and so forth appear to be single purpose. That is, they lead you through some specific example, and if your needs are a little different, you seem to be left hanging.
The next example makes use of the grid in a slightly different way. Not all your data comes directly from a database. In fact, ADO.NET allows you to fill in tables of data manually. This means that your data can come from any source or from multiple sources.
The best way to get data in anything other than a simple application is to abstract the data from the application. This means that your application does not know where the data comes from and does not care. This allows you to change the data source with no changes in the code that manages the data. This is a good thing, and it is what you should work toward.
As far as the DataGrid goes, it offers you the ability to edit fields, accept changes, roll back changes, restrict data types, and provide validation events. I have not shown you much of the validation end, but this example will take care of that. Here is what you will see in this example:
A public class that contains information about a particular town
A static class that returns town objects on demand
Abstraction of data gathering and updating from data management
A DataGrid event handler to detect a cell click
A DataTable event handler to validate new data
An error object in a DataGrid control
Start a new project in C# or VB. Mine is called "GridRestrict." Add a single DataGrid control to the form and call it dg1. Figure 6-6 shows you the layout.

That was not too complicated, was it? Here is where the tricky bit comes in:
Add a class called Towns to the project.
Add a class called Town to the project.
In the C# project, add a reference to the Microsoft Visual Basic .NET runtime.
The Town class holds information about a particular town. For this project, I picked just a few properties that a town has. You can add more if you like. Here is the code.
using System;

namespace GridRestrict_c
{
  /// <summary>
  /// This class contains information about a town.
  /// </summary>
  public class Town
  {
    private string mName;
    private string mCounty;
    private string mState;
    private string mMayor;
    private string mZip;
    private float mMillRate;
    public string Name
    {
      get { return mName; }
      set { mName = value; }
    }
    public string County
    {
      get { return mCounty; }
      set { mCounty = value; }
    }
    public string State
    {
      get { return mState; }
      set { mState = value; }
    }
    public string Mayor
    {
      get { return mMayor; }
      set { mMayor = value; }
    }
    public string Zip
    {
      get { return mZip; }
      set { mZip = value; }
    }

    public float MillRate
    {
      get { return mMillRate; }
      set { mMillRate = value; }
    }
  }
}
VB
Option Strict On

Public Class Town

  Private mName As String
  Private mCounty As String
  Private mState As String
  Private mMayor As String
  Private mZip As String
  Private mMillRate As Single

  Public Property Name() As String
    Get
      Return mName
    End Get
    Set(ByVal Value As String)
      mName = Value
    End Set
  End Property

  Public Property County() As String
    Get
      Return mCounty
    End Get
    Set(ByVal Value As String)
      mCounty = Value
    End Set
  End Property
  Public Property State() As String
    Get
      Return mState
    End Get
    Set(ByVal Value As String)
      mState = Value
    End Set
  End Property

  Public Property Mayor() As String
    Get
      Return mMayor
    End Get
    Set(ByVal Value As String)
      mMayor = Value
    End Set
  End Property

  Public Property Zip() As String
    Get
      Return mZip
    End Get
    Set(ByVal Value As String)
      mZip = Value
    End Set
  End Property

  Public Property MillRate() As Single
    Get
      Return mMillRate
    End Get
    Set(ByVal Value As Single)
      mMillRate = Value
    End Set
  End Property
End Class
Objects instantiated from this class serve as the basic data container that is known to all parts of the program. You will see what I mean shortly.
As you can see, this class is nothing more than a way to store data, add to it, and retrieve it. The next class is a factory class that creates these Town objects upon demand. As soon as a property is called in this class, the constructor is run and an internal table is filled with data.
The data that I get does not come from a database table. It is instead filled in manually by me in the code. Why do that? I am trying to show you that data can come from anywhere. The code that fills in the data table is easily interchanged with code that gets data from a database, an XML Web service, or something else.
Listings 6-2a and 6-2b show the complete code for the Towns class.
using System;
using System.Data;

namespace GridRestrict_c
{
  /// <summary>
  /// static class that gets information about towns in a state from
  /// an Access Database.
  ///
  /// This is an abstraction of the data from the main program. I can change the
  /// way data is obtained and its source at any time without having to change
  /// the interface to the data from the outside. This is a good thing!
  /// </summary>
  public class Towns
  {
    private static DataSet DS;

    static Towns()
    {
      DS = new DataSet();
      DS.Tables.Add(GetData());
    }


    public bool Update(Town t)
    {
      //Code in here updates the database and
      //merges the new and old dataset
      return true;
    }
    #region public static properties

    public static float MinAllowedMillRate { get { return 12f; } }
    public static float MaxAllowedMillRate { get { return 99f; } }

      public static Town Hartford
    {
      get
      {
        Town t = null;
        DataTable dt = DS.Tables["TownInfo"];
        foreach(DataRow r in dt.Rows)
        {
          if(r["Name"].ToString() == "Hartford")
          {
            t = FillFromRow(r);
            break;
          }
        }
        return t;
      }
    }

    public static Town LosAngeles
    {
      get
      {
        Town t = null;
        DataTable dt = DS.Tables["TownInfo"];
        foreach(DataRow r in dt.Rows)
        {
          if(r["Name"].ToString() == "Los Angeles")
          {
            t = FillFromRow(r);
            break;
          }
        }
        return t;
      }
    }
    public static Town Orlando
    {
      get
      {
        Town t = null;
        DataTable dt = DS.Tables["TownInfo"];
        foreach(DataRow r in dt.Rows)
        {
          if(r["Name"].ToString() == "Orlando")
          {
            t = FillFromRow(r);
            break;
          }
        }
        return t;
      }
    }

    #endregion

    #region local methods

    private static Town FillFromRow(DataRow r)
    {
      Town t = new Town();
      t.Name = (string)r["Name"];
      t.State = (string)r["State"];
      t.County = (string)r["County"];
      t.Mayor = (string)r["Mayor"];
      t.Zip = (string)r["Zip"];
      t.MillRate = (float)r["MillRate"];
      return t;
    }

    private static DataTable GetData()
    {
      //Let's pretend that we are getting this data from a database table.
      //For now this shows that you can make the table by hand if you want to.
      //You can also get the data from an INI file, CFG file, or XML WEB service.
      //Any way you get the data it can be arranged in a table that has specific
      //demands.
      // Create a new DataTable.
      DataTable dt = new DataTable("TownInfo");
      DataColumn dc;
      DataRow dr;

      // Create town name
      dc            = new DataColumn();
      dc.DataType   = System.Type.GetType("System.String");
      dc.ColumnName = "Name";
      dc.ReadOnly   = true;
      dc.Unique     = true;
      // Add the column to the DataColumnCollection.
      dt.Columns.Add(dc);

      // Create state town is in
      dc            = new DataColumn();
      dc.DataType   = System.Type.GetType("System.String");
      dc.ColumnName = "State";
      dc.ReadOnly   = false;
      dc.Unique     = false;
      dt.Columns.Add(dc);

      // Create county town is in
      dc            = new DataColumn();
      dc.DataType   = System.Type.GetType("System.String");
      dc.ColumnName = "County";
      dc.ReadOnly   = false;
      dc.Unique     = false;
      dt.Columns.Add(dc);

      // Create mayor of town
      dc            = new DataColumn();
      dc.DataType   = System.Type.GetType("System.String");
      dc.ColumnName = "Mayor";
      dc.ReadOnly   = false;
      dc.Unique     = false;
      dt.Columns.Add(dc);

      // Create town zip code
      dc            = new DataColumn();
      dc.DataType   = System.Type.GetType("System.String");
      dc.ColumnName = "Zip";
      dc.ReadOnly   = false;
      dc.Unique     = true;
      dt.Columns.Add(dc);
      // Create town mill rate
      dc            = new DataColumn();
      dc.DataType   = System.Type.GetType("System.Single");
      dc.ColumnName = "MillRate";
      dc.ReadOnly   = false;
      dc.Unique     = false;
      dt.Columns.Add(dc);

      // Create 4 DataRow objects that represent towns. Add them to the table
      dt.Rows.Add(new object[] {"Hartford", "CT", "Hartford",
                                "Mike", "06011", 45.23f } );
      dt.Rows.Add(new object[] {"Los Angeles", "CA", "LA",
                                "Fred", "23456", 64.85f } );
      dt.Rows.Add(new object[] {"Orlando", "FL", "Kissimmee",
                                "Mikey", "45376", 25.00f } );

      return dt;
    }

    #endregion

  }
}
Option Strict On

Public Class Towns

  ' static class that get information about towns in a state from
  ' an Access Database.
  '
  ' This is an abstraction of the data from the main program. I can change the
  ' way data is obtained and its source at any time without having to change the
  ' interface to the data from the outside. This is a good thing!
  Private Shared DS As DataSet

  Shared Sub New()
    DS = New DataSet()
    DS.Tables.Add(GetData())
  End Sub
  Public Function Update(ByVal t As Town) As Boolean
    'Code in here updates the database and
    'merges the new and old dataset
    Return True
  End Function

#Region "public static properties"

  Public Shared ReadOnly Property MinAllowedMillRate() As Single
    Get
      Return 12.0F
    End Get
  End Property

  Public Shared ReadOnly Property MaxAllowedMillRate() As Single
    Get
      Return 99.0F
    End Get
  End Property

Public Shared ReadOnly Property Hartford() As Town
  Get
    Dim t As Town = Nothing
    Dim dt As DataTable = DS.Tables("TownInfo")
    Dim r As DataRow
    For Each r In dt.Rows
      If r("Name").ToString() = "Hartford" Then
        t = FillFromRow(r)
        Exit For
      End If
    Next
    Return t
  End Get
End Property

Public Shared ReadOnly Property LosAngeles() As Town
  Get
    Dim t As Town = Nothing
    Dim dt As DataTable = DS.Tables("TownInfo")
    Dim r As DataRow
    For Each r In dt.Rows
      If r("Name").ToString() = "Los Angeles" Then
        t = FillFromRow(r)
        Exit For
      End If
    Next
    Return t
  End Get
End Property

Public Shared ReadOnly Property Orlando() As Town
  Get
    Dim t As Town = Nothing
    Dim dt As DataTable = DS.Tables("TownInfo")
    Dim r As DataRow
    For Each r In dt.Rows
      If r("Name").ToString() = "Orlando" Then
        t = FillFromRow(r)
        Exit For
        End If
      Next
      Return t
    End Get
  End Property

#End Region

#Region "local methods"

Private Shared Function FillFromRow(ByVal r As DataRow) As Town
  Dim t As Town = New Town()
  t.Name = CType(r("Name"), String)
  t.State = CType(r("State"), String)
  t.County = CType(r("County"), String)
  t.Mayor = CType(r("Mayor"), String)
  t.Zip = CType(r("Zip"), String)
  t.MillRate = CType(r("MillRate"), Single)
  Return t
End Function

Private Shared Function GetData() As DataTable
  'Let's pretend that we are getting this data from a database table.
  'For now this shows that you can make the table by hand if you want to.
  'You can also get the data from an INI file, CFG file, or XML WEB service.
  'Any way you get the data it can be arranged in a table that has specific
  'demands.

  ' Create a new DataTable.
    Dim dt As DataTable = New DataTable("TownInfo")
    Dim dc As DataColumn
    Dim dr As DataRow

    ' Create town name
    dc = New DataColumn()
    dc.DataType = System.Type.GetType("System.String")
    dc.ColumnName = "Name"
    dc.ReadOnly = True
    dc.Unique = True
    dt.Columns.Add(dc)

    ' Create state town is in
    dc = New DataColumn()
    dc.DataType = System.Type.GetType("System.String")
    dc.ColumnName = "State"
    dc.ReadOnly = False
    dc.Unique = False
    dt.Columns.Add(dc)

    ' Create county town is in
    dc = New DataColumn()
    dc.DataType = System.Type.GetType("System.String")
    dc.ColumnName = "County"
    dc.ReadOnly = False
    dc.Unique = False
    dt.Columns.Add(dc)

    ' Create mayor of town
    dc = New DataColumn()
    dc.DataType = System.Type.GetType("System.String")
    dc.ColumnName = "Mayor"
    dc.ReadOnly = False
    dc.Unique = False
    dt.Columns.Add(dc)

    ' Create town zip code
    dc = New DataColumn()
    dc.DataType = System.Type.GetType("System.String")
    dc.ColumnName = "Zip"
    dc.ReadOnly = False
    dc.Unique = True
    dt.Columns.Add(dc)
    ' Create town mill rate
    dc = New DataColumn()
    dc.DataType = System.Type.GetType("System.Single")
    dc.ColumnName = "MillRate"
    dc.ReadOnly = False
    dc.Unique = False
    dt.Columns.Add(dc)

    ' Create 4 DataRow objects that represent towns. Add them to the table
    dt.Rows.Add(New Object() {"Hartford", "CT", "Hartford", _
                              "Mike", "06011", 45.23F})
    dt.Rows.Add(New Object() {"Los Angeles", "CA", "LA", _
                              "Fred", "23456", 64.85F})
    dt.Rows.Add(New Object() {"Orlando", "FL", "Kissimmee", _
                              "Mikey", "45376", 25.0F})

    Return dt
  End Function
#End Region
End Class
Let's look at this class a little more closely. This class is called a static class in C# and a shared class in VB.
| Tip |
Static methods, variables, and constructors are very handy indeed. I suggest you look up further examples on how to use them. |
A class that has static methods or properties allows you to call these methods without instantiating the class. Have you ever played around with the Colors class, the Pens class, or the Brushes class in GDI+? These three classes are prime examples of static classes. For instance, you can get a color from the Colors class without instantiating the class first:
This.BackColor = Colors.Red;
This makes it seem as if you are just getting a color. A lot is going on behind the scenes, though.
For my Towns class, I can make this call directly:
Dim MyTown as Town = Towns.Orlando
I never instantiated an object of Towns. How was I able to return a Town object without explicitly loading the data? The answer is the static (shared) constructor.
If you have a normal constructor, you will need to instantiate the object before this constructor gets called. What I have done here is added the static (shared) keyword to the constructor definition. This means that this constructor will run once, and only once, when a static method is called. Suppose I did this:
Dim MyTown as Town = Towns.Orlando
Dim MyTown2 as Town = Towns.Hartford
The static constructor will get called only once. Therefore, I get the data only once.
Note that this class contains a method to update a Town object. This method is not static, so you need to instantiate an object of this class before you use it.
If I were to fill out this Update method, I would include a normal constructor that set up some other parameters I may need. This Update method would also include code to accept or reject changes to the Town object and merge those changes with the static DataSet. This way, the next time I call the property that returns a particular Town object, I get the changed data.
This kind of programming allows you to get and save data blindly. The presentation code has no idea how the data is saved, and it does not care. It only cares that the new data it saved for Orlando, for example, would also appear the next time it got an Orlando Town object.
The code for the form consists of three sections: a section that initializes data in the constructor, a section that handles events, and a section that makes the table for the DataGrid. The third section is as follows. Add this code to your form.
C#
    #region internal methods

    private DataTable MakeTable()
    {
      // Create a new DataTable.
      DataTable dt = new DataTable("SomeTowns");
      DataColumn dc;
      DataRow dr;

      dc = new DataColumn();
      dc.DataType= System.Type.GetType("System.String");
      dc.ColumnName = "Town Name";
      dc.Caption = "Town Name";
      dc.ReadOnly = true;
      dc.Unique = true;
      dt.Columns.Add(dc);
      dc = new DataColumn();
      dc.DataType= System.Type.GetType("System.String");
      dc.ColumnName = "State";
      dc.Caption = "State";
      dc.ReadOnly = true;
      dc.Unique = false;
      dt.Columns.Add(dc);

      dc = new DataColumn();
      dc.DataType= System.Type.GetType("System.String");
      dc.ColumnName = "County Name";
      dc.Caption = "County Name";
      dc.ReadOnly = true;
      dc.Unique = false;
      dt.Columns.Add(dc);

      dc = new DataColumn();
      dc.DataType= System.Type.GetType("System.Single");
      dc.ColumnName = "MillRate";
      dc.Caption = "MillRate";
      dc.ReadOnly = false;
      dc.Unique = false;
      dt.Columns.Add(dc);

      return dt;
    }
    #endregion
VB
#Region "internal methods"

  Private Function MakeTable() As DataTable
    ' Create a new DataTable.
    Dim dt As DataTable = New DataTable("SomeTowns")
    Dim dc As DataColumn
    Dim dr As DataRow

    dc = New DataColumn()
    dc.DataType = System.Type.GetType("System.String")
    dc.ColumnName = "Town Name"
    dc.Caption = "Town Name"
    dc.ReadOnly = True
    dc.Unique = True
    dt.Columns.Add(dc)
    dc = New DataColumn()
    dc.DataType = System.Type.GetType("System.String")
    dc.ColumnName = "State"
    dc.Caption = "State"
    dc.ReadOnly = True
    dc.Unique = False
    dt.Columns.Add(dc)

    dc = New DataColumn()
    dc.DataType = System.Type.GetType("System.String")
    dc.ColumnName = "County Name"
    dc.Caption = "County Name"
    dc.ReadOnly = True
    dc.Unique = False
    dt.Columns.Add(dc)

    dc = New DataColumn()
    dc.DataType = System.Type.GetType("System.Single")
    dc.ColumnName = "MillRate"
    dc.Caption = "MillRate"
    dc.ReadOnly = False
    dc.Unique = False
    dt.Columns.Add(dc)

    Return dt
  End Function

#End Region
Look at this code closely. The grid has columns that are set up for particular data types. All of the columns are read-only except for the MillRate column. Also note that the town name must be unique. These are constraints that I put on the DataGrid to help me with data entry and validation. The grid will not allow me to enter in any data that is not the correct data type. It will also not allow any cells to be edited that are read-only. With just these few properties, I have effectively shut down the user from doing anything he or she should not be allowed to do. There are some exceptions, of course, that I cover shortly.
This next section of code contains the delegates to handle some grid and table events.
C#
    #region event code
    private void DataChanged(object sender, DataColumnChangeEventArgs e)
    {
      DataTable dt = (DataTable)sender;
      if (e.Column.ColumnName.Equals("MillRate"))
      {
        if ((float)e.ProposedValue < Towns.MinAllowedMillRate ||
          (float)e.ProposedValue > Towns.MaxAllowedMillRate)
        {
          e.Row.RowError =
                "You tried to enter a value outside accepted parameters!";
          string s = "Mill Rate cannot be < " +
                     Towns.MinAllowedMillRate.ToString() +
                     "\n Mill Rate cannot be > " +
                     Towns.MaxAllowedMillRate.ToString();
          e.Row.SetColumnError(e.Column, s);

          //An error object is put up next to the row and cell
          dt.RejectChanges();
          //Yes folks, you can use VB commands in C#.
          Microsoft.VisualBasic.Interaction.Beep();
        }
        else
        dt.AcceptChanges();
      }
    }

    private void Grid_MouseDown(object sender, MouseEventArgs e)
    {
      // Use the DataGrid control's HitTest method with the x and y properties.
      //I use this event to clear errors in the current row.
      DataGrid.HitTestInfo GridHit = dg1.HitTest(e.X,e.Y);

      if(GridHit.Type == DataGrid.HitTestType.Cell)
      {
        DataSet DS = (DataSet)dg1.DataSource;
        if(DS.HasErrors)
        {
          DataTable DT = DS.Tables[dg1.DataMember];
          DT.Rows[GridHit.Row].ClearErrors();
        }
      }
    }

    #endregion
#Region "event code"

  Private Sub DataChanged(ByVal sender As Object, _
                          ByVal e As DataColumnChangeEventArgs)
    Dim dt As DataTable = CType(sender, DataTable)

    If e.Column.ColumnName.Equals("MillRate") Then
      If CType(e.ProposedValue, Single) < Towns.MinAllowedMillRate Or _
          CType(e.ProposedValue, Single) > Towns.MaxAllowedMillRate Then
        e.Row.RowError = _
          "You tried to enter a value outside accepted parameters!"
        Dim s As String = "Mill Rate cannot be < " + _
                     Towns.MinAllowedMillRate.ToString() + _
                     "\n Mill Rate cannot be > " + _
                     Towns.MaxAllowedMillRate.ToString()
        e.Row.SetColumnError(e.Column, s)

        'An error object is put up next to the row and cell
        dt.RejectChanges()
        Beep()
      Else
        dt.AcceptChanges()
      End If
    End If
  End Sub

  Private Sub Grid_MouseDown(ByVal sender As Object, _
                             ByVal e As MouseEventArgs)
    ' Use the DataGrid control's HitTest method with the x and y properties.
    'I use this event to clear errors in the current row.
    Dim GridHit As DataGrid.HitTestInfo = dg1.HitTest(e.X, e.Y)

    If GridHit.Type = DataGrid.HitTestType.Cell Then
      Dim DS As DataSet = CType(dg1.DataSource, DataSet)
      If DS.HasErrors Then
        Dim DT As DataTable = DS.Tables(dg1.DataMember)
        DT.Rows(GridHit.Row).ClearErrors()
      End If
    End If
  End Sub
#End Region
These two routines are my data validation routines. The first one, DataChanged(), detects the cell that was changed. If it is a MillRate cell, then I see if the new value is within range. If the new value is not within range, I set the error object for the row and for the cell. I then reject the change, which brings back the previous value and makes the computer beep.
| Note |
It is possible to use VB commands in a C# program. I had you add a reference to the Visual Basic DLL at the start of the project. The C# code here calls a VB Beep command. C# has no beep command. You are able to use things like the VB string functions if you like. Some builtin methods are easier to use in VB, and .NET allows you to access them. |
The second delegate, Grid_MouseDown(), has code that detects the cell the user clicked in. Once I know that a cell was clicked, I determine if the DataSet had errorsOnce. Fill in the following constructor code to see how this works.
C#
    public Form1()
    {
      InitializeComponent();

      //Create a new data set with a table
      DataSet   DS = new DataSet();
      DataTable DT = MakeTable();

      Town t = Towns.Hartford;
      DT.Rows.Add(new object[] {t.Name, t.State, t.County, t.MillRate});
      t = Towns.LosAngeles;
      DT.Rows.Add(new object[] {t.Name, t.State, t.County, t.MillRate});
      t = Towns.Orlando;
      DT.Rows.Add(new object[] {t.Name, t.State, t.County, t.MillRate});
      DT.AcceptChanges(); //A base comparison to reject changes if necessary

      //Add table to data set
      //Only one table so assign source directly to it.
      DS.Tables.Add(DT);
      dg1.DataSource = DS;
      dg1.DataMember = "SomeTowns";
      DT.ColumnChanged += new DataColumnChangeEventHandler(this.DataChanged);
      dg1.MouseDown += new MouseEventHandler(this.Grid_MouseDown);

    }
VB
  Public Sub New()
    MyBase.New()

    InitializeComponent()

    'Create a new data set with a table
    Dim DS As DataSet = New DataSet()
    Dim DT As DataTable = MakeTable()
    Dim t As Town = Towns.Hartford
    DT.Rows.Add(New Object() {t.Name, t.State, t.County, t.MillRate})
    t = Towns.LosAngeles
    DT.Rows.Add(New Object() {t.Name, t.State, t.County, t.MillRate})
    t = Towns.Orlando
    DT.Rows.Add(New Object() {t.Name, t.State, t.County, t.MillRate})
    DT.AcceptChanges() 'A base comparison to reject changes if necessary

    'Add table to data set
    'Only one table so assign source directly to it.
    DS.Tables.Add(DT)
    dg1.DataSource = DS
    dg1.DataMember = "SomeTowns"

    AddHandler DT.ColumnChanged, _
               New DataColumnChangeEventHandler(AddressOf DataChanged)
    AddHandler dg1.MouseDown, _
               New MouseEventHandler(AddressOf Grid_MouseDown)

  End Sub
Once I get the data from the static methods and add them to the table as rows, I accept the changes. This sets up a baseline for any changes that come along later. If the validation code finds that the changes are illegal, it calls the RejectChanges method. Otherwise it calls the AcceptChanges method again to create a new baseline.
Compile and run the code. Your screen should look like the one shown in Figure 6-7.
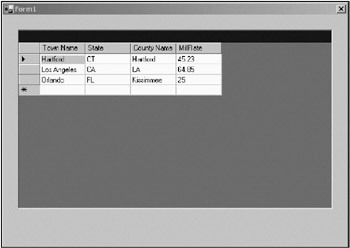
Try to change some values. You will see that you are locked out of all columns except for the MillRate column. Try changing the mill rate for a town to some string value. The grid will not allow it.
Try to change the mill rate for a town to 5. Your screen should look like Figure 6-8.
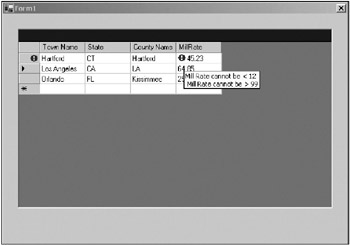
You see the error icon appear at both the row level and at the cell itself. Figure 6-8 shows the cell error. Also note that the new illegal value you entered was rolled back.
Click the mouse in any cell and the error icons disappear. This is what you want to happen. These error icons do not indicate a current error in this case (the code reversed that); they just show that an error occurred. If the user got rid of these icons before viewing them, no harm would be done.
The example in the previous section showed you how to use disconnected data as a data source for the DataGrid control. Normally, when programmers think of ADO.NET and the DataGrid control, they think of disconnected data as using a DataSet. Though I used a DataSet here to hold the DataGrid data, it had nothing to do with the classic idea of a disconnected recordset.
My data for this example came from a class that served up the Town object via static methods. If you have a program that has fairly constant data, such as towns in a state, a static class is a great way to access this data.
The static class in the example used a DataSet with a DataTable to hold data. I did this for convenience, as the DataSet is transactional. I can accept any changes to it or reject them. If I use my own data structures, I need quite a bit of code to replicate this functionality that I get for free.
[1]In fact, this is routine and should be done to abstract the data from the source.