So, you can now flash errors to the user. You know how to detect any user-entered data that is wrong, and you can politely show the user the error of his or her ways.
What about errors that have nothing to do with user input? These are errors such as unexpected coding bugs (yes, you can catch these at runtime), bad data coming in from some RS-232 port, or perhaps a security breach in your program. How do you handle errors such as these? Let's look to the System.Diagnostics namespace for the answers.
The first thing I want to cover is the EventLogger. You may or may not be aware that since Windows 2000, there are system event log files and extensions to the Windows application programming interface (API) that allow you to read, write, create, and delete these log files.
The three basic log files are called Application, Security, and System. These three files are often written to by the operating system and also by various third-party programs. If you look at these log files, you can find some interesting information. You can also find some useless and outdated information.
I am not going to tell you where these files are until after this next small example. Well, OK, on my Windows XP machine they are located in the WINNT\System32\Config folder of my C: drive. If you want to find where your files are located, perform a search for "SysEvent.evt" on your root drive. You should see quite a few files in this directory.
The main method of the EventLog class is, of course, the WriteEntry command. This is an overloaded method that allows you to enter the following information:
A string detailing what happened
An EventLogEntryType enumeration that indicates what kind of event this is
An EventID, which is a user-defined integer that you can use identify an event
A category, which is a user-defined integer that you can use to categorize an event
The only thing you really need is the string detailing what happened. This next example, though, will use everything but the category.
| Note |
The EventLogger is not really the place to put all messages you wish to save to disk. For instance, if you want to record information in a file to be sent back to you, the event log is not the place. The event log is used mainly for recording installation details and program start-up, shutdown, and security details. |
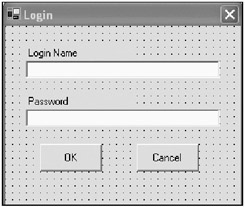
Start a new C# or VB Windows program. Mine is called "Logging." Put a Button on the main form called cmdLogin and make the text read Login. Double-click this Button to get the click delegate.
Add another form called Login to the project. Add the following controls:
Add a Label that reads Login Name.
Add a TextBox called txtName below the Label.
Add a TextBox called txtPass below the Password Label. Make the MaxLength equal 5 and change the PasswordChar to *.
Add a Button called cmdOK to the form. Change its text to OK.
Add a Button called cmdCancel to the form. Change its text to Cancel.
Double-click the two Buttons to get the click delegates.
Your login form should look like the one shown in Figure 7-8.
So, now you have two forms with essentially no code. Before you add code to these forms, you will need to add a class to your project called "EventLogger."
This class has static (shared in VB) methods that write certain things to a predetermined event file. Listings 7-2a and 7-2b show the code for this class.
using System;
using System.Diagnostics;

namespace Logging_c
{
  /// <summary>
  /// Summary description for EventLogger.
  /// </summary>
  public class EventLogger
  {
    private const int LE_Error      = 1;
    private const int LE_BadEntry   = 2;
    private const int LE_Started    = 3;
    private const int LE_Ended      = 4;
    private const int LE_Login      = 5;
    private const int LE_Logout     = 6;
    private const string ProdName   = "Logger";
    private const string SourceName = "Test Logger";

    static EventLog DataLog;

    static EventLogger()
    {
      if(!EventLog.SourceExists(ProdName))
        EventLog.CreateEventSource(ProdName, SourceName);

      //It is possible to enable an event to notify you of
      //a log entry being written
      DataLog = new EventLog();
      DataLog.Source = SourceName;
      DataLog.EnableRaisingEvents = true;
      DataLog.EntryWritten += new EntryWrittenEventHandler(EventLogWritten);

    }

    private static void EventLogWritten(object sender, EntryWrittenEventArgs e)
    {
      string s = string.Empty;
      switch(e.Entry.EventID)
      {
        case LE_Error:
          s="Error Event Written";
          break;
        case LE_BadEntry:
          s="Bad Entry Event Written";
          break;
        case LE_Started:
          s="Program Started Event Written";
          break;
        case LE_Ended:
          s="Program Ended Event Written";
          break;
        case LE_Login:
          s="Login Event Written";
          break;
        case LE_Logout:
          s="Logout Event Written";
          break;
        default:
          s="Event Written";
          break;
      }
      System.Windows.Forms.MessageBox.Show(s);
    }

    public static void ProgramStart()
    {
      //Write to the log file that the program was started
      DataLog.WriteEntry("Program Started",
                         EventLogEntryType.Information, LE_Started);
    }

    public static void ProgramEnd()
    {
      //Write to the log file that the program was started
      DataLog.WriteEntry("Program Ended",
                         EventLogEntryType.Information, LE_Started);
    }

    public static void LoginOK(string LoginName)
    {
      DataLog.WriteEntry("Successful Login:" + LoginName,
                         EventLogEntryType.SuccessAudit, LE_Login);
    }

    public static void LoginFailed(string LoginName)
    {
      DataLog.WriteEntry("Failed Login:" + LoginName,
                         EventLogEntryType.FailureAudit, LE_Login);
    }
    public static void LoginCanceled(string LoginName)
    {
      if (LoginName == String.Empty)
        LoginName = "Unknown Login Name";

      DataLog.WriteEntry("Failed Login:" + LoginName,
                         EventLogEntryType.FailureAudit, LE_Login);
    }

    public static void LogoutOK(string LoginName)
    {
      DataLog.WriteEntry("Successful Logout:" + LoginName,
                         EventLogEntryType.SuccessAudit, LE_Logout);
    }
  }
}
Option Strict On

Imports System
Imports System.Diagnostics

Public Class EventLogger

  Private Const LE_Error As Int32 = 1
  Private Const LE_BadEntry As Int32 = 2
  Private Const LE_Started As Int32 = 3
  Private Const LE_Ended As Int32 = 4
  Private Const LE_Login As Int32 = 5
  Private Const LE_Logout As Int32 = 6
  Private Const ProdName As String = "Logger"
  Private Const SourceName As String = "Test Logger"

  Shared DataLog As EventLog

  Shared Sub New()
    If Not EventLog.SourceExists(ProdName) Then
      EventLog.CreateEventSource(ProdName, SourceName)
    End If
    'It is possible to enable an event to notify you of
    'a log entry being written
    DataLog = New EventLog()
    DataLog.Source = SourceName
    DataLog.EnableRaisingEvents = True
    AddHandler DataLog.EntryWritten, New _
                           EntryWrittenEventHandler(AddressOf EventLogWritten)
  End Sub

  Private Shared Sub EventLogWritten(ByVal sender As Object, _
                                     ByVal e As EntryWrittenEventArgs)
    Dim s As String = String.Empty
    Select Case (e.Entry.EventID)
      Case LE_Error
        s = "Error Event Written"
      Case LE_BadEntry
        s = "Bad Entry Event Written"
      Case LE_Started
        s = "Program Started Event Written"
      Case LE_Ended
        s = "Program Ended Event Written"
      Case LE_Login
        s = "Login Event Written"
      Case LE_Logout
        s = "Logout Event Written"
      Case Else
        s = "Event Written"
    End Select
    System.Windows.Forms.MessageBox.Show(s)
  End Sub

  Public Shared Sub ProgramStart()
    'Write to the log file that the program was started
    DataLog.WriteEntry("Program Started", _
                       EventLogEntryType.Information, LE_Started)
  End Sub

  Public Shared Sub ProgramEnd()
    'Write to the log file that the program was started
    DataLog.WriteEntry("Program Ended", _
                       EventLogEntryType.Information, LE_Started)
  End Sub
  Public Shared Sub LoginOK(ByVal LoginName As String)
    DataLog.WriteEntry("Successful Login:" + LoginName, _
                       EventLogEntryType.SuccessAudit, LE_Login)
  End Sub

  Public Shared Sub LoginFailed(ByVal LoginName As String)
    DataLog.WriteEntry("Failed Login:" + LoginName, _
                       EventLogEntryType.FailureAudit, LE_Login)
  End Sub

  Public Shared Sub LoginCanceled(ByVal LoginName As String)
    If LoginName = String.Empty Then
      LoginName = "Unknown Login Name"
    End If

    DataLog.WriteEntry("Failed Login:" + LoginName, _
                        EventLogEntryType.FailureAudit, LE_Login)
  End Sub

  Public Shared Sub LogoutOK(ByVal LoginName As String)
    DataLog.WriteEntry("Successful Logout:" + LoginName, _
                        EventLogEntryType.SuccessAudit, LE_Logout)
  End Sub

End Class
Let's see what's going on in this class. The static constructor is guaranteed to run the first time I use any of the methods in this class. The constructor looks for an existing log source name. If this source name does not exist, then it creates a log file with the corresponding source name. It is possible to have a single log file accessed through many sources. This way, if you have a client/server program running on your machine, you could make one source the client source and one source the server source. They would both write to the same log file and you could distinguish them when reading the log file based on source name.
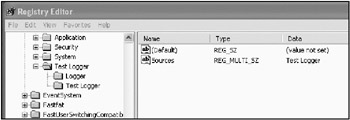
How does .NET know if a source exists? The API call that is wrapped by the EventLog.SourceExists static method looks in the registry for the source name. An event log file does not have any source name associated with the file itself. You will find event log entries in the registry under HKEY_LOCAL_MACHINE/SYSTEM/ ControlSet001/Services/EventLog. Figure 7-9 shows my registry after running this finished example.
If the source does not exist, I make a new log file with the corresponding source. I enable log events and assign a delegate to capture those events.
Each static method in this class writes a value to the log file with a special event code. The log event handler looks at this code to determine what was written to disk.
Normally, you would not enable events for writing log file entries. There is no point in doing so, and it takes time. I do it here to show you what is going on.
The next code to fill in is the login form. Because you got the wizard to make the click delegates for the buttons, you only need to fill in the click event code. Here it is.
C#
    private void cmdOK_Click(object sender, System.EventArgs e)
    {
      const bool LoginOK = true; //Causes unreachable code

      //First put in some code to evaluate if login succeeded
      if(LoginOK)
        EventLogger.LoginOK(txtName.Text);
      else
        EventLogger.LoginFailed(txtName.Text);

      this.Close();
    }

    private void cmdCancel_Click(object sender, System.EventArgs e)
    {
      EventLogger.LoginCanceled(txtName.Text);
      this.Close();
    }
  Private Sub cmdOK_Click(ByVal sender As System.Object, _
                          ByVal e As System.EventArgs) Handles cmdOK.Click
    Const LoginOK As Boolean = True 'Causes unreachable code

    'First put in some code to evaluate if login succeeded
    If LoginOK Then
      EventLogger.LoginOK(txtName.Text)
    Else
      EventLogger.LoginFailed(txtName.Text)
    End If

    Me.Close()

  End Sub

  Private Sub cmdCancel_Click(ByVal sender As System.Object, _
                          ByVal e As System.EventArgs) Handles cmdCancel.Click
    EventLogger.LoginCanceled(txtName.Text)
    Me.Close()
  End Sub
As you can see, there is not much here. All I do is call a static method on the event logger based on the click event. No validation code here.
The next piece of code to add is the code for the main form. Again, there is not much here. Just make sure your Form_Load and button click event handlers look like this.
C#
    private void Form1_Load(object sender, System.EventArgs e)
    {
      EventLogger.ProgramStart();
    }

    private void cmdLogin_Click(object sender, System.EventArgs e)
    {
      Login frm = new Login();
      frm.ShowDialog();
    }
  Private Sub cmdLogin_Click(ByVal sender As System.Object, _
                             ByVal e As System.EventArgs) Handles cmdLogin.Click
    Dim frm As Login = New Login()
    frm.ShowDialog()

  End Sub

  Private Sub Form1_Load(ByVal sender As System.Object, _
                         ByVal e As System.EventArgs) Handles MyBase.Load
    EventLogger.ProgramStart()
  End Sub
I also have a method to write to the log file upon program close. You will do this in the Dispose method of the main form. Add this line of code to the main form's Dispose method just before the end of the procedure:
EventLogger.ProgramEnd();
Lose the semicolon for VB.
There you have it. Run the program and try to log in, or click Cancel on the login form. You should see some message boxes appear when log events are being written to the file.
You have two ways to view the file. You can use the EventLog methods to extract events and create your own event viewer. You can also use the supplied Event Viewer that comes with the Windows operating system. To access the Event Viewer, click the Start button and select Control Panel → Administrative Tools → Event Viewer. Figure 7-10 shows the Event Viewer looking at the Test Logger event file.
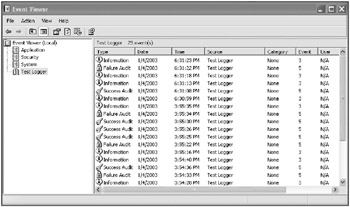
If you double-click any of the events, you can see the text that was written to this event. You can also set some parameters for the log file in here. For instance, you can set the maximum size of this file. It is a first-in first-out rotation.
The log file is good for keeping permanent records (within limits) of events on a certain machine. I often use it for just the purpose this example shows: program start-up and shutdown, and security. The real logger is the Trace function of .NET.
My version of Microsoft Word flags "instrumenting" as not being a word. You would think that the .NET folks would incorporate their own lexicon into the Word dictionary … but I digress.
Instrumenting is the process of enabling your code to report status about things that happen in your code during runtime. Although you use the Debug class mainly for the development stage, you use the Trace class for collecting data out in the field. Here is what happens during a trace in Windows Forms:
You define a trace listener or use the default listener.
You add the listener to the Listeners collection.
You define the level of tracing according to the TraceLevel enumeration.
You add trace statements at strategic points in your code.
You turn on tracing via a configuration file or via a code switch.
This is the general idea. The actual implementation is somewhat more involved. So, what would you trace? Here are some things I have found to be essential tracing material:
Success or failure of launching other programs from within code
Modem initialization strings and return messages
Database reading and writing
RS-232 input and output
Hardware initialization status
Once you get the hang of tracing your code, you will find it indispensable for troubleshooting problems in the field. It is no big deal to have tracing off by default and then turned on by a configuration file. This is the preferred method—let me tell you why. You could have several listeners in the Listeners collection. Some of these listeners could (read: should) be writing some information to a file. File I/O takes time, and if you have a trace switch set to verbose, you would be writing every trace message you have to every listener you have. This could severely impact performance.
Here is the trick to using tracing. Make sure you use a switch to turn tracing on and off. Use conditional trace writes based on the four levels of tracing. Use a configuration file to turn the trace levels on.
Although several types of trace listeners are available to you natively, there are some instances when you will want to make your own. In these cases, you would inherit from the TraceListener class and override the necessary methods, and perhaps add a few of your own.
When I started playing around with tracing, I wanted to send trace output to a console window. I like console windows. Unfortunately, you cannot do this in a Windows application; you can do it only in a console application. When you have a Windows application, all writes to the console go to the Debug window in the IDE and they vanish when running the executable. What to do? I could take the easy route and make the next example a console application. But I really wanted to do the console thing in a Windows application, so I came up with this example.
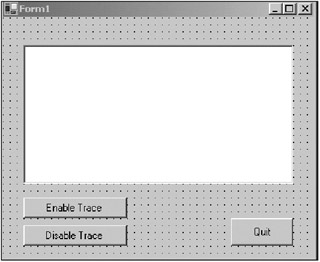
Start a new Windows project in C# or in VB. Mine is called "Tracing." You will need a second form to simulate the console window. Setup consists of the following steps:
Add a TextBox called txtInput to the main form.
Make this TextBox Multiline.
Add a Button called cmdEnable to the main form. The text should read Enable Trace.
Add a Button called cmdDisable to the main form. The text should read Disable Trace.
Add a Button called cmdQuit to the main form. The text should read Quit.
Make the form start in the center of the screen.
Your form should look like Figure 7-11.
The next thing to add is another form called console. This form should have a single TextBox on it called txtOut. Make this TextBox Multiline and set its Docking property to Fill.
You will also need to set the form's FormBorderStyle to FixedToolWindow. You should see a form whose contents are taken up with the TextBox. Because this is a tool window, the border is very small and contains a small X to kill the form.
There is not much code in this form. Listings 7-3a and 7-3b show the code for this form minus much of the wizard-generated code.
using System;
using System.IO;
using System.Drawing;
using System.Collections;
using System.ComponentModel;
using System.Windows.Forms;
namespace Tracing_c
{

  public class console : System.Windows.Forms.Form
  {

    private bool mAlive;

    private System.Windows.Forms.TextBox txtOut;
    private System.ComponentModel.Container components = null;

    public console()
    {
      InitializeComponent();
      this.Text        = "Console Output";
      txtOut.BackColor       = Color.Black;
      txtOut.ForeColor = Color.White;
      mAlive           = true;
      this.Hide();
    }

    protected override void Dispose( bool disposing )
    {
      if( disposing )
      {
        if(components != null)
        {
          components.Dispose();
        }
      }
      base.Dispose( disposing );
      mAlive = false;
    }
    #region Windows Form Designer generated code
    ...
    ...
    ...
    #endregion

    private void console_Load(object sender, System.EventArgs e)
    {
    }

    public bool IsAlive { get{return mAlive;} }
    public void Out(string buffer)
    {
      this.Show();
      txtOut.AppendText(buffer);
    }

    public void OutL(string buffer)
    {
      this.Show();
      txtOut.AppendText(buffer + "\r\n");
    }

    public void Clear()
    {
      txtOut.Text = string.Empty;
    }

  }
}
Option Strict On
Imports System.IO

Public Class console
  Inherits System.Windows.Forms.Form

  Private mAlive As Boolean

#Region " Windows Form Designer generated code "
  Public Sub New()
    MyBase.New()

    InitializeComponent()
    mAlive = True
    Me.Hide()

  End Sub

  'Form overrides dispose to clean up the component list.
  Protected Overloads Overrides Sub Dispose(ByVal disposing As Boolean)
    If disposing Then
      If Not (components Is Nothing) Then
        components.Dispose()
      End If
    End If
    MyBase.Dispose(disposing)
    mAlive = False
  End Sub

...
...
...

#End Region

  Public ReadOnly Property IsAlive() As Boolean
    Get
      Return mAlive
    End Get
  End Property

  Public Sub Out(ByVal buffer As String)
    Me.Show()
    txtOut.AppendText(buffer)
  End Sub

  Public Sub OutL(ByVal buffer As String)
    Me.Show()
    txtOut.AppendText(buffer + vbCrLf)
  End Sub
  Public Sub Clear()
    txtOut.Text = String.Empty
  End Sub
End Class
This class has a method to output a line of text to the TextBox and one to output a line of text followed by a carriage return/linefeed. If you look at the Trace class, you will see that this follows the methods in there that allow you to just pump out information or to output information a line at a time.
Note the IsAlive property. You may be wondering why I need this. I will tell you shortly.
Back to the main form. First, you need to add some namespace references.
C#
using System.ComponentModel;
using System.Windows.Forms;
using System.Data;
using System.Diagnostics;
using System.IO;
VB
Imports System.Data
Imports System.Diagnostics
Imports System.IO
Next, you need some class local variables.
C#
    #region class local variables
    TraceSwitch Tsw;
    #endregion
VB
#Region "class local variables"
  Dim Tsw As TraceSwitch
#End Region
Then you need some delegates to handle various events. Add the following code block to your main form.
    #region events

    private void EnableTrace(object sender, EventArgs e)
    {
      Tsw.Level = TraceLevel.Verbose;
      Trace.WriteLineIf(Tsw.TraceVerbose, DateTime.Now.ToString() +
                                          " Tracing enabled");
    }

    private void DisableTrace(object sender, EventArgs e)
    {
      Trace.WriteLineIf(Tsw.TraceVerbose, DateTime.Now.ToString() +
                                         " Tracing Disabled");
      Tsw.Level = TraceLevel.Off;
    }

    private void Quit(object sender, EventArgs e)
    {
      Trace.WriteLineIf(Tsw.TraceVerbose, DateTime.Now.ToString() +
        " Program Closed");
      Trace.Close();
      this.Close();
    }

    private void KeyPress(object sender, KeyPressEventArgs e)
    {
      if(e.KeyChar == (char)13)
        Trace.WriteLineIf(Tsw.TraceVerbose, string.Empty);
      else
        Trace.WriteIf(Tsw.TraceVerbose, e.KeyChar.ToString());
    }
    #endregion
VB
#Region "events"

  Private Sub EnableTrace(ByVal sender As Object, ByVal e As EventArgs)
    Tsw.Level = TraceLevel.Verbose
    Trace.WriteLineIf(Tsw.TraceVerbose, DateTime.Now.ToString() + _
                                        " Tracing enabled")
  End Sub
  Private Sub DisableTrace(ByVal sender As Object, ByVal e As EventArgs)
    Trace.WriteLineIf(Tsw.TraceVerbose, DateTime.Now.ToString() + _
    " Tracing Disabled")
    Tsw.Level = TraceLevel.Off
  End Sub

  Private Sub Quit(ByVal sender As Object, ByVal e As EventArgs)
    Trace.WriteLineIf(Tsw.TraceVerbose, DateTime.Now.ToString() + _
      " Program Closed")
    Trace.Close()
    Me.Close()
  End Sub

  Private Shadows Sub KeyPress(ByVal sender As Object, _
                               ByVal e As KeyPressEventArgs)
    If e.KeyChar = ChrW(13) Then
      Trace.WriteLineIf(Tsw.TraceVerbose, String.Empty)
    Else
      Trace.WriteIf(Tsw.TraceVerbose, e.KeyChar.ToString())
    End If
  End Sub
#End Region
When the Enable button is clicked, I turn on tracing to the maximum level. You should be aware that each level also turns on the levels below it.
When the Disable button is clicked, I write a trace message and turn off tracing. You can see from the code that I use a version of the WriteLine method that checks for the trace level before writing. This is handy but it comes with a warning. The runtime engine will check to see if the trace message can be displayed even if the trace level is not active. This means that the whole line had better work all the time or you could throw an exception. So if you want to display the division of two numbers, you should make sure the divisor is not zero.
Next, add a trace line to the Form_Load delegate.
C#
    private void Form1_Load(object sender, System.EventArgs e)
    {
      //You should not see this anywhere in any trace logs
      Trace.WriteLineIf(Tsw.TraceVerbose, "Program Started");
    }
  Private Sub Form1_Load(ByVal sender As System.Object, _
                         ByVal e As System.EventArgs) Handles MyBase.Load
    'You should not see this anywhere in any trace logs
    Trace.WriteLineIf(Tsw.TraceVerbose, "Program Started")
  End Sub
Normally, you will not see this trace line anywhere, because the initialization routine has the trace switch turned off at start-up.
To send trace output to the console form, you need to make a new kind of trace listener. To do so, you need to add a new class to the main form. Add it below the class local variables section of the main form.
C#
    public class NewListener : TraceListener
    {
      console con = new console();
      public NewListener()
      {
        con = null;
      }
      public override void Write(string s)
      {
        if(con == null || !con.IsAlive)
          con = new console();

        con.Out(s);
      }
      public override void WriteLine(string s)
      {
        if(con == null || !con.IsAlive)
          con = new console();

        con.OutL(s);
      }
      public override void Close()
      {
        if(con != null)
        {
          con.Close();
          con = null;
        }
      }
      public void clear()
      {
        if(con != null)
          con.Clear();
      }
    }
VB
  Public Class NewListener
    Inherits TraceListener

    Dim con As console = New console()

    Public Sub New()
      con = Nothing
    End Sub

    Public Overloads Overrides Sub Write(ByVal s As String)
      If con Is Nothing OrElse Not con.IsAlive Then
        con = New console()
      End If
      con.Out(s)
    End Sub

    Public Overloads Overrides Sub WriteLine(ByVal s As String)
      If con Is Nothing OrElse Not con.IsAlive Then
        con = New console()
      End If
      con.OutL(s)
    End Sub

    Public Overloads Overrides Sub Close()
      If Not con Is Nothing Then
        con.Close()
        con = Nothing
      End If
    End Sub

    Public Sub clear()
      If Not con Is Nothing Then
        con.Clear()
      End If
    End Sub
  End Class
This class inherits from the TraceListener abstract base class. It overrides two of the Write methods and adds its own Clear method. Look in the online help to see which methods are required to be overridden and which are optional.
Now you can see from this code why I needed the IsAlive method in the console form. Every time a message is written to the console form, I need to know if the form exists or not. If it does not exist, then I create it and write to it. This way, the user can kill the console form any time, and if tracing is enabled my program will not crash but will instead pop the form back up.
Now add the following constructor code.
C#
    public Form1()
    {
      InitializeComponent();

      Tsw = new TraceSwitch("VerboseTrace", "Trace data read/write");

      Stream myFile = File.Create("TestFile.txt");
      Trace.Listeners.Add(new TextWriterTraceListener(myFile));
      Trace.Listeners.Add(new NewListener());
      Trace.AutoFlush = true;

      txtInput.KeyPress += new KeyPressEventHandler(this.KeyPress);
      cmdEnable.Click   += new EventHandler(this.EnableTrace);
      cmdDisable.Click  += new EventHandler(this.DisableTrace);
      cmdQuit.Click     += new EventHandler(this.Quit);
    }
VB
  Public Sub New()
    MyBase.New()

    InitializeComponent()

    Tsw = New TraceSwitch("VerboseTrace", "Trace data read/write")

    Dim myFile As Stream = File.Create("TestFile.txt")
    Trace.Listeners.Add(New TextWriterTraceListener(myFile))
    Trace.Listeners.Add(New NewListener())
    Trace.AutoFlush = True
    AddHandler txtInput.KeyPress, New KeyPressEventHandler(AddressOf KeyPress)
    AddHandler cmdEnable.Click, New EventHandler(AddressOf EnableTrace)
    AddHandler cmdDisable.Click, New EventHandler(AddressOf DisableTrace)
    AddHandler cmdQuit.Click, New EventHandler(AddressOf Quit)

  End Sub
This constructor sets up the trace listeners and adds them to the collection. Note that I have three listeners. The default listener writes to the Debug window in the IDE. I have a listener that writes to a file. I have a listener that writes to the console form. Whenever I use the Trace.WriteLineIf method, the output goes to all three. This is pretty cool, don't you think?
Now run the program and start typing in the text box. Click the Enable button and continue typing. You should see the result of your typing in the console window as well, as shown in Figure 7-12.

Kill the console window and continue typing. The console window will pop back up again. Disable tracing and the window stays up but nothing is written to it.
This is a pretty neat way to do debugging in the field. Quite often it is handy to have a console window on the screen where you can see what is going on in real time. I have used this many times to capture communication between some device and my program. I can tell pretty quickly if something is wrong and where the problem is.
Note the contents of the trace text file. It has the same information as the screen shown in Figure 7-12 does.
| Note |
C# users will find the text file in the Debug directory under the BIN directory for this project. VB users will find it in the BIN directory. |
When you create a program, you do not want any special buttons on the form to turn tracing on and off. The better way is to have your program read a configuration file and determine the state of the trace switch at runtime. This way, you shut down the program, edit the configuration file switch, and turn on the program, and you have instant tracing.
Add an XML file to your project called <application name>.exe.config.
| Note |
Because I denote my examples with -c or -vb, my .config files are called Tracing-c.exe.config and Tracing-vb.exe.config. |
The contents of this file are as follows:
<?xml version="1.0" encoding="utf-8" ?>
<configuration>
  <system.diagnostics>
    <switches>
      <!-- "0"=off, "1"=errors, "2"=errors+warnings,
           "3"=detailed error info, "4"=verbose -->
      <add name="VerboseTrace" value="4"/>
    </switches>
  </system.diagnostics>
</configuration>
Spelling and case matter here. Although this file is created in your project directory, it needs to reside in the same directory as your executable.
VB users should copy this file to the BIN directory under their Tracing project directory. C# users should copy this file to the BIN\Debug directory under their Tracing project directory.
Now run your program and the trace message in the Form_Load delegate gets written to the console screen. In fact, the console screen appears at start-up.
You can change the value in this configuration file to reflect any of the four allowable values. This way, you can control tracing at the customer site when needed.