The basic method of handling errors when entering data is the ErrorProvider object. You saw this object a few times in Chapter 6, but I never really explained it.
Basically, the ErrorProvider is a small icon that you can associate with any visible control on your form. All you need to do is instantiate a new version of it and tell it which control to sit next to. The user sees a small blinking icon next to the offending field. When the mouse hovers over the icon, a ToolTip text message appears with some relevant information.
My thoughts on this ErrorProvider control have gone from "This is pretty cool" to "This is cute but not terribly useful." I concede that the control does have some uses, though.
Have you ever filled in a Web page with information needed to complete a transaction? Oftentimes when you leave something out, the same Web page comes back with a little error icon next to the fields you forgot (or failed) to fill in. This is useful to let the user know what he or she needs to do to remedy the situation. The ErrorProvider control for Windows Forms programs serves basically the same function.
In the ASP world, a user fills in fields in a Web page. When the user clicks OK, that Web page gets posted back to the server, and then it gets validated as a whole. If the Web page has any errors, it gets transferred back to the user's PC with error icons attached.
Windows Forms programs work a little differently. Most times you are able to validate a field during data entry or immediately after. There is no need for any ErrorProvider control in this case, as you will sound the klaxons and prevent the user from continuing on until the error is fixed.
There are times, though, when this control is useful. If you want, or need, to stave off validation until a whole form's worth of fields are entered, then you could use this control to flag several fields that may be in error. This is validation at the end of data entry.
When you have a form whose fields are validated at the end of the data entry phase, this is usually because many fields on the form are interrelated or maybe some fields are required to be filled in. Each field cannot be validated on its own, but the form must be validated as a whole. Try this simple example.
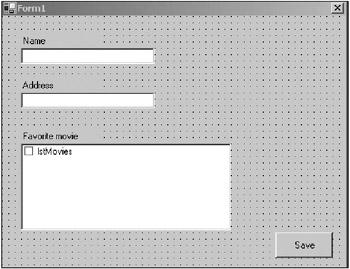
Make a new project. Mine is called "ErrProvider." Add the following controls:
Add a Label whose text reads Name.
Add a TextBox called txtName below this Label.
Add a Label whose text reads Address.
Add a TextBox called txtAddr below this Label.
Add a Label whose text reads Favorite movie.
Add a CheckedListBox called lstMovies below this Label.
Add a Button called cmdSave whose text reads Save.
Your form should look like the one shown in Figure 7-1.
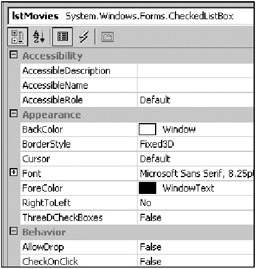
Before I have you add the ErrorProvider code, I want you to click each control on this form and look at the Properties page. For instance, if you click the CheckedListBox control, your Properties page should look like the one shown in Figure 7-2.
Now add an ErrorProvider object to your form and call it Err. Click your CheckedListBox again and notice that there are some new properties, as shown in Figure 7-3.
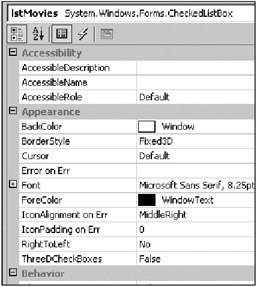
These new properties have been added to all the controls on your form:
Error on Err
IconAlignment on Err
IconPadding on Err
These are design-time properties only and you can't change them in code or at runtime. They're here to provide you with the capability of hard-coding in an error display while you're laying out the form. This is nice of Microsoft, don't you think? The only properties I would use are the icon placement and icon padding properties. The text should be flexible and code based.
Anyway, double-click the cmdSave button and get the delegate generated for you. Your filled-in delegate should look like the following.
C#
    private void cmdSave_Click(object sender, System.EventArgs e)
    {
      if(txtName.Text == string.Empty)
        Err.SetError(txtName, "Cannot save form without a name");
      else
        Err.SetError(txtName, "");
      if(txtAddr.Text == string.Empty)
        Err.SetError(txtAddr, "Cannot save form without an address");
      else
        Err.SetError(txtAddr, "");

      if(lstMovies.SelectedIndices.Count == 0)
        Err.SetError(lstMovies, "Cannot save form without a favorite movie");
      else
        Err.SetError(lstMovies, "");
    }
VB
  Private Sub cmdSave_Click(ByVal sender As System.Object, _
                            ByVal e As System.EventArgs) Handles cmdSave.Click

    If (txtName.Text = String.Empty) Then
      Err.SetError(txtName, "Cannot save form without a name")
    Else
      Err.SetError(txtName, "")
    End If

    If (txtAddr.Text = String.Empty) Then
      Err.SetError(txtAddr, "Cannot save form without an address")
    Else
      Err.SetError(txtAddr, "")
    End If

    If (lstMovies.SelectedIndices.Count = 0) Then
      Err.SetError(lstMovies, "Cannot save form without a favorite movie")
    Else
      Err.SetError(lstMovies, "")
    End If
  End Sub
Now add some code to fill in the CheckedListBox.
    private void Form1_Load(object sender, System.EventArgs e)
    {
      lstMovies.Items.Add("Dumbo");
      lstMovies.Items.Add("WindTalkers");
      lstMovies.Items.Add("Paper Chase");
      lstMovies.Items.Add("War Of The Worlds");
      lstMovies.Items.Add("LOTR");
    }
VB
  Private Sub Form1_Load(ByVal sender As System.Object, _
                         ByVal e As System.EventArgs) Handles MyBase.Load

    lstMovies.Items.Add("Dumbo")
    lstMovies.Items.Add("WindTalkers")
    lstMovies.Items.Add("Paper Chase")
    lstMovies.Items.Add("War Of The Worlds")
    lstMovies.Items.Add("LOTR")

  End Sub
Run the program and click the Save button. Your screen should look like the one shown in Figure 7-4.
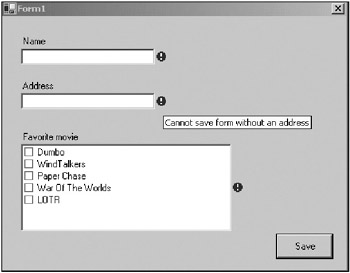
If you add some text to one of the TextBoxes or check a movie, the corresponding error will go away when you click the Save button again.
Although the ErrorProvider is good for this kind of scenario, I prefer to use a more in-your-face error-handling method when possible.
If you have a form with many fields that just need to be filled in, the ErrorProvider is OK to use. For this form, however, I prefer to pop up a dialog box as well that shows the user the error of his or her ways in as explicit terms as possible. There is not much information you can provide in an ErrorProvider's ToolTip text box.
Have you ever come across an error like the one shown in Figure 7-5?
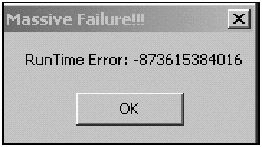
I have seen errors like this many times. Click OK and your program just disappears. This is not too friendly. It is, however, all too common.
When you create error messages, be mindful of the following:
The error message should provide a good description of the error.
The error message should suggest a way for the user to fix the problem.
The error message should provide a way for your program to get around the error or gracefully exit if the error is a showstopper.
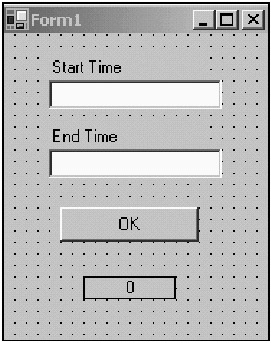
The next example (in C# only) shows a better way to display an error with gentle prodding. Open up a new project and call it "ErrDialog." Figure 7-6 shows the form after you have added the following controls:
Add a TextBox called txtStart.
Add a Label that reads End Time.
Add a TextBox called txtEnd.
Add a Label called lblTicks. Make its BorderStyle FixedSingle and center the text.
Add a Timer to the form.
Add a Button called cmdOK. It should read OK.
Double-click the Timer to get the timer1_Tick delegate.
Listing 7-1 shows the code for the whole form (except for the wizard code). There is not much here, but there is enough to show what I need.
using System;
using System.Drawing;
using System.Collections;
using System.ComponentModel;
using System.Windows.Forms;
using System.Data;
namespace ErrDialog_c
{
  public class Form1 : System.Windows.Forms.Form
  {
    private System.Windows.Forms.Timer timer1;
    private System.Windows.Forms.Label lblTicks;
    private System.Windows.Forms.Button cmdOK;
    private System.Windows.Forms.Label label1;
    private System.Windows.Forms.TextBox txtStart;
    private System.Windows.Forms.Label label2;
    private System.Windows.Forms.TextBox txtEnd;
    private System.ComponentModel.IContainer components;

    public Form1()
    {
      InitializeComponent();

      timer1.Interval = 1000;
      timer1.Start();
      cmdOK.Click += new EventHandler(this.OK_Click);

      txtStart.Text = DateTime.Now.ToShortTimeString();
      txtEnd.Text   = DateTime.Now.AddMinutes(-1).ToShortTimeString();
    }

    protected override void Dispose( bool disposing )
    {
      if( disposing )
      {
        if (components != null)
        {
          components.Dispose();
        }
      }
      base.Dispose( disposing );
    }

    #region Windows Form Designer generated code
...
...
...
    #endregion
    [STAThread]
    static void Main()
    {
      Application.Run(new Form1());
    }

    private void timer1_Tick(object sender, System.EventArgs e)
    {
      lblTicks.Text = (int.Parse(lblTicks.Text)+1).ToString();
    }

    private void Form1_Load(object sender, System.EventArgs e)
    {
    }

    private void OK_Click(object sender, EventArgs e)
    {
      DialogResult Retval;
      string msg;

      msg =  "The end time field has an incorrect value.\n";
      msg += "The end time must be later than the start time\n\n";
      msg += "Press 'Yes' to automatically adjust the end time";

      Retval = MessageBox.Show( msg,
                                "Incorrect End Time",
                                MessageBoxButtons.YesNo,
                                MessageBoxIcon.Error);
      if(Retval == DialogResult.Yes)
        txtEnd.Text =
               DateTime.Parse(txtStart.Text).AddMinutes(1).ToShortTimeString();
      txtEnd.SelectAll();
      txtEnd.Focus();
    }
  }
}
Run the program and click the OK button. Figure 7-7 shows a much better dialog box than the one in Figure 7-5.
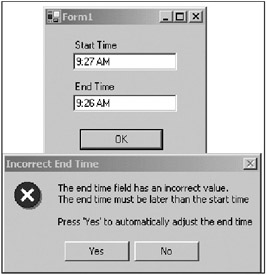
This error dialog box tells the user explicitly what is wrong and what needs to be done to correct the problem. In this case, the program is able to automatically correct the problem for the user and offers to do so.
If the user clicks Yes, the end time will change to the start time plus 1 minute, the End Time TextBox will be highlighted, and the text inside will be selected. If the user clicks No, the same thing will happen, except the time will not be adjusted.
The user has been led back to the offending field and the field is ready to be edited. I have come across many instances where this kind of nice error handling has been possible but not used. You should show users errors like this whenever possible.
I had you add a timer to the form that displays the seconds as they tick by. I did this to prove a point. When the MessageBox is invoked, it is modal. That is to say, you cannot do anything else in your program until you get rid of the dialog box. Does this mean that your program stops running? It appears to, as the next line of code after the MessageBox appears does not get run until the MessageBox goes away. However, look at the Label that holds the result of the time tick event.
The timer keeps ticking away, and the Label is updated with the new time while the MessageBox is still on the screen. This tells you that your program still responds to events, as it normally should. This is good news if you happen to be communicating with some RS-232 device at the time you pop up this message. Of course, any other thread that happens to be running on the side still continues on as normal.
There is one thing missing from the MessageBox dialog box: It has no provision for a Help button. Even the IDE debugger has a Help button on its MessageBox. Why leave it off here?[1] There is also no provision to add your own buttons to the dialog box. The VB 6.0 MessageBox dialog box was much more comprehensive in this respect.
| Tip |
Although it is not recommended by Microsoft, you can still use the VB 6.0 MsgBox command. If you need the extra functionality, it may be useful to you. See the online help for information on how to use the MsgBox command. |
You may find the built-in MessageBox to be limiting in its use. For instance, you may want to add a Help button or maybe some user-defined buttons. Perhaps you would like the dialog box to be nonmodal but still reside on top of the form. You can do all of this if you roll your own MessageBox form. You already have the knowledge to do this, and it could definitely enhance your programs that use it.
[1]Sometimes I do not understand decisions like this.