If you've ever worked on a team larger than about six or seven developers, then you've probably already used a source control system, if only out of sheer necessity. But if you've worked only on smaller teams, then you might not yet be fully comfortable with the basic ideas and concepts of source control. We'll look at some of those now. If you're already familiar with Visual SourceSafe (or a similar tool), then you can skip ahead to the next section. There, we'll examine something much more interesting: ways to use these source control features when debugging.
| Note |
Visual Studio.NET was a major release of Visual Studio. Everything about the product changed drastically… except for Visual SourceSafe, which didn't even get its minor version number incremented. Aside from a few bug fixes, the SourceSafe that ships with VS .NET is identical to the one that shipped with VS6. |
Most teams without source control set up a central server where the official version of the code is stored. The developers will edit files on their local computers, and will copy the changed files to the central server only when the file is ready. This process works much better than editing the files directly on the server, because this lets you can take as long as you need to make a change: While you're editing a file, everyone else can continue to use the old version, which still compiles and runs. But if you edited the file directly on a server, then coworkers would be trying to compile your code even as you're writing it, which would almost certainly fail.
Visual SourceSafe works just like that central server except it also enforces formal processes to make sure everything runs smoothly. If you want to edit one of the files, you must first check out the file, and when you're done editing, you check in. The check-out/check-in process lets the system know someone is editing the file, and the system can then prevent other people from making changes to that file while you're working on it. Without this protection, two developers might change the same file at the same time, overwriting each other's changes.
While you're editing the file, someone else may wish to view the project's code. To do this, they fetch the latest version from SourceSafe. That fetch will give them the last "good" version of code that had been formally checked in to the system. Users won't see the changes you've made to your checked-out version until you announce that it's complete by checking in—after all, the changes you've made to your checked-out version might not even compile yet, so you don't want other people using that file before you're ready. This is the same principle that the central server method relies on, except that SourceSafe can also track who has which files checked out.
Finally, Visual SourceSafe doesn't store only the latest version of the code—it stores every version anyone has ever checked in since the beginning of the project. Normally, developers want to work with the latest code. But sometimes, they're interested in code that shipped in the previous version, or code from a week ago before a coworker messed everything up with an idiotic change, or code from the very start of the project. Or maybe they want to see what changed between two versions of a file. We'll talk about some situations where that's useful later in this chapter.
SourceSafe provides four major features. These features can be used in different ways to accomplish so many different tasks that it seems as if the system supports more features, but at the core, you're always using SourceSafe to do the following:
Allow developers to work together.
See a history of changes and compare versions.
Fetch a particular version or branch a copy.
Protect against accidental deletion of files.
Putting all your files in the root directory of your hard drive makes it difficult to find the file you want. So instead, you store your files in a hierarchical tree containing directories and subdirectories. Visual SourceSafe lets you store files the same way. Put some serious thought into how you want to structure your directory hierarchy in SourceSafe because changing it after the fact is cumbersome. Regardless of your original hierarchy, though, it will almost inevitably grow very deep as the project gets larger: At my company, a typical path looks like "Development/Name of Product Line/Name of Product/Which Version/ Name of Component/Name of Subcomponent/Name of Sub-Subcomponent/ Name of File".
Normally, when you fetch a project, SourceSafe creates a directory path on your computer that matches the one listed in SourceSafe. But on very large teams, many programmers work on only one small section and seldom look at the rest of the project code. If that describes your situation, you might find it convenient to shorten the path to something smaller, say, "Development/My stuff". SourceSafe can be configured to copy the files to your short-named directory rather than to the long path. The directory in SourceSafe will still be a mile long, but at least your local directory will be short. That can save a few mouse clicks when navigating to your directories.
To configure this aliasing in SourceSafe, right-click the project, and select "Set Working Folder". You can then check in/check out, edit, delete, or create new files in your directory, and everything will work just as if you were using the longer directory paths. Of course, you may have to undo this setting if you ever need to build the rest of the project, but if you don't anticipate a need for that anyway, then this shortcut can be very handy.
Under the central server method, great caution needs to be taken anytime two developers make changes to the same source file. Suppose both developers copy the file from the server, and each fixes a bug. The first developer finishes and copies the file back to the server. But the second developer is unaware of that, so now he copies his version to the server, overwriting the first developer's changes. Two bugs were fixed, but only one is now on the server.
Many teams partially work around this problem by assigning each source file an "owner" and forbidding anyone else to edit that file. Of course, enforcing that policy isn't always easy—what if one developer is on vacation when someone else needs a change? What if the change is a simple one-line fix that requires more time to explain than to do? Assigning an owner to each file helps, but it's not a complete solution.
Besides, the single owner policy still doesn't solve another problem with the central server method. After editing multiple files for a particular bug, will you remember all the files you changed? It's very common to edit several files, but to forget about one of them, so all the files get copied back to the central server except one. Then the fix is incomplete—at best, the project won't compile, and at worst, a hard-to-find bug will be introduced.
Visual SourceSafe eliminates these problems by creating the check-in/checkout system. The check-out essentially locks the file for your exclusive use until you're done, so it becomes impossible for one person to overwrite another's changes. Even after you check in the file, SourceSafe will ensure that no one else can edit it until he's first fetched the latest version of the file. You can cheat this protection scheme if you're deliberately trying, but you won't have to worry about accidental conflicts.
Finally, SourceSafe also solves the problem of checking in only half a fix due to forgetfulness. Each day before you go home, ask SourceSafe for a list of all the files you have checked out. Scan that list and be sure to check in any file you're finished with.
| Tip |
To get a list of the files you have checked out, go to the View menu of SourceSafe, select Search |
By default, Visual SourceSafe will allow only one person to check out a file at a time. If you want to edit a file that someone else has checked out, then you have no choice but to wait for her to finish. That makes a lot of sense, especially for teams new to source control. It guarantees no developer ever overwrites someone else's changes unless he's deliberately trying. But what about the downside? Suppose you need to make a very quick one-line change to a file, but someone else has it checked out for major edits? There's no good way to get your bug fix added to the system without also adding your coworker's not-yet-ready changes.
Or what if the other person isn't around to check in her file? The angriest I've ever been at a coworker was when someone checked out half our product and then left on a 2-week vacation. Fortunately, SourceSafe ships with an administrator-only tool that can be used to undo another person's checkout, and that's what we used here. But you don't want to do that too often. So advanced teams might want to consider enabling SourceSafe's ability to allow simultaneous check-outs.
With simultaneous check-outs, the problems I just described wouldn't happen because multiple people could check out at the same time. How do you avoid overwriting each other's changes? When you check in a file that another developer has already changed, SourceSafe will try to automatically merge the two versions. For any non-trivial change, SourceSafe asks you to confirm its merge. Be sure to pay attention during this step. The automatic merge utility usually does a very good job, but if it messes up and you don't notice, then important code changes will be lost.
Should you decide to enable multiple checkouts, launch the SourceSafe Administrator tool, select the Tools menu, select Options ![]() General, and then select Allow multiple check-outs.
General, and then select Allow multiple check-outs.
SourceSafe stores every version of every file that's ever been checked in. More than that, it also records the history of those changes—who did it? When? Why? Which lines of code were affected? This change history is an extremely powerful debugging tool. In this section, we'll just talk about what change histories are; but later, we'll examine several real-world bugs demonstrating the full power of change histories.
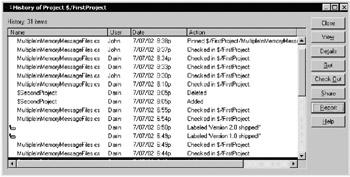
Whenever you check in a file, SourceSafe will ask for a comment summarizing the change you made, and those comments are stored as a sort of historical record of the file. That lets you see how and why the file changes over time. The check-in comment doesn't have to be in-depth. Think of it more as a one-line title than a multi-line summary—for instance, "Fixed a crash under low memory conditions by handling an exception". Descriptions like that allow you to rapidly browse the change history and pick out the changes that are potentially relevant to the issue you're debugging. Figure 10-1 shows a typical change history.
In addition to showing you the comments from each check-in, SourceSafe also has the concept of labels. A label is just a comment indicating some particular version of the file achieved some significant milestone. For example, "Code that was shipped for our second release" is a good (if wordy) label. When you discover a bug and wonder whether it was introduced before or after the last release, you can browse the history and instantly see whether the offending check-in came before the release label. In fact, my team adds a label for every single product build (even the ones that aren't shipped to customers) for the same reason.
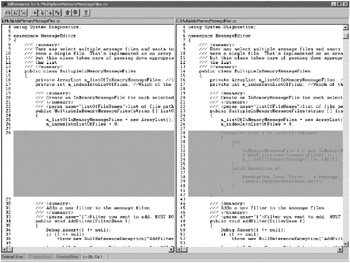
Finally, it's very often useful to see exactly what changed between two versions. Hopefully, the check-in comment was meaningful, but it's still nice to see the specific lines of code that changed. SourceSafe allows this by letting you diff any two versions against each other. The two versions are shown side-by-side, and the modified lines are highlighted so that they stand out. To diff two files in a change history, select them both and then click the Diff button. You should see a window that looks similar to Figure 10-2.
Most of the time, you'll work with the latest version of the source code. Usually, the latest version is the best—"New & Improved!" But sometimes, you'll be interested in an earlier version. Other times, you'll want to split the code into two different branches so you can make changes to one copy without affecting the other. And once in a while, you may even decide to throw away your recent changes and revert the code back to an earlier copy. Since SourceSafe stores all the past versions of each of your files, it can retrieve any version you want.
Why would you want to work with an earlier version of the code? The most common reason is when a customer reports a bug in the currently shipping version, but you've already begun work on the next version. If the new version isn't yet ready to be shipped, then you may need to prepare a hotfix based on the old version, so you need some way of fetching just that code. SourceSafe makes this easy: Bring up the file's change history, select the version you want, and click the button to fetch it.
If you expect to make changes in that older version often, you should go one level further and use SourceSafe's branching feature. This copies (or forks) source files into a separate directory. Now you have two identical versions—but they won't be identical for long because changes made to one branch won't show up in the other. This makes a good platform for managing parallel development—create one branch to hold the major changes of your next version, and another branch for the minor hotfixes built atop the currently shipping version. Of course, if you fix a bug in the hotfix branch, you need to remember to make the fix in the other branch as well. But even then, making fixes in two branches is better than the alternative of being unable to easily make changes to the currently shipping code at all.
| Note |
To branch a version in SourceSafe, you first share the files. Go to the SourceSafe project you want the branch in, and click the Share button (the button has a picture of a chain link). Select the files you want and hit OK. This results in two copies, but any changes made to one copy will show up in the other. Click the Branch button (the button has a picture of a broken chain link) to split the shared files into a new branch. You now have two completely independent copies of the source. |
It's a good idea to add a label on the last version before a major change—for instance, "Here is the last version before we switch to the new rendering engine." That way, if you decide to abandon your major changes midway through because they're proving too difficult, you can easily tell where you need to back up to. SourceSafe can then rollback to that version. That saves you the work of having to manually undo each of your many changes. Be careful when rolling back—the process is non-reversible. But if you're sure you want to throw away an entire set of changes (perhaps a coworker foolishly broke everything with a poorly written change), then SourceSafe can make it happen quickly.
| Note |
To rollback to an earlier version in SourceSafe, go to the change history screen of the file or project you want. Select the change or label you wish to revert to, and click the Rollback button. |
Storing all your code on your own computer without a backup is risky. What if you accidentally delete an important source file? If your computer has the only copy, then you've lost valuable work. Maybe you're diligent enough to back up your hard drive every night, and you're counting on that to help you recover from any accidental file losses. Backups are a great first step, but the problem with them is that they're all or nothing—you can't quickly recover just a single file. Wouldn't it be better to periodically copy your code to another machine, or better yet, to Visual SourceSafe?
Sometimes, developers who work alone think they don't need a source control system—"I'd just keep everything checked out to myself all the time, anyway." But if for no other reason than protection against accidental deletion, lone developers should always check in their changes often. Recovering a file from SourceSafe takes only a second or two, and you don't have to worry about backup drives.
| Tip |
A coworker in my office once leaned against my desk, accidentally pushing a book against my keyboard's Delete key. In the span of our 5-minute conversation, my entire source file was deleted! The file was saved without me even noticing, and I nearly checked the file in before discovering the problem. Make sure SourceSafe always contains a recent copy so you can recover from such disasters. |
Of course, backups are still important—since the source control system is the official repository of your code, you should back up that machine's hard drive every night. These backups guard against hardware failure on the SourceSafe machine. But you no longer need to worry about accidental file deletions because it's very hard to accidentally delete anything from SourceSafe. By default, SourceSafe keeps a record of files even after deletion, and you can always recover them. Unless you turn on the Permanently delete files option, you shouldn't have to worry about accidental deletions.