So far we have looked at SOAP and Web services from a technical point of view. When it comes to working with SOAP messages and Web services, you need to know how to debug the messages that are sent from and received by the Web service. Here we will show you how to create a simple Web service and trace the SOAP communication between the client and the server to see what is going on behind the scenes.
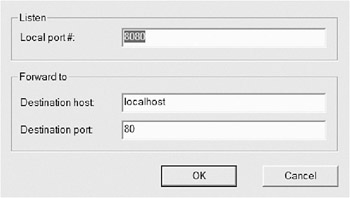
To make it easier to understand how a SOAP message is built and what it consists of, an application that traces SOAP messages is helpful. Many freeware tools for tracing SOAP messages exist on the market, and the SOAP SDK kit also contains such a tool called trace utility. It listens on a port that you specify and forwards all incoming traffic to its destination Web server and port, which you also specify. Figure 6-7 shows the trace utility configured to listen to port 8080 and forward the incoming messages to the server localhost.
Once you have configured the trace utility to listen to a port, you must make your client send all requests to this port on the destination host. Therefore, for this example, instead of sending a SOAP request to http://localhost/myservice.asp, it should be sent to http://localhost:8080/myservice.asp. If you want to capture SOAP messages while running code, simply run the trace utility and make it listen on port 8080, and replace the service URL in the code to point to port 8080 on the destination host. The trace utility will intercept and capture the request and response messages, and display them in the trace window.
It is time to see a Web service in action. Here we will walk you through the steps for creating a .NET Web service that exposes a couple of functions. After that, we will show you how to create a client that consumes the Web service.
The Web service exposes functions from a financial legacy system. It will be able to report an account's status, add an amount of money (we wish this were a real Web service!), and draw from the account. The Web service itself also verifies that the account contains enough money before it allows the business to charge the account. If the sum is not enough, the Web service will return a SOAP fault error message the client has to deal with.
To follow along with this example, open Visual Studio .NET.
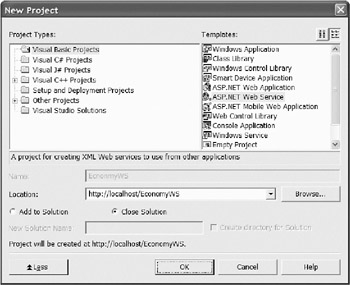
Select ASP.NET Web Service under Templates, and also specify where the Web service should be located on the server (see Figure 6-8). For this example, we specified EconomyWS.
Click OK, and VS .NET will set up an empty ASP.NET Web service project.
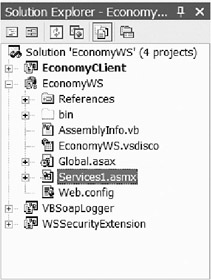
The first action to take when the project has opened is to change the name of the created Web service page from Services1.asmx, as shown in Figure 6-9, to something more suitable. Since the Web service will expose functionality for accounts, rename the project as Account.asmx.
We assume that you are probably familiar with the VS .NET development environment, hence we will give only a short overview here. The Solution Explorer contains the projects that are loaded in the solution (a solution is a group of files gathered from different projects). This ASP.NET Web service project sets up one empty .asmx page (which is the actual Web service) and a global.asax page (because this Web service is an application in the Web server). The global.asax page can contain global information for all pages in the Web service, such as logon credentials. It also contains the old events that will occur in this application—Application_Start, Application_End, Session_Start, Session_End—as well as some other events such as Application_BeginRequest, Application_AuthenticateRequest, and Application_Error.
The next thing you will do is change the namespace of the Web service. This is the namespace that will be used in all responses from this Web service. For this example, you will use the name of a fictional company called My Comp. After you change the namespace, you input the complete Web service code, which is shown in Listing 6-3.
Imports System.Web.Services
<WebService(Namespace:="http://localhost/WebServices", _
Description:="This Web Service exposes account functionality.")> _

Public Class Account
    Inherits System.Web.Services.WebService

    <WebMethod(Description:="Obtains the Salary on the specified account.", _
          EnableSession:=False)> _
      Public Function GetSalaryOnAccount(ByVal AccountID As Long, _
                                            ByVal StrUserID As String) As Integer
        Select Case AccountID
            Case 1
                Return DateTime.Now.Second * 100
            Case 2
                Dim rnd As New Random(DateTime.Now.Second)
               'Seed value to ensure another pseudo random series.
                Return rnd.Next() 'Return the random number
            Case Else
                Return 0
        End Select

    End Function
    <WebMethod(Description:="Obtains the Name of the specified account.", _
      EnableSession:=False)> _
    Public Function GetAccountName(ByVal AccountID As Long, _
 ByVal StrUserID As String) As String

        Select Case AccountID
            Case 1
                Return "My public account"
            Case 2
                Return "My secret account"
            Case Else
                Return "Unknown"
        End Select
    End Function
End Class
Two functions are created: one that returns the name of an account, and one that returns the amount in the account.
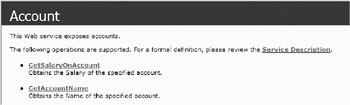
To test the project, right-click Account.asmx, choose Set as Start Page, and then choose Start from the Debug menu or press F5 to build and run the project. This will launch a service documentation page in Internet Explorer that should look like the one in Figure 6-10.
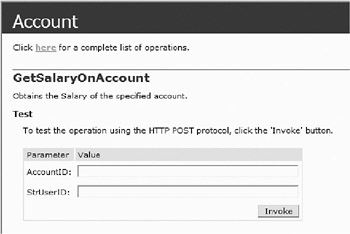
This is a default page that is automatically generated. If you click GetSalaryOnAccount, you will be transferred to the test page shown in Figure 6-11. On this test page you can invoke the selected method on the Web service and also pass it the different parameter it requires.
Fill in some valid parameter values (1 for the AccountID and a username), and click the Invoke button. The request is sent to the Web service and processed on the server, and a SOAP response message like the following is returned:
<? XML version="1.0" encoding="utf-8" ?>
  <int xmlns="http://localhost/WebServices">3000</int>
But what is really sent to and from the server by invoking the Web service this way? A little bit farther down the test page you will see what is going on behind the scenes (see Listing 6-4).
POST /EconomyWS/Account.asmx HTTP/1.1
Host: localhost
Content-Type: text/XML; charset=utf-8
Content-Length: length
SOAPAction: "http://localhost/WebServices/GetSalaryOnAccount"

<?XML version="1.0" encoding="utf-8"?>
<soap:Envelope xmlns:xsi="http://www.w3.org/2001/XMLSchema-instance"
    xmlns:xsd="http://www.w3.org/2001/XMLSchema"
    xmlns:soap="http://schemas.xmlsoap.org/soap/envelope/"> <soap:Body>
    <GetSalaryOnAccount xmlns="http://localhost/WebServices">
      <AccountID>1</AccountID>
      <StrUserID>Rickard</StrUserID>
    </GetSalaryOnAccount>
  </soap:Body>
</soap:Envelope>
HTTP/1.1 200 OK
Content-Type: text/XML; charset=utf-8
Content-Length: length

<?XML version="1.0" encoding="utf-8"?>
<soap:Envelope xmlns:xsi="http://www.w3.org/2001/XMLSchema-instance"
xmlns:xsd="http://www.w3.org/2001/XMLSchema"
xmlns:soap="http://schemas.xmlsoap.org/soap/envelope/">
  <soap:Body>
    <GetSalaryOnAccountResponse xmlns="http://localhost/WebServices">
      <GetSalaryOnAccountResult>3000</GetSalaryOnAccountResult>
    </GetSalaryOnAccountResponse>
  </soap:Body>
</soap:Envelope>
First you can see an ordinary post to the Web services containing a SOAP message. The body contains a method declaration and its parameters.
The second part shows the response from the server. It contains the SOAP envelope and a body that has a GetSalaryOnAccountResponse (named after the requested method and a suffix of Response). The return value shows a suffix of Result added to the method name.
Normally you will not invoke Web services this way. In .NET it is very easy to consume Web services and use them as objects, as you will see in Chapter 9.
Normally when an error occurs and you want to pass it back to the caller, all you need to do is throw an exception. By doing this, the server creates a SOAP exception message and throws it to the caller application. The proxy on the server will serialize the error in the returning SOAP message sent to the caller. Normally you would want to add some extra information to the fault message so the caller can get a clue as to why the request failed. To return a more complex fault message, you need to use one of the other constructors of the SoapException class. The following constructors suit this purpose:
Public Sub New(ByVal message As String, _
ByVal code As System.XML.XmlQualifiedName, _
ByVal actor As String, _
ByVal detail As System.XML.XmlNode)
This code takes a fourth parameter, an xmlNode. What this lets you do is populate your own XML document and put it in the returning fault message!
Let us look at an example. To the code in Listing 6-3 you will add a validate function named ValidateWithdraw. The function will take two parameters. The first will identify the user, and the second will be the account number that should be used. Of course, the last parameter will be the amount that should be withdrawn from the specified account number. If the action is allowed (that is, if there is enough money in the account), the function will return true. If not, a specific fault message will be filled with information about the error. (The function could have returned false to tell the user that the withdrawal was not allowed, but we are returning a specific fault message for the purpose of this example.) Listing 6-5 shows the complete code for the ValidateWithdraw function.
Private Function ValidateWithdraw(ByVal UserID As String, _
                                       ByVal Account As Long, _
                                       ByVal Amount As Decimal) As Boolean
'Verify that there is enough money in the account for the current action.
Const MAXWITHDRAWVALUE As Integer = 1000
If UserID.Equals("Bandit") Then
'This guy shouldn't be allowed to do anything.
ThrowComplexException("ValidateWithdraw", _
"We're not allowed to do anything here.", "", UserID, _
Account, Amount)
Else
'A withdraw > MAXWITHDRAWVALUE not allowed.
      If Amount > MAXWITHDRAWVALUE Then
      ThrowComplexException("ValidateWithdraw", _
      "We're not allowed to withdraw more than " & _
                   MAXWITHDRAWVALUE, "", UserID, Account, Amount)    End If
End If
End Function
The ThrowComplexException function in Listing 6-6 is a little bit more complicated.
Private Sub ThrowComplexException(ByVal ProcedureName As String, _
ByVal Message As String, _
ByVal stacktrace As String, _
Optional ByVal UserID As String = vbNullString, _
Optional ByVal Account As Long = Long.MinValue, _
Optional ByVal Withdraw As Decimal = Decimal.Zero)
        Dim doc As New System.XML.XmlDocument()
        Dim detail As System.XML.XmlNode = _
        doc.CreateNode(XmlNodeType.Element, _
        SoapException.DetailElementName.Name, _
        SoapException.DetailElementName.Namespace)
        'The procedure name

        Dim procNode As System.XML.XmlNode = _
            doc.CreateNode(XmlNodeType.Element, _
            "Procedure", SoapException.DetailElementName.Namespace)
        procNode.InnerText = ProcedureName

        Dim StackNode As System.XML.XmlNode = _
            doc.CreateNode(XmlNodeType.Element, _
        "StackTrace", SoapException.DetailElementName.Namespace)
        StackNode.InnerText = stacktrace
        detail.AppendChild(procNode)
        detail.AppendChild(StackNode)

        If UserID.Length > 0 Then
            'There exists user information - add it.
            Dim newAttr As XmlAttribute = doc.CreateAttribute("ID")
            newAttr.Value = UserID
            Dim UserNode As System.XML.XmlNode = _
                doc.CreateNode(XmlNodeType.Element, _
            "User", SoapException.DetailElementName.Namespace)
            UserNode.Attributes.Append(newAttr) 'Adds the userid as an attribute.

            Dim AccountNode As System.XML.XmlNode = _
                doc.CreateNode(XmlNodeType.Element, _
            "Account", SoapException.DetailElementName.Namespace)
            AccountNode.InnerText = Account
            Dim WithdrawNode As System.XML.XmlNode = _
                doc.CreateNode(XmlNodeType.Element, _
            "Amount", SoapException.DetailElementName.Namespace)
            WithdrawNode.InnerText = Withdraw
            'Add Account node and Withdraw node as children to the usernode
            UserNode.AppendChild(AccountNode)
            UserNode.AppendChild(WithdrawNode)
            'Add the usernode to the detail node.
            detail.AppendChild(UserNode)
        End If
        'Throw the new exception

        Dim ex As New SoapException(Message, _
            SoapException.ClientFaultCode, _
            "", detail)
        Throw ex
    End Sub
Since the SOAP body is made of pure XML, you can add any kind of structure to the fault part, including a complete XML document, if you like. In Listing 6-6, notice some new nodes are created below the detail node.
As this listing demonstrates, you first create the doc object, which is the XML document you want to include. The next object is the detail object, which will act as a root node to all other nodes you add later in the subroutine.
You use the XML document as a root node, and by creating new nodes and adding them together, you finally have a complete detail message in the XML document.