From our discussions about Web services and SOAP, it should now be quite clear to you that SOAP is only the backbone for a message-based communication or an RPC/encoded communication, leaving it up to the implementation to fulfill the requirements from the application.
Web services and SOAP are being changed rapidly, much faster than traditional applications, as new protocols and extensions continuously influence the market.
The ability to easily apply security and functionality to your Web services is very important, if you want to create cost-effective solutions through which Web services and SOAP really add value to your business. To this end, we will discuss ways to extend SOAP in the following sections.
SOAP header elements are meant to extend SOAP communication with information that is not necessarily part of the message data, but is nevertheless required for processing the message, such as a transaction ID and user information and credentials.
The soapenv:Header element is an optional child element of soapenv:Envelope that can be used to convey such information in the form of application-defined child elements. Headers can be sent with the response/request messages to communicate information back and forth between the client and the service. One use of the SOAP header might be to put credentials in it, which will verify on the server side that the requester is allowed to use the server's resources.
<soapenv:Envelope
xmlns:xsi='http://www.w3.org/2001/XMLSchema-instance'
xmlns:xsd='http://www.w3.org/2001/XMLSchema'
xmlns:soapenv='http://schemas.xmlsoap.org/soap/envelope/'>
<soapenv:Header>
 <authInfo
  xmlns="http://schemas.mycomp.com/WSHeader">
   <uid>bond</uid>
 <pwd>james007</pwd>
 </authInfo>
</soapenv:Header>
...
</soapenv:Envelope>
Since this header information is defined by the application, a problem might arise when a client sends a header the service does not understand. In many cases, the sender must be certain that the application-defined SOAP headers added to a request really are understood by the receiver. To meet this requirement, SOAP defines a soapenv:mustUnderstand attribute that can be placed on a header element; if set to 1, the recipient must understand this header or send back a Soap fault element, indicating that it does not understand the header. The following code snippet show how to apply this attribute to the envelope with the application-defined headers shown previously to ensure that the server understands the authInfo element:
<soapenv:Envelope
xmlns:xsi='http://www.w3.org/2001/XMLSchema-instance'
xmlns:xsd='http://www.w3.org/2001/XMLSchema'
xmlns:soapenv='http://schemas.xmlsoap.org/soap/envelope/'>
<soapenv:Header>
 <authInfo
  xmlns=http://schemas.mycomp.com/WSHeader soapenv:mustUndertand="1">
   <uid>bond</uid>
 <pwd>james007</pwd>
 </authInfo>
</soapenv:Header>
...
</soapenv:Envelope>
The attribute soapenv:mustUnderstand="1" tells the receiver it must understand this header. The receiver should send a fault message back to the caller if it does not understand the tag.
Another way to extend the Web services is to use the .NET feature called SOAP extension functionality. To get an idea of how this feature works, consider Figure 6-12.
The ASP.NET engine handles the Web service request from a caller. The ASP.NET engine instantiates the Web service HandlerFactory and calls the getHandler method. This method will return an object (called handler in this example) that has implemented either the sync session handler or the sync sessionless handler interface, depending on the configuration of the chosen method of the Web service. If the requested method uses sessions (for example, the attribute session =False is not set), the object returned from the Web service handler factory is an object implementing the sync session handler interface. If the Web method does not use sessions, the object returned would of course implement the sync sessionless handler interface.
This returned object is responsible for handling the incoming request, and may be the one that invokes your class, executes the method, and returns the result to the caller serialized in a SOAP message. We say that the Httphandler object may be the one that invokes your class, because at the point where this would happen, other possibilities could occur, as evidenced by the dotted arrows in Figure 6-12. This is the place where the SOAP extension will do its job. Here it is possible to plug in customized classes that process the Web services request in any way you like. All you need to do in a class is to inherit System.Web.Services.Protocols.SoapExtension, and insert it along the request processing path between the HTTP handler and your Web service. These classes make it possible to do pre- and post-processing of Web service requests, such as authentications, usage counts, and the like. Since this occurs outside the real Web service, this is a good place to implement infrastructure functions that seldom change over time (or at least less often than the content in the Web service itself).
Let us dig into the structure of the SOAP extension and look at some examples showing what you can do with it. All SOAP Extension classes inherit system.Web.Services.Protocols.SoapExtension and override the base class's methods.
There are plenty of methods for the Extension class, but one of the most important (in our opinion the most important) is the ProcessMessage, shown in the following code:
Public MustOverride Sub ProcessMessage(ByVal message As _
System.Web.Services.Protocols.SoapMessage)
It is quite clear by the name what this method is intended to do, and it is used frequently in processing Web service messages. It is used four times in the normal processing of a message: twice for the request and twice for the response. You probably want to optimize this code as much as possible to keep the overhead down when using the Extension classes. So how do you know what you are processing at any given time, the request or the response? The parameter message has a property called Stage, which tells you at what stage the processing is occurring: BeforeDeserialize, AfterDeserialize, BeforeSerialize, and AfterSerialize.
BeforeDeserialize: This stage occurs just before the request is deserialized from the message into the corresponding data types on the system.
AfterDeserialize: AfterDeserialize is called directly after BeforeDeserialize. This is when the object is instantiated on the server and the requested method is executed.
BeforeSerialize: This stage occurs just before the result from the executed method is serialized and sent back to the caller.
AfterSerialize: Finally, this stage occurs when the result has been serialized into the return format.
| Note |
One thing to remember is that for each Web services request there is one instance of the Httphandler object created earlier. This means that the same object handles all the stages for one Web service request. |
Now that you have the big picture of Web service flow, the next step is to see what you can do with this information. The SOAP Extension class example in this section will demonstrate how to implement simple authorization functionality. You can dictate who should be able to access your valuable Web service. In the "WSE and Security" section later in this chapter, we will take a look at WS-Security, WSE SDK, and how to implement authorization and authentication in Web services. But until then, let us implement some security via the SOAP extension.
The first thing you want to know is when the request for a particular Web service occurs so you can later store this request somewhere where you can see when people have used your Web service, and how many have tried to use it without permission. The purpose of such code is to override the Initialize method, and to store this information in a local variable in the class. Remember, since all the stages are handled by one instance of this HTTP handler, all stages will be able to access this information.
Public Overrides Sub Initialize(ByVal initializer As Object)
    mstrTimeInitialized= System.Guid.NewGuid().ToString()
End Sub
When you need to do per-instance initialization, this is the place to put the code. Starting here, you insert the new Extension class into the Web service stream between your class and the HTTP handler. There are two ways to use the new SOAP extension in your Web services. To apply a SOAP extension to all Web methods on all Web services in a particular virtual root on the Web server, you simply edit the virtual root's web.config file and add a reference to the SOAP extension by inserting the following into the Web services section:
<soapExtensionTypes>
   <add type="WebExtensionTypeName,WebExtensionAssemblyName"
   priority="1" group="0"/>
</soapExtensionTypes>
The preceding type reference should be the fully qualified name of your SOAP Extension class, including the namespace. If your class is named MyNameSpace.SecurityExtension and located in an assembly called InfraSecurity.dll, then the type reference would be
Type=" MyNameSpace.SecurityExtension, InfraSecurity"
The priority attribute here specifies the priority used by the HTTP handler to decide in which order the Extension classes should be processed on the incoming request. If you have a security Extension class, you should process that one before any other extensions. The priority value is from 0 on up; the Extension class with a priority of 0 is processed first, and subsequent Extension classes are processed in ascending order. The group attribute gathers the types together, and the priority is applied on a per-group basis.
The second approach is to apply this SOAP extension to specified methods of the Web service. To do this, you first need to create an attribute for the Extension class, and then set this attribute on the methods in the Web service that you would like to monitor.
To create a custom attribute, you create a class that inherits from System.Web.Services.Protocols.SoapExtensionAttribute and override its two properties: ExtensionType and Priority.
ExtensionType is a read-only property that tells ASP.NET the SOAP extension's class type. Priority is a read-write property used to tell ASP.NET the extension's priority and, because it is writable, lets the developer using your SOAP extension specify the extension's priority. In Listing 6-7, the property is empty so as not to allow the user to change the priority order for this very important security extension.
<AttributeUsage(AttributeTargets.Method)> _
Public Class SecurityExtensionAttribute
    Inherits SoapExtensionAttribute

    Private Priority As Integer
    Private Permissions As String

    Public Sub New(ByVal RequestedPermissions As String)
        Permissions = RequestedPermissions
        Priority = 1
    End Sub
     Public Property Permissions() As String
        Get
            Return _Permissions
        End Get
        Set(ByVal Value As String)
            Permissions = Value
        End Set
    End Property
    Public Overrides Property Priority() As Integer
        Get
            Return Priority
        End Get
        Set(ByVal Value As Integer)
            'It is not possible to change the priority for this class.
        End Set
    End Property
    Public Overrides ReadOnly Property ExtensionType() As System.Type
        Get
            Return GetType(SecurityExtension)
        End Get
    End Property
End Class
The last thing to discuss is how you can read the incoming stream in your Extension class, and how you can write to the outgoing stream. Access to the streams, both incoming and outgoing, is available in the function ChainStream located in your SOAP Extension class. This function includes the incoming stream as a parameter, and the return value of the function indicates the outgoing stream. Streams are chained: The output stream from the first SOAP extension becomes the input stream to the second SOAP extension. It is, however, important not to use the Stream object passed as parameter to the ChainStream directly. Instead, you should create an instance of the Stream object. Save the instance in a private member variable, copy the contents for the SOAP message to this private Stream object, and finally return the private instance to the calling program from the ChainStream method.
To summarize, the application should read from the incoming Stream object passed as a parameter and write to the outgoing Stream object, which is the return value from the function.
We will not dive deeper into SOAP extensions here, since we recommend in most cases that you instead use WS-Security, WS-Attachment, WS-Transaction, and WS-Routing, which will make it easier for you to create more sophisticated and flexible Web services.
Sending binary data via SOAP messages requires some special handling, since your message may contain only legal characters. In other words, you cannot just put binary data in the body of a SOAP message and send it to the receiver. You can choose between several different methods for handling binary data, based on the size of the data and the nature of the application.
For binary content of relatively small size, you can encode the bits into a legal character representation using any encoding/decoding scheme that is convenient for your service and its clients. Base64, one such encoding scheme, is fairly widespread and available in many implementations. Both the .NET Framework and the SOAP Toolkit support Base64 encoding/decoding of data.
We recommend the use of Base64 instead of a homemade encoding scheme if you cannot use WS-Attachment. Because Base64 is so well known, it makes it easy for others to integrate your Web services into their business. Despite the simplicity of Base64 encoding, we would like to encourage you to use the new WS-Attachment, which has the benefit of reducing overhead because the attachment does not need to be serialized/deserialized (and it is not harder to use, as you will see in section "WSE and Binary Attachments in DIME Format" later in this chapter).
| Note |
Although Base64 encoding works well for content that is small (approximately less than 20KB), it becomes impractical for large content, such as images and files, because of the processing required to encode and decode content, and the significant increase in size of the encoded content compared to the original size. For instance, encrypting a SOAP response with WSE SDK (which uses Base64 encoding) increases the size by approximately 30 percent. As a rule, if the binary data that you would like to send together with the SOAP message is larger than approximately 20KB, use the WSE and binary attachment in DIME format instead. |
The SOAP with Direct Internet Message Encapsulation (DIME) attachments specification defines how a SOAP message can be transmitted along with arbitrary binary content, such as images and files in their original format, all combined into one document. This document, called a Multipurpose Internet Mail Extensions (MIME) document, contains several parts. One part contains the SOAP message, and each binary content item has a unique content ID. MIME, on the market for several years, has some drawbacks. You need to traverse through the data stream to be able to find the headers for each binary message. This makes it slower compared to the DIME specification discussed later in this chapter. DIME takes the best of MIME and tries to simplify it. For instance, the header of a DIME message contains the encoding type, the length of the header, and the payload. This makes it possible to jump between the different headers in the binary message without reading the actual data. In .NET, it is easy to handle attachments by using the WSE SDK and its support for DIME, as you will soon see in the section "WSE and Binary Attachments in DIME Format."
Many new specifications are being developed that will help you solve many of the problems that have existed in the past in the traditional client server environment.
Problems involving transaction and security issues will be easier to handle with a collection of new specifications named WS-I. Some of the specifications this collection includes are as follows:
WS-Attachment: Represents a framework for sending binary attachments.
WS-Coordination: Helps you coordinate distributed transactions.
WS-Inspection: Defines how to find Web services and determine their functions.
WS-Referral: Provides support to find alternative paths for messages.
WS-Routing: Defines a message path, and is, together with WS-Referral, very powerful for the next generation of Web services.
WS-Security: Makes it easier for you to use secure calls and add authentication and authorization to your Web services.
WS-Transaction: Serves as a definition of how to support transactions via Web services and distributed applications.
Previously we gave a hint on how to use the SOAP extension to add security and authorization functionality to Web services. Soon we will explore WS-Security and see how it lets you handle security issues in an even easier way, but first we want to give you a short overview of what WS-Security is.
WS-Security functions as a dependable framework for message authentication, integrity, and confidentiality by relying on the XML Encryption, XML Signature, and Security Assertion Markup Language (SAML) specifications. Although these specifications on their own provide security to a service when being accessed by a requestor, WS-Security groups them together in a more convenient and useful way.
When using only the specifications just mentioned to include a combination of signatures, encryption information, and authentication information in a SOAP message, no information about the sequence of processing these steps is included. In other words, the lack of an indicator for the order in which the message was processed makes it possible for the corresponding functions to fail on the server side. WS-Security addresses this and includes security headers for storing all the preceding information, and it specifies the order in which the security information needs to be processed.
WS-Security headers can also be used to specify information intended for a specific node or destination in a multisequence situation, where the caller and the service need to separate encryption, signing, and authentication on different services.
Until WS-Security appeared, no standardized mechanism for passing authentication information in Web service messages existed. Some Web services have solved the security issues by using SSL with client authentication, HTTP Basic/Digest, and NTLM for authenticating messages—for example, transport authentications. Others have added SOAP parameters for passing login data in the SOAP header, or in the body itself, with an implicit contract between the client and the server for understanding of these parameters. We previously showed how to use the SOAP extensions to add authorization to Web services. We hardly need to say that this is inconvenient from an administrational point of view, because it requires managing the specification of the extra parameters and broadcasting these specifications to all new users of the Web service.
The downside of using SSL and Transport Layer Security is that you do not know if forthcoming nodes in the routing chain will handle the SOAP message over secure connections. Therefore you are dependent on all nodes to handle the message in a secure way. This is irrelevant when you have a single start point and endpoint where you have control over the transport layer; but as soon as your Web services are rerouted by other servers or third parties, you cannot be sure that they all are using SSL to secure your data. As we said before, using the WS-I specification can help you to secure the information in the message, and this does not occur on the transport protocol level.
By moving security from the transport layer into the SOAP message, security is guaranteed to follow the message from its source to its destination, no matter what kind of transport layer is used.
Standard security tokens such as Binary tokens (X509 certificates, Kerberos tickets) and XML tokens (SAML) for passing information are being introduced by WS-Security.
One component of WS-Security, XML Signatures, gives you the ability to sign your messages using enveloping signatures, enveloped signatures, or detached signatures.
When you sign a message, you decide what algorithms, key and certification passing mechanisms, and transformation algorithms for determining the target of the signatures to use according to the WS-Security specification recommendations. When signing multiple SOAP parts using the same key, we encourage you to define the public key for verifying the message only once within the message. To do so, you would reference a Binary tokens for an X509 certificate. This reduces the overhead of using security in the SOAP message.
Another component of the WS-Security framework gives you the ability to keep the message you are sending confidential. Keeping SOAP messages private is important for an application through which such messages, which could contain confidential information, are sent over the Internet. To prevent people from reading the information when it travels down the line, SOAP messages can be encrypted. The encryption in use is specified in security headers in the SOAP message.
The specification allows for encryption of any combination of body blocks, headers, and attachments, either by symmetric keys, asymmetric keys, or keys placed in messages in encrypted form. In order to handle this flexibility, you use the XML Encryption standard. What you really do is add a security part to your SOAP header.
Finally, when the message has arrived at its destination, you should find some way to ensure that the content is valid at the time of arrival. This capability is supported in WS-Security by letting SOAP security information be valid for a specific time, through Kerberos service tickets or SAML assertions. WS-Security also provides standard timestamp headers that can be used for determining the validity of the message. It is thereby possible to specify a date for the message when it is no longer valid to use its content. An order or an offer, for instance, may not be valid after a specific date due to changes in currencies. Another issue is that replay attacks may be detected by using a signed timestamp.
Even security functions can fail. Therefore WS-Security provides standardized error fault codes that can be used to propagate error information while processing security headers—for example, authentication failures or missing security information. As noted, WS-Security leverages and enhances many existing specifications, so security information can be created and processed in a more standardized manner. This is useful in providing the next level of Web services interoperability.
WSE 1.0 is a new class library from Microsoft for building Web services using the latest specifications for protocols, including WS-Security, WS-Routing, DIME, and WS-Attachment. WSE does not include total support of WS-Policy at the moment, since no standardized specification of how the server should expose its requirements for the client to use a Web service exists. The standards of Web services—XML, SOAP, XSL, XSD, WSDL, and UDDI—provide enough features to build simple solutions. But when you want to build more complex solutions, the standard Web services functionality is not enough to handle the complex integrations that exist in many applications today. For instance, there are no standard approaches (until now) for building secure Web services besides using the transport layer support of security, such as SSL.
Security is only one of many issues that standard Web services do not address. Another issue is the lack of architecture structure to handle routing of messages, such as ensuring reliable delivery, coordinating in distributed networks, or using compensation transactions. Until now, it has not been a standard solution. Since all the mentioned problems are not application specific, we hope that solutions to these problems will be implemented in the next-generation Web services infrastructure.
To achieve this, IBM, Microsoft, and others have started to write architecture protocols that describe ways to implement these needs. Microsoft has released an implementation of a subset of these architecture protocols. The first version of this WSE SDK focuses on the basic message-level protocols: WS-Security, WS-Routing, and finally DIME and WS-Attachment.
WSE is very powerful because it is closely wrapped around the message model and manipulates the protocol headers directly. WSE gives you the ability to use the specifications in an easy and object-oriented way through various classes.
WSE is an engine that applies advanced Web service protocols to SOAP messages. This can be simple things like timestamps or more complex operations like encrypting or decrypting the body of the SOAP message.
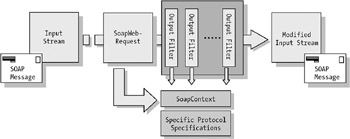
WSE functionality is encapsulated into two types of filters: filters for incoming messages and filters for outgoing messages. As shown in Figure 6-13, all messages leaving a process are dealt with using the outbound message filters. The inbound message filters deal with all messages that are entering a process.
The filters in Figure 6-13 are classes (SOAP extensions) attached to the incoming and outgoing pipes for SOAP messages on the server and client. They are accessible through a new proxy class called Microsoft.Web.Services.WebServicesClientProtocol and are an extension of the default base class for Web service proxies, System.Web. Services.SoapHttpClientProtocol. This new proxy class makes it possible for the WSE extension to process the incoming and outgoing SOAP messages whenever a client invokes one of the proxy's methods. In order to use WSE, you must change the base class of each of your proxies to use WebServicesClientProtocol. This is necessary regardless of whether you generate your proxy code using the wsdl.exe command-line tool or Visual Studio .NET Add Web Reference or Update Web Reference commands.
The WebServicesClientProtocol proxy base class uses two new communication classes named Microsoft.Web.Services.SoapWebRequest and Microsoft.Web. Services.SoapWebResponse. These classes are in turn derived from the standard WebRequest and WebResponse classes.
All input filters and output filters are chained together. The result from the first input filter is the next input filter's input. The same goes for the output filters.
The behavior of an input filter (a SoapWebRequest) is very simple. It parses the outgoing SOAP message stream with a standard XML DOM API into an instance of the SoapEnvelope class. Then it passes it to the next output filter in the chain. Normally an output or input filter modifies or reads the header of the SOAP envelope. Sometimes, though, the content in the body is also altered—for instance, when you are working with security issues and encrypting or decrypting the body content.
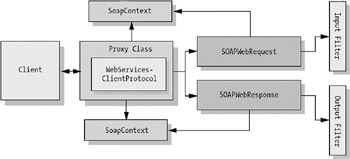
A SoapContext class controls the behavior of the input and output filters. Each instance of the SoapContext class records a specific protocol option. This can be usernames, digital certificates, signatures, and creation and/or expiration timestamps using a simple object model. It is possible to access SoapContext for a particular SoapResponse via its property SoapContext. The process of a SoapResponse instance is specified in its SoapContext instance. Figure 6-14 illustrates the complete flow for an incoming SOAP message and the SoapResponse and SoapContext positions in the SOAP chain.
However, you seldom need to tap into the pipe and manipulate the output and input filters directly. As shown in Figure 6-15, the WebServicesClientProtocol encapsulates these and exposes them as the properties RequestSoapContext and ResponseSoapContext, both of type SoapContext.
It is time to show you how to use the WebServicesClientProtocol to hook into the process pipeline of incoming and outgoing SOAP messages. Because our example will be a simple one, it doesn't represent the best approach in sending username and passwords due to the lack of encryption for the information. Demonstrated here is the simplicity of using the WebServicesClientProtocol to add a username and a password in a security token to the header of the SOAP message. We will then show you how to extract the username and password from the server side and echo the username back to the client.
The first step is to create the server-side Web service that will extract the username from the request. Start by opening Visual Studio .NET and creating a new Web services application. The Web service should be called UserService. The service has only one method: GetUserName. This method will extract the username from the token in the SOAP message and echo it back to the caller (the client, soon to be created). Listing 6-8 shows the method GetUserName.
<WebMethod()>
    Public Function GetUserName() As String
        Dim userName As String
        Dim reqCtx As SoapContext = HttpSoapContext.RequestContext
        Dim token As Security.SecurityToken
        For Each token In reqCtx.Secrity.Tokens
            If TypeOf token Is Security.UsernameToken Then
                userName = CType(token, Security.UsernameToken).Username
                Exit For
            End If
        Next
        If userName.Length = 0 Then
            'Not a valid username
            Throw New Exception("No username found.")
        Else
            'Return username to caller
            Return userName
        End If
    End Function
The first thing that is done here is to retrieve a reference to the request context. The request context is the incoming pipe on the server and is actually a static lookup in the HttpContextItems collection, with the key RequestSoapContext and ResponseSoapContext. Then all security tokens (in the incoming request) are iterated over, and the current token is checked to see if it is of type UsernameToken (in the client, a username token is added to the security tokens with a username and password). When the username token is found, the application extracts the username from the token. Finally, the function checks whether the username is empty or not. The console application that will use the Web service needs a Web reference to it.
One of the main goals of the WSE SDK is to make the use of more secure Web services easier. In the previous example, you saw that it is quite easy to tap into the SOAP pipelines to read and write information. This is just what the Web Service Enhancements does when it adds security information to your Web services. You are not restricted to using only the underlying transport protocol support for security. Instead, you can now easily code security into your SOAP messages. The WSE SDK sits on top of the .NET Framework. The heart of WSE is the Microsoft.Web.Services.SoapContext class that provides you with an interface for reading the WS-Security header and other headers for incoming SOAP messages, and adding or modifying WS-Security and other headers for outgoing SOAP messages.
The first thing you need to do is to configure WSE to work correctly with your Web services; this involves configuring your ASP.NET application to use the WSE SOAP extension. As with all .NET applications and .NET security, it is possible to apply security settings at different levels: machine level, application level, and user level. We strongly advise you to apply the WSE SDK at application level, since other applications on the server may not benefit from the WSE SDK; remember that there is a performance hit when you include WSE in the SOAP chain. To use WSE SDK from an existing Web application, you need to add the /configuration/system.web/webServices/soapExtensionTypes/Add element to the web.config file. This element will look similar to this example:
<webServices>
  <soapExtensionTypes>
    <add type="Microsoft.Web.Services.WebServicesExtension,
        Microsoft.Web.Services, Version=1.0.0.0, Culture=neutral,
        PublicKeyToken=31bf3656ad464e55" priority="1" group="0" />
  </soapExtensionTypes>
</webServices>
This is the minimum effort you need to make to be able to use the WSE SDK from your Web service. What you actually do through this code is add a WebServicesExtension to the Web application (the virtual directory) (This acts as an ISAPI filter in IIS. ISAPI filters can have different priorities. By setting the attribute priority to 1, you ensure that the ISAPI filter has the highest priority and will be processed first when a request comes into the Web application.)
Before you can continue, you need to know some security basics—in particular, you must have an understanding of digital signatures. Validating the integrity of a digitally signed message from Dr. Evil when you expected it to come from Miss Nice does not give you much protection. Therefore we will introduce you to username tokens and how you can use them from WSE.
A username token is defined in WS-Security to allow simple username/ password validations. The username token and its use is similar to the basic authentication found in HTTP traffic. The different forms of username tokens are displayed in Listing 6-9.
<!-- No Password -->
<UsernameToken>
  <Username>Steve</Username>
</UsernameToken>
<!-- Clear Text Password -->
<UsernameToken>
  <Username>Steve</Username>
  <Password Type="wsse:PasswordText">Opensezme</Password>
</UsernameToken>
<!-- Digest: SHA1 hash of base64-encoded Password -->
<UsernameToken>
  <Username>Steve</Username>
  <Password Type="wsse:PasswordDigest">
    QSMAKo67+vzYnU9TcMSqOFXy14U=
  </Password>
</UsernameToken>
The first form of username token does not include any password and is used only for simple identification. The second one sends the password in clear text, which is not a wise solution in a real application. The last one sends a digest (hashed version) of the password. The good thing with the last solution is that the password is never sent over the wire—the bad is that Dr. Evil can take this hashed password and resend it.
To avoid this problem, you can specify that the hashed password should be sent together with a unique string that identifies this request. The digest sent is a combination of this number used once, or nonce, and the password.
<!-- Revised UsernameToken -->
<wsse:UsernameToken
    xmlns:wsu="http://schemas.mycomp.com/ws/2003/01"
    wsu:Id="SecurityToken-13564463-5bdc-4a6b-a7fb-94a0d7357a20">
  <wsse:Username>Steve</wsse:Username>
  <wsse:Password Type="wsse:PasswordDigest">
    gpBDXjx79eutcXdtlULIlcrSiRs=
  </wsse:Password>
  <wsse:Nonce>
    h56sI9pKV0BVRPUolQC8Sg==
  </wsse:Nonce>
  <wsu:Created>2003-02-04T19:13:30Z</wsu:Created>
</wsse:UsernameToken>
Even if you now have a nonce unique for each request, Dr. Evil may still take the whole username token and put it into his own request. This can be avoided by setting the timestamp expiration (another feature in WSE) to a short duration that is just enough time for the message to be handled on the server. The server will then refuse requests older than the expiration time. This is not the optimal solution, however, as clock differences between the sender and the server may cause some trouble. To be even safer, the server can keep a list of recently used nonces and reject requests if the same nonce is used again. Since you do not know if the first request or the second one is the original, you need to ignore both requests. The use of username tokens with a hashed password requires that the sender and the server know the user's password. On the sender side, the user has probably entered his or her password, but on the server side you use the password provider found in WSE. The password provider has an interface, Microsoft.Web.Services.Security.IpasswordProvider, that a class should implement in order to register as a password provider. The interface has only one function—GetPassword—and takes UsernameToken as an input parameter. The GetPassword function returns the password for the user in UsernameToken. The idea is that you should be able to store passwords and usernames in any way you like, and then create a class used by WSE to retrieve passwords. In order to let WSE take advantage of your new password provider class, you need to add some configuration to your config file on the application level, as in this example:
<configSections>
  <section name="microsoft.web.services"
    type="Microsoft.Web.Services.Configuration.WebServicesConfiguration,
    Microsoft.Web.Services, Version=1.0.0.0, Culture=neutral,
    PublicKeyToken=32bf3856ad364e344" />
</configSections>
Remember that the type attribute should be on one line, but we have broken it into several lines here for readability. Then you add in your web.config file code similar to the following for enabling your password provider class for WSE:
<microsoft.web.services>
  <security>
    <!-- This is the class that will provide
         the password hashes for the UsernameToken signatures. -->
    <passwordProvider
        type=" WS-NameSpace.PasswordProvider, My_WS_Security" />
  </security>
</microsoft.web.services>
The type attribute contains the class (PasswordProvider) you have written in your namespace WS-NameSpace. The namespace is found in My_WS_Security.dll.
The code for your password provider class is very simple:
namespace WS-NameSpace
{
    public class PasswordProvider : IPasswordProvider
    {
        public string GetPassword(UsernameToken token)
        {
            return "mypassword";
        }
    }
}
Well, the previous solution may work in many cases—but here you are dealing with Dr. Evil. He is able to tap your line for incoming requests, take a username token, and use it in his own requests—hence there will only be one nonce with a valid timestamp! To avoid this security problem, you need to digitally sign your requests.
It is quite easy to digitally sign a SOAP message with WSE. To be able to digitally sign a SOAP request, you must have a certificate. In a traditional Windows environment, the certificates are stored in a certificate store. Each user has a private certificate store where the user's public certificate, the public key, and the private key are stored. A user signs a SOAP request with its private key, and then the server can use the public key in the certificate for verification. In WSE, you can use Microsoft.Web.Services.Security.X509 to access the installed certificate in a user's certificate store. The function CurrentUserStore is used to retrieve an object of type X509CertificateStore that contains the current user's certificate store. The X509CertificateStore object has a collection (Certificates) containing all certificates for the current user.
Now when you know how to retrieve the available certificate, you can use it in your SOAP request. The following code takes the first certificate and adds it to the request context:
X509Certificate cert = (X509Certificate)store.Certificates[0];
proxy.RequestSoapContext.Security.Tokens.Add(new X509SecurityToken(cert));
Listing 6-10 presents the server-side code to retrieve the added certificate from the SOAP request.
[WebMethod]
public string PersonalHello()
{
    // Only accept SOAP requests
    SoapContext requestContext = HttpSoapContext.RequestContext;
    if (requestContext == null)
    {
        throw new ApplicationException("Non-SOAP request.");
    }
    // We only allow requests with one security token
    if (requestContext.Security.Tokens.Count == 1)
    {
        foreach (SecurityToken tok in requestContext.Security.Tokens)
        {
            // Only accept X.509 Certificates
            if (tok is X509SecurityToken)
            {
                X509SecurityToken certToken = (X509SecurityToken)tok;
                return "Hello " + certToken.Certificate.GetName();
            }
            else
            {
                throw new SoapException(
                    "X.509 security token required.",
                    SoapException.ClientFaultCode);
            }
        }
    }
    else
    {
        throw new SoapException(
            "Request must have exactly one security token.",
            SoapException.ClientFaultCode);
    }
    return null;
}
Only adding a certificate to a request does not automatically sign the request. Anyone can add a certificate to your request. What you need to do is use the certificate to digitally sign your request (or part of it) with your private key, and then let the server side validate your request with the certificate you have brought with the request. Normally you would not include the certificate in all requests to the server because it is a performance hit to send it with every request. More likely you will store the public certificate on the server to be able to retrieve it when a request arrives. Here, however, we will show you how to send it with the request to complete our example. To digitally sign a SOAP request, you need to take advantage of another collection, SoapContext.Security.Elements, in which you put a Signature element. Building from the previous client code that included a digital certificate, you can now use that same certificate to sign the request. The code to do this is shown here:
X509Certificate cert =
(X509Certificate)store.Certificates[listBox1.SelectedIndex];
X509SecurityToken certToken = new X509SecurityToken(cert);
proxy.RequestSoapContext.Security.Tokens.Add(certToken);
proxy.RequestSoapContext.Security.Elements.Add(new Signature(certToken));
When you have applied the digitally signed information and the certificate to a SOAP message, the result looks something like Listing 6-11 (the message is cleaned up to show only the parts we are going to discuss later).
<?XML version="1.0" encoding="utf-8"?>
<soap:Envelope
    xmlns:soap="http://schemas.xmlsoap.org/soap/envelope/"
    xmlns:xsi="http://www.w3.org/2001/XMLSchema-instance"
    xmlns:xsd="http://www.w3.org/2001/XMLSchema">
  <soap:Header>
    <wsrp:path
        soap:actor="http://schemas.xmlsoap.org/soap/actor/next"
        soap:mustUnderstand="1"
        xmlns:wsrp="http://schemas.xmlsoap.org/rp">
      <wsrp:action
          wsu:Id=" Id-c126ad70-7a1b-4895-a05c-5f6596ca1421"
             ...
    </wsrp:path>
              ...
    <wsse:Security
        soap:mustUnderstand="1"
        xmlns:wsse="http://schemas.xmlsoap.org/ws/2002/07/secext">
      <wsse:BinarySecurityToken
          ValueType="wsse:X509v3"
          EncodingType="wsse:Base64Binary"
          xmlns:wsu="http://schemas.xmlsoap.org/ws/2002/07/utility"
          wsu:Id="SecurityToken-f6f96b4b-23c5-421e-92ff-f1050d531e82">
        MIIFezCDBXugAwIBAgID ... 29Vmjd10Lw==
      </wsse:BinarySecurityToken>
      <Signature xmlns="http://www.w3.org/2000/09/xmldsig#">
        <SignedInfo>
          <CanonicalizationMethod
              Algorithm="http://www.w3.org/2001/10/XML-exc-c14n#" />
          <SignatureMethod
              Algorithm="http://www.w3.org/2000/09/xmldsig#rsa-sha1" />
          <Reference URI="#Id-14cc3130-6f1a-23fe-a949-51d7ed9fc111">
            <Transforms>
              <Transform
                  Algorithm="http://www.w3.org/2001/10/XML-exc-c14n#" />
            </Transforms>
            <DigestMethod
                Algorithm="http://www.w3.org/2000/09/xmldsig#sha1" />
            <DigestValue>
              /8iL3OP9mfzuixI/ilkhHMbatV0=
            </DigestValue>
          </Reference>
          <Reference URI="#Id-c126ad70-7a1b-4895-a05c-5f6596ca1421">
            <Transforms>
               ...
          </SignedInfo>
          <SignatureValue>
        ZX4MgHzCYz+CCdAz1LhAFjy6QxQoKKoA7l2eC45QV0hDI
        JrmXwLEGrPnpX+uPan5+MS6hm+oL/sGTbKJ/DJMp/t5Zy
        qY1qvngGQLcYXRy538zemwFfeGN5R2wmOoUSeCBUqprQV
        Ubnkz+qlVp/5f7t7VGD3Ee55Q3ol+ApFoGQD=
        </SignatureValue>
         <KeyInfo>
           <wsse:SecurityTokenReference>
             <wsse:Reference
    URI="#SecurityToken-f6f96b4b-23c5-421e-92ff-f1050d531e82" />
          </wsse:SecurityTokenReference>
        </KeyInfo>
      </Signature>
    </wsse:Security>
  </soap:Header>
  <soap:Body
      wsu:Id="Id-14cc3130-6f1a-23fe-a949-51d7ed9fc111"
      xmlns:wsu="http://schemas.xmlsoap.org/ws/2002/07/utility">
    <PersonalHello xmlns="http://tempuri.org/" />
  </soap:Body>
</soap:Envelope>
Yes, it is a big message, but we will help you to figure out what the different parts do.
The first interesting part is in the security header that contains a Base64-encoded element. This is the X509SecurityToken that is added to the Tokens collection in the last example. You do not actually need to include it in the request (and you certainly should not when the number of SOAP messages sent is high, since it makes the request larger than necessarily), but we have provided it here to smooth out the verification. The second interesting thing in the security part is a Signature element in the security header. There are three different child elements to the Signature element: SignedInfo, SignatureValue, and KeyInfo. The SignedInfo element describes what parts of the SOAP message are digitally signed, how it is being canonicalized, and what algorithm is being used for computing the signature. The reference elements are the elements in the request that are signed. The first one has the URI that is later found in the body—the body is thereby digitally signed. The URIs found in the reference list are the signed ones. These can be any kind of element. The second reference you have is to the action part in the path header. WSE automatically includes the path and the timestamp headers in the digitally signed part. The following is a list of the elements that WSE will reference in the SignedInfo header and thus will be included in the digital signature:
/soap:Envelope/soap:Header/wsrp:path/wsrp:action
/soap:Envelope/soap:Header/wsrp:path/wsrp:to
/soap:Envelope/soap:Header/wsrp:path/wsrp:from
/soap:Envelope/soap:Header/wsrp:path/wsrp:id
/soap:Envelope/soap:Header/wsu:Timestamp/wsu:Created
/soap:Envelope/soap:Header/wsu:Timestamp/wsu:Expires
/soap:Envelope/soap:Body
The complete path and timestamp headers are signed because they are used in the WS-Routing definition and need to be "protected" to be sure that messages are routed the correct way (so that no one hijacks a message and reroutes it to another destination).
The last thing in the Signature element is the KeyInfo part that has a reference back to the BinarySecurityToken that contains your certificate. The public key for your certificate can then be used to verify that your message comes from a person who knows the certificate's private key (probably the owner).
The final step is to verify that the message actually comes from the person who owns the certificate that is used to digitally sign the incoming SOAP message to the server. Obviously you need to verify that the body part is digitally signed with the certificate—it is not enough to verify that the message is digitally signed. It may only be the path and timestamp headers that are digitally signed; the rest of the message might be altered. To verify that the body of the message is digitally signed by the right certificate, you need to add the code shown in Listing 6-12 to your Web service.
[WebMethod]
public string PersonalHello()
{
    // Only accept SOAP requests
    SoapContext requestContext = HttpSoapContext.RequestContext;
    if (requestContext == null)
    {
        throw new ApplicationException("Non-SOAP request.");
    }
    // Look for Signatures in the Elements collection
    foreach (Object elem in requestContext.Security.Elements)
    {
        if (elem is Signature)
        {
            Signature sign = (Signature)elem;
            // Verify that signature signs the body of the request
            if (sign != null
                && (sign.SignatureOptions &
                    SignatureOptions.IncludeSoapBody) != 0)
            {
                // Determine what kind of token is used
                // with the signature.
                if (sign.SecurityToken is UsernameToken)
                {
                    return "Hello " +
                        ((UsernameToken)sign.SecurityToken).Username;
                }
                else if (sign.SecurityToken is X509SecurityToken)
                {
                    return "Hello " +
                        ((X509SecurityToken)sign.SecurityToken)
                        .Certificate.GetName();
                }
            }
        }
    }
    // No approriate signature found
    throw new SoapException("No valid signature found",
        SoapException.ClientFaultCode);
}
To protect yourself from different kinds of attacks from Dr. Evil, we recommend you use WS-Security. To sum up: Reply attacks are handled by using expiration timestamps in the SOAP messages together with tracking of the requests. The man-in-the-middle attack is mitigated by using X509 certificates with a digital signature that the receiver verifies via a Certification Authority (CA) that is trusted by both sides to verify the public key that is in use. You also encrypt the content of the message to make it difficult for Dr. Evil to read your message.
We recommend you sign and encrypt all data in any SOAP message that needs to be protected from alteration.
In the previous example, the complete body was signed, but sometimes you may only want to sign specific parts of information in the body. This can be done by using SignatureOptions in the Signature element. SignatureOptions tells WSE what parts of the message should be digitally signed. The different values for SignatureOptions are as follows:
IncludePath
IncludePathAction
IncludePathFrom
IncludePathId
IncludePathTo
IncludeSoapBody
IncludeTimestamp
IncludeTimestampCreated
IncludeTimestampExpires
You can combine these to get the parts you want signed. IncludeNone gives you the ability to sign only the parts of the body (or anything else) that you want to be signed in the message. WS-Security specifies that there are two ways to define what should be signed in the message. The first one is to define a transformation of the message and then create a signature of the result. This is not implemented in the WSE SDK from Microsoft. The second way is to mark all elements that should be signed with their own ID and put these IDs in the reference part of the SignedInfo portion of the Signature element. This is how WSE has implemented support for partially signed messages. We are going to look at an example in which only a portion of the SOAP body is signed by adding an ID to the part to be signed. To follow this example, you first create a Web service that will return some account information.
It is very important that you use the right namespace for the property of the class that will be serialized to an XML attribute that matches the namespace in the WS-Security specification; use the Namespace parameter of the XmlAttribute attribute to set it to http://schemas.xmlsoap.org.ws/2002/07/utility.
public class AccountNum
{
    [XmlAttribute("Id",
    Namespace="http://schemas.xmlsoap.org/ws/2002/07/utility")]
    //Line above is very important!!!!
    public string ID;
    [XmlText]
    public string AccountNumber;
}
This class will be used in the following code that serializes an instance of the class, generates a GUID for the ID, puts the ID in the SignedInfo portion, signs the message (for example, the ID attribute), and finally returns the message to the client.
You need to be able to access the local certificate store from ASP.NET where your Web service is hosted. To be able to do this, you permit the ASP.NET user (normally the one under which the ISAPI filter for ASP.NET is running) to access the local certificate store. In real-world applications, this is not so good from a security point of view, however. Other applications may then be able to read your certificates; but we will include this process here since the main purpose of this example is to show how you can partially sign a SOAP response. Now when you have a security token, you create an instance of the signature passing in your token in the constructor. The first thing you do is set SignatureOptions to IncludeNone to define the parts of the message that should be signed by yourself. Finally, you add a reference to your ID, shown previously, and send in the generated GUID by using the function AddReference on the Signature object, as demonstrated in Listing 6-13. The # indicates that it is a local reference in the same message.
[WebMethod]
public AccountNum Get AccountNum ()
{
    SoapContext responseContext = HttpSoapContext.ResponseContext;
    AccountNum Acc = new AccountNum ();
    Guid referenceID = Guid.NewGuid();
    Acc.ID = "Id:" + referenceID.ToString();
    Acc.PONumber = "Acc123";
    X509CertificateStore store =
        X509CertificateStore.LocalMachineStore(
            X509CertificateStore.MyStore);
    store.OpenRead();
    X509Certificate cert
        = store.FindCertificateBySubjectName(
            "CN = bill.summerland.corp.msdotnet.nu")[0];
    X509SecurityToken token = new X509SecurityToken(cert);
    responseContext.Security.Tokens.Add(token);
    Signature sig = new Signature(token);
    sig.SignatureOptions = SignatureOptions.IncludeNone;
    // The # indicates a local reference.
    sig.AddReference(new Reference("#" + Acc.ID));
    responseContext.Security.Elements.Add(sig);
    return Acc;
}
The client code to verify that it is the right certificate and that the right person has signed the account ID in the returned message appears in Listing 6-14.
localhost.Service1Wse proxy = new localhost.Service1Wse();
localhost. AccountNum Acc = proxy.GetAccountNum();
foreach (Object element in proxy.ResponseSoapContext.Security.Elements)
{
    if (element is Signature)
    {
        Signature sig = (Signature)element;
        foreach (Reference reference in sig.SignedInfo.References)
        {
            if (reference.Uri == "#" + Acc.Id)
            {
                X509Certificate signatureCert
                    = ((X509SecurityToken) sig.SecurityToken).Certificate;
                if (signatureCert.Equals(poCert))
                    MessageBox.Show("Whow - It's signed!");
            }
        }
    }
}
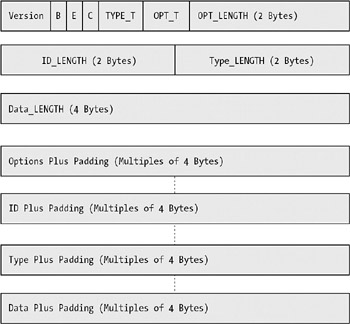
When you want to send large attachments to SOAP messages, it is often inconvenient to encode them in standard Base64 encoding. Instead, you likely want to send them as binary attachments. Some of the problems this involves have been how to handle these binary packages and how to tell the receiver the total number of packages included in such a request to enable the receiver to know when all data has been retrieved successfully. The solution to this problem is to use the DIME format and pack the information into data packets (see Figure 6-16).
The first five bits contain the DIME version number. The number is used by DIME to determine if it can parse the DIME message successfully or not. If the parser does not support the DIME version, the DIME message is deleted. The SOAP Toolkit supports DIME version 1. The B (Beginning) flag indicates the start of the DIME record. The first DIME record in a DIME message has this bit set to one; the rest of the records in the DIME message have this bit set to zero. The E (End) flag indicates the last DIME record in the DIME message. This is zero for every DIME record in the DIME message, except for the last one. Since a binary stream can be chunked over several DIME records, the C (Chunky) flag specifies if the current DIME record is part of a chunky block. This is set to one if the current DIME record is part of a chunky block. The TYPE_T block is a 4-bit field that indicates the structure of the value of the type field. This field can contain the following values:
0x00 indicates that the type is unchanged from the previous record (used for chunking DIME records):
Additional fields in the DIME record include the following:
OPT_T is a 4-bit field that indicates the format of the option bytes. A value of zero indicates that there is no option present. The current version of SOAP does not support any DIME record options.
OPT_LENGTH is a 16-bit field that indicates the length of the options in octets, without any padding.
ID_LENGTH is a 16-bit field that specifies the length (in bytes) of the ID field in the DIME record. The ID field stores the unique ID of the payload and the ID_LENGTH field is always a multiple of 4 bytes.
TYPE_LENGTH is a 16-bit field that provides the length (in bytes) of the TYPE field of the DIME record.
DATA_LENGTH is a 32-bit field that specifies the length of the DATA field in the DIME record.
OPTIONS carries the actual value of the options. The length of this field must be a multiple of 4 bytes. If the OPTIONS value is not a multiple of 4 bytes, padding is used. The OPT_LENGTH field provides the length of the OPTIONS value, but does not include the padding used.
The ID field provides the unique ID value (a URI) of the attachment in the record. The ID_LENGTH field of the DIME record specifies the length of this field. The same rules regarding padding are applied to this field as to the OPT_LENGTH field.
The TYPE part of the DIME records describes the type of the payload (attachment type). The TNF (Type Name Format) field describes the structure of the value in this field.
DATA carries the actual payload (a SOAP message or an attachment). The length of this field is always a multiple of 4 bytes. Padding is used if the actual value is not a multiple of 4 bytes. The padding is not included in the DATA_LENGTH field.
Through this technical description of the DIME records, you see that the size of the record and thus the start for the next DIME record header can be calculated from the DIME record information. This removes the need to traverse the data to find the next header. Let us present some examples of how this works. Here we will show you how to create a simple Web service that will return images as a binary attachment. We will then demonstrate the creation of a client that can consume the binary attachments and include them in the application.
You start by creating an ASP.NET Web service project with the name DIMEImages. Next, add references to the Microsoft.Web.Services and System.Web.Services assemblies. You then need to modify the web.config file as follows so that support of WSE is available to the Web service:
<!--This element adds WSE functionality to the Web Service -->
<configuration>
    <system.web>
        <webServices>
            <soapExtensionTypes>
                <add type="Microsoft.Web.Services.WebServicesExtension,
                Microsoft.Web.Services, Version=1.0.0.0,
                Culture=neutral,
                PublicKeyToken=31bf3866ad364e36"
                priority="1" group="0" />
            </soapExtensionTypes>
        </webServices>
    <system.web>
<configuration>
What we are showing you here is how to configure this Web service to use WebServicesExtension when it is invoked. Note that the type attribute in the preceding configuration file is split into several lines. In code, the type should be on one line.
Import the following namespaces into the Web service:
Imports Microsoft.Web.Services.Dime
Imports Microsoft.Web.Services
Imports System.Net
The last step is to add a Web method that will return a DIME attachment to the SOAP response. The final code for the Web service is shown in Listing 6-15.
Imports System.Web.Services
Imports Microsoft.Web.Services.Dime
Imports Microsoft.Web.Services
Imports System.Net
<WebService(Namespace:="http://tempuri.org/")> _
Public Class DIMEImages
    Inherits System.Web.Services.WebService
    <WebMethod(Description:= _
"This method returns an image as a dime attachment.", CacheDuration:=20)> _
    Public Sub GetDimedImage(ByVal ImageName As String)
        Dim respContext As SoapContext
        respContext = HttpSoapContext.ResponseContext
        'This will fail if we are using the ordinary Web service proxy.
        Dim dimeAttach As DimeAttachment
        If ImageName.Length > 0 Then
            dimeAttach = New DimeAttachment( _
            "image/jpg", TypeFormatEnum.MediaType, _
            ImageName)
        Else
            dimeAttach = New DimeAttachment( _
            "image/jpg", TypeFormatEnum.MediaType, _
            "C:\images\sunset.jpg")
        End If
        respContext.Attachments.Add(dimeAttach)
    End Sub
End Class
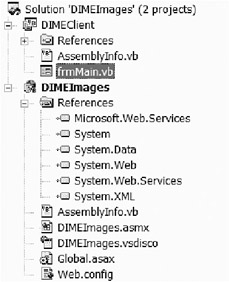
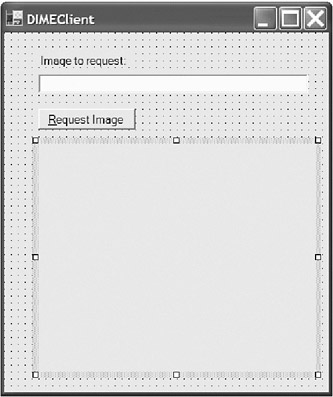
Well, so far there is nothing tricky. The method has to get a reference to the response context and be able to add an attachment to the response. This attachment is a DIME attachment, and the source is a file you put on the server. Now you have a server—but how will the client be able to unpack the DIME attachment? You deal with this by adding a Windows application to your Visual Studio solution. Name this application DIMEClient, as shown in Figure 6-17.
Add a text box, a button, and a picture box to the application as shown in Figure 6-18.
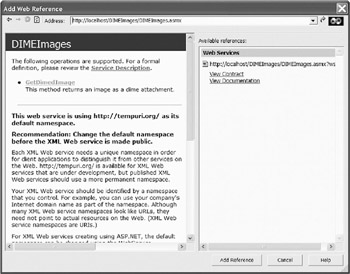
Simply add a Web reference to the DIMEImages Web service you recently created (see Figure 6-19).
What you have done is to tell the Visual Studio to create a proxy for you.
| Note |
Not all automatically generated Web services in the current release of Visual Studio use the Web Service Enhancements classes. This means the proxies that will be generated for your Web service derive from the wrong base class. You need to change the base class manually in the reference class. |
| Tip |
A faster way to solve this problem is to add the reference to Microsoft.web.services dll before you add the Web reference to your Web service. By doing it this way, the wizard that creates the proxy is deriving the proxy from the Microsoft.Web.Services. WebServicesClientProtocol instead of the old System.Web.Services. Protocols.SoapHttpClientProtocol. Please note that the generated proxy class gets the suffix WSE added to the original class name. |
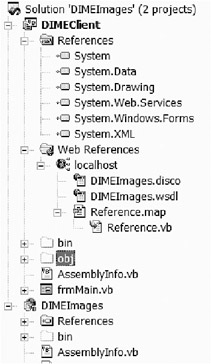
If you still want to add a proxy the hard way (you may have existing proxies that you do not want to regenerate for some reason), you need to go into the reference file and manually change the implementation for the proxy from the old System.Web.Services to the new Microsoft.Web.Services. The proxy class is found beneath the References folder, as shown in Figure 6-20.
If the proxy class is not visible, click the "show all files" icon (the second from the left) in the Solution Explorer and expand the References folder. Beneath it you should see the Reference.vb file. Open this proxy class and change the inheritance from System.Web.Services.Protocols.SoapHttpClientProtocol to Microsoft.Web.Services.WebServicesClientProtocol.
Now you only have some small code parts left to include before you can run the attachment example. Add the code in Listing 6-16 to the button in the client application.
Public Class frmMain
    Inherits System.Windows.Forms.Form
Private Sub btnRequest_Click(ByVal sender As System.Object, _
                                  ByVal e As System.EventArgs) _
                                  Handles btnRequest.Click
    Dim objDimeServer As New localhost.DIMEImages()
    Try
    Cursor.Current = Cursors.WaitCursor
    objDimeServer.GetDimedImage(txtImageToRequest.Text)
  If objDimeServer.ResponseSoapContext.Attachments.Count = 1 And _
  objDimeServer.ResponseSoapContext.Attachments(0).Type = "image/jpg" Then
                 'We have something there...
                 pbxRequestedImage.Image = New _
Bitmap(objDimeServer.ResponseSoapContext.Attachments(0).Stream)
             End If
        Catch ex As Exception
             'Oops this wasn't good. Show an error message.
            MsgBox("An error occured. - Please verify that" & _
              " the Web Service is running correctly.", _
             MsgBoxStyle.Critical Or MsgBoxStyle.OKOnly, _
             "An error occured.")
        Finally
            Cursor.Current = Cursors.Default
            objDimeServer.Dispose() 'Clean up when we have finished.
        End Try
    End Sub
End Class
What you have done here is to create a Web service that adds a DIME attachment and returns this SOAP request to the caller. The caller (your DIMEClient) simply retrieves the binary stream from the first attachment and puts it into a picture box.
One drawback with using the WSE SDK enhancement to Web services is that not too many WS tools have support for its specifications. It will be all right when you have total control over the client and the server environment and can choose tools that support WS-Security and WS-Attachment on both sides. If you cannot guarantee that both sides support WS-Security, you can choose a middle way— accepting security by the transport layer from the client to the Web service facade, and from there using WSE internally on the server when you need to do more jumps.
Transactions and Web services are interesting because of the disconnected nature of Web services and the controlled, connected nature of traditional transactions. Transactions are a fundamental functionality in a business-critical system, and the four main components in transactions are the well-known ACID properties:
Atomicity: If successful, then all the operations happen; and if unsuccessful, none of the operations happen.
Consistency: The application performs valid state transitions at completion.
Isolation: The effects of the operations are not shared outside the transaction until it completes successfully.
Durability: Once a transaction successfully completes, the changes survive failure.
A Web service requires the same coordination performance as a traditional transaction mechanism to control the operations and the results from applications, but with some changes. Web services need to be able to handle transactions in a more flexible way than the ACID specifications provide. Instead, what is required is a method of coordination, rather than complete ACID transaction functionality. The WS-Coordination and WS-Transaction specifications provide a WSDL definition for such coordinated behavior.
The Coordination Framework is defined in the WS-Coordination specification (http://msdn.microsoft.com/library/en-us/dnglobspec/html/ws-coordination.asp?frame=true). In a nutshell, the Coordination Framework supports the Activation service, which creates activities; the Registration service, which coordinates protocol selection and registers participants; and the Coordination service, which performs activity completion processing.
The Coordination Protocols, as defined in the WS-Transaction specifications (http://msdn.microsoft.com/library/en-us/dnglobspec/html/ws-transaction.asp?frame=true), can separated into two categories: protocols for atomic transactions, and protocols for business transactions. You can use both types of protocols in your transactions, depending on the length of time for various activities.
Atomic transaction protocols are used for short-lived activities, and they serve as two-phase commitment protocols. The transaction scope specifies that all work is completed in its entirety; as you can see by the definition of atomicity we provided earlier, a successful activity results in all operations being performed. With an unsuccessful activity, no operations are performed. On completion, the results of successful activity become available to other users.
Unlike atomic transaction protocols, business transactions protocols support long-lived activities. Release of the results of operations at various intervals before an activity has been fully completed allows other potential users to readily access the resources engaged by the activity. Inclusion of mechanisms for fault and compensation handling allows the effects of previously completed business activities to be reversed.
Next we will go through the different services that the WS-Coordination specification supports.
The first service is the Activation service. You can use this service to create a message, to begin a new activity, or to specify the protocols for a specific activity. You can also use it to connect two different activities—for example, specifying a relationship between a new and a previously created activity—and thereby create hierarchical relationships.
With the Registration service, a Web service registers and selects a protocol to use to coordinate an activity. By using the Registration service, it is possible for a Web service to participate in a transaction in the role of a coordinator or as a general participant. The registration process identifies the specific protocol that should be used for activity coordination between the different roles. You can register for unlimited number of Coordination Protocols by adding multiple registration operations.
The writers of this specification predict that there will eventually be other ways of getting WS-Transaction to set its Coordination Protocol definitions. This would likely involve a specification of the transaction protocols that a Web service would support. The actual method for getting information passed from the coordinator to the participant is not yet defined, however.
The Coordination service is the last service we will discuss. It contains an Activation service, a Registration service, and at least one Coordination Protocol. The Coordination service controls the completion process for a Web service using the attached Coordination Protocols. A Coordination Protocol defines the behavior requirements for a Web service. The protocol also defines the operations that are supported to complete the process and in which order they should be conducted. The operations are grouped around roles. For instance, a role can consist of a consultant submitting a reservation for buying a new computer. The consultant provides an interface for the coordinator to control the direct agreement of the reservation (preparing it in this case). The boss in turn provides an interface for the Coordination service that has functions for completing the submission (commit and roll back of the submitted reservation).
The message format between the different services is called a context. For instance, the Activation service returns a CoordinationContext containing the following fields:
Identifier: A unique name to identify the coordination context.
Expires: An expiration date for the activity.
CoordinationType: Coordination Protocols that define the supported, completed processing behaviors.
Registration service: A service that contains the address of the Registration service. This service is used to register interest and participation in a Coordination Protocol for determining the overall outcome of the activity.
The last element in the context is the extensibility element provided for optional implementation-specific extensions. The example that follows comes from the WS-Coordination specification (http://msdn.microsoft.com/library/en-us/dnglobspec/html/ws-coordination.asp?frame=true) and shows an implementation of the WS-Coordination extensions we have talked about so far:
<soapenv>
    <soapbody>
        <wscord:CoordinationContext
        xmlns: wscord=http://www.w3.org/2002/06/Coordination>
            <Identifier> ... </Identifier>
            <Expires> ... </Expires>
            <wscord:CoordinationType> ... </wscord:CoordinationType>
            <wscord:RegistrationService>
                <Address/>
            </wscord:RegistrationService>
            <!--extensibility element ->
        </wscord:CoordinationContext>
    </soapbody>
</soapenv>
We will leave the WS-Coordination specification here, and talk about how you can scale your Web services to support many concurrent users.
So far we have not talked about scalability in relation to Web services. Why? Because you need to know what kind of functionality to use before we can show you the problems involved in scaling Web services.
Web services are run on Web servers. These Web servers are scaled out or scaled up, or even both, to be able to serve more requests.
When scaling out, we normally talk about Web farms, As you may recall, a Web farm consists of two or more Web servers tied together that look like one big machine on the outside.
| Note |
For more information about scalability issues, see Chapter 3. |
When designing and using Web services in Web farms, you need to keep in mind a couple of issues.
As with all performance issues involving Web servers, keep the session-required services down to a minimum. If you need session-based Web services, you must keep the session handling in a central place, since you never know if the next request will be redirected to the same instance of the Web service handler or not.
When using .NET, you get a lot of functionality for free. The caching functionality implemented in ASP.NET is possible to use for caching requests to your Web services. By caching a request for a Web service for a limited time, the load on the back-end servers will be reduced as well as the response time from the Web service. We have previously shown how to use DIME attachments from a Web service. For the DIME Web service example, a cache of the response for five minutes will reduce disk access on the server, thereby also reducing the load.
However, you do not want to cache everything you have on your server. Let us show you some rules that can help you to decide what to cache.
How much of the data is dynamic and how often is the data changed? For instance, NASDAQ information cannot be cached for 30 minutes, but your images in the DIMEImages project are possible to cache, because they will rarely change.
The scope of the data—is it public or private? If it is private, is the data different between different users, or is it only protected behind authentication routines? In many cases Web services deal with user-specific data, and in such instances it is ineffective to cache the result, because you will end up with a cache for each user.
Does your Web service rely on resources that you can reuse between different requests? Many times expensive resources, such as reading files from disk and reading the same data from a database, are used for each request. By caching this information, the response time for the Web service will be reduced dramatically.
If you know the resources you are using today, can you predict the resources your Web service might use tomorrow? This may be tricky, but take a look at your use cases and try to figure out new combinations, maybe totally new ones that could change the usage of resources in the future.
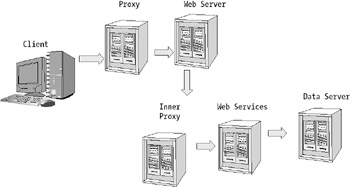
If you are going to cache data, where will you do that? Today data is probably cached "everywhere" in the application, but where is the best place from a security, performance, maintenance, and user point of view? See Figure 6-21 for a common data flow between a client and several servers.
In every server in Figure 6-21, response data can be cached to boost the performance of Web services.
When will the data expire? Is the data valid a constant amount of time, or will it change at random intervals? You have to find an optimal time interval for updating the cache, or else watch for the action that makes your cached data invalid.
How do you notify the customers of your Web services when the data has expired? The answer to this depends on where and how you are caching your data. If you are caching data as an XML data island at the client's computer, you could include an expiration date in the XML data that you return to the client. If you are using a Web-based client, you can set an expiration date on a data page that you have embedded in the client.
If you try to apply the preceding questions to the DIMEImages project, you can see that it helps to use cached information because the data is nearly static. It is public for everyone, and it does not have any kind of personalization that is user specific. The data will be cached on the Web server where the Web service resides.
Okay, now we will demonstrate how to add caching functionality to the DIMEImages Web service. First you need to open the .asmx file for the Web service. In the DIMEImages example the page is called DIMEImages.asmx. The easiest way to add cache functionality to a Web service is to add the CacheDuration attribute to the Web method you would like to cache. For this example, you want to cache the response from GetDimedImage for 50 seconds, and add the following attribute to the method:
<WebMethod(Description:="This method returns an image as a dime attachment.",
CacheDuration:=50)> _
Done! The power of .NET has once again been made visible to you!