In our test lab, with our servers built on VMware 4, we start creating the Web server cluster for our user interface (which consists of ASP.NET pages). We decide only to use two virtual machines on which we install Windows Server 2003 Web Edition. We then run Windows Update on each machine to get all the latest patches.
This section will cover a little bit of what we do to secure and tune our system. Remember that processes like these should be done in close cooperation with your local IT staff. They know their hardware better than anybody else.
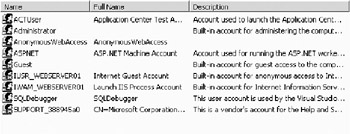
When the servers are installed, we disable the IUSR_MACHINE user account and create another account named AnonymousWebAccess (see Figure 9-38). This way we prevent anyone from trying to use the default anonymous account for attacks.
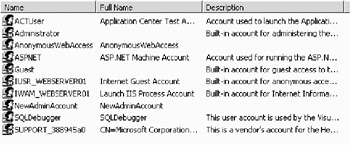
After we create the new account, we tell IIS to use the new account for anonymous access, as you can see in Figure 9-39. This account has minimum privileges in our system. Creating this account is only necessary if we are going to use anonymous access, of course; so if we have an application in which we are planning to use forms, authentication it is necessary.
We then disable the Guest account and create a new Administrator account. We add this to the local Administrators group. After that, we disable the original Administrator account so no one can try to exploit it (see Figure 9-40).
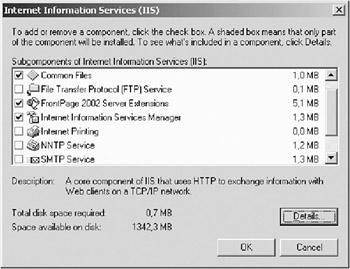
The next thing we do is make sure no unnecessary services are running. This could vary from system to system, depending on the needs of a particular application. We make sure that the FTP Service, NNTP Service, SMTP Service, and so on are not installed (see Figure 9-41). We also disable the DHCP Server and Client, for example.
| Tip |
Always make sure to go through the services list and ensure only those that are necessary will run. |
This way we can be certain that as much CPU processing power as possible is always available to service Web requests.
Then we prohibit WebDAV, Internet Data Connector, RPC Proxy Server Extensions, and all unknown CGI and ISAPI extensions (see Figure 9-42).
To confuse a malicious attacker at least a little, we move the default Web site root directory for IIS, and place it on another disk. We make sure only a minimum number of user accounts have access to this directory (see Figure 9-43).
As we are already changing NTFS permissions, we continue to remove the everyone account from the following directories:
System directory (windows\system32)
.NET Framework tools directory (windows\Microsoft.NET\Framework\{version})
Root (\)
The new Web site root directory
We also make sure our new anonymous user account has no write access to any of the Web content directories. Since this is the only directory this account has any privileges to, we do not have to check for it in any other directory.
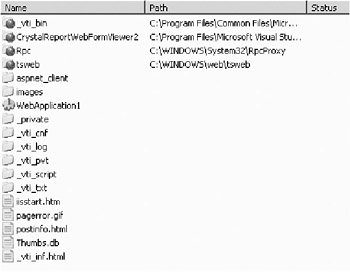
The next step is to make sure we have no unwanted virtual directories in our Web site root directory (see Figure 9-44).
We make sure we have W3C extended logging enabled and also change the directory for the log files. To prevent anyone from covering their tracks by changing the log files, we ensure only administrators and the SYSTEM account have access to the log file directory (see Figure 9-45).
Microsoft has two tools you can use to harden security on IIS servers: the IIS Lockdown Tool and URLScan. These are most useful to you on a Windows 2000 system with IIS 5.0. Most of their features have been implemented in IIS 6.0 on Windows Server 2003, so you do not have much use of these applications on this platform. The IIS Lockdown Tool will not even be installed on an IIS 6.0 system, for instance.
URLScan 2.5 can be installed, however; but if you carefully read the document "URLScan Security Tool" (http://www.microsoft.com/technet/treeview/default.asp?url=/technet/security/tools/tools/URLScan.asp), you can see that it does not really offer much for a Windows Server 2003 system. One thing you could use perhaps is the ability to disable or change the server header. By doing this, you could confuse an inexperienced hacker for a while when he or she tries to hack our Windows system with tools for hacking a Linux machine. But tools are available to the more experienced hacker to get around this obstacle, so your hacker could soon find out that you have a Windows system anyway. But it could be fun to create a header for a new operating system and see the newsgroups being posted with requests for this system.
The document has a good comparison of the differences in features between URLScan 2.5 and IIS 6.0 that you should read to determine for yourself if you need to install it or not for your own applications. For our example application, we choose not to.
Since our servers will use SSL, we need to implement a server certificate. For our purposes, we request a trial certificate from VeriSign (https://www.verisign.com/cgi-bin/go.cgi?a=w29710122100110000). This certificate is valid for 14 days, giving us enough time to evaluate it in the context of the demo application.
Installation is pretty simple. We follow the instructions provided by VeriSign, and within minutes have our server configured.
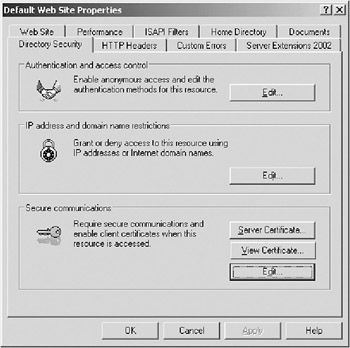
Certificates are managed from the Internet Information Services Manager. From the MMC console, right-click Default Web Server (or the server you are going to use) and click the Directory Security tab (see Figure 9-46). On this tab are three buttons used for certificate management: Server Certificate, View Certificate, and Edit.
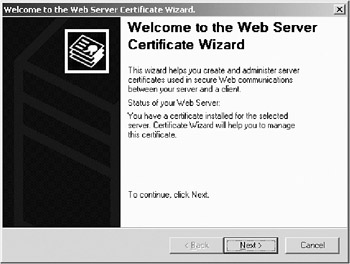
Server Certificate: This button opens a wizard that lets you manage your certificates (see Figure 9-47). You can add new certificates, remove old ones, export certificates, and so on.
View Certificate: This button allows you to view installed certificates. Figure 9-48 shows our trial certificate from VeriSign.
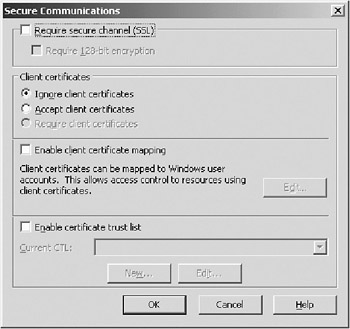
Edit: The Edit button is used when you want to edit the communications settings for your site. As you can see in Figure 9-49, for our purposes we can configure the site to require SSL, and so on.
Our virtual machines have two Network Interface Cards (NICs), which is perfect, because we can separate the internal and the external networks. One of them has a connection to the outside world (the Internet). This also has a default gateway configured. It will be through this gateway our clients will access the cluster. The other NIC is internal and will be used for cluster administration tasks and also for our cluster servers to access the application layer.
| Note |
We are not going to go through the whole configuration process in detail here; instead we will highlight the simplicity of creating a NLB cluster using the Network Load Balancing Manager. |
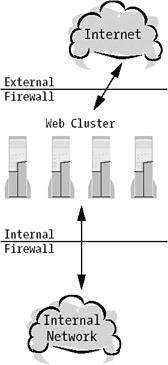
The Network Load Balancing Manager is a tool that comes with Windows Server 2003 and is found under administrative tools. It is not our intention to cover the network infrastructure design here, since it is complex and has to be considered with the input of enterprise administrators and security experts. As you saw in Chapter 4, however, we can choose to have a firewall both in front of the Web cluster (external firewall) and behind it (internal firewall) to create a perimeter network (see Figure 9-50).
This approach is a good way to increase security, but we can also choose to only have the external firewall. As long as security is high we are okay; with your own applications, discuss this setup with the security experts at your company to be sure.
| Note |
Keep in mind that building a perimeter network does not mean you do not have to spend time on your external firewall. You still need to put as much effort into that firewall as you would if no internal firewall existed. |
So let us start by walking through the creation of our NLB cluster. From Administrative Tools we open the Network Load Balancing Manager (see Figure 9-51).
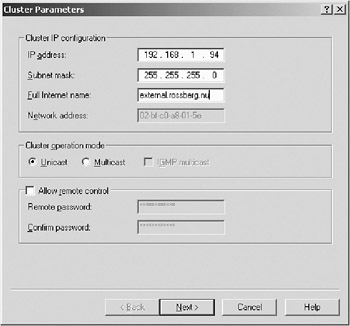
We choose New from the Cluster menu to initiate the wizard that will help us create a new cluster. A window like the one in Figure 9-52 opens. First we need to fill in some information about the cluster, like the cluster IP address, subnet mask, and full Internet name. This is also where we specify whether the cluster operates in unicast (default value) or multicast mode. We will stick with the default here. We also choose not to enable remote control because of the security risks that comes with allowing this feature. We click Next to continue.
If we wanted to add more IP addresses to our cluster, we would do so in the next screen. We only do this if we are going to maintain several clusters on our machine. This way we can create an environment that can handle several loadbalanced applications. In our case, we will only expose one, so we click Next to continue to the next screen (see Figure 9-53).
This screen lets us add port rules to our configuration. By clicking Add or Edit we can add new port rules or edit our existing ones. If we highlight the default rule and click Edit, we can change rules regarding ports, protocols, filtering, and so on (see Figure 9-54). We can do this for all cluster IP addresses we added previously. We usually do not set port rules for other ports than those our applications use.
| Note |
Remember that all port rules must be the same on each cluster member. Otherwise a new cluster member won't be accepted if it tries to join a cluster with port rules as different from the ones it has itself. |
We click OK or Cancel to close the window and click Next to continue the wizard. Now it is time to select which of our network cards will expose the cluster. Or more correctly, we choose which network connection will expose it. We do this by typing the IP address of the server in the host text box and clicking Connect. This will show the available network connections we can use (see Figure 9-55). We are going to use Local Area Connection 2 for our cluster, so we highlight it and click Next.
The next screen shows the host parameters, which define the parameters for the network interface card we are using for the specified network connection (see Figure 9-56). If we are satisfied with them, we can click Finish to create the cluster.
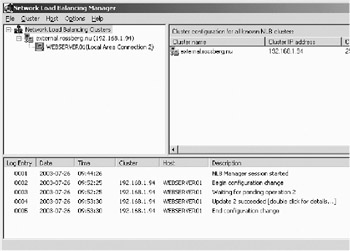
Now Network Load Balancing Manager starts configuring the cluster. When it is finished, the new cluster member is listed in the Network Load Balancing Manager, as shown in Figure 9-57, and the icon beside it should appear green.
Now we can start adding our new members. To do so, we simply right-click the cluster and choose Add host to cluster. This will start a new wizard similar to the Create New Cluster Wizard discussed previously, but it will start with the dialog box shown in Figure 9-55 and continue from there. We can then add up to 32 servers to our cluster.
So what else do we need to do besides creating our cluster? Well, we decide to enable NLB logging so we would get a record of all cluster events in case we need to troubleshoot the cluster. We also restrict access to the directory where we save the log files so no one can manipulate them.
Now that we have set up our Web cluster, we can just purchase a new server, configure it with all application data and same settings as the one we just configured, and add it to the cluster with the help of Network Load Balancing Manager. This is good way to increase performance quickly. Figure 9-58 shows the solution so far.