Testing the application should be conducted from the first line of code. Tests are done on at least three different levels:
Unit tests
Code reviews
Integration tests
Acceptance tests
Unit tests can be done by using the freeware tool NUnit, which we discussed in Chapter 5. These tests should cover 100 percent of the code and should be done by the developer during the developing phase.
| Note |
Using automatic unit tests takes time to implement, requiring you to write test classes that will validate the code. Automatic testing is no silver bullet that will solve all problems. By using automatic unit tests, you cannot slice the test time down to three hours; you still need test time to implement and run the tests. The benefit of automatic unit tests will mainly be visible when you have several develop iterations and you want to ensure that no code fixes or new functionality have changed already delivered functionality. |
We want to mention code reviews here, even if they are not considered "real" tests of the application. We would like to emphasize that code reviews should be done on a regular basis to create an application that is following the decided architecture—to test that the architecture and the design guidelines are being followed. Too often are code reviews omitted due to pressing deadlines. This will often result in an application containing an unclean architecture, with many different layouts that make it more difficult to maintain and debug the application. When doing a code review, we put up a list with the different coding conventions we should check. We then walk through the code and check that the coding conventions for the project are being followed. Code review and unit tests are more beneficial the sooner they are conducted. In the beginning of a project, most developers involved have not learned all the coding conventions yet. Putting some extra effort into reinforcing these conventions at the beginning of projects will pay off later, since all developers will learn the coding conventions for this particular project much faster if they have someone who reviews their code.
| Note |
Avoid letting the developers review their own code. Instead, create a list through which you delegate the review of each module to another developer. |
Integration tests, sometimes called system tests, should be performed for a complete iteration of the development phase. These tests are based on test scripts that are already written during the design phase of the application and are based on the use cases. NUnit can also be used in integration tests, but the test classes for an integration test can sometimes be hard to code, so we seldom use this tool. By leveraging use cases to generate test cases, however, testing teams can get started much earlier in the life cycle, allowing them to identify and repair defects that would be very costly to fix later, ship on time, and ensure that the system will work reliably.
The final test is called an acceptance test and is performed by the customer. This test should verify that the delivered system has the requested functionality and performance. It is very important that the customer writes the acceptance scripts to be sure that his or her needs are reflected in the scripts.
The first step in deploying our application is to write a deployment document. This document should contain all the steps we need to take to deploy each component on the server. The most important items in this document are the manual steps that need to be done with the components.
Next we will create a deployment project that should help us with the installation of the application. This deployment project will take care of setting up the Web application on the server and putting our pages in the right place. The deployment project could also register our components in Component Services, but we will do this manually.
To create a deployment project, we select Add project from the File menu in Visual Studio and click the Setup and Deployment Project option shown in Figure 9-79.
Next, we select the Web Setup Project option and name it TimeReportWebSetup. Figure 9-80 shows the setup project.
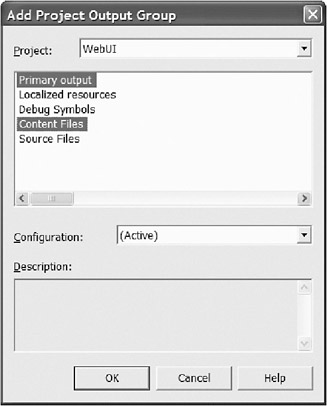
Now we add the output from our WebUI project to the deployment project. This is done by right-clicking the Web Application folder (which is our root for the Web application) and selecting Add | Project Output.
After specifying the WebUI project in the combo box, we select Primary Output (which is our webui.dll—the code-behind classes) and Content Files (which are our Web pages) as shown in Figure 9-81.
Done! Now when we build the deployment project, a setup program will be created that will install the output (our Web pages and the code-behind DLL) from the WebUI onto the machine where the setup program is executed.
We add a new deployment project to our solution file and name it TimeReportWebServiceSetup. We perform the same steps as for the TimeReportWebSetup, but this time we select the primary output and the content output for our Web service project. This setup will be run at the application server, since the Web services will be hosted there to support the Web server with our components.
The next step is to manually register our components on the application server. When we have copied the DLLs to the application server, we need to register them in Component Services. The traditional way to do this is to register the components via the MMC snap-in for Component Services. However, this will not work for managed serviced components!
| Note |
To register the components in Component Services, you need to use the Regsvcs util. Trying to register the components via the MMC snap-in for Component Services will fail. |
For our components, we need to use the Regsvcs utility. The tool can be found in the .NET Framework catalog.
We create a batch file and name it installcomponents.bat. The file should contain the following lines of code:
Regsvcs /fc /appname:TimeReport BusinessFacade.dll
Regsvcs /exapp /appname: TimeReport BusinessRules.dll
Regsvcs /exapp /appname: TimeReport DataAccess.dll
The parameter /fc in the first command line tells Regsvcs that it should first try to find an existing application named TimeReport. The application is created if it does not exist. The second parameter, /appname, tells Regsvcs what the name of the application should be. The last parameter is the name of our DLL that should be registered.
The second command is a bit different. The command /fc is replaced by /exapp. This means that Regsvcs should look for an existing application (since the application was created on the previous command line). We could, of course, have used the /fc parameter, since it would have found the application we created in the first step.
When we execute this batch file in the same directory where our DLLs are located, the components in the DLLs will be installed into an application called TimeReport in Component Services.
All the enterprise attributes we have set in the classes will be used by Regsvcs to configure the components.
However, we need to configure the data connection string that should be located in the constructor string for the data access component. We also need to configure the path to the LDAP that should be used by the data Service component LdapAuthentication.
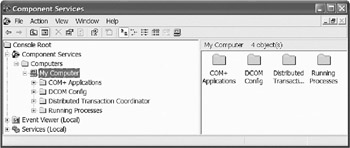
To do so, we start by opening the Component Services Administration tool and expanding My Computer as shown in Figure 9-82.
Our time reporting application will be located in the COM+ Applications folder. We browse down to the DataAccess.UserReport component, right-click it, and select Properties. We then click the Activation tab and add the connection string to the database in the Constructor String Field (see Figure 9-83).
The connection string can be stored in several places in our application. We have the connection string accessed via the constructor to make changing the database that should be used more dynamic. Other ways are to add it to the application config file or to code it as a constant in the data access class. The last approach is often not suitable. If the database server changes, we would need to recompile the data class to change the connection string.
Adding the connection string to the LDAP is done in the same way. We browse to the DataAccess.LdapAuthentication component and add the path to the LDAP that should be used. In our case, the connection string will be
LDAP://RRCorp.com/DC= RRCorp,DC=com
That's it. To install our application, we simply need to follow these steps:
Run the TimeReportWebSetup on the Web server to install our Web application.
Copy our components to the application server and run our installcomponents.bat file to install them into Component Services.
Run the TimeReportWebServiceSetup to install the Web services for the application layers.
Finally, we are ready to test the application. When entering the UserReport.aspx page, ASP.NET realizes that we are not authenticated and redirects us to the login.aspx page. When we have filled in user credentials, the code-behind file verifies with LDAP that we have entered the correct information. If we have, we are redirected back to the UserReport.aspx page.
Back on the UserReport.aspx page, we click the getUserReport button and receive the time report for week 42.