Okay, it is time to begin implementing our time reporting application. We have a couple of tasks to complete to implement the required solution. The different steps we will take are listed here:
Create the enterprise template for our application.
Set the references and the dependencies between the different layers.
Add code to support Enterprise Services.
Implement our data factory class.
Implement specific data classes for use with SQL Server, which is our data store.
Implement the MSMQ functionality.
Enable facades for Web services access.
Implement security.
Test the application.
Deploy the application.
In the following sections, we will look at each step in more detail.
Before we start coding, we verify that all requirements have been caught in our UML diagram, and that all class diagrams support the functionality that the customer requires. As you have seen previously, the work to create use cases, sequence diagrams, and then class diagrams is an iterative process that may be run through many times before all cases have been written down and all requirements have been covered in UML, sequence, and class diagrams.
Looking back at the UML diagram and the classes we created earlier, we realize that some functionality is missing. Since the enterprise architecture we described in Chapter 5 is service oriented, the classes need to have be able to serve the caller with information. We will focus on adding such functionality to three different classes here: the WeekReport class, the User class, and the Projects class.
The previously created UMLs are the ones that will form our facade classes in the enterprise architecture. The key is to let the user interface deal with as few objects as possible; therefore, we encapsulate all related actions (for example, a use case) into one object, so only one object from our enterprise application needs to be created in the user interface. Recall the use case we showed you in Figure 9-5? We will now create a facade object to handle all functions the actor needs to be able to carry out to register the time report. We will call the facade object UserReportFacade, and we need functions for the following actions:
Retrieve a complete time report.
Save a time report.
Submit a time report.
Add projects to the time report.
Remove projects from the time report.
Update already added lines in the time report.
The sequence diagrams show the Time Sheet object, which has the required functions for saving a time report and adding and removing projects from the time sheet.
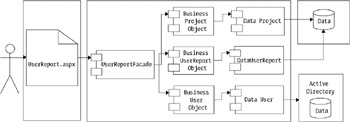
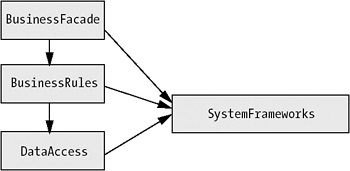
The UserReportFacade object also needs to work with the Project object to retrieve all possible projects users can have in their time reports. Figure 9-61 shows how UserReportFacade works with different business objects in our enterprise application. The UserReport.aspx page (the user interface) uses only one facade object—UserReportFacade.
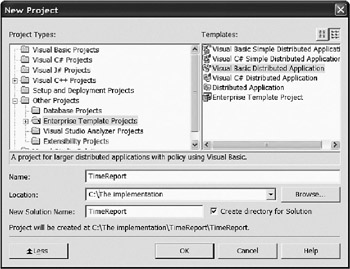
Now that all requirements have been checked, we need to create the enterprise templates we will customize. Visual Studio 2003 contains a template that can be used for getting us on track quite fast. We open Visual Studio 2003 and under Templates select Visual Basic Distributed Application as shown in Figure 9-62. This template has the structure we need to create our application.
The IDE will ask for the URL for the site where the Web user interface should be created. We specify a URL to indicate where the Web application will reside as you can see in Figure 9-63.
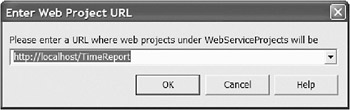
Visual Studio will also ask where the Web services project should be hosted. We select the same URL as for the Web application, except we end the URL with WS (for Web service).
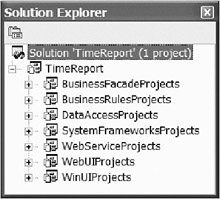
It will take a while for the IDE to create the Web application and the Web services application on the selected Web server. When the IDE has finished, the Solution Explorer will appear as shown in Figure 9-64.
The solution contains seven different enterprise groups:
The first one, BusinessFacadeProjects, contains our facade projects. In this application, we will have only one facade project called BusinessFacade. As mentioned in Chapter 5, the facade classes are used for grouping relative functionality together; normally a use case is placed in one facade class.
The second project group is BusinessRulesProjects. Here our business rules project will reside, which in this case is named BusinessRules.
Next project group is DataAccessProjects. It contains our data access project, named DataAccess.
The SystemFrameworksProjects is where global projects should be placed—for instance, interface projects that need to be accessible from different projects.
The WebServiceProjects group contains our Web service project. The project should be named WebService.
The WebUIProjects group contains our Web application. The project should be named WebUI.
The last group, WinUIProjects, contains the Windows-based application (in our case, an administration application), but we will not use it in this example.
Before we continue, we need to set up dependencies and references between the projects. This way we make sure they can communicate with each other. The time reporting application and all its layers will initially be run on a single box to allow easy scale out when the need arises.
First we set up how the projects depend on each other. We are doing this because Visual Studio builds the projects based on how the projects depend on each other. We start by right-clicking the solution icon in the Solution Explorer window and selecting Project Dependencies.
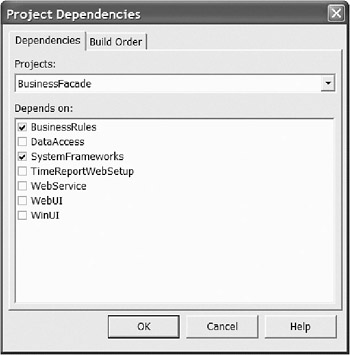
The Project Dependencies dialog box appears (see Figure 9-65).
As you can see, two tabs exist on this dialog box. The first tab shows the dependencies between the projects in the solution; the second tab shows the build order. The build order is determined by the dependency between the projects. On the Dependencies tab you will find a combo box and a list box. The combo box contains all projects in a solution. Of the projects that appear in the list box, those that the specified project in the combo box depends on are indicated with a check mark in the list.
The dependencies between the different projects for our application are shown in Figure 9-66.
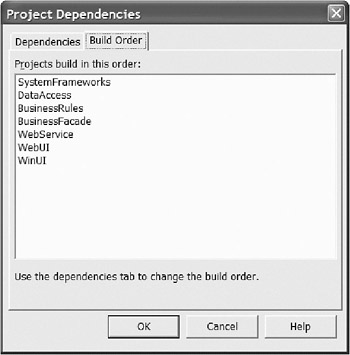
After we fill in all dependencies, the build order is shown on the second tab (see Figure 9-67).
Now that we have specified the dependencies between the different projects, the compiler knows in which order the projects should be compiled. However, we also need to specify the references between the projects so we can create, for instance, a business object from a facade class. The process of adding references between the projects are the same as the dependencies. To add references between the BusinessFacade project and the Business project, we right-click the Reference folder in the Solution Explorer and select Add Reference.
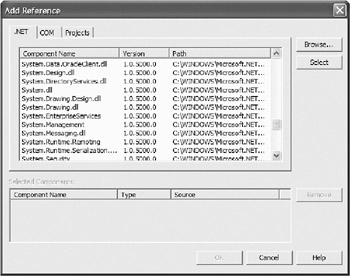
The Add Reference dialog box, shown in Figure 9-68, contains three different tabs: The .NET tab lists managed DLLs that we can use, the COM tab lists unmanaged DLLs that we can reference, and the Projects tab lists all projects in the current solution that we can refer to.
We click the Projects tab and double-click the BusinessRules project to add it to the list box at the bottom of the form. We also double-click SystemFrameworks, because the Facade needs a reference to that project as well. After we click the OK button, the references are added to the BusinessFacade project.
Since we are not going to develop a Windows-based application in this example, we will therefore remove it from the build process. To do this, we right-click the Solution file, and select the Configuration Manager from the pop-up menu.
We deselect the checkbox for the WinUI project and specify that the shown configuration is for the debug configuration. After we select the release configuration in the combo box, we deselect the WinUI project in this configuration too (see Figure 9-69).
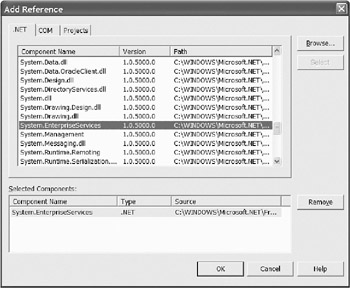
Finally, we need to add a reference to System.EnterpriseServices to our BusinessFacade, BusinessRules, and DataAccess projects because we want them all to take advantage of Enterprise Services. We right-click the references catalog under each of the mentioned projects and click Add reference. We then scroll down to System.EnterpriseServices on the first tab and double-click it to add it to the list at the bottom of the form (see Figure 9-70).
When we have added the System.EnterpriseServices reference to the BusinessFacade, BusinessRules, and DataAccess projects, we have configured most of the stuff we need to before being able to start coding. We will start from the client side of the application and work down toward the database.
First we need to implement the classes we found in our use cases and sequence diagrams. The first class from the client side is the BusinessFacade class UserReport. This class will contain all the functions and methods the actor needs to be able to complete his or her tasks. To implement the class, we open the BusinessFacade project in the Solution Explorer, right-click the project, and select Add | Add Class.
After we name the class UserReport and click OK, an empty class will be added to the BusinessFacade project. The first thing we need to do with this class is have it inherit from the EnterpriseServicedComponent.
Imports System.EnterpriseServices
Public Class UserReport
Inherits System.EnterpriseServices.ServicedComponent
To take advantage of COM+, we must add some custom attributes to the class to tell System.EnterpriseServices how the class should be registered in the COM+ application. From Chapter 5, you know that we need to add a strong name to the assembly. To achieve this, we use the sn.exe tool, which generates a key pair that is used for generating a strong name for our assembly. We generate key pairs for each layer in the application by opening the Visual Studio 2003 command prompt and executing sn –k c:\TimeReportBusinessFacade.snk. We then add an assembly attribute that references the key pair file by adding the following line to AssemblyInfo.vb in the BusinessFacade project.
<Assembly: AssemblyKeyFile("c:\TimeReportBusinessFacade.snk")>
Now the key pair will be used to generate a strong name for the BusinessFacade project (which is the assembly).
| Tip |
We can also use a relative path here. The path is from the bin catalog in the current project. If we put the strong name key file in the root of the project, the attribute will look as follows: <Assembly: AssemblyKeyFile("..\..\TimeReportBusinessFacade.snk")>. |
To summarize what we have done so far: We first created the enterprise template for our time reporting application. This was done by using the enterprise template found in Visual Studio .NET 2003 Enterprise version. Then we created a facade class that should be used for the UserReport class. We also added a reference to the System.EnterpriseServices DLL and specified some attributes to the class for object pooling. All assembly-related attributes are collected in AssemblyInfo.vb. When we added attributes to this file for using the key pair file, we made it possible for the compiler to give a strong name to the assembly.
Next, we will add the first function we need in our UserReportFacade object. The function GetUserReport needs to be added to the class, and it should take two parameters—the user ID for the user and the week number for the report that should be retrieved. (We can later add another GetUserReport function that takes a date interval and returns all time reports between the specified intervals if we need to, but for now we want to keep it simple.) The code for the UserReportFacade class appears in Listing 9-1.
Imports System.EnterpriseServices
<ObjectPooling(Enabled:=True, MinPoolSize:=1, MaxPoolSize:=8, _
CreationTimeOut:=25000)>_
Public Class UserReport
    Inherits ServicedComponent
    'Function that returns the requested time report.
    Public Function GetUserReport(ByVal UserID As String, _
                                     ByVal WeekNo As Integer) As DataSet
         'Our code goes here...
    End Function
End Class
The function GetUserReport will return a dataset with the complete time report inside. As we mentioned elsewhere in this book, it is best to try to catch input errors as soon as possible. Here we can already catch invalid week numbers and empty user IDs to ease the burden on the server. If any of the incoming parameters are wrong, we do not need to create a business object to verify the input. We also must create a business object and call the appropriate function to retrieve the time report. The business object will be named UserReport in the Business project and the function will be named GetUserReport with the same parameters as the equivalent Facade function.
The business logic in the function will check whether the requested time report is submitted or not. If it is submitted, the time report is returned as read-only. Well, we know this does not amount to much business logic, but there will be more when we attempt to update time reports. We try, however, to be proactive and set the time report as read-only to prevent the client from changing it if the time report has already been submitted. The complete code for the facade class calling the business class for the time report will look as shown in Listing 9-2.
Imports System.EnterpriseServices
<ObjectPooling(Enabled:=True, MinPoolSize:=1, MaxPoolSize:=8, _
CreationTimeOut:=25000)>
Public Class UserReport
    Inherits ServicedComponent
    'Function that returns the requested time report.
    Public Function GetUserReport(ByVal UserID As String, _
                                     ByVal WeekNo As Integer) As DataSet
        Dim objUserReport As BusinessRules.UserReport
        Try
            If UserID.Length > 0 And WeekNo > 0 And WeekNo < 53 Then
                objUserReport = New BusinessRules.UserReport
                Return objUserReport.GetUserReport(UserID, WeekNo)
            Else
                'Not valid input parameters.
            Throw New Exception("Input parameters are invalid. " & _
            UserId cannot be empty and/or WeekNumber not between 1 and 52)")
            End If

        Finally
            objUserReport.Dispose()
            objUserReport = Nothing
        End Try
    End Function
End Class
The facade class checks if the input parameters are valid. If they are not valid, the function raises an exception to the caller. If the parameters are valid, the function creates a business object and retrieves the dataset via the business function GetUserReport. The business class for the time report is quite similar to the facade class and calls the data layer class to retrieve the dataset. The business code is shown in Listing 9-3.
Imports System.EnterpriseServices
Imports SystemFrameworks
<InterfaceQueuing(Interface:="IUserReportAsync"), _
ObjectPooling(Enabled:=True, MinPoolSize:=1, MaxPoolSize:=10, _
CreationTimeOut:=25000), JustInTimeActivation(True)> _
    Public Class UserReport
    Inherits ServicedComponent
    Implements IUserReportAsync
    Public Function GetUserReport(ByVal UserID As String, _
    ByVal WeekNo As Integer) As SystemFrameworks.dsUserReport
        'Our code goes here...
        Dim objUserReport As DataAccess.UserReport
        Try
            objUserReport = New DataAccess.UserReport
            Return objUserReport.GetUserReport(UserID, WeekNo)
        Finally
            objUserReport.Dispose()
            objUserReport = Nothing
        End Try
    End Function
End Class
As you can see, the code for the facade class and the business class is identical. We will later add some business functionality to the business layer. The architecture in an application can be follow strictly or loosely. By strictly, we mean that all calls go from the facade object to the business object and from the business object to the data object. In this case, we do not have any business rules at the moment, so we could have called the data object directly from the facade object to avoid instantiating the business object—this is the loose way to follow the architecture.
We recommend following the architecture strictly, since any business logic that may be needed (which we may have missed or omitted in this first release) should be put into the business layer. If we were calling the data object directly from the facade, a recode and recompile of the facade object would be necessarily if we suddenly realized that we needed business rules for the particular function. With the business object in place, we only need to change the code internally without changing anything else.
You saw in the previous examples that we return a dataset from the function GetUserReport. Datasets can either be nontyped or typed. In a normal dataset, the fields in tables are specified by the data that fills the dataset. If you have a database query that retrieves the first name and last name values from an employee table, the fields in the dataset will be named firstname, lastname. In a typed dataset, you specify the different fields that will occur in the dataset. For our example, we specify that the database field firstname should be named First Name in the dataset and the database field lastname should be named Last Name in the dataset.
The typed dataset is first derived from the dataset and the schema information (tables, columns, and so on) is generated and compiled into this new dataset class as a set of first-class objects and properties used to create a class. This is of great importance, since by specifying the field's names you isolate the database structure from the data carriers (the datasets) in the application.
A change in any database fields will not be reflected in the data carriers and affect your code—it will only affect where you retrieve the data and put it into the dataset. Another benefit with the typed dataset is that you can retrieve the data fields by name instead of index position. If you have an employee table with employee data, the code to retrieve the field firstname from an untyped dataset is the following:
Dim s As String
s = CType(dsEmployee.Tables("Employees").Rows(0).Item("firstname"), String)
With a typed dataset, you can use the following code instead:
Dim s As String
s = dsEmployee.Employees(0).firstname
As you can see, this code is neater and there is less risk that you retrieve the wrong column since you are using the name of the column for direct access. The design of the typed datasets that will server as data carriers between the different layers in our application can be done in different way, but here we will show how to do it by creating a dataset from scratch. The typed datasets will be stored in the SystemFrameworks project, which contains all the definitions that need to be accessible from different projects.
The first step we need to do is right-click the project file for the SystemFrameworks project and select Add | Add New Item. In the Add New Item dialog box, we select Dataset, rename the dataset to dsUserReport, and then click Open. Visual Studio now adds a blank schema to the SystemFrameworks project. The name we give the dataset, dsUserReport, will also be used for the class that is generated.
Double-click dsUserReport to open it in design view. The Toolbox will now contain an XML Schema group that contains elements we can use in our dataset. We know from the analysis phase in the beginning of this chapter that dsUserReport should contain a UserReport table that has the following items:
An ID
Start date for the week
End date for the week
Week number for the week
Expected hours for the week
Status for the complete report (whether it is submitted to administration staff or not)
The dsUserReport dataset should also have a ReportLine table that contains all report lines for the selected week. The ReportLine table will include the following:
An ID to the UserReport
An ID for the report line
A project number
Number of hours
Type of time
A comment
By dragging elements from the toolbox onto the form, we build up the structure for our typed dataset.
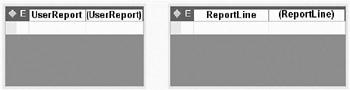
We start by dragging an element from the toolbox onto the form to create our table definition. We will have two of them—one for the time report header and one for the time report lines. We name the table by overwriting element1 in the box at the top of the element.
When two elements have been added and renamed, our form looks like the one in Figure 9-71.
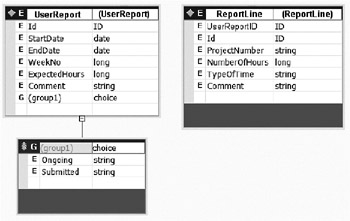
The next step is to add the individual properties for each table. We start with the UserReport table.
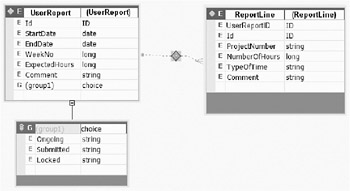
Clicking in the empty line below the UserReport header, we enter Id in the first column. The second column is the data type that should be used for the field, so we select data type ID. We easily add the previously mentioned properties to the UserReport and the ReportLine to arrive at the complete structure shown in Figure 9-72.
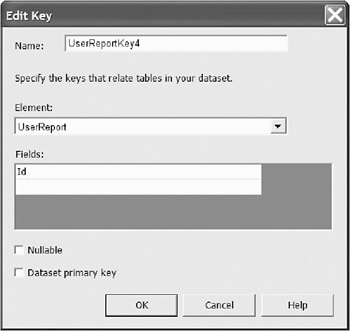
The final step in implementing the dataset is to create a relation between the two tables. First we need to define what fields in the UserReport and the ReportLine tables are key fields. This is done by simply dragging a key item from the toolbox onto the UserReport and the ReportLine tables. The Edit Key dialog box that appears will ask us for a key name and which field in the table should be used as the key (see Figure 9-73).
We are using the UserReport key as part of the ReportLine key so that the application allows many time reports to be sent in the same dsUserReport dataset.
Next we drag a relation item from the toolbox onto the UserReport table, and the Edit Relation dialog box shown in Figure 9-74 appears.
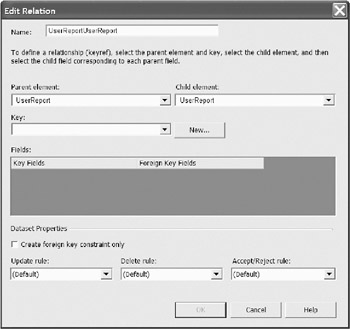
We simply select the parent element and the child element and select the key that should be used for the relationship. If no key exists, we can create one by clicking the New button. The dataset properties are left as they are.
The final dataset is shown in Figure 9-75.
To ensure that dsUserReport is returned from the GetUserReport function rather than and a general dataset, we change the return value from dataset to our dsUserReport. At the same time, we also need to add a reference to the SystemFrameworks project, since our definition (the schema) of dsUserReport is located there. We add the reference to the SystemFrameworks project to all projects in which the dsUserReport dataset will be handled.
Now we have a typed dataset that will be used for transporting data between the layers and out to the client application that will be created in ASP.NET—but how do we retrieve the data that should be put into the dataset? The data class that should do the real work may be implemented to use ADO.NET directly, but doing so will decrease the possibilities to change the data source in the future, since we would have code toward one data provider, such as SQL Server or OLEDB. Instead of using the specific data provider directly, we create something called a factory class. A factory class is a class that handles the creation of the object and passes back an object to the caller. The caller does not create the object itself. Therefore we make the creation and handling of the specific data provider abstract for the caller—our real data access class. The enterprise application we create here will live for a long time. If the company later decides to switch from SQL Server to Oracle, or to some other data storage system, the use of a data factory class to abstract data access is a wise approach to reduce the costs of making a change in the data provider.
We took the DataHelper class released from Microsoft, modified it a bit, and merged it with our own data factory class that is working with the interfaces for data providers. The data factory encapsulates the creation of connections, datasets, and calls to stored procedures into a base class that will be used from our data helper class, which in turn is used from our data access component. The complete data factory we will use in this example is listed in Appendix B.
As you can see, IDb interfaces are frequently used in this data factory. These interfaces, which are listed in Table 9-3, are the base interfaces for all data provider–specific connectors such as SQLClient. All data providers should support these interfaces. By using these interfaces in our data factory class, we can be sure that the data factory class supports all kinds of data providers. To add a new provider to the data factory, we only need to add a new enumeration value and the associated type values to the factory's static type arrays.
|
Interface |
SQLClient Class |
Oracle.NET |
OLEDB Class |
Description |
|---|---|---|---|---|
|
IDbConnection |
SqlConnection |
OracleConnection |
OleDbConnection |
Represents a connection to the database |
|
IDbDataAdapter |
SqlDataAdapter |
OracleDataAdapter |
OleDbDataAdapter |
Represents a set of command-related properties that are use to work with a DataSet |
|
IDbCommand |
SqlCommand |
OracleCommand |
OleDbCommand |
Represents a SQL statement (or command) to be executed against a data source |
|
IDataParameter |
SqlParameter |
OracleParameter |
OleDbParameter |
Represents a parameter to the command object |
|
IDataParameter |
SqlParameter |
OracleParameter |
OleDbParameter |
Represents a parameter to the command object |
|
IDataReader |
SqlDataReader |
OracleReader |
OleDbDataReader |
Represents one or more result sets that can be accessed in a read-only, forward-only manner |
|
IDbTransaction |
SqlTransaction |
OracleTransaction |
OleDbTransaction |
Represents a transaction to be performed against a data source |
Microsoft provides a helper class that can be used to reduce the amount of code in our data class. The helper class Microsoft provides is written for the SQL provider. We have a modified version that works with our provider factory to be able to switch provider more easily. More documentation about Microsoft's data helper class and a download link can be found at http://msdn.microsoft.com/library/default.asp?url=/library/en-us/Dnbda/html/daab-rm.asp.
As soon as we need a connection, a command, or some other objects, we use the helper class that has functions to handle most of the actions we will do on our data. The helper class, in turn, uses the provider factory to obtain the specific provider object. Here we will take a look at the helper class.
| Tip |
Since these classes are not complete to use out of the box, we encourage you to visit http://www.apress.com, where you will find the complete project for download. |
The helper class contains functions and methods for common tasks we do with data. Here we have functions like ExecuteDataSet, which executes a query and returns a dataset. This function is overloaded with different versions for executing a stored procedure, etc. We also have functions to create data parameters that are inherited from the base class—for example, providerFactory.
The important thing to note with this class is that it works only with the generic IDb interfaces. All data providers in .NET should support the interfaces. By relying on these interfaces, we are able to switch providers. This is done via the constructor method that has the parameter providerType. This parameter indicates what provider to use.
Now we should use our helper class in our real data class. We start by creating a class in the DataAccess project. The class should inherit ServicedComponent to take advantage of Enterprise Services and import ProviderFactory and SystemFrameworks.
One benefit with using Enterprise Services is that we can use the constructor parameter support. This means that we can read at runtime the connection string to our database from the configuration of our serviced component, among other things. This makes the solution more flexible, because we can change database connection without recompiling the code.
To take advantage of this functionality, we simply add a custom attribute to the class as follows:
<EnterpriseServices.ConstructionEnabled(True)>
We then override the method Construct and store the connection string in a private variable for later use in the class.
Protected Overrides Sub Construct(ByVal s As String)
    'Retrieve the connection string that should be used.
    strConnection = s
   End Sub
The function that should be used for retrieving time reports will be called GetUserReport as mentioned earlier.
The first thing we need to do is to create a DataHelper object. In the constructor for the data helper object, we specify what kind of provider we want. This is done by a constructor parameter since different data classes may use different kinds of providers. Here this class is using the SQLClient provider, whereas other data classes may use an Oracle provider.
Since we have encapsulated the creation of the dataset and the filling of it in our data helper class and the provider factory, not much code is needed in the real data class.
GetUserReport simply uses the FillDataSet function on the data helper object, and passes in the connection string and the desired stored procedure to run. Back comes the dataset, ready to return to the caller.
Behind the scenes in FillDataSet, the following occurs:
First a connection is created and opened. We are working only with the generic interfaces in the data helper class to enable different providers.
Secondly, we create a command object that is used to call our stored procedure. Next we create a data adapter and do the table mapping in the dataset. After that, we call the FillDataSet method on the data adapter we recently created and return the filled dataset to the caller.
The complete code for our DataAccess class is shown in Listing 9-4.
Imports DataAccess.DataHelper
Imports SystemFrameworks
Imports System.EnterpriseServices
<EnterpriseServices.ConstructionEnabled(True), _
ObjectPooling(Enabled:=True, MinPoolSize:=1, MaxPoolSize:=5, _
CreationTimeOut:=25000)> _
Public Class UserReport
    Inherits ServicedComponent
    Private objDataHelper As DataAccess.DataHelper
    Private strConnection As String = String.Empty
#Region " Component Designer generated code "

    Public Sub New(ByVal Container As System.ComponentModel.IContainer)
        MyClass.New()
        'Required for Windows.Forms Class Composition Designer support
        Container.Add(Me)
    End Sub

    Public Sub New()
        MyBase.New()

        objDataHelper = New DataAccess.DataHelper _
(DataUtils.ProviderFactory.ProviderType.SqlClient)
        'This call is required by the Component Designer.
        InitializeComponent()
        'Add any initialization after the InitializeComponent() call.
    End Sub

    'Component overrides Dispose to clean up the component list.
    Protected Overloads Overrides Sub Dispose(ByVal disposing As Boolean)
        If disposing Then
            If Not (components Is Nothing) Then
                objDataHelper = Nothing
                components.Dispose()
            End If
        End If
        MyBase.Dispose(disposing)
    End Sub
    'Required by the Component Designer
    Private components As System.ComponentModel.IContainer

    'NOTE: The following procedure is required by the Component Designer.
    'It can be modified using the Component Designer.
    'Do not modify it using the code editor.
    <System.Diagnostics.DebuggerStepThrough()> Private Sub InitializeComponent()
        components = New System.ComponentModel.Container
    End Sub

#End Region
#Region "Public functions"
    Public Function GetUserReport(ByVal UserID As String, _
                                     ByVal WeekNo As Integer) As dsUserReport
        Dim ds As New dsUserReport
        Try
        objDataHelper.FillDataset(strConnection, CommandType.StoredProcedure, _
        "getUserReport", ds, _
        New String() {"UserReportHeader", "ReportLine"}, _
        objDataHelper.CreateDataParameter("@UserID", UserID), _
        objDataHelper.CreateDataParameter("@WeekNo", WeekNo))
            Return ds
        Catch e As SystemException
            Throw New Exception(e.Message, e.InnerException)
        End Try
    End Function
Public Function SaveUserReport(ByVal ds As dsUserReport)
    Try
        Dim insertCommand As IDbCommand = objDataHelper.CreateCommand _
(objDataHelper.CreateConnection(strConnection), _
"InsertUserReport", "Id", "StartDate", "EndDate", "WeekNo", "ExpectedHours", _
"Comment", "Status")
        Dim updateCommand As IDbCommand = objDataHelper.CreateCommand _
(objDataHelper.CreateConnection(strConnection), _
"UpdateUserReport", "Id", "StartDate", "EndDate", "WeekNo", "ExpectedHours", _
"Comment", "Status")
        Dim deleteCommand As IDbCommand = objDataHelper.CreateCommand _
(objDataHelper.CreateConnection(strConnection), _
"DeleteUserReport", "Id", "StartDate", "EndDate", "WeekNo", "ExpectedHours", _
"Comment", "Status") objDataHelper.UpdateDataset(insertCommand, deleteCommand, updateCommand, ds, _
"UserReport")
        Finally
                InsertCommand.Dispose()
                InsertCommand=nothing
                updateCommand.Dispose()
                updateCommand =nothing
                deleteCommand.Dispose()
                deleteCommand =nothing
                ObjDataHelper.Dispose()
                ObjDataHelper=nothing
        End Try
    End Function
#End Region

    Protected Overrides Sub Construct(ByVal s As String)
        'Retrieve the connection string that should be used.
        strConnection = s
    End Sub
End Class
As you can see, we use a DataHelper class that has functions to handle most of the actions we want performed on the data. The DataHelper class in turn inherits the provider factory and uses the interfaces for connections, commands, etc., which makes it possible to switch between different providers quite easily.
You saw from our requirements that a submission of a time report should be instantaneous—regardless of the number of concurrent users. This can be achieved by using serviced components that take advantage of MSMQ, or using MSMQ directly via the System.Messaging namespace. In Chapter 5 you saw the basic message flow for two components using a message queue. Here we will show you how to use the classes .NET provides.
Remember from Chapter 5 that you need to do the following to take advantage of MSMQ from your components:
Create a queue that should be used for your messages.
Add code to the component to write to the queue and to read from it.
The System.Messaging namespace contains classes that you use when working with queues. Here we will look at two different classes: the Message class and the MessageQueue class. The MessageQueue class contains all the necessarily functionality to work with MSMQ queues. The Message class contains everything necessary to define and use an MSMQ message.
Queues can be created either programmatically or manually. Programmatically this is done by using the shared Create method of the MessageQueue Object.
Try
  Dim queueAsMessageQueue
  queue = MessageQueue.Create(".\Private$\SavedUserReports",true)
  ' If there is an error creating a queue you get a MessageQueueException
exception
  Catch ex As MessageQueueException
End Try
The path to the queue is specified as a parameter to the Create function. The dot serves as shorthand for this node, and to make this queue private, we put it in the Private$ folder by including Private$ in the path name. The Boolean tells MSMQ that the queue should have transactional support.
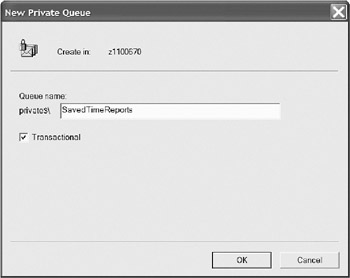
A public queue can be created or accessed by specifying the machine name\queue name. The other way to create a queue is to do it manually by using the Computer Management tool. We do this by opening the Computer Management tool, browsing down to the private queues, right-clicking and selecting New | Private Queue.
The wizard will ask us for a name of the queue. We name it SavedUserReports and also select the checkbox Transactional and click OK (see Figure 9-76). The queue is created and listed under the private Queues folder.
Enabling the checkbox option Transactional ensures that all messages sent to the queue arrive in correct order and are not lost between the sender and the receiver. Since our application must be reliable, we select this checkbox—we cannot afford to lose a time report. However, we will keep in mind that using transactional support costs us performance. If it does not matter in what order the messages arrive, or if a message is lost between the sender and the receiver, we can clear the checkbox and get a faster application.
| Note |
To be able to send a message to a transactional queue, you have to be in a transaction (internal or external), or else an error will be thrown. |
To send information to the queue, we use the Send method on the MessageQueue class.
MyQueue.Send("<<Message>>", "<<Message Label>>")
Message can be a Message object or any other managed object like as our dataset. If the object is not a Message object, the object is serialized and stored in the message body. Message Label is just a label on the message that can be used in message queue rules. We will not use it here.
There are two different functions to use when reading messages from a queue: Peeking and Receiving. The Receiving function simply receives messages and removes messages from the queue, whereas the Peek method reads messages but does not remove them from the queue.
Okay, we will not dive into MSMQ too deeply here because we will use Queued Components instead of MSMQ directly, but the technique described previously is used behind the scenes of our queued components.
Queued components (QC) are a service provided by COM+ that let you call components asynchronously. The architecture of queued components is based on transactional messaging provided by MSMQ. When a queued component is created by the caller, the queued component is not created directly. Instead, a component called QC recorder is created. When the caller executes methods on the object, these method calls are packed into an MSMQ message by the QC recorder and posted on a transactional queue. A listening component picks up the message from the queue and replays the method calls on the real object in the order they where recorded. By using Queued Components, you ensure that all calls are definitely called and that no duplicate calls are executed.
To be able to use QC in our example application, we need to run our assembly as a server application. This will cost us performance, because the assembly will now run in its own process. This is how the listener is able to run asynchronously in the background. Since here we only have one method that is taking advantage of QC, we leave it in the same component as the other functions. If we have many functions, we can move these to a separate assembly that is run as a server application while the rest of the layer is running as a library application to avoid cross-process calls as much as possible.
The next step is to tell the component that it should act as a queued component. This is made by adding a custom attribute to the AssemblyInfo file:
<Assembly: ApplicationQueuing(Enabled:=True, MaxListenerThreads:=3, _
QueueListenerEnabled:=True)>
The MaxListenerThreads parameter allows us to control the number of threads that exist to process messages in the queue. Under Windows 2000, we can't directly control this value, but under COM+ 1.5 or higher (in Windows XP or higher), this value provides us with a powerful tool for adjusting the load that these components place on our server.
Then we need to add an interface that should be used for accessing our queued method SaveUserReport. We create a new interface in the BusinessRules project and name it IUserReportAsync. The interface will only have one function, named SaveUserReport, which takes dsUserReport as the only parameter.
We then implement this interface into the business layer (all transactions and message queues are started from the business layer) and add the code to call our data component.
Public Function SaveUserReport(ByVal ds As SystemFrameworks.dsUserReport) _
As Object ImplementsIUserReportAsync.SaveUserReport
        Dim objUserReport As DataAccess.UserReport
        Try
            objUserReport = New DataAccess.UserReport
            objUserReport.SaveUserReport(ds)

        Finally
            objUserReport.Dispose()
            objUserReport = Nothing
        End Try
    End Function
The final step is to tell Enterprise Services that the interface IUserReportAsync is to be used as a queued access point to our object:
InterfaceQueuing(Interface:="ISaveUserReport")>
The complete code for the business class will now appear as shown in Listing 9-5.
Imports System.EnterpriseServices
Imports SystemFrameworks
<ObjectPooling(Enabled:=True, MinPoolSize:=1, _
MaxPoolSize:=8, CreationTimeOut:=25000), _
InterfaceQueuing(Interface:="ISaveUserReport")> _
    Public Class UserReport
    Inherits ServicedComponent
    Implements IUserReportAsync

    Public Function GetUserReport _
(ByVal UserID As String, ByVal WeekNo As Integer) _
As SystemFrameworks.dsUserReport
        'Our code goes here...
        Dim objUserReport As DataAccess.UserReport
        Try
            objUserReport = New DataAccess.UserReport
            Return objUserReport.GetUserReport(UserID, WeekNo)

        Finally
            objUserReport.Dispose()
            objUserReport = Nothing
        End Try
    End Function
    Private Function isUserReportSubmitted(ByVal dts As DataSet) As Boolean
        'Returns true if the time report in the dataset is submitted.
    End Function

    Public Function SaveUserReport(ByVal ds As SystemFrameworks.dsUserReport) _
As Object Implements IUserReportAsync.SaveUserReport
        Dim objUserReport As DataAccess.UserReport
        Try
            objUserReport = New DataAccess.UserReport
            objUserReport.SaveUserReport(ds)
        Finally
            objUserReport.Dispose()
            objUserReport = Nothing
        End Try
    End Function
End Class
To use the SaveUserReport from our facade class, we simply declare an object as IUserReportAsync and call the SaveUserReport method on the interface as shown in Listing 9-6.
Public Function SaveUserReportAsync(ByVal ds As dsUserReport)
    Dim objUserReport As BusinessRules. IUserReportAsync         Try
    objUserReport= new BusinessRules.UserReport
objUserReport.SaveUserReport(ds)
    Finally
        objUserReport = Nothing
    End Try
End Function
At this point we have implemented functions to retrieve a time report and return it to the database. This is fine if we are going to access our application layers from the same machine, or if we can run Remoting between the different objects. However, sometimes we will not want to install all layers on the same machine. In these cases, we can expose the facade layers, or selected parts of the facade methods, as Web methods.
We can expose our facade methods in two different ways. We either add the Webmethod attribute to the methods we would like to expose as Web services or implement a Web service method in a dedicated Web service project that in turn calls our facade method.
The latter technique gives us more flexibility, since we can add specific validations that should only occur when the call arrives via the Web service. The drawback with a separate Web service project is that there will be more code to maintain. In this example, we will use the Web service project.
To expose our two facade methods as Web methods, we first create a class in our Web service project and name it UserReportServices.
The class should have two public methods, similar to the ones found in the facade class. Each method is given the Webmethod attribute and a short description of what the method does. The code will appear as shown in Listing 9-7.
Imports System.Web.Services
Imports SystemFrameworks

<System.Web.Services.WebService(Namespace:= _
"http://msdotnet.nu/WebService/UserReport/UserReportService")> _
Public Class UserReportService
    Inherits System.Web.Services.WebService
#Region "Web Services Designer Generated Code "
    ... code removed to conserve space..
#End Region
<WebMethod(Description:="Saves a UserReport", EnableSession:=False)> _
    Public Function SaveUserReport(ByVal ds As dsUserReport)
        Dim objUserReport As BusinessRules.IUserReportAsync = _
        New BusinessRules.UserReport
        Try
            objUserReport.SaveUserReport(ds)

        Finally
            objUserReport = Nothing
        End Try
    End Function
<WebMethod(Description:="Gets a UserReport", EnableSession:=False)> _
    Public Function GetUserReport(ByVal WeekNo As Integer) As dsUserReport
        Dim objUserReport As New BusinessRules.UserReport
        Try
            Return objUserReport.GetUserReport( _
            HttpContext.Current.User.Identity.Name, WeekNo)
            End If

         Finally
            objUserReport = Nothing
        End Try
    End Function
End Class
The interesting part is SaveUserReport. Remember that we implemented it as a Queued Component. Here we declare objUserReport as a type of the interface IUserReportAsync. We then create an object that uses the mentioned interface.
Now we have a complete flow from the Web service, or the facade, down to the data layer.
The last thing to do is to create our fancy user interface. We open the WebUI project and add a Web form by right-clicking the project and selecting Add | Add Web Form.
We then rename the Web form to UserReport. This form will contain our time report.
Data binding support is one of many new features exist in .NET. Actually, this functionality exists in Visual Basic 6, but in .NET it has been developed further, and is much better than its predecessor. Data binding involves tying a visual control to data, and the control itself takes care of rendering the data. We are going to use this feature to bind a data grid to our dataset dsUserReport. This way we reduce the code in the UI, thereby decreasing development time.
In the toolbar there is a tab called Web Form that contains controls designed for use in a Web form. From these controls, we drag a data grid onto our form and change its name to datagridUserReport. We also drag a button from the toolbar onto the form and rename the button btnGetUserReport.
Okay, now that we have a data grid on the Web form, the next step is to fill it with a particular time report. (Sure, we need some more stuff around the data grid, but we will hold off on the decorations until we have seen that this works.)
The Web form consists of two different pages: the Web form we recently added the data grid to, and the code-behind page. The code-behind page is just a normal managed class, and can be written in any of the languages that are supported under .NET. The code-behind page is where we will put the code to call our Web services method GetUserReport to retrieve the data that we should bind to the data grid.
There are many ways to open the code-behind window. One is to click the code-behind icon in the Solution Explorer toolbar when the Web form has focus. Another way is to press F7 when the Web form has focus.
One function already exists in the code-behind page: Page_Load. Since the code-behind class will contain all code for our Web form, the code-behind class can receive events from the Web form. One of them is the Page_Load event that is fired when the Web form is loaded. We will add some code to this event to fill our data grid with data.
The first step is to get in touch with our Web service (remember that all application logic layers, including the exposed Web services, are installed on a different server, as you saw in Figure 9-60).
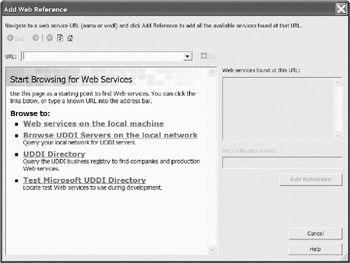
We right-click the Reference folder in the WebUI project and select Add Web Reference.
Now we should browse for our Web service named UserReport. We click the link Web Services on the local machine (because during development we have all projects on the same machine) as shown in Figure 9-77.
All local Web services will show up in the lower window after a while. We locate the UserReport Web service and click it. (If you cannot find your service when you try this yourself, you probably have forgotten to compile the solution.)
We select our UserReport service and click the Add Reference button.
The next step is to add some code in the code-behind class to handle the click event on the button. When the user clicks the submit button, a time report for week 42 should be retrieved. Double-clicking the button results in the event handler in the code behind class opening. Listing 9-8 shows the complete code to retrieve our time report.
Private Sub Page_Load(ByVal sender As System.Object, _
                        ByVal e As System.EventArgs) Handles MyBase.Load
        'Put user code to initialize the page here
        If Not MyBase.IsPostBack Then
            'This is the first time the page is loaded. fill the datagrid.
            'dim obj as new
        End If
    End Sub
Private Sub btnGetUserReport_Click(ByVal sender As System.Object, _
                                      ByVal e As System.EventArgs) Handles _
                                      btnGetUserReport.Click
        Dim dsMyUserReport As localhost.dsUserReport
        Dim objWS As New localhost.UserReportWS
        dsMyUserReport = objWS.GetUserReport(42)
        'Do databinding.
        With DataGridUserReport
            .DataSource = dsMyUserReport
            .DataMember = "UserReportHeader"
            .DataKeyField = "Id"
            .DataBind()
        End With
    End Sub
If newly added methods in the Web services do not show up in IntelliSense in the Web project, we need to right-click the Web reference and select Update Web Reference.
| Tip |
By changing the URL behavior property on the Web reference for the Web service to dynamic, the reference to the Web service is stored in the web.config file and can later be changed without recompiling the code. |
That's it! Or is it? Besides fixing the design of the page, we have one more important aspect to cover before we can say that we have a complete flow from the user interface down to the data source—security.
The security techniques we need to implement and authentication and authorization are important for the success of our enterprise application. Our application needs to be able to authenticate users to give them the right level of permissions and also access to the right projects.
Authentication and authorization can be done in several ways. In .NET there exists at least three different ways we can authenticate the user. Depending on the server and the clients involved, some of the authentication methods are more suitable than others. We need to take into account some or all of the following areas to be able to choose the best authentication type for our enterprise application:
The server and client operating systems: If we are using only Microsoft Windows, we can use Windows authentication to make the authentication of our clients smooth.
The client browser type: If the application is Web based, the client Web browser can impact the chosen authentication method. Some browsers don't support SSL, whereby a form authentication approach with SSL is impossible. Some browsers do not support basic authentication, so that may also be unavailable to us.
The number of users, and the location and type of username and password database: The number of authentications that should be done and the type of storage for the data we should authenticate against may make some authentication methods more suitable than others. Using SSL to protect the traffic can sometimes be unwise, since SSL takes up a lot of resources on the server.
When using form-based authentication together with SSL in a Web application that has users, we suggest putting all SSL traffic to the login page on a separate Web server, and collecting all unencrypted traffic (HTTP) on the other Web servers. By separating the different transport protocols, you can achieve better performance. In this example application, we will not put the SSL traffic on a separate machine, because the number of concurrent users is not so big.
Deployment considerations, such as whether your application is Internet or intranet based and whether it is located behind a firewall, also come into play. If the application is Internet based, the use of Windows authentication is bad. Instead, we generally will use form authentication or some other authentication method for Internet-based application, such as Microsoft Passport.
If we want the application we have developed to run on our local intranet or on a LAN, we can use Windows authentication for maximum security and to ease the login behavior for the clients. When using Windows authentication, we can do a pass-through authentication that will result in the user being automatically authenticated when he or she browses a protected page.
The application type is a parameter we need to take into account. For example, is it an interactive Web site or a noninteractive Web service?
Performance and scalability factors in balance with sensitivity of the data we are protecting are also of importance for choosing the right security solution for our application.
Application authorization requirements must also be considered. For example, we may want to restrict our application to certain groups of registered users and other areas to administrators.
Our application will be used on an intranet. There will be known users in an environment that is separated from Internet. We are going to use form-based authentication and verify the user credentials with an Active Directory. The access to the Active Directory is implemented as a data service and located in our data layer. Roughly, the flow will be as follows:
The user tries to access a restricted page—our UserReport.aspx page. ASP.NET recognizes that the user has not been authenticated and redirects the user to our login.aspx page. This page employs HTTPS and SSL to secure the communication between the user and the server.
The user enters the username and the password and submits the page to the server. The server-side code (the code in the code-behind page) creates a facade object and sends the credentials down through the layers to our data service component.
The data service component in turn asks the Active Directory for the requested user, and returns an answer if the user has entered the right password or not.
If the user has entered the right password, a form authentication ticket is created and stored in the HTTP context.
Each time the user comes back during this session, the user will be authenticated by ASP.NET (until the authentication times out or the user disconnects from the session).
To add this to our Web application, we need to do the following:
First we need to tell our application what kind of authentication method we want to use. This is done by opening the web.config file and browsing down to the authentication element. The element has an attribute named mode, and this mode should be set to Forms. We also need to add a login URL that ASP.NET will use to redirect the user to if the user is not authenticated. This is done by adding a new element inside the authentication and naming it forms. The forms element should have three attributes. The first one is the login URL that has a value login.aspx (our login page). The second attribute is the name of the cookie that will be used during the session. The third attribute is the timeout in minutes for the authentication. When this time has elapsed, the user is redirected to the login page again.
After this, we need to restrict the access to our time report page. This is done by opening the web.config file in the Web application and browsing down to the section authorization mode.
This section contains one element called deny and one called allow—which are not too tricky to figure out. The first one tells ASP.NET which users should be denied access the application. In our case, all unauthenticated users should be denied. This is acquired by setting the users attribute to "?".
| Tip |
Access to parts of the site can also be restricted. This is done by adding a web.config file in the folder that should be restricted and setting the elements and attributes as previously described. The root web.config would be configured to allow unauthenticated access, whereas the restricted area (which will be a folder in the Web application) will have a web.config file that does not allow unauthenticated access. |
The allow element tells ASP.NET which users are allowed. In our case, all authenticated users will be allowed. This is done by adding a "*" to the users attribute of the allow element.
The web.config file part that we change is shown in Listing 9-9.
When we have saved the web.config file, we are ready for the next step. We will create a data service component (this time we will work from the data layer out to the facade class when adding functions). The data service component will have code to access Active Directory via Lightweight Directory Access Protocol (LDAP).
We start by creating a new VB class in our data project and naming the class LdapAuthentication. To be able to access Active Directory via LDAP, we need to add a reference to System.DirectoryServices.dll. Then we import the System.directoryServices into our class.
The class should have one public function named IsAuthenticated. It will have three parameters—the domain, the username, and the password. The function returns true if the user credentials are found; otherwise the return value will be false. Listing 9-10 shows the complete code for the function.
Public Function IsAuthenticated(ByVal Domain As String, _
                                       ByVal UserName As String, _
                                       ByVal password As String) As Boolean
    Dim domainAndUserName As String = Domain & "\" & UserName
    Dim objEntry As DirectoryEntry
    Dim objSearcher As DirectorySearcher
    Dim obj As Object
    Dim objSearchResult As SearchResult
    Try
        If activeDirectoryPath.Length = 0 Then
            Throw New Exception("Not a valid Active Directory Path. " & _
            "Add a path to the constructor of this class in Component Services.")
        End If
        objEntry = New DirectoryEntry(activeDirectoryPath, UserName, password)
        'Bind to the AdsObject to force authentication of the user.
        obj = objEntry.NativeObject
        'No exception so far - go ahead and create a directory searcher object to
         'search for the user.
        objSearcher = New DirectorySearcher(objEntry)
        With objSearcher
            .Filter = "(SAMAccountName=" & UserName & ")"
            .PropertiesToLoad.Add("cn")
            objSearchResult = .FindOne
            If objSearchResult Is Nothing Then
                Return False
            Else
                Return True
            End If
        End With
        ObjSearcher.Dispose()     ObjSearcher=nothing
        ObjEntry.Dispose()
        ObjEntry=nothing
        ObjSearchResult.Dispose()
        ObjSearchResult=nothing
    Finally
    End Try
End Function
The function IsAuthenticated retrieves a directory entry to the specified domain.
Next we try to bind to the Active Directory object to force an authentication of the supplied user information. If the binding is successful, we create a DirectorySearcher object and search for the username. We return true if the user is found in the directory.
We will also add another function to the class that will retrieve the different groups the user belongs to. This can be used later to verify that the user belongs to a specific group that is allowed to access the requested resource.
The function should be named GetUserGroups and has the same number of parameters as the authentication function: domain, username, and password. The function will return a collection of all the groups the requested user belongs to.
First GetUserGroups will use the LdapAuthentication function to authenticate the user. Then we retrieve the groups the user belongs to (see Listing 9-11).
Public Function GetUserGroups(ByVal domain As String, _
                                     ByVal username As String, _
                                     ByVal password As String) As String
        'returns the groups the user belongs to.
        'all functions are working separately -eg. a
                'call to a function should not depend on that other calls
        'Have already been made to other functions to initalize private
variables.
        Dim objSearcher As DirectorySearcher
        Dim objSearchResult As SearchResult
        Dim intCounter, propertyCount, equalIndex, commaIndex As Integer
        Dim group As String
        Dim groupNames As System.Text.StringBuilder
        Dim enumerator As IEnumerator
        Const DELIMITER As String = "|"
        Try
            If IsAuthenticated(domain, username, password) Then
                'valid user credentials. retrieve the groups for the user.
                objSearcher = New DirectorySearcher(path)
                With objSearcher
                    .Filter = "(cn=" & filterAttribute & ")"
                    .PropertiesToLoad.Add("memberOf")
                    objSearchResult = .FindOne()
                End With
                enumerator = objSearchResult.Properties("memberOf").GetEnumerator
                    While enumerator.MoveNext
                        group = enumerator.Current
                        groupNames.Append(group.Substring((equalIndex + 1), _
                                          (commaIndex - equalIndex) - 1))
                        groupNames.Append(DELIMITER)
                    End While
                    Return groupNames.ToString

        End If
    Catch exp As Exception
        Throw New Exception("Error in retrieving groups for user:" & _
        username & "error message:" & exp.Message)
    End Try
End Function
The last thing we need to do to pass the calls down to the data layer is to add functions in the business layer, the facade layer, and the Web service project. The functions will have the same parameters as the functions we have created in the data layer earlier.
To the Web service project we add a new Web service named authenticateuser.asmx. This Web service will contain a function called GetUserGroups. The function should contain the code in Listing 9-12.
<WebMethod(Description:="Get a users's groups", EnableSession:=False)> _
    Public Function GetUserGroups(ByVal domain As String, _
                                     ByVal userName As String, _
                                     ByVal password As String) As String
        Dim objUser As BusinessRules.User = New BusinessRules.User
        Try
            If Not HttpContext.Current.User.Identity.IsAuthenticated Then
                Throw New Exception("User is not authenticated.")
            Else
                Return objUser.GetUserGroups(domain, userName, password)
            End If

        Finally
            objUser = Nothing
        End Try
    End Function
We recompile the solution and refresh the Web service reference in our WebUI project to ensure that the new function is visible to us.
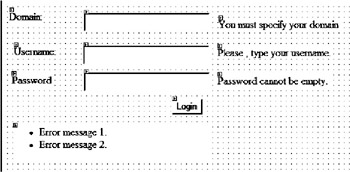
We need to add a new Web page to the WebUI project. To do so, we right-click the project, select Add Web Form, name the page login.aspx, and click OK. We then add the controls listed in Table 9-4.
|
Control Type |
ID |
Text |
|---|---|---|
|
Label |
LabelDomain |
Domain Name: |
|
Label |
LabelUserName |
User Name: |
|
Label |
LabelPassword |
Password: |
|
Text Box |
txtDomain | |
|
Text Box |
txtUserName | |
|
Text Box |
txtPassword | |
|
Button |
btnLogin |
Login |
|
RequiredFieldValidator |
reqDomain |
ErrorMessage: You must specify your domain. |
|
RequiredFieldValidator |
reqUserName |
ErrorMessage: Please type your username. |
|
RequiredFieldValidator |
reqPassword |
ErrorMessage: Password cannot be empty. |
|
ValidationSummary |
valSummary |
We lay out the controls as shown in Figure 9-78.
To open the login button handler, we double-click the login button. At the top of the code-behind class, we import the System.Web.Security assembly to access the FormsAuthentication methods easily.
In the event for the button, we need to add code to create a Web service request for our function GetUsersGroups. We could also have called the IsAuthenticated, but we know that GetUsersGroups also authenticates the call. Since we also need to retrieve the groups the user belongs to, we decide to call the GetUsersGroups to minimize the number of calls we need to make.
The code for the login button appears in Listing 9-13.
Private Sub btnLogin_Click(ByVal sender As System.Object, -
                          ByVal e As System.EventArgs) Handles btnLogin.Click
        Dim objUser As AuthenticateUserWebService.AuthenticateUser = _
         New AuthenticateUserWebService.AuthenticateUser
        Dim groups As String

        Try
            'Try to retrieve the user groups.
            groups = objUser.GetUserGroups _
            (txtDomain.Text, txtUserName.Text, txtPassword.Text)
            Dim authenticationTicket As FormsAuthenticationTicket = _
    New FormsAuthenticationTicket(1, txtUserName.Text, _
    DateTime.Now, DateTime.Now.AddMinutes(30), False, groups)
            'Encrypt ticket
            Dim encryptedTicket As String = _
FormsAuthentication.Encrypt(authenticationTicket)
            Dim cookie As HttpCookie = _
New HttpCookie(FormsAuthentication.FormsCookieName, encryptedTicket)
            Response.Cookies.Add(cookie)
            Response.Redirect(FormsAuthentication.GetRedirectUrl _
(txtUserName.Text, False))

        Catch ex As Exception
            Dim lblMessage As New Label
            lblMessage.Text = "Invalid domain,username or password."
            valSummary.Controls.Add(lblMessage)
        Finally
            objUser.Dispose()
            objUser = Nothing
        End Try
    End Sub
Okay, now we have code in the login button that authenticates the user and sends him or her to the requested page. To be able to use the roles in a role-based scenario, we need to retrieve the cookie from the client and create a GenericPrincipal object and a FormsIdentity object.
The GenericPrincipal object contains the different roles and groups the user belongs to. (These are the groups we retrieved with the getUsersGroups recently.)
To take care of this, we need to add some code to the global.asax file.
This file contains several events that will be useful for us, particularly AuthenticateRequest. This is called when the incoming request should be authenticated. In this method, we will look for the cookie we created recently and create an identity and a principal object that will follow this HTTP context. The complete code for the method is shown in Listing 9-14.
Sub Application_AuthenticateRequest(ByVal sender As Object, ByVal e As EventArgs)
        ' Fires upon attempting to authenticate the user
        Dim cookieName As String = FormsAuthentication.FormsCookieName
        Dim DELIMITER As Char = "|"
        If cookieName.Empty Then
            'There is no authentication cookie, proceed to the login.
        Else
            'There is an authentication cookie.
            Dim authTicket As FormsAuthenticationTicket
            Try
                authTicket = FormsAuthentication.Decrypt(cookieName)
                If Not authTicket Is Nothing Then
                    Dim roles() As String =
authTicket.UserData.Split(DELIMITER)
                    Dim id As FormsIdentity = New FormsIdentity(authTicket)
                    Dim principal As GenericPrincipal = _
                    New GenericPrincipal(id,roles)
                    Context.User = principal
                End If
            Catch ex As Exception
                'Log the error
            End Try
        End If
    End Sub
Now our users will be redirected to the login page the first time they enter our application. When the user has entered a valid username and password, we create a cookie that we put on the user's computer. The next time the user enters the application, the cookie is used to create a principal object that is put in the current context.
Later on in our application this information can be used to verify that the user belongs to certain groups. For instance, in the project page, there might be an add button. This button should only be visible to users that belong to the admin group. In the load event of the projects page, we will include the following code snippet that retrieves the roles the current user belongs to and decides if the button should be visible or not:
btnAdd.visible= context.User.IsInRole("Admin")