Let's not mess around with wimpy little dialogs. We'll build a monster dialog that contains almost every kind of control. The job will be easy because Visual C++'s dialog editor is there to help us. The finished product is shown in Figure 6-1.
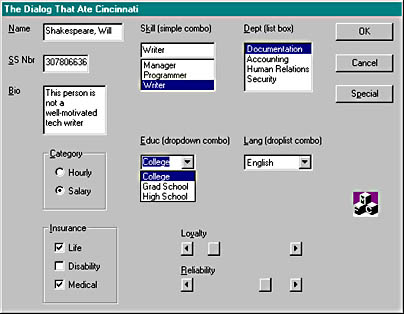
Figure 6-1. The finished dialog in action.
As you can see, the dialog supports a human resources application. These kinds of business programs are fairly boring, so the challenge is to produce something that could not have been done with 80-column punched cards. The program is brightened a little by the use of scroll bar controls for "Loyalty" and "Reliability." Here is a classic example of direct action and visual representation of data! ActiveX controls could add more interest, but you'll have to wait until Chapter 8 for details on ActiveX.
Building the Dialog Resource
Here are the steps for building the dialog resource:

As usual, AppWizard sets the new project as the current project.
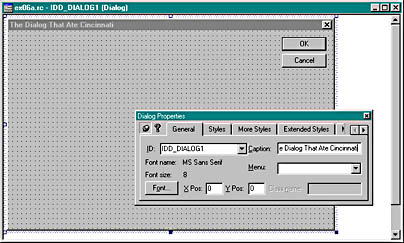
The dialog editor assigns the resource ID IDD_DIALOG1 to the new dialog. Notice that the dialog editor inserts OK and Cancel buttons for the new dialog.
When you right-click on the new dialog and choose Properties from the pop-up menu, the Dialog Properties dialog appears. Type in the caption for the new dialog as shown in the screen below. The state of the pushpin button in the upper-left corner determines whether the Dialog Properties dialog stays on top of other windows. (When the pushpin is "pushed," the dialog stays on top of other windows.) Click the Toggle Grid button (on the Dialog toolbar) to reveal the grid and to help align controls.

The dialog editor displays the position and size of each control in the status bar. The position units are special "dialog units," or DLUs, not device units. A horizontal DLU is the average width of the dialog font divided by 4. A vertical DLU is the average height of the font divided by 8. The dialog font is normally 8-point MS Sans Serif.
Here's a brief description of the dialog's controls:

Be sure that both buttons have the Auto property (the default) on the Styles tab set and that only the Hourly button has the Group property set. When these properties are set correctly, Windows ensures that only one of the two buttons can be selected at a time. The Category group box has no effect on the buttons' operation.
Later, when you set the dialog's tab order, you'll ensure that the Insurance group box follows the last radio button of the Category group. Set the Insurance control's Group property now in order to "terminate" the previous group. If you fail to do this, it isn't a serious problem, but you'll get several warning messages when you run the program through the debugger.
This is a combo box of type Simple. The user can type anything in the top edit control, use the mouse to select an item from the attached list box, or use the Up or Down direction key to select an item from the attached list box.
Aligning ControlsTo align two or more controls, select the controls by clicking on the first control and then Shift-clicking on the other controls you want to align. Next choose one of the alignment commands (Left, Horiz.Center, Right, Top, Vert.Center, or Bottom) from the Align submenu on the dialog editor's Layout menu.
To set the size for the drop-down portion of a combo box, click on the box's arrow and drag down from the center of the bottom of the rectangle.
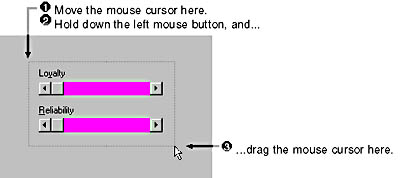
Selecting a Group of Controls
To quickly select a group of controls, position the mouse cursor above and to the left of the group. Hold down the left mouse button and drag to a point below and to the right of the group, as shown here.

If you mess up the tab sequence partway through, you can recover with a Ctrl-left mouse click on the last correctly sequenced control. Subsequent mouse clicks will start with the next sequence number.
A static text control (such as Name or Skill) has an ampersand (&) embedded in the text for its caption. At runtime, the ampersand will appear as an underscore under the character that follows. (See Figure 6-1.) This enables the user to jump to selected controls by holding down the Alt key and pressing the key corresponding to the underlined character. (The related control must immediately follow the static text in the tabbing order.) Thus, Alt-N jumps to the Name edit control and Alt-K jumps to the Skill combo box. Needless to say, designated jump characters should be unique within the dialog. The Skill control uses Alt-K because the SS Nbr control uses Alt-S.
You have now built a dialog resource, but you can't use it without a corresponding dialog class. (The section titled "Understanding the EX06A Application" explains the relationship between the dialog window and the underlying classes.) ClassWizard works in conjunction with the dialog editor to create that class as follows:
Accept the default selection of Create A New Class, and click OK. Fill in the top field of the New Class dialog, as shown here.
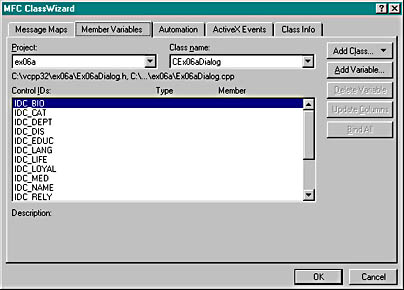
You need to associate data members with each of the dialog's controls. To do this, click on a control ID and then click the Add Variable button. The Add Member Variable dialog appears, as shown in the following illustration.
Type in the member variable name, and choose the variable type according to the following table. Be sure to type in the member variable name exactly as shown; the case of each letter is important. When you're done, click OK to return to the MFC ClassWizard dialog. Repeat this process for each of the listed controls.
| Control ID | Data Member | Type |
| IDC_BIO | m_strBio | CString |
| IDC_CAT | m_nCat | int |
| IDC_DEPT | m_strDept | CString |
| IDC_DIS | m_bInsDis | BOOL |
| IDC_EDUC | m_strEduc | CString |
| IDC_LANG | m_nLang | CString |
| IDC_LIFE | m_bInsLife | BOOL |
| IDC_LOYAL | m_nLoyal | int |
| IDC_MED | m_bInsMed | BOOL |
| IDC_NAME | m_strName | CString |
| IDC_RELY | m_nRely | int |
| IDC_SKILL | m_strSkill | CString |
| IDC_SSN | m_nSsn | int |
As you select controls in the MFC ClassWizard dialog, various edit boxes appear at the bottom of the dialog. If you select a CString variable, you can set its maximum number of characters; if you select a numeric variable, you can set its high and low limits. Set the minimum value for IDC_SSN to 0 and the maximum value to 999999999.
Most relationships between control types and variable types are obvious. The way in which radio buttons correspond to variables is not so intuitive, however. The CDialog class associates an integer variable with each radio button group, with the first button corresponding to value 0, the second to 1, and so forth.
Click on the Message Maps tab. The ClassWizard dialog should contain an entry for IDC_SPECIAL in the Object IDs list box. Click on this entry, and double-click on the BN_CLICKED message that appears in the Messages list box. ClassWizard invents a member function name, OnSpecial, and opens the Add Member Function dialog, as shown here.
You could type in your own function name here, but this time accept the default and click OK. Click the Edit Code button in the MFC ClassWizard dialog. This opens the file ex06aDialog.cpp and moves to the OnSpecial function. Insert a TRACE statement in the OnSpecial function by typing in the boldface code, shown below, which replaces the existing code:
void CEx06aDialog::OnSpecial()
{
    TRACE("CEx06aDialog::OnSpecial\n");
}
BOOL CEx06aDialog::OnInitDialog()
{
    // Be careful to call CDialog::OnInitDialog
    //  only once in this function
    CListBox* pLB = (CListBox*) GetDlgItem(IDC_DEPT);
    pLB->InsertString(-1, "Documentation");
    pLB->InsertString(-1, "Accounting");
    pLB->InsertString(-1, "Human Relations");
    pLB->InsertString(-1, "Security");

    // Call after initialization
    return CDialog::OnInitDialog();
}
You could also use the same initialization technique for the combo boxes, in place of the initialization in the resource.
Now we've got the resource and the code for a dialog, but it's not connected to the view. In most applications, you would probably use a menu choice to activate a dialog, but we haven't studied menus yet. Here we'll use the familiar mouse-click message WM_LBUTTONDOWN to start the dialog. The steps are as follows:
void CEx06aView::OnLButtonDown(UINT nFlags, CPoint point)
{
    CEx06aDialog dlg;
    dlg.m_strName  = "Shakespeare, Will";
    dlg.m_nSsn     = 307806636;
    dlg.m_nCat     = 1;  // 0 = hourly, 1 = salary
    dlg.m_strBio   = "This person is not a well-motivated tech writer";
    dlg.m_bInsLife = TRUE;
    dlg.m_bInsDis  = FALSE;
    dlg.m_bInsMed  = TRUE;
    dlg.m_strDept  = "Documentation";
    dlg.m_strSkill = "Writer";
    dlg.m_nLang    = 0;
    dlg.m_strEduc  = "College";
    dlg.m_nLoyal   = dlg.m_nRely = 50;
    int ret = dlg.DoModal();
    TRACE("DoModal return = %d\n", ret);
    TRACE("name = %s, ssn = %d, cat = %d\n",
          dlg.m_strName, dlg.m_nSsn, dlg.m_nCat);
    TRACE("dept = %s, skill = %s, lang = %d, educ = %s\n",
          dlg.m_strDept, dlg.m_strSkill, dlg.m_nLang, dlg.m_strEduc);
    TRACE("life = %d, dis = %d, med = %d, bio = %s\n",
          dlg.m_bInsLife, dlg.m_bInsDis, dlg.m_bInsMed, dlg.m_strBio);
    TRACE("loyalty = %d, reliability = %d\n",
          dlg.m_nLoyal, dlg.m_nRely);
}
void CEx06aView::OnDraw(CDC* pDC)
{
    pDC->TextOut(0, 0, "Press the left mouse button here.");
}
#include "ex06aDialog.h"
at the top of the CEx06aView class source code file (ex06aView.cpp), after the statement
#include "ex06aView.h"
Understanding the EX06A Application
When your program calls DoModal, control is returned to your program only when the user closes the dialog. If you understand that, you understand modal dialogs. When you start creating modeless dialogs, you'll begin to appreciate the programming simplicity of modal dialogs. A lot happens "out of sight" as a result of that DoModal call, however. Here's a "what calls what" summary:
CDialog::DoModal
CEx06aDialog::OnInitDialog
…additional initialization…
CDialog::OnInitDialog
CWnd::UpdateData(FALSE)
CEx06aDialog::DoDataExchange
user enters data…
user clicks the OK button
CEx06aDialog::OnOK
…additional validation…
CDialog::OnOK
CWnd::UpdateData(TRUE)
CEx06aDialog::DoDataExchange
CDialog::EndDialog(IDOK)
OnInitDialog and DoDataExchange are virtual functions overridden in the CEx06aDialog class. Windows calls OnInitDialog as part of the dialog initialization process, and that results in a call to DoDataExchange, a CWnd virtual function that was overridden by ClassWizard. Here is a listing of that function:
void CEx06aDialog::DoDataExchange(CDataExchange* pDX)
{
    CDialog::DoDataExchange(pDX);
    //{{AFX_DATA_MAP(CEx06aDialog)
    DDX_Text(pDX, IDC_BIO, m_strBio);
    DDX_Radio(pDX, IDC_CAT, m_nCat);
    DDX_LBString(pDX, IDC_DEPT, m_strDept);
    DDX_Check(pDX, IDC_DIS, m_bInsDis);
    DDX_CBString(pDX, IDC_EDUC, m_strEduc);
    DDX_CBIndex(pDX, IDC_LANG, m_nLang);
    DDX_Check(pDX, IDC_LIFE, m_bInsLife);
    DDX_Scroll(pDX, IDC_LOYAL, m_nLoyal);
    DDX_Check(pDX, IDC_MED, m_bInsMed);
    DDX_Text(pDX, IDC_NAME, m_strName);
    DDX_Scroll(pDX, IDC_RELY, m_nRely);
    DDX_CBString(pDX, IDC_SKILL, m_strSkill);
    DDX_Text(pDX, IDC_SSN, m_nSsn);
    DDV_MinMaxInt(pDX, m_nSsn, 0, 999999999);
    //}}AFX_DATA_MAP
}
The DoDataExchange function and the DDX_ (exchange) and DDV_ (validation) functions are "bidirectional." If UpdateData is called with a FALSE parameter, the functions transfer data from the data members to the dialog controls. If the parameter is TRUE, the functions transfer data from the dialog controls to the data members. DDX_Text is overloaded to accommodate a variety of data types.
The EndDialog function is critical to the dialog exit procedure. DoModal returns the parameter passed to EndDialog. IDOK accepts the dialog's data, and IDCANCEL cancels the dialog.
You can write your own "custom" DDX function and wire it into Visual C++. This feature is useful if you're using a unique data type throughout your application. See MFC Technical Note #26 in the online documentation.