18.8 Template Tutorial
In this tutorial, you'll create a template for the Horoscopes section of the National
Exasperater site. Then you'll build a page based on that template and enjoy an easy
sitewide update courtesy of Dreamweaver's templates feature.
NOTE
The tutorial in this chapter requires the example files from this book's Web site,
www.sawmac.com/dwmx2004/
. Click the Tutorials link to go to the tutorials page. Under
"Chapter 18: Templates Tutorial," click
Windows or Macintosh to download the files, depending on the kind of machine you're using.
After your browser downloads and decompresses the files, you should have a DWTemp (short for Dreamweaver
Templates) folder on your computer, containing the Web pages and graphics needed for this tutorial.
If you're having difficulties, the Web site contains detailed instructions for downloading the files you'll be
using with this book.
18.8.1 Creating a Template
This tutorial guides you through the creation of a template, the creation of a page
based on that template, and then an editing and auto-update procedure.
These instructions assume that you've downloaded the necessary tutorial files, as
described above, and defined a site using the DWTemp folder as your local root folder
(for information on defining a site, see Section 1.3.1
).
Open the Site window by pressing the F8 key.
In the Site window, find and double-click the page horoscope.html.
It's usually easier to start with an already-designed Web page and then save it as
a template. For the purposes of getting to bed before midnight tonight, pretend
that you've just designed this beautiful, half-finished Web page.
Choose File Save as Template. Save as Template.
The Save as Template dialog box opens. Name the template Horoscope; click Save. In the Update Links window, click Yes.
Behind the scenes, Dreamweaver creates a new folder桾emplates梚n the site's
root folder and saves the file as Horoscope.dwt inside it. A new template is born.
You can see it in the Templates page of the Assets panel, as well as the new folder
in the Site window.
The template is a model for other pages. But although they'll be based on its design,
they won't be identical. The next step is to identify those areas of the design that
will change from page to page梩he editable regions.
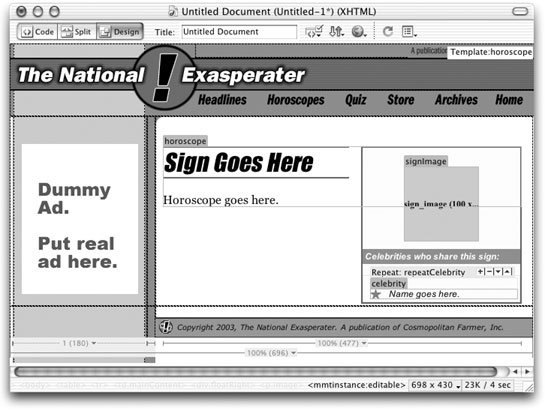
Click the gray square labeled sign_image.
For placement purposes, you've put a dummy graphic on the page. When you add
new horoscopes to the site, you can replace this graphic with a real astrological
sign. To make it possible to replace it with a real image in the resulting Web pages,
you need to mark this graphic as editable, like so:
Choose InsertTemplate ObjectsEditable Region.
The New Editable Region dialog box appears. Here, as in the following steps,
you can also choose the Editable Region option from the Templates menu on
the Common tab of the Insert bar (see Figure 18-2) or press Ctrl+Alt+V (Option- -V). -V).
Type signImage; click OK.
A small tab, labeled signImage, appears on the placeholder graphic. There is one
more thing you'll want to replace every time you create a Web page based on this
template: the horoscope text.
Click before the "S" in the heading Sign Goes Here and drag down and to the
right until you've selected the two lines of text. (Don't select the image with the
moon that appears below the text.)
At this point, the heading and the paragraph marked "Horoscope goes here"
should be selected.
Choose InsertTemplate ObjectsEditable Region; type horoscope; click OK.
So far you've added two editable regions梩he most basic type of template region.
Next, you'll explore some of the templating features Dreamweaver offers.
Select the "Sign of the Month" image.
Of course, only one sign each month can be the Sign of the Month, so you'll want
this graphic to appear only on a single page each month. An image like this is the
perfect opportunity to use an optional region梐n area of the page that you can
hide or show on a page-by-page basis.
Choose InsertTemplate ObjectsOptional Region.
The New Optional Region window appears.
Type SignOfMonth in the name field, turn off the Show by Default checkbox, and click OK.
Since most pages won't display this graphic, you'll speed up your work by hiding
it by default, and making it visible just on the one "Sign of the Month" page.
Next, you'll add a repeating region to the box on the right side of the page to accommodate
multiple names of "Celebrities who share this sign." You'll then make
the text editable, so that you can type the list of individual celebrity names.
In the yellow box at the right side of the page, click anywhere inside the text
"Name goes here."
This text is enclosed inside a <div> tag, which is itself wrapped by another <div>
that has a Cascading Style Sheet class called "celebrity" applied to it (see Section 8.3.1.6 for more detail on the use of the <div> tag). Each time you want to add a celebrity
name, you'll need to duplicate this tag. To do so, turn it into a repeating region:
In the tag selector at the bottom of the window, click the <div.celebrity> tag.
You've just selected the <div> tag and everything inside it. Because the number of
names may vary from page to page, this is a perfect place for a repeating region. Choose InsertTemplate ObjectsRepeating Region. In the window that appears,
type repeatCelebrity. Click OK.
Dreamweaver inserts a new repeating region with the familiar blue tab. The
region's name is "Repeat: repeatCelebrity," indicating that it isn't any ordinary
template region梚t's a repeating region. However, turning a part of the page
into a repeating region doesn't automatically make it editable. Since you'll want
to edit the text and add new names to each page, you'll need to add an editable
region inside this repeating region.
Select the text "Name goes here," and choose InsertTemplate ObjectsEditable
Region. In the Name field, type celebrity, and click OK.
Another blue tab, labeled "celebrity" appears inside the repeating region. On
template-based pages, you'll now be able to change this text, plus add additional
celebrity names easily. There's one last item for this page梩he ad. The current ad
you see is just a placeholder. Because all ads that go in that location are the same
size and require the same formatting, you don't need to make the entire graphic
editable. You'll use Dreamweaver's Editable Tag Attribute feature instead. At the left side of the page, click the graphic labeled Dummy Ad. Choose Modify
TemplatesMake Attribute Editable.
The Editable Tag Attributes window appears. Choose SRC from the Attribute menu. Turn on "Make attribute editable."
The other fields in the window become active (see Figure 18-20).
In the label field, type adSrc. Choose URL from the Type menu, and leave the default value as it is.
The window should look like Figure 18-20. The label helps you identify which
property of which page element you're editing. URL in the Type menu informs
Dreamweaver that this attribute is a path, enabling Dreamweaver's site management
tools to accurately update links and paths to graphics files as you move
template-based pages around your site.
Click OK to close the window.
The graphic suddenly changes into Dreamweaver's broken-image icon. Don't
worry; everything is just fine, as you'll see in the next section. (Note that in the
real world, you'd also want to make the image's Alt property editable as well, so
that you can add different alternate text for each ad on each page.) Choose FileSave.
Dreamweaver pops up an annoying message informing you that the editable region
signImage (the region containing the gray placeholder graphic for each sign's
astrological symbol) is inside a <p> tag, and that anyone who uses this template
won't be able to create new paragraphs. When building a page from this template,
page authors can only change this image; they can't delete the image and, say, type
a 40-page treatise instead (thank goodness!). This irritating error is Dreamweaver's
way of "helping" by pointing out what must be an error on your part. Click OK to close the dialog box. Close this file.
Congratulations! You've created your first template.

18.8.2 Creating a Page Based on a Template
Now it's time to get down to business and build Web pages. Look at the Site menu
and make sure you've selected the site that you defined in step 1 at the beginning of
this tutorial (Section 18.8). Then proceed as follows:
Choose FileNew.
The New Document window opens. Click the Templates tab.
A list of all defined sites appears in the "Templates for" box at left. Make sure the site you defined for this tutorial is selected; also make sure the
"Update page when template changes" checkbox is turned on.
If you don't turn on the "Update page" box, the new page won't link to the original
template file梐nd won't update when you make changes to the template. Select Horoscope from the templates list and click Create.
And lo, a new, untitled Web page document appears, one that looks (almost)
exactly like the template (Figure 18-21).
Choose FileSave. Save the file as gemini.html in the DWTemphoroscopes folder.
To indicate that it's the offspring of your template, the document window has a
yellow tab in the upper-right corner that reads Template: Horoscope. You can see
your editable and repeating regions indicated by blue tabs.
Make sure the document window's toolbar is visible (by choosing ViewToolbars
Document); type Gemini into the Title field.
You've just named your page, saving you from the ignominy of showing up in
search engines as "Untitled." Next stop: Replacing the dummy astrological sign
image with a real one.
Click the gray "sign_image" box to select it. Press the Delete or Backspace key.
It's useful to include placeholders for your text and graphics, like this image placeholder,
in your templates, to give your page shape and make clear what the content
should look like. You'll now replace this placeholder with a Gemini sign image.
Insert the Gemini image.
Choose InsertImage, for example. Navigate to the DWTempimages_global
horoscope folder; double-click the file called gemini.gif. When you return to your
document, you'll discover that Dreamweaver has replaced the placeholder image
with the sign's "twins" astrological symbol.
Now you'll add a proper horoscope. Select the words Sign Goes Here, and type Gemini.
You also want to add Gemini's unfortunate astrological forecast. Select the text "Horoscope goes here" and type the following:
You'll wish you had a twin this month. Then at least there'd be someone else to blame
for your problems and share your woes. Ever thought about moving? Good, 'cause
now's the time: You're being evicted on the 16th.
Oh, well梩here'll be other months for Gemini. However, it just so happens that
Gemini is the "Sign of the Month." (Remember the optional region you created
for this graphic in the previous tutorial?) It isn't currently displayed because you
turned it off. In the next step, you'll magically make it reappear.
Choose ModifyTemplate Properties.
The Template Properties window appears (see Figure 18-22). There are two items
listed: The first is the editable tag attribute for the banner ad, and the second is
the optional region you wish to make visible.
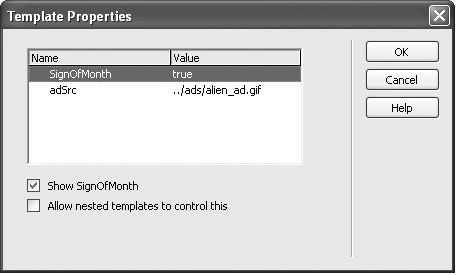
In the properties list, select "signOfMonth" and turn on the "Show signOfMonth"
checkbox.
The optional region is now visible on the page. While you're here, you may as well
also add a real ad to the page.
Select "adSrc" in the Template Properties window. Click the Folder icon at the bottom
of the window. Browse to and select the file alien_ad.gif in the ads folder.
As when selecting any file in Dreamweaver, the helpful "select file" button makes
supplying the proper path to a file a snap.
Click OK to close the window.
The red "Sign of the Month" button appears, as does an ad for the amazing and
historically accurate video, Alien Autopsy 7. You're nearly done building this
new page. The last task is adding a list of celebrities who share this unfortunate
horoscope.
NOTE
This tutorial would like to apologize to those who have a true belief in and understanding of the
zodiac. The astrological predictions included herein are purely fictitious and intended for entertainment
purposes only.
At the bottom of the page, click the blue tab labeled "celebrity."
You've just selected the text in that editable region.
Type Mike Myers.
There are a lot of Gemini celebrities out there. Fortunately, you can add more
entries using the repeating region controls.
Click the + button just to the right of the blue Repeat:RepeatCelebrity tab.
You've added another row to the page, as shown in Figure 18-23.
NOTE
If a page has a lot of elements crowded together梩ables, images, text桪reamweaver sometimes can't
display the small buttons that let you add and remove repeating entries. In this case, you can also use the
Modify menu. Click inside a repeating region and choose ModifyTemplatesRepeating Entries and select
an action from the submenu, such as New Entry After Selection, to add another editable entry.
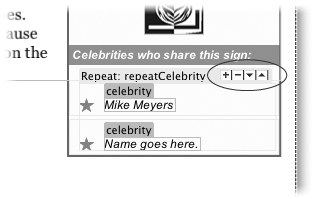
Click the blue tab of the newly added "celebrity" editable region and type Angelina Jolie.
For now, you'll add just one more celebrity to the list, though you can actually
add as many as you want.
Repeat steps 17 and 18 to add one last celebrity name: Son of Bigfoot.
But since Son of Bigfoot is a corporate spokesperson for the National Exasperater,
he'd better get top billing.
Select "Son of Bigfoot" (either select the text, or click the blue tab above the
name), and twice click the up arrow button next to the repeating region.
The up and down arrows (Figure 18-23) let you move a repeated region above or below other repeated regions.
OK. Gemini's received enough bad news for one month. This page is done. Choose FileSave and then close the gemini.html document window.
Congratulations! You've just created your first page based on a template. You
could, of course, continue in this manner, building page after page based on this
template.
18.8.3 Updating a Template
Now the fun begins. Remember, this page maintains a reference to the original
template. In the final phase, you're going to make a few changes to the template.
Choose WindowAssets to open the Assets panel, and click the Template button
to reveal the templates for this site (see Figure 18-4).
In the Assets panel, double-click the Horoscope template to open it.
The original templatethe Horoscope.dwt fileopens. It would be nice to add
a navigation bar to the left side of this page, so that visitors can quickly jump to a
particular horoscope. Fortunately, there's a Library item already created for doing
so. (See Chapter 17 for more on Dreamweaver's Library tool.)
Click the Library icon in the Assets panel (directly below the Template icon).
There's one Library item listed: Horoscope Nav. Drag the Library item from the Assets panel and drop it into the empty space just
above the broken-image icon for the ad on the left edge of the template.
Alternatively, you can click inside this area in the document window, select the
Library item in the Assets panel and then click the Insert button at the bottom of
the Assets panel. Either way, a fresh new navigation system appears on the page. It would also be nice if the "Sign of the Month" graphic were a little more prominent;
inside the box on the right side of the page, for example.
Click the blue tab labeled "If Sign of Month."
You've just selected the optional region you created earlier. Now you need to move
it to the box on the right side of the page. Remove the region from the page by choosing EditCut.
Don't worry梱ou'll add it back next. What you really want to do is place it at
the top of the box, before the astrological symbol for the particular sign. The tag
selector will make your task easier. Click just below the top of the yellow box and to the left of the "sign image"
region.
The cursor is now just to the left of the sign image, but not at the top of the box.
At this point, you need to know a little bit about the HTML code used here; the
placeholder graphic is actually inside of a paragraph tag. To put the "Sign of the
Month" optional region above it, you need to place the cursor before this paragraph.
Unfortunately, you can't do it by clicking in the document window, but you can
use the tag selector to help you. Click the <p> tag in the tag selector at the bottom of the document window and
press your keyboard's left arrow key.
Now you're probably thinking, "But everything looks the same!" After all, the cursor
still appears just to the left of the image.

However, even though Dreamweaver doesn't show it, you've just moved the cursor
to the outside of the <p> tag. You've just learned one of the most valuable tips for
using Dreamweaver to edit HTML code. If you understand your code, you can
navigate around it easily using the tag selector and your keyboard's arrow keys.
Choose EditPaste.
Dreamweaver drops the optional region into its new location. Choose FileSave.
Once again that annoying message appears (see step 21 in Section 18.8.2); just click OK. The Update Template Pages dialog box appears, listing all of the pages in the
site based on this template (in this case, just the lone gemini.html file).
Click Update.
Dreamweaver opens the Update Pages dialog box and updates the appropriate
Web pages, adding the new sidebar navigation and emoticons to each one. In
this case, you based only one page on the template, so Dreamweaver updates
only one page梐s indicated by the list of changes Dreamweaver shows when it's
finished.
Click Close to close the Update Pages dialog box. Finally, open the file gemini.html, and press F12 to preview it in a Web browser.
Notice that the horoscope navigation bar now appears in the gemini.html document
and the "Sign of the Month" graphic has moved. (Figure 18-24). This series of events happened because you changed the template to which the page was
genetically linked. Ah, the power!
|