|
|
< Day Day Up > |
|
22.1 Retrieving InformationSince databases can contain lots of information, you need a way to find just the data you need. Even though your company keeps information about its products, customers, suppliers, and so on in one database, you may only be interested in, say, an alphabetical list of all your customers. After securing that list, you might want to look at a particular customer's contact information, or perhaps the list of products that person bought. 22.1.1 Understanding RecordsetsTo retrieve specific information from a database, you start by creating what's called a recordset. A recordset梐lso called a database query梚s a command issued to a database asking for particular information: "Hey Database, show me all the customers listed in the Customers table." It's the heart of many database operations you'll perform in Dreamweaver (and a piece of jargon you can't escape in the dynamic-Web-page business). Recordsets let you retrieve specified columns in a database. They can also sort records alphabetically or in numerical order, as when viewing a list of products from least to most expensive. In addition, a recordset can zero in on a specific record based on information submitted by a visitor to the site, or based on information provided in a URL. In essence, recordsets let you winnow down massive amounts of database information in a fraction of a second梐 powerful benefit, indeed. NOTE
ASP.NET note桪reamweaver uses the term DataSet instead of recordset to refer to database queries in ASP.NET. 22.1.2 Creating RecordsetsQuerying a database can be quite simple or extremely complex. Dreamweaver provides tools to get the novice database developer up and running quickly, while also supplying what's necessary to create more advanced recordsets. Whatever your level of expertise, you start by opening the Recordset dialog box using one of these methods (each of which assumes you've set up a server model as described in Chapter 21):
The Application tab of the Insert bar (shown here split in half to fit the page) provides one-click access to many powerful application objects, which automate common dynamic Web page building tasks. (See the next two chapters for details on the rightmost four buttons.)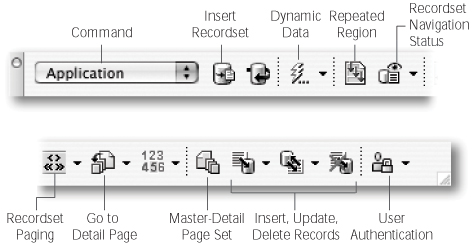
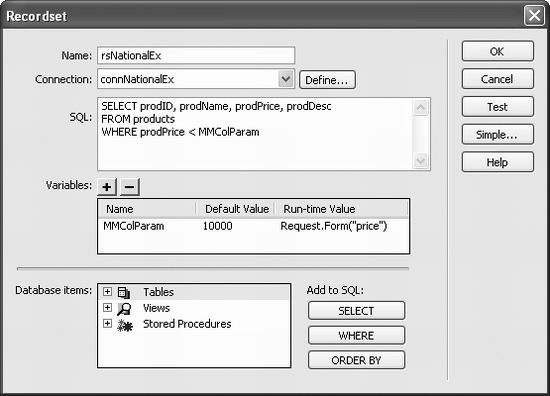
Whichever technique you choose, the Recordset dialog box opens (Figure 22-2). This box lets you create a database query or recordset, and provides both simple and advanced modes of operation. To create a simple query, make sure you're in the Simple mode. (If a button labeled Simple appears at the right edge of the dialog box, click it to make it say Advanced. Now you're in Simple mode.)
The Recordset window lets you retrieve data from a database. The main window (pictured here) lets beginners search and sort databases for specific information. Advanced options let even seasoned database programmers take advantage of Dreamweaver's dynamic page-building abilities.
NOTE
To retrieve data from more than one table at a time, you need to create an advanced recordset (see Section 22.1.6).
To view the results of the recordset, click Test to open the Test SQL Statement window, which contains all records that match that query. If there are more than 25 matches, you can see the next group of results by clicking Next 25 at the bottom of the window. When you're done looking at the test results, click OK to return to the Recordset window. If the test results looked right, click OK to close the Recordset window and add the code into the currently opened page. NOTE
Unlike a database connection, which is listed in the Databases panel and is available to every page on the site, a recordset is specific to a particular page. (See Section 22.1.7 to learn how to reuse recordsets on other pages.) 22.1.3 Filtering InformationAlthough you may have selected a limited number of columns when creating a basic recordset, the final results of the recordset still include all of the records within the table. That's fine when you want a list of all items in a database, like when you're creating an index of all your company's products. But it's not so useful when you want a particular subset of those records, like a list of just the red toupees your company sells, or when you want details on a single record梩he "Flaming Inferno 78B toupee," for example. To search a database table for specific records, use the Filter option in the Recordset window (see Figure 22-3). A filter lets you compare the information in one database column with a particular value and then select records that match. Suppose, for example, that your products database table contains a column named Price. To find all products that cost less than $35, you could create a filter that looked for all records where the price column held a value of less than 35. Filters let you limit the number of records retrieved by a recordset using information supplied in a URL or in a form submitted by a visitor to the site, among other ways. Using a filter, a recordset can identify and retrieve data for a single record in the database.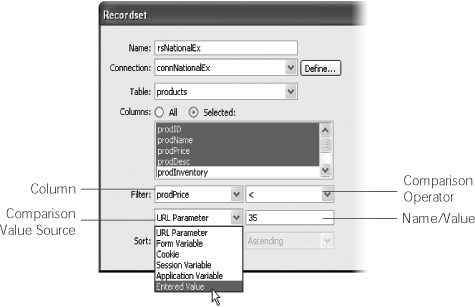
Using the Filter feature in the Recordset dialog box takes only a few steps:
22.1.4 Comparison Operators for FiltersDreamweaver provides many different ways to compare information from a database column with information from another source, such as a form, cookie, or simply a value you type into the Recordset window. The type of comparison you choose also depends on the type of data you're comparing: text or numbers. 22.1.4.1 Comparing text valuesYou'll often want to create recordsets that find database matches to particular words. For example, a recordset could filter a list of products to find only those records whose descriptions contain the word "green," or you could filter a database of clients to search for a record for "Craig McCord." Dreamweaver provides the following types of text comparisons:
The other comparison operators (<, >, <=, >=) aren't very useful for searching text in a database. They're intended for comparing numbers, as described next. 22.1.4.2 Comparing numbersFilters are particularly useful for numbers: finding products that cost less than $35, albums that were released in 1967, products with more than 3,000 items in stock. If you've taken basic algebra, these options for comparing numbers should be familiar: = (equal to), <> (not equal to), < (less than), > (greater than), <= (less than or equal to), or >= (greater than or equal to). 22.1.5 Getting Comparison ValuesBy now it should be clear that the Filter option of the Recordset window lets you compare data from one column with some other value. But you're probably wondering where this "some other value" comes from. It depends on which option you selected from the third drop-down menu梩he Source menu (see Figure 22-3). The most straightforward option is the last item in the menu: Entered Value. After selecting it, you simply type the value into the field to the right of the menu. This could be a number, a letter, or one or more words. So, to create a recordset that will find a product whose price is more than $50, you'd select the price column, the > (greater than) comparison symbol, and the Entered Value source option, and then type 50 into the value field. Unfortunately, this kind of recordset is rather limited. The comparison value you specify (50) is hardwired into the recordset, making it very inflexible. What if a visitor wanted to see products that cost more than $15, $30, or $100? No joy. This recordset is limited to what you, the designer, entered as a value. A better option would be to create the filter on the fly from information gathered when the page with the recordset is requested by the visitor's Web browser. In this way, you can create very flexible recordsets that are capable of searching databases for a variety of different pieces of information, not just the one value selected by a programmer. (After all, how good a search engine would Yahoo be if the programmers determined what the search criteria were? No matter what you searched for?span class="docEmphasis">Web design, Used cars梚t would always find Web sites about Java, Burning Man, and Diet Coke.) Dreamweaver can also draw a filter value from a form, cookie, or even the URL of a link. The process is always the same: From the filter's comparison value source menu (Figure 22-3), select the source you want, and then type the name of the appropriate source item. For example, if you select Form Variable from the source menu, type the name of the form field in the box to the right. In most cases, you must depend on an additional Web page to provide the source of these values. For example, a search function on a Web site usually requires more than a single page: One (or more) containing a Search field and a Submit button to send the information, and another that displays the results of the search. In this example, the form on one page sends information (the search terms) to another page (the results page), which uses the form information to search the database. In essence, the words typed into the search form on one page are used to create the recordset on another page. The two most common ways to pass information from one page to another are forms and URLs. (Three advanced sources梒ookies, session variables, and application variables梐re discussed in Section 24.2.) 22.1.5.1 Form variablesA form variable is simply the information that a visitor types into a form field (or the value of a selected radio button, menu item, or checkbox). Forms are discussed in depth in Chapter 11, but their use in recordset filters is straightforward.
NOTE
For these steps to work, the form's method must be set to Post in the Property inspector (see Section 11.2). If Get is selected, the form information will appear in the URL when the form is submitted. What's more, form information won't be sent as a form variable. (You can, however, use the Get method in conjunction with the URL parameters option discussed next.)
22.1.5.2 URL parametersIn your Web travels, you've probably encountered URLs that look kind of strange, along the lines of www.nationalexasperater.com/shopping.asp?prodID=34&quant ity=4. Everything up to the ? looks fine, but you're probably wondering what the ?prodID=34&quantity=4 means. Forms aren't the only way to pass information to a dynamic Web page; URLs can do it, too, thanks to information tidbits called parameters. Dynamic Web sites can read parameters and use them to create a recordset, among other things. (In fact, using the Get method for a form puts the form's information into the URL.) By using the Recordset window's Filter option, you can use one of these parameters to search a database. To identify a single record in a database, for instance, the URL could contain a number identifying the record's primary key (see Section 21.4.2 for a definition). You'll find an example of this trick in the tutorial in Section 22.8.4. The steps for using URL parameters to filter recordsets are similar to those for form variables. You need two pages, one with a link containing the URL parameter and another containing the recordset.
22.1.5.3 Creating a link with a URL parameterDreamweaver provides several ways to create a link that contains a URL parameter. The simplest way is to highlight the item you wish to turn into a link梪sually text or a graphic. Then, in the Property inspector's link box, type the link followed by a ?, a parameter name, an =, and the value (for example: products.asp?category=7). However, you'll probably find it easier to browse for the file and let Dreamweaver write all the complex stuff. To do this, proceed as follows:
The Parameters window lets you add URL parameters to a link. Recordsets can use these pieces of information to filter a database query, as discussed in Section 22.1.3.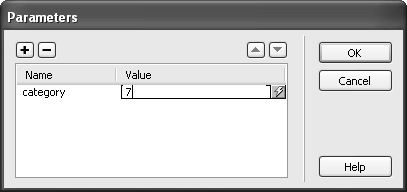
22.1.5.4 Creating the recordset for the Results pageOnce you've created the link, you need to create an appropriate recordset for the results page. Here's how:
Like form variables, this recordset depends on information included in the URL of a link. If a visitor just stumbles across the results page without using a link with a URL parameter, the recordset will most likely produce no results. Because of this, make sure you only link to this kind of page via a link with a parameter. Otherwise, modify the default value for the URL parameter in the recordset as described in Section 22.1.5.2 . 22.1.6 Advanced Recordsets and SQLSometimes you'll need more power than Dreamweaver's simple recordset tool provides. For example, say you're building an online classified ads system. On one page, you want to present various pieces of information: the name of the sale item, its price, who's selling it, and how to contact the seller, for example. In order to store this kind of information, your database has two tables梠ne for products and one for sellers. To present all this information, you must simultaneously access both tables. In addition, you need to connect the records of those two tables so that each product is associated with the correct seller桱ohn Smith is selling the Whirligig 2003, for example. There's only one way to create this kind of complex query: using the advanced options of the Recordset window. To display these options, insert a recordset, using the steps described in Section 22.1.2. Then, in the Recordset window, click the Advanced button. The Advanced Recordset window should appear (see Figure 22-5). (If you see a Simple button, then you're in the advanced options.)
Unfortunately, putting together advanced database queries is not as easy as most other operations in Dreamweaver. The Advanced Recordset window is basically just a way of typing in commands, using a database programming language called SQL (Structured Query Language, pronounced "ess-cue-ell"). SQL is a standard language used by many database servers to access, update, delete, and add information to a database. To create an advanced recordset, type an SQL statement in the window's SQL box. The Recordset window's advanced options aren't for the uninitiated. You'll need to have a good grasp of SQL梩he standard database program language梩o make complex recordsets.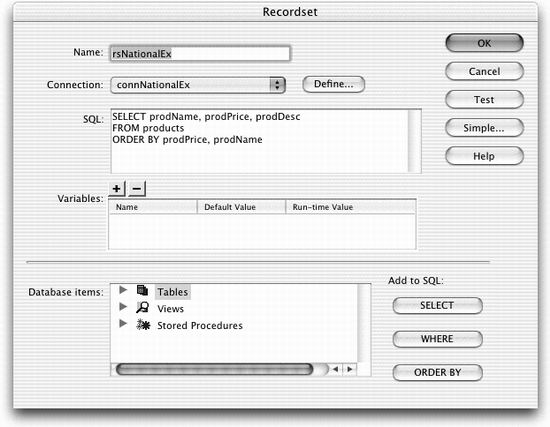
22.1.6.1 SQL: The very basicsSQL lets you communicate with a database by adding new records, deleting records, and creating new tables. In the context of the Advanced Recordset window, you only need to understand how SQL retrieves information. After all, a recordset is just a selection of data pulled from the database. To make an SQL query (called an SQL statement), you must first specify:
Only the first two pieces of information are absolutely necessary. A very basic SQL statement would look like this: SELECT prodPrice, prodName FROM products SELECT is an SQL keyword that specifies columns of data for retrieval; FROM indicates which database table contains it. This statement instructs the database server to look inside the Products table and retrieve the price and name of each product listed. The result is a list of the price and the name of each product in the database. Of course, you may not always want every record in a table. You may want to limit the search to a select number or items, such as products under $10. The WHERE keyword lets you do just that. SELECT prodPrice, prodName FROM products WHERE prodPrice < 10 Now the SQL statement retrieves only the price and the name of products that cost less than $10. Finally, SQL can sort records into order. In this example, you could also sort all of the results from least to most expensive, like this: SELECT prodPrice, prodName FROM products WHERE prodPrice < 10 ORDER BY prodPrice ASC The ORDER BY keywords indicate which column should be used to sort the records. Specifying the prodPrice column sorts the items by price. ASC is short for ascending, meaning that the records will appear in low-to-high price order. (DESC sorts records into descending order, Z桝, or high-to-low.) You can even sort by multiple columns. If, for example, you wanted a list of all products sorted by price and then alphabetically by product name, you would simply change the above ORDER BY keyword to read like this: ORDER BY prodPrice ASC, prodName ASC In this way, all the products that were the same price (for example, $10) would then be presented in alphabetical order (A梈). 22.1.6.2 Using the Data Tree viewAlthough you need to know SQL to use the Recordset window's advanced options, you can get a little help from the data tree in the Database Items list at the bottom of the window (see Figure 22-5). This area of the window functions just like the Databases panel, and lets you view the tables, columns, views, and stored procedures in the database (see Section 21.6.1). Click the + (arrow) button next to the word Tables heading to make a list of all tables in the database appear. Click the + (arrow) next to a table name to see all of the columns within that table. That's a very helpful technique when you're building an SQL statement, because you may not remember the exact names of every table and column in your database. To build an SQL statement, you can select a column name and click one of the three buttons桽ELECT, WHERE, or ORDER BY. The SQL command and column name then appear in the SQL box. Suppose, for example, you wanted to create the following SQL statement: SELECT prodPrice, prodName FROM products To build this statement using the data tree, click the + button next to the table named Products, which expands to show a list of all columns. Then click the column named prod- Price and click SELECT. Next, click the prodName column and click SELECT again. Although these buttons can save you time, they don't check whether the SQL statement is valid. Unless you've got some grasp of SQL, you can easily create a statement that generates errors when run by the test server. NOTE
Be careful when using multiple database tables that contain the same column name. For example, it's possible to have two tables?span class="docEmphasis">products and sellers, for example梩hat contain columns with the same name, such as sellerID. Dreamweaver won't make any distinction when inserting these columns using the Database Items tools. To correctly differentiate like-named columns in the Advanced Recordset's SQL box, you must begin the column name with the name of the table, like this: products.sellerID or seller.sellerID. 22.1.6.3 Creating variables for filtering dataVariables let you filter data using information from sources such as forms, URLs, cookies, session variables, and application variables. If you use the filtering option in the basic Recordset window, Dreamweaver creates the variables for you梑ut in the Advanced Recordset window, you must create them yourself. To add a variable for use in an SQL query, follow these steps:
NOTE
Keep in mind that if you add more than one SQL variable in the Advanced Recordset window, you won't be able to switch back to the simple view. Once you create a variable, you can include it in your SQL statement. Since variables are frequently used to help filter information, you'll often add them to the SQL WHERE keyword. For example, if you create a variable named formPrice that retrieves information from a form, you can add it to the SQL statement like this: SELECT prodPrice, prodName FROM products WHERE prodPrice < formPrice In this example, whatever information is passed from the form is stored in the formPrice variable and compared to the price stored in the prodPrice column of the database. 22.1.7 Reusing RecordsetsRecordsets are created on a page-by-page basis. In other words, when you create a recordset, it's added only to the current document. If you create another Web page that requires the same recordset, you must add the proper code to the new page. You can do this either by recreating the recordset梐 potentially laborious process梠r by simply copying the recordset from one page and pasting it into another. Here's how:
Now switch to the document that will receive the pasted recordset. Right-click (Control-click) in the Server Behaviors panel and choose Paste from the contextual menu.
22.1.8 Editing RecordsetsWhat if you have to edit a recordset? Maybe you forgot an important column of information when you originally created the recordset, or perhaps you want to modify a recordset you copied from another page. The process is easy: Simply open either the Bindings panel (Ctrl+F10) or Server Behaviors panel (Ctrl+F9) and double-click the name of the recordset you wish to edit. The Recordset window appears, looking just as it did when you first created the recordset (see Figure 22-2). Make any changes to the recordset, and then click OK.
22.1.9 Deleting RecordsetsIf you add a recordset to a page, and later realize that the page isn't using any of the information retrieved by the recordset, you should delete it. Each recordset forces the database server to do some work. Unnecessary recordsets only make your Web pages work harder and more slowly. You can delete a recordset using either the Bindings or Server Behaviors panel. Just select the name of the recordset in either panel and click the 梑utton at the top of the panel (pressing the Delete key on your keyboard has the same effect). |
|
|
< Day Day Up > |
|
 Application Objects