|
|
< Day Day Up > |
|
22.5 Viewing Live Data Within DreamweaverAfter you add dynamic information to a Web page, you see something like this in the document window: {rsProducts.prodID}. It gives you an idea of what the information is梚n this example, the database column prodID from a recordset named rsProducts 梑ut it doesn't show any real database information, which can make designing a page more difficult. You're especially far from seeing the actual result when a page contains a repeating region: What appears as a single row of dynamic text will actually appear as multiple rows or records when viewed in a Web browser. Fortunately, you can preview a page with real database records directly in Dreamweaver. In addition to Design view and Code view, Dreamweaver includes a view for working with dynamic information: Live Data view. When viewing a dynamic page in Live Data view, Dreamweaver contacts the testing server, retrieves recordset data from the database, and displays it in the document window (see Figure 22-15). This is the Live Data view of the dynamic table pictured in Figure 22-10. In Live Data view, you can update the data displayed on the page by clicking the Refresh button. Turn on Auto Refresh if you want Dreamweaver to update the Live Data view automatically whenever you make a change to a dynamic element of the page (but avoid it if your connection to the testing server is slow). Also, if refreshing the data takes too long梠r when switching into Live Data view, Dreamweaver seems to have stopped working梱ou can click the Stop Live Data Update button to halt the current update.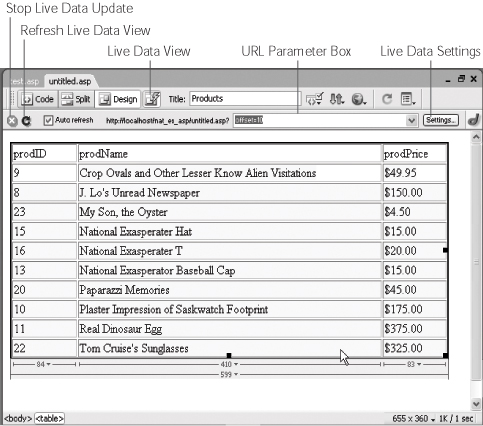
To turn Live Data view on or off, click the Live Data View button on the toolbar, choose
View With Live Data view turned on, it's much easier to see what your page will look like when viewed on the Web. You can continue to work on a Web page in this view just as you would in Design view. You can add text and graphics, modify page properties, and even format dynamic data as described in Section 22.2.2. However, when you're working with a repeating region, you can only select, delete, or format the first set of dynamic data items. For instance, following Figure 22-15, a dynamic table displays repeating rows of database records. If you wanted to apply a Cascading Style Sheet style to the name of each product listed, you would click the item in the first row of dynamic data梚n this example, "Crop Ovals and Other Lesser- Known Alien Visitations"梐nd apply the style to it. To see the style applied to the other records, click the Refresh button in the Live Data View toolbar. 22.5.1 Live Data View SettingsSome recordsets depend on information provided by a form or URL. When you use the filter option, for instance, a recordset searches a database for records that match information from a form or URL. This feature can come in handy for pages that provide detailed information about a single record. Frequently for these types of pages, the URL might appear something like this: details.asp?prodID=38, where the name of the page (details.asp) is followed by a URL parameter that includes a name (prodID) and value (38). The recordset then looks for the product whose ID (prodID) matches 38. Because pages like this can't show up properly without a little outside help, you need to provide extra information in the Live Data View Setting window, like this:
The Live Data Settings window lets you define information that the dynamic page needs to operate correctly. For example, the page may include a recordset that uses information contained in the URL to search records in a database. The Initialization Script section of the window stores temporary code that will be executed by the application server prior to viewing the page in Live Data view. Use this advanced option for setting the session and application variables that the application server uses to process the page (see Section 24.2.7).
|
|
|
< Day Day Up > |
|
 Live Data, or press Ctrl+Shift+R (Shift-