|
|
< Day Day Up > |
|
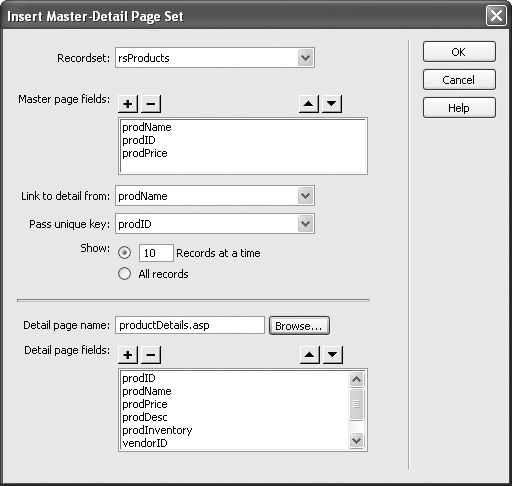
22.6 Master Detail Page SetA common task when building a database-driven Web site is providing your visitors with both an overview and detailed view of information. Usually, it takes two separate Web pages to do the job: One that lists limited information about all records in a recordset, and one that links to a second page with detailed information about a single record. Dreamweaver calls these master and detail pages and provides a tool for making quick work of this task (see Figure 22-17). An example of Dreamweaver's Master Detail Page Set. The screen on the left represents a master page? a list of items retrieved from a recordset. Clicking a link on this page opens a detail page (right), which displays the details of a single record.
The Master Detail Page Set object automates the process of creating dynamic tables and recordset navigation bars, as well as adding many different server behaviors to your pages. In fact, there's nothing this tool does that you can't do (albeit more slowly) with the other tools you've learned about in this chapter. NOTE
The Master Detail Page Set object is not available for the ASP.NET server model. To create a Master Detail Page set, follow these steps:
Once completed, you can (and should) modify the tables, format the dynamic items, and design the page to your liking. Because the Master Detail Page Set tool just automates the process of adding repeating regions, recordset navigation bars, and other server behaviors, you must edit those items individually on the page. In other words, you can't return to the Insert Master-Detail Page Set window (Figure 22-18) to alter items on either page. For example, if you decide to remove a piece of dynamic information from the detail page, you must make this change on the detail page itself. While the Master Detail Page Set tool makes building these types of pages a snap, it does have its drawbacks. The primary problem is that Dreamweaver uses the same recordset for both the master and detail pages. This can slow down the works, because even though you may want to display only a few columns of data on the master page (the prodName, prodID, and prodPrice fields in Figure 22-17), the recordset added to the page must retrieve all of the information required by the detail page. The database server is doing a lot of extra work retrieving unused data. However, there is a workaround: On the master page, edit the recordset and select only the fields that that page uses. (Editing recordsets is described in Section 22.1.8.) Although the Master Detail Page Set makes quick work of creating these types of pages, you can do all the same tasks using the tools you've already learned梤epeating regions, recordset navigation bars, and so on梬ith the added benefit of greater design flexibility. For an example of creating a more complex master and detail page set by hand, complete the tutorial at the end of this chapter. |
|
|
< Day Day Up > |
|
 Application Objects