8.9 CSS Layout Tutorial
In this tutorial, you'll build a basic two-column page design using nothing but Cascading
Style Sheets. In the process, you'll use Dreamweaver MX 2004's new CSS tools,
marvel at its improved display, and learn how to use the program's layer tools.
8.9.1 Getting Started
Before you begin building the page, download the tutorial files. As always, you'll find
them at
www.sawmac.com/dwmx2004; click the Tutorials link to go to the tutorials
page. Under Layout Tutorial, click either Windows or Macintosh, depending on the
kind of computer you're using.
When the files have downloaded and decompressed, you should have a folder named
DWLayout on your computer, containing the Web pages and graphics needed for this
tutorial. If you're having difficulties, the Web site contains detailed instructions for
downloading the files you'll be using with this book.
In Dreamweaver, choose Site Manage Sites. Manage Sites.
The Manage Sites window appears. Click the New button and select Site from the small pop-up menu.
The Site Definition window appears. Make sure the Basic tab is selected. Type Layout Tutorial in the site name field. Click Next.
This is the name that Dreamweaver will use while you're working on this tutorial. Select the "No, I do not want to use server technology" option and click Next.
In this tutorial, you'll be building a basic Web page. (The server technology referred
to here is a far more complex, database-driven feature, as described in Part VI of
this book.) In the next steps, you'll tell Dreamweaver how you want to work on the files in
your site and where you store those files. In this example, you'll use the folder you
downloaded from this book's Web site. (In other situations, you'll choose or create
a folder of your own.) Click "Edit local copies on my machine."
As mentioned in Section 16.1, there are several ways to edit files and transfer them
to a Web server. You'll be editing these right on your computer. Click the folder icon next to the label, "Where on your computer do you want to
store your files?"
The Choose Local Root Folder window opens. Browse to and select the DWLayout folder.
Windows and Macs handle this slightly differently, as described in Section 1.3.1.
Selecting the DWLayout folder makes it the local root folder梩he folder that
holds all the files, graphics, and other folders that are part of a single Web site
(see Section 1.3). Click Next.
Next you'll be asked how you want to connect to a remote server梩he computer
(the Web server) that holds your finished Web files and dishes them out to the
citizens of the Internet. From the pop-up menu, choose None.
For this tutorial, you won't be connecting to a Web server. But, when building
your own sites, you certainly will. For detailed instructions on transferring files
to your Web server, see Chapter 16. Click Next.
A summary of the options you selected appears. If you made a mistake, you can
cycle back through the various screens by clicking Back. Click Done to close the Site Definition window, then click Done on the Manage
Sites window to close it.
Now you're all set to begin the tutorial.
8.9.2 Adding a Banner Layer
So you can get right down to the fun of laying out a page with Cascading Style Sheets,
you'll start with a partly finished page, complete with content and some basic CSS
styles for text formatting. You'll add the layers that control the layout of the page.
Choose FileOpen and, in the DWLayout folder, select the file named layout. html.
This page is a headline story for the National Exasperater Web site. You'll notice
that there's no layout, just content that runs from the top to the bottom of the
page. You'll create several CSS styles to position the banner, sidebar, and main
content areas of the page. Make sure the CSS Styles panel is open (WindowCSS Styles) and click the New
Style button (see Figure 6-1).
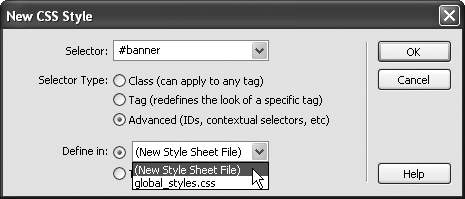
You'll start by creating a layer for the page's banner. Click the Advanced button and type #banner in the Selector box.
You're creating an ID style, an advanced style that always begins with a #. You'll
also add this style to a new external style sheet file. From the "Define in" menu, select New Style Sheet File (see Figure 8-12).
There's already one external style sheet attached to this page, called global_styles.
css. You could add these layer styles to that file, but for this tutorial, you'll see you
can have multiple external style sheets attached to a single page.
Click OK. In the Save Style Sheet File As box, type layout.css in the File Name
field (Save As field on Mac). Click Save.
Dreamweaver saves a new CSS file into your site and opens the CSS Style Definition
window. You'll start by adding a background property. Click the Background category, then click the Browse button to the right of the
Background Image box.
This opens the now-familiar Select Image Source window for selecting graphic
files. You're going to add a red stripe (just like in last chapter's tutorial) that will
extend from the logo to the right edge of the page, giving the illusion of one really
wide graphic. Navigate to the Images Global folder, double-click the bg_banner.gif file.
Because background images normally tile left to right and top to bottom, you're
going to add instructions to this style so the stripe only tiles horizontally across
the page. Choose "repeat-x" from the Repeat menu. Click Positioning in the Category
list.
Dreamweaver displays all of the CSS positioning properties梩he heart of creating
absolutely positioned elements. Here's where the magic is. From the Type menu, select "absolute."
This will give the layer an absolute position on the page. Because the banner will
stretch across the browser window梟o matter what size that browser window
is梱ou'll next give the layer a width that spreads across the page. Type 100 in the Width box and select % from the menu next to it.
You've just set the layer to 100 percent width, meaning it will take up 100 percent
of the available space in the browser. Next, you'll position the layer in the top left
corner of the page.  |
There's shortcut for typing values into a CSS box. Instead of typing a number in one box and then
selecting a unit of measurement (pixels, percentages, or ems) from a menu, you can type the number and
measurement together in the first box: 100%, for example, or 1 em, or 20px. Dreamweaver automatically
adjusts the units menu.
Just don't put a space between the number and the measurement type. For example, 20 px won't work.
|
|
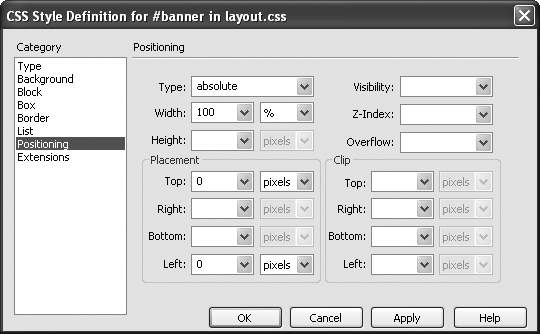
For the Placement options type 0 in the Top box and 0 in the Left box.
The window should now look like Figure 8-13. Click OK to finish creating the style.
You've just created your first ID style. Congratulations. Applying it is a piece of
cake. Select the National Exasperater logo graphic, and choose InsertLayout Objects
Div Tag.
Alternatively you can click the Insert Div Tag object on the Layout tab of the Insert
bar (see Figure 8-5). Either way the Insert Div Tag window opens. From the ID menu, select "banner." Make sure the "Wrap around selection" option
is turned on and click OK.
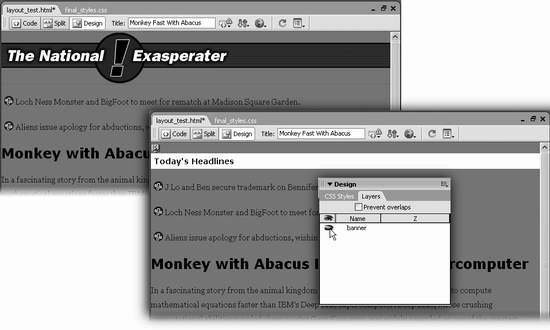
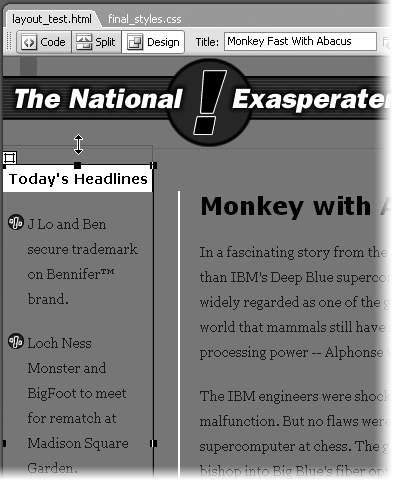
Dreamweaver wraps the new layer around the graphic. The banner moves to the
top left corner of the page and the logo appears to extend the entire width of the
window (see top image in Figure 8-14). In the next part of this tutorial, you'll create
a layer to position the sidebar info in the left edge of the page below the banner.
8.9.3 Creating the Sidebar
You may have noticed something strange after you added that banner layer. The rest
of the text on the page moved up and much of the sidebar information?Today's
Headlines"梔isappeared underneath the banner. Welcome to absolute positioning and CSS-based layout! As described in Section 8.3.1, whenever you use absolute
positioning, the content in the layer is moved out of the normal flow of the page. In
this case the banner floats above the page, and the other content fills in the left over
space. It's almost as if the sidebar information and other page content doesn't know
the layer even exists.
In this next phase, you'll format the sidebar so that it fits below the banner and use
some of Dreamweaver's tools for working with layers. First, you'll use the Layers panel
to temporarily hide the banner as you format the other parts of the page.
Chose WindowLayers to open the Layers panel.
The Layers panel lets you hide layers and change their layering (how a layer overlaps
another layer). In this case, you'll temporarily make the banner invisible so you
can work on the sidebar. In the Layers panel click to the left of the word "banner" (see Figure 8-14).
You should see a closed eye appear in this column. This indicates that the layer is
invisible, and the banner should disappear from the page. If you still see the banner,
keep clicking in the Layers panel until the closed eye appears. Now you can see all
of the content for the sidebar. It's a simple process to create a layer for that.
In the Design panel group梬here the Layers panel is located梒lick the CSS
Styles tab to bring that panel to the front.
Alternatively, you can choose WindowCSS Styles panel to open the panel. Click the New CSS Style button to open the New CSS Style window.
Again, you'll create an ID style. Click the Advanced selector button and type #sidebar in the Selector name box.
The "Define in" menu should say layout.css. Click OK to begin creating the
style.
This is another ID style that you'll store in the external style sheet you created
earlier. You'll add some CSS properties to position this layer precisely on the
screen. In the CSS Style Definition window, click the Positioning category.
This is the same process as creating the banner; however, you'll position the sidebar
in a different location on the screen. From the position menu, select "absolute."
The sidebar will only fill a small part of the total width of the page, so you'll set
a pixel value for its width. In the width box, type 150.
Dreamweaver defaults to pixel values, so you don't have to do anything else with
the width. However, you do want to position the layer so it's below the banner. For the Placement options, type 150 in the Top box and 0 in the Left box.
This will place the sidebar 150 pixels down from the top of the page, but keep it
clinging to the left edge. Click OK to finish the style.
Next you'll select the sidebar content and wrap it in the layer. Click just before the letter T in "Today's Headlines" and drag down and to the
right until you've selected the headline and the three bulleted items below it.
Choose InsertLayout ObjectsDiv Tag.
Alternatively you can click the Insert Div Tag object on the Layout tab of the Insert
bar (see Figure 8-5). Either way the Insert Div Tag window opens. From the ID menu, select "sidebar." Make sure the "Wrap around selection" option
is turned on, and click OK.
Dreamweaver wraps the new layer around the sidebar content. As with the banner,
the sidebar is now taken out of the normal flow of the page, so the story text
moves to the top of the page and flows under the sidebar. Don't worry, you'll fix
that next.
8.9.4 Positioning the Main Content
The main content for this page梩he story about the calculating monkey梥hould go
below the banner and to the right of the sidebar. It won't have a set width, however.
Like the banner, the content should be fluid, so that if someone resizes their browser
window, the story will grow or shrink to fit the available space. (This is like the "liquid
HTML" table designs described in Section 7.2.6.)
Using absolute positioning, it's difficult to get that kind of fluid design to work across
all of today's browsers. Fortunately, there's a simple trick you can use to achieve the
same goal: Instead of absolutely positioning the story content, you'll use large top-
and left-hand margins to actually indent the story area away from the banner and
sidebar. This is a common trick used by many Web designers who employ CSS-based
layout. Here's how it works:
In the CSS Styles panel, click the New Style button.
You'll create another ID style next. In the New CSS Style window, create an ID style named #main for the layout.css
style sheet. Click OK.
Refer to step 5 in the previous section for more detail on this process. In the CSS Style Definition window, click the Box category.
You'll set the margin properties here. Turn off the "Same for all" box under the Margin heading; type 115 in the Top
box, type 175 in the Left box, and type 10 in the Right box (see Figure 8-15).
This will indent the content 115 pixels from the top of the page and 175 pixels from
the left edge. The 10 pixel value in the Right box moves the text away from the right
edge so it doesn't collide with the edge of the Browser window. Note that you're not
using absolute positioning for this style. In other words, you're not creating a layer
here, just indenting the text as you might with any CSS style you create. It just so
happens that the margins you're adding are so large, they effectively position the
text out of the way of the banner and sidebar. You're also going to add a jazzy border along the left edge of the text, so you need
to add a bit of padding to move the text away from the border.
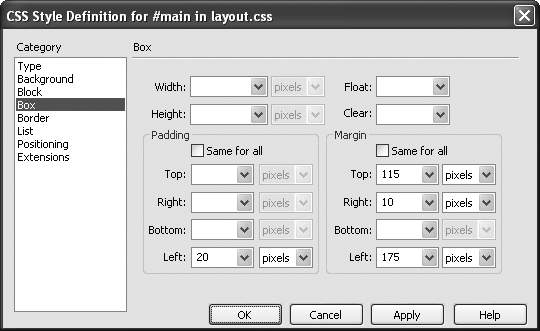
Turn off the "Same for all" box underneath the Padding heading and type 20 in
the Left box.
The CSS Style Definition window should look like Figure 8-15. Finally, you'll add
a border to this style. In the Category list, click Border.
You'll only add a border to the left edge of the text. Turn off all 3 "Same for all" boxes and use the following three values for the Left
border settings: dotted for the style, 2 pixels for the width, and a color of white
(#FFFFFF).
This will create a 2 pixel dotted white border along the left edge of the main
content. Click OK to create the style.
You apply this style just like all the others. Click before the letter "M" in Monkey and drag down and to the right to select
all of the text for the story.
You won't select the sidebar doing this. Even though the sidebar appears to be
inside that text, its code is actually at the top of the page. Finally, repeat steps 12-13 in Section 8.9.3 to wrap this text with the style you just
created.
The page is coming together nicely. You'll just make the banner visible again so
you can see the page in all its glory. Choose WindowLayers to open the Layers panel. Click the closed eye icon to
the left of the banner layer until the banner appears on the page again.
You can either click until you see an open eye icon梞eaning the layer is visible梠r until you see no icon (the default setting which is also visible). In the last part of this tutorial, you'll fine-tune your design and add a navigation
bar.
8.9.5 Fine-tuning the Design
The page is looking pretty good. You've placed different elements in different parts
of the page梬ithout tables! However, it could use a little adjustment. The sidebar is
a tad too low on the page, and the banner needs a navigation bar.
In the document window, move your mouse over the top edge of the sidebar
area. When a red border appears around the sidebar, click to select it.
You can also select a layer by clicking any of its edges, selecting the layer's name
in the Layers panel, or by clicking the layer's selection handle (see Figure 8-7 in
Section 8.4). NOTE
Dreamweaver can at times appear fickle about this kind of operation. You might move your mouse
over a layer and find that no border appears. If this happens, click anywhere on the page first, then move
your mouse over a layer's edge.
Three resize handles appear at the top of the sidebar layer. You'll use the middle
handle to move the layer up. Drag the middle handle at the top of the sidebar layer up, leaving a little space
between the bottom of the banner and the sidebar (see Figure 8-16).
The exact placement isn't important梬hatever looks good to you. After testing
the design in a browser, you can always return and change its placement.
With the layer still selected, type 177px into the Width box in the Property inspector.
This makes this layer 177 pixels wide梛ust wide enough to touch the white border
on the left edge of the main content. Of course, you could have used the right resize
handle梛ust as in the last step梩o make this layer wider. Dreamweaver provides
many ways to do the same thing. NOTE
You may notice that resize handles never appear around the main content of this page. Dreamweaver
only includes resize handles for absolutely positioned elements梬hat Dreamweaver calls layers. Because
you use a little trick to position the main content梥etting the margin properties梱ou can't resize this part of
the page like you can the layers. If you wanted to move the main content higher on the page, or farther to
the right, you'd have to adjust the margin properties of its style.
In the last part of this tutorial, you'll add a navigation bar to the banner. Choose WindowCSS Styles to open the CSS Styles panel. Click the New CSS
Style button.
You'll create another layer to hold the site's navigation buttons. As with the previous layers, create an ID style named #nav in the layout.css style
sheet. Click OK.
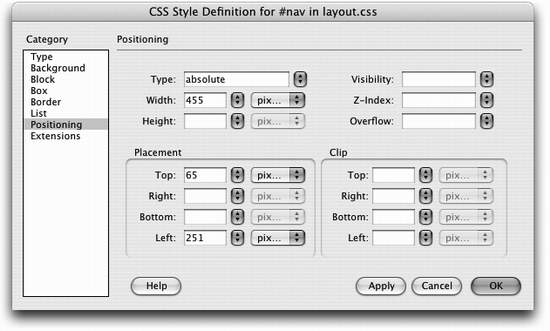
This process is detailed in steps 4 and 5 in Section 8.9.3. In the CSS Style Definition window, click the Positioning category and enter the
values shown in Figure 8-17.
In essence, you're creating an absolutely positioned layer that's 455 pixels wide and
appears 65 pixels from the top and 251 pixels from the left.
Click OK to create the style.
This time, instead of wrapping already existing content with a layer, you'll insert
the layer and then add content to it. Choose InsertLayout ObjectsDiv Tag.
Again, you can also use the Insert Div Tag object on the Layout tab of the Insert
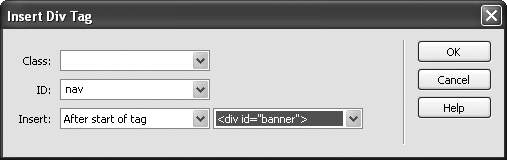
bar. Either way, the Insert Div Tag window appears (see Figure 8-18). Select "nav" from the ID menu; select "After start of tag" from the Insert menu;
and choose "<div id="banner">" from the bottom menu (see Figure 8-18).
This series of steps inserts the new layer. However, instead of wrapping it around
something, or even just dropping the layer on the page, you're inserting the layer
inside the banner layer. This is called nesting a layer (see Section 8.8) and has the
benefit of making the navigation bar layer a part of the banner. If you move the
banner layer梥ay, you want it a few pixels further down on the screen梩he
navigation bar will move along with it. NOTE
This example demonstrates the flexible nature of absolutely positioned elements. The navigation
layer is placed in an absolute position 65 pixels from the top and 251 pixels from the left. However, because
this layer is nested inside the banner layer, those measurements aren't relative to the top and left edges of
the page. Instead, a nested layer's positioning is in relation to the edges of its parent layer. In this case, the
navigation layer will appear 65 pixels from the top edge of the banner no matter where the banner is placed
on the page. Nested layers are discussed in Section 8.8.
Click OK to insert the new layer.
Dreamweaver adds a layer with the text "Content for id 'nav' Goes Here." You'll
put the navigation bar here. You may notice that the layer appears to slightly
overlap the logo. Dreamweaver's Design view includes many visual aids to help
you identify invisible elements on a page or the borders of a table or layer. Sometimes
those "aids" get in the way. You'll turn them off to make working with this
page easier. Choose ViewVisual AidsHide All.
The design shifts subtly after Dreamweaver removes its visual aids梱ou can always
turn them back on (and back off) with the keyboard shortcut Shift+Ctrl+I
(Shift- -I). -I). Now the page looks a little better, and you can add the navigation bar to the
page. To streamline the process, you'll use an already created navigation bar from
another Web page. Choose FileOpen. Navigate to and open the file navigation.html in the DWLayout
folder.
Select the navigation bar on the page and copy it.
For example, click inside the page choose EditSelect All and then EditCopy. Choose Windowlayout.html to return to your page design.
Windows users of Dreamweaver can also click the page tabs that appear at the
top of the document window to switch between documents. Triple-click anywhere inside the navigation layer.
That is, anywhere inside the text "Content for id 'nav' Goes Here." This selects
that paragraph of text. Choose EditPaste.
The navigation bar is dumped into the layer. The page is looking great. Just one
last change. The banner is too close to the top of the window. It would look better
if it were just a few pixels lower. In the document window, move your mouse to the top edge of the banner area.
When a red border appears around the layer, click to select it.
Again, you can use any of the techniques listed in step 1 in Section 8.9.5.
Press the down arrow key three times.
This step moves the banner down 3 pixels梩he perfect amount. Notice that the
navigation bar moves also. Because it's nested inside the banner, it will always go
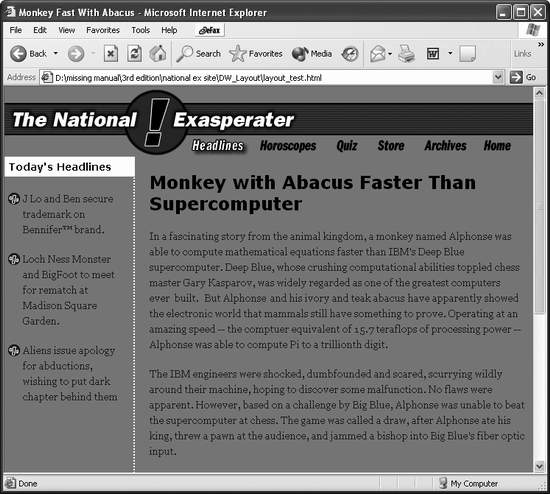
where the banner layer goes. Press F12 to preview your design in a Web browser (see Figure 8-19).
Congratulations! You've had your first taste of CSS-based layout.
|