| [ Team LiB ] |
|
Working with the Form Design WindowYou use the Form Design window to build and customize a form. Using this window, you can add objects to a form and customize them by using the many properties available in the Properties window. Microsoft has supplied many form and control properties. After gaining a command of these properties, you can customize the look and feel of your forms. Understanding and Working with the Form Design ToolsA developer needs the right tools for the job. Fortunately, Microsoft provides tools that help you build exciting and utilitarian forms. The Form Design window includes a toolbar, a toolbox, and the actual form you're designing. Other tools are available to help you with the design process, including the Field List and Properties windows. By default, two toolbars appear when you're in a form's Design view: the Form Design toolbar and the Formatting toolbar. The Form Design toolbar has buttons you use to save, print, copy, cut, paste, and perform other standard Windows tasks within a form. It also includes buttons that allow you to toggle the different design windows (such as the toolbox). Additional tools in the Form Design toolbar include the Format Painter tool and the Build tool. The Format Painter tool allows you to copy all formatting from one control to one or more additional controls. You can use the Build tool to open the Choose Builder dialog box, where you can invoke the Expression, Macro, and Code builders. The Formatting toolbar contains tools for graphically modifying a form's properties and objects. You can modify the font, font size, and color of selected objects on the form. With the Formatting toolbar, you can also add bold, underline, and italic; change the alignment; and add special effects to the selected objects. Toggling the Tools to Get What You WantMany windows are available to help you with the design process when you're in a form's Design view. If you don't have a high-resolution monitor (1,024x768), you'll probably find it annoying to have all the windows open at once. In fact, with all the windows open at once on a low-resolution monitor, a form is likely to get buried underneath all the windows. This is why Microsoft has made each window open and close in a toggle-switchlike fashion. The Form Design toolbar has tools for the Field List, Toolbox, and Properties windows, and each of these toolbar buttons is a toggle. Clicking once on the button opens the appropriate window; clicking a second time closes it. Figure 11.3 shows a form with the Field List, Toolbox, and Properties windows open. Although you can size each of these windows however you like (and you can dock the toolbox to a window edge), the design environment in this low-resolution display is rather cluttered with all these windows open. One of the tricks in working with Access is to know when it's appropriate to have each set of tools available. The goal is to have the right windows open at the right time as often as possible. Figure 11.3. The Form Design toolbar with Design windows visible.
Adding Fields to a Form
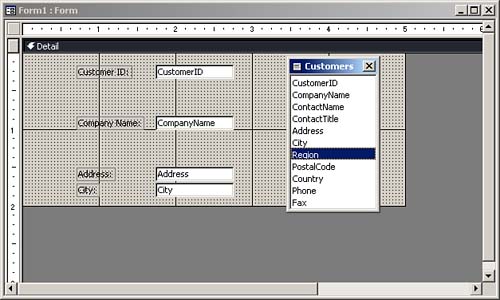
Figure 11.4. A form based on the Customers table.
To add multiple fields to a form at the same time, follow these steps:
Selecting, Moving, Aligning, and Sizing Form ObjectsYou must know several important tricks of the trade for selecting, moving, aligning, and sizing form objects. These tips will save you hours of frustration and wasted time. Selecting Form ObjectsThe easiest way to select a single object on a form is to click it. After you have selected the object, you can move it, size it, or change any of its properties. Selecting multiple objects is a bit trickier, but you can accomplish it in several ways. Different methods are more efficient in different situations. It's important to understand which objects you've actually selected. Figure 11.5 shows a form with four selected objects. The CustomerID text box, the Company Name label, and the Address label and Address text box are all selected; however, the Customer ID label and CompanyName text box aren't selected. If you look closely at the figure, you can see that the selected objects are completely surrounded by selection handles. The Customer ID label and CompanyName text box each has just a single selection handle because each is attached to an object that is selected. If you changed any properties of the selected objects, the Customer ID label and CompanyName text box would be unaffected. Figure 11.5. Selecting objects on a form.
One way to select multiple objects is to hold down the Shift key and click each object you want to select. Access surrounds each selected object with selection handles, indicating that you have selected it. You can also select objects by lassoing them. Objects to be lassoed must be adjacent to one another on the form. To lasso objects, you place the mouse pointer on a blank area of the form (that is, not over any objects) and then click and drag the mouse pointer around the objects you want to select. You can see a thin line around the objects the mouse pointer is encircling. When you let go of the mouse button, any objects that were within the lasso, including those only partially surrounded, are selected. If you want to deselect any of the selected objects to exclude them, you hold down the Shift key and click the object(s) you want to deselect. One of my favorite ways to select multiple objects is to use the horizontal and vertical rulers that appear at the edges of the Form Design window. You click and drag within the ruler, and as you do this, two horizontal lines appear, indicating which objects are selected. As you click and drag across the horizontal ruler, two vertical lines appear, indicating the selection area. When you let go of the mouse button, any objects within the lines are selected. As with the process of lassoing, to remove any objects from the selection, you hold down the Shift key and click the object(s) you want to deselect.
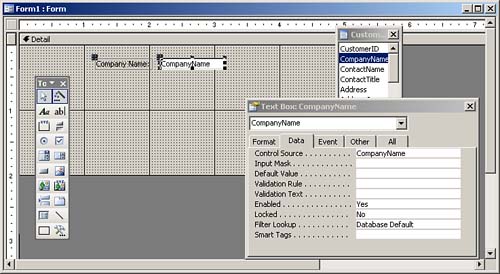
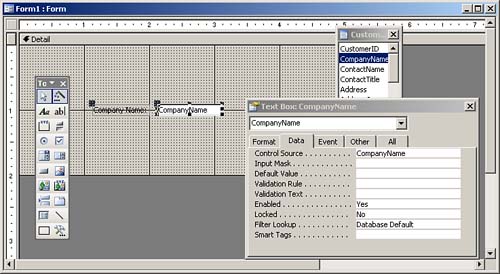
Moving Things AroundTo move a single control with its attached label, you don't need to select it first. You place the mouse over the object and click and drag. An outline appears, indicating the object's new location. When the object reaches the position you want, you release the mouse. The attached label automatically moves with its corresponding control. To move more than one object at a time, you must first select the objects you want to move. You select the objects by using one of the methods outlined in the previous section. When you place the mouse over any of the selected objects and click and drag, an outline appears, indicating the proposed new position for the objects. You release the mouse when you have reached the position you want for the objects. Sometimes you want to move a control independently of its attached label, and this requires a special technique. If you click a control, such as a text box, as you move the mouse over the border of the control, a hand icon with five fingers pointing upward appears. If you click and drag, both the control and the attached label move as a unit, and the relationship between them is maintained. Figure 11.6 shows the label and text box before they've been moved as a unit. Figure 11.7 shows them after they've been moved as a unit. If you place the mouse pointer over the larger handle in the upper-left corner of the object, the mouse pointer appears as a hand with only the index finger pointing upward. If you click and drag here, the control moves independently of its attached label, and the relationship between the objects changes. Figure 11.8 depicts objects after they've been moved independently. Figure 11.6. Objects before being moved.
Figure 11.7. Objects after being moved as a unit.
Figure 11.8. Objects after being moved independently.
Aligning Objects to One AnotherAccess makes it easy to align objects. Figure 11.9 shows several objects that aren't aligned. Notice that the attached labels of three of the objects are selected. If you align the attached labels, the controls (in this case, text boxes) remain in their original positions. If you select the text boxes as well, the text boxes try to align with the attached labels. Because Access doesn't allow the objects to overlap, the text boxes end up immediately next to their attached labels. To left-align any objects (even objects of different types), you select the objects you want to align and then choose Format | Align | Left, or you can right-click one of the objects and select Align | Left. Access aligns the selected objects (see Figure 11.10). You can align the left, right, top, or bottom edges of any objects on a form. Figure 11.9. A form before objects are aligned.
Figure 11.10. A form after objects are aligned.
Snap to GridThe Snap to Grid feature determines whether objects snap to the gridlines on a form as you move and size them. This feature is found under the Format menu. If you turn off this feature (it's a toggle), you can move and size objects without regard for the gridlines. Sizing ControlsJust as there are several ways to move objects, there are several options for sizing objects. When you select an object, you can use each handle, except for the handle in the upper-left corner of the object, to size the object. The handles at the top and bottom of the object allow you to change the object's height, and the handles at the left and right of the object let you change the object's width. You can use the handles in the upper-right, lower-right, and lower-left corners of the object to change the width and height of the object simultaneously. To size an object, you place the mouse pointer over a sizing handle, click, and drag. You can select several objects and size them all at once. Each of the selected objects increases or decreases in size by the same percentage; their relative sizes stay intact. You use the upper-left handle to move an object independently of its attached label. This means, for example, that you can place the label associated with a text box above the text box rather than to its left. Access offers several powerful methods of sizing multiple objects, which you access by selecting Format | Size:
Probably the most confusing of the options is Format | Size | To Fit. This option is somewhat deceiving because it doesn't perfectly size text boxes to the text within them. In today's world of proportional fonts, it isn't possible to perfectly size a text box to the largest possible entry it contains. Generally, however, you can visually size text boxes to a sensible height and width. You use a field's Size property to limit what's typed in the text box. If the entry is too large to fit in the allocated space, the user can scroll to view the additional text. As the following tip indicates, the Format | Size | To Fit option is much more appropriate for labels than it is for text boxes.
Controlling Object SpacingAccess provides excellent tools for spacing the objects on a form an equal distance from one another. Notice in Figure 11.11 that the CustomerID, CompanyName, Address, and City text boxes aren't equally spaced vertically from one another. To make the vertical distance between selected objects equal, you choose Format | Vertical Spacing | Make Equal. In Figure 11.12, you can see the result of using this command on the selected objects. Figure 11.11. A form before vertical spacing is modified.
Figure 11.12. A form after vertical spacing is modified.
You can make the horizontal distance between objects equal by choosing Format | Horizontal Spacing | Make Equal. Other related commands that are useful are Format | Vertical Spacing | Increase (or Decrease) and Format | Horizontal Spacing | Increase (or Decrease). These commands maintain the relationships between objects while proportionally increasing or decreasing the distances between them. Modifying Object Tab OrderAccess bases the tab order for the objects on a form on the order in which you add the objects to the form. However, this order isn't necessarily appropriate for the user. You might need to modify the tab order of the objects on a form yourself. To do so, you select View | Tab Order to open the Tab Order dialog box, shown in Figure 11.13. This dialog box offers two options. First, you can click the Auto Order button to tell Access to set the tab order based on each object's location in a section on the form. Second, if you want to customize the order of the objects, you click and drag the gray buttons to the left of the object names listed under the Custom Order heading to specify the objects' tab order. Figure 11.13. The Tab Order dialog box, where you select the tab order of the objects in each section of a form.
|
| [ Team LiB ] |
|