The Auto Element Naming dialog enables you to configure automatic naming for any element type. Each element can have separately configured automatic names and aliases.
To set up auto naming, follow the steps below:
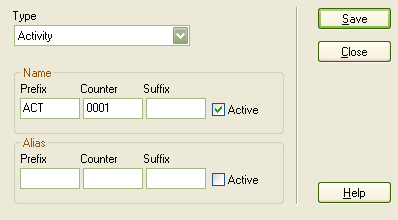
| 1. | Select the Settings | Auto Name Counters option from the main menu. The Auto Name Counters dialog displays.
|
| 2. | In the Type field, click on the drop-down arrow and select the element type (eg. Activity). |
| · | In the Prefix field, type a prefix for the new name (optional). |
| · | In Counter field, type the counter value; use a many 0's as required to pad the name. |
| · | In the Suffix field, type a suffix for the new name (optional). |
| · | If required, click on the Active checkbox to turn auto naming on for this element type. |
| · | In the Prefix field, type a prefix for the new alias (optional). |
| · | In Counter field, type the counter value; use a many 0's as required to pad the alias. |
| · | In the Suffix field, type a suffix for the new alias (optional). |
| · | If required, click on the Active checkbox to turn auto naming on for this element type. |
| 5. | Click on the Save button. |
New elements of this type now have an automatically-generated name and/or alias with an incrementing counter value.
Note: If an Alias is active then auto naming applies; however, to view the Alias in a diagram requires that the option is selected in Diagram Properties.
See Also


