


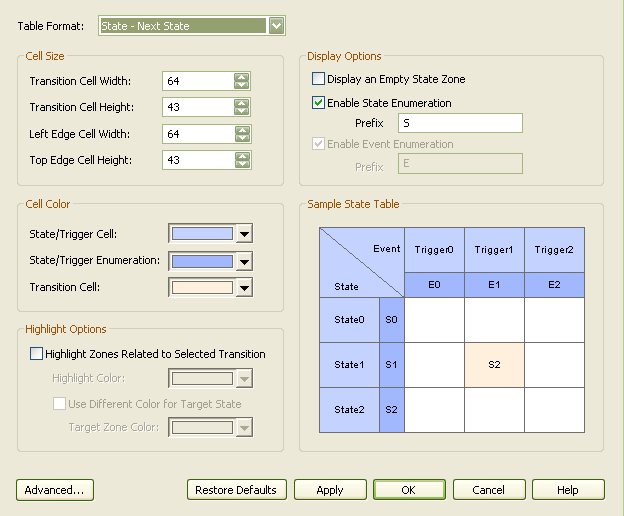
You can choose the State Machine table layout and set other options from the State Machine Diagram: Options dialog, which you display by either:
| · | Double-clicking on the State Machine table background or |
| · | Right-clicking on the background and selecting the State Table Options context menu option. |
Field |
Description |
||||||
Table Format |
Click on the drop-down arrow and select the required table format:
|
||||||
Cell Size |
|||||||
Transition Cell Width |
Type or select the width of the transition cells (that is, the column width). |
||||||
Transition Cell Height |
Type or select the height of the transition cells (that is, the row height). |
||||||
Left Edge Cell Width |
Type or select the width of the left edge (row title) cells. |
||||||
Top Edge Cell Height |
Type or select the height of the top edge (column title) cells. |
||||||
Cell Color |
|||||||
State/Trigger Cell |
Click on the drop-down arrow and select the color of the row and column title cells. |
||||||
State/Trigger Enumeration |
Click on the drop-down arrow and select the color of the enumeration (row/column numbering) cells. Note: You must select at least one of the Enable State Enumeration and Enable Event Enumeration checkboxes to set this color. |
||||||
Transition Cell |
Click on the drop-down arrow and select the color of the transition cells (in the main body of the table). |
||||||
Highlight Options |
|||||||
Highlight Zones Related to Selected Transition |
Select this checkbox to highlight the cells for all elements involved in a selected transition - the initial state, the target state, and the trigger. |
||||||
Highlight Color |
Click on the drop-down arrow and select the color of the highlight. |
||||||
Use Different Color for Target State |
Select this checkbox to highlight the cell for the target element in a transition in a different color to the cell for the source element. |
||||||
Target Zone Color |
Click on the drop-down arrow and select the color of the highlight. |
||||||
Display Options |
|||||||
Display an Empty State Zone |
Select the checkbox to add an empty row (and, on a State - Next State table, an empty column) to the end of the table. The title cell contains an ellipsis (...). You can click twice (not double-click) on the ellipsis to edit it and identify a new state. In this case, another empty state zone is automatically added. |
||||||
Enable State Enumeration |
Select this checkbox to add a cell to each state title cell, to number the state. Numbering starts at 0. |
||||||
Prefix |
If required, type a prefix for the state number or delete the default S to have no prefix. |
||||||
Enable Event Enumeration |
Select this checkbox to add a cell to each event or trigger title cell, to number the event. Numbering starts at 0. |
||||||
Prefix |
If required, type a prefix for the event number or delete the default E to have no prefix. |
||||||
Sample State Table |
Displays a preview of the table format as you define it. |
||||||
Button |
Description |
Advanced |
Click on this button to define diagram options. The State Machine Diagram Properties dialog displays. |
Restore Defaults |
Click on this button to reapply the State Table diagram default values. |
Apply |
Click on this button to apply changed options to the State Table diagram. |
See Also