To introduce C# GUI event handling in a gentle, stepwise fashion, we'll do so in three phases:
First, we'll talk about the C# event model in general.
Secondly, we'll illustrate how to tackle event handling with a simple Push Me button example.
Finally, we'll dive in and provide full-blown event handling for the SRS GUI.
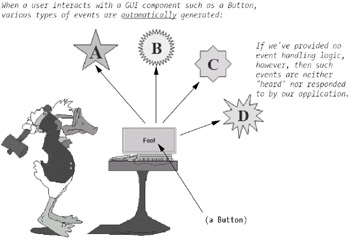
GUI events are generated whenever a user interacts with an enabled object on the GUI: for example, clicks a button, types in a field, and so on. As with virtually everything else in C#, events themselves are objects! There are many different types of event; we'll learn about several of these shortly.
When we create a GUI object, it automatically has the ability to generate one or more types of event whenever a user interacts with it—we need do nothing to get this phenomenon to occur (see Figure 16-40).
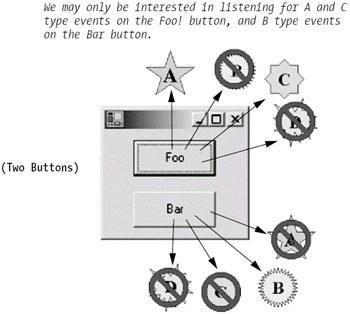
What we do need to explicitly deal with, however, is programming how the GUI should react to the subset of events that we're interested in (known as event handling). Otherwise, events are generated but ignored, in the same way that the sound of a tree falling in the woods is ignored if there is nobody there to hear it (see Figure 16-41).
The C# mechanism for "listening for" and responding to specific types of events on specific GUI objects takes advantage of the C# delegation model, and thus involves the use of a special C# type known as a delegate. Let's discuss the delegation model in general first, after which we'll return to a discussion of how the delegation model is used specifically in the case of C# GUI event handling.
Recall from our discussion of interfaces in Chapter 7 that an interface is a set of abstract method headers that collectively specify the behaviors that an implementing class must provide. The implementing class, in turn, must program concrete method bodies for each of the methods specified by the interface. By way of review, here's a simple example of an interface, ITeacher, and a class, Professor, that implements the ITeacher interface:
// An interface ...
public interface ITeacher {
  // An abstract method header -- no "body" provided.
  void ChooseTextbook();
}
// ... and a class that implements the interface.
public class Professor : ITeacher {
  // A concrete implementation of the method.
  public void ChooseTextbook() {
    // A concrete method body goes here, to implement the business
    // logic for how this method is to be carried out for a Professor ...
    // details omitted.
  }
}
In a certain general sense, we can think of a delegate as a form of "pseudo-interface" that specifies only one such abstract method to be programmed by an "implementing" class. However, unlike an interface, which requires that the implementing class (Professor, in our preceding example) provide specific logic for all of the required methods (ChooseTextbook, in our preceding example) at compile time, classes that specify/utilize delegates can defer a decision on what specific logic is to be performed until run time. Let's look at this conceptually in a bit more detail:
As shown in Figure 16-42, at compile time, a class X declares that it requires a delegate "plug-in"–i.e., a method with a header that is compatible with the delegate header in terms of its return type and argument signature; note that the "plugged in" method needn't have the same name as the delegate, however.
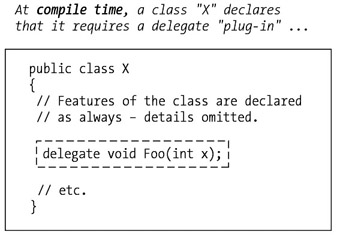
Figure 16-42: Class X declares a requirement for a delegate "plug-in."
Then, at run time, a method with a compatible header is associated with a particular object/instance of X, serving essentially like a "plug-in" for that object (see Figure 16-43).
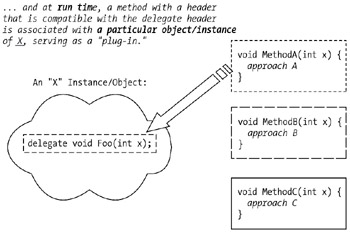
Figure 16-43: An appropriate method is associated with an instance of X at run time.
As long as the header of the method being handed into the object in question matches the prescribed header of the delegate in terms of its argument signature and return type, all is well. If the headers aren't compatible, the compiler will generate the following error:
error CS0123: Method <method_name> does not match delegate <delegate_name>
| Note?/td> |
For readers who are familiar with the C or C++ programming languages, note that a delegate is, very loosely speaking, conceptually similar in nature to the notion of a function pointer in those languages. However, C# delegates are far more sophisticated than C/C++ function pointers; delegates are true objects, in that they are instantiated at run time using the new keyword, and encapsulate both a method and a reference to the target object that the method is to operate upon. |
The actual behind-the-scenes mechanism of delegates is much more complex than what we've conceptualized here, but the net effect—namely, having the ability at run time to "plug in" behavior for a given object—is all we need to understand conceptually about delegates in order to provide event handling for a GUI.
| Note?/td> |
We'll be taking advantage of the delegation mechanism that is built into the various C# GUI component classes to plug in behaviors for the various objects comprising the SRS GUI. For an in-depth discussion of how general-purpose delegates can be crafted and used for a variety of purposes beyond GUI event handling, please refer to the recommended reading list in Chapter 17. |
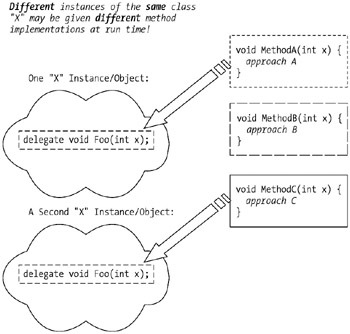
Note that each object/instance of X can be handed a different behavioral implementation at run time, if desired, as shown in Figure 16-44.
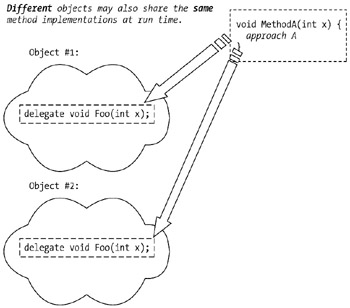
Of course, it's also possible to associate the same method with more than one object if desired, as we can see in Figure 16-45.
We can actually associate multiple behaviors to the same delegate if the delegate in question happens to be a special type of delegate known as a multicast delegate. As illustrated conceptually in Figure 16-46, a multicast delegate can accept multiple methods as "plug-ins" at run time, and will execute the logic of all of them in turn.
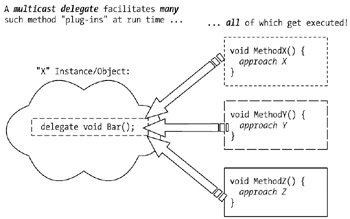
Again, the actual mechanism of a multicast delegate is much more complex than what we've conceptualized here, but the net effect is the same: namely, having the ability at run time to plug in multiple behaviors for a given object to perform.
The C# language uses the delegation model as described previously to implement events and event handling.
Events in C# are represented by instances of a special derived type of multicast delegate know as an event delegate.
Every FCL GUI class declares or inherits one or more events as public members. Each such event represents a different type of event that a particular type of GUI object can generate in response to user interactions with the object. For example, here are some of the events declared as public members of the Button class:
MouseDown: Occurs when the mouse pointer is over the Button and the mouse button is pressed.
MouseUp: Occurs when the mouse pointer is over the Button and the mouse button is released.
Click: Represents the user's "click" of a button, when the mouse pointer is over the Button and the mouse button is pressed and released. (Whenever a user clicks a button, therefore, all three of these event types–MouseDown, MouseUp, and Click–are generated.)
BackColorChanged: Occurs when the background color of the Button is programmatically changed.
SizeChanged: Is generated when the size of the Button is programmatically changed.
and there are more; the Button class declares or inherits over 50 events representing a wide variety of things that can happen to a Button.
To provide event handling for a given object, there are three basic steps that programmers must take:
We must first decide which subset of available event types we're interested in handling for that given GUI object.
| Note?/td> |
A complete list of all event types that are generated for each predefined GUI class can be found in the .NET Framework SDK documentation. |
We must write event handler methods for every event type that is to be handled for that object, to define the logic that is to be performed when handling each event of interest. The return type and argument list of the event handling methods have to be the same as those declared by the event delegate.
We must provide the logic to "associate" the event handling method(s) to the object's appropriate event delegate(s) at run time.
Before we retrofit event handling into the SRS GUI, we'll use a simple example of a Push Me button to illustrate all three of these steps.
The look of our simple Push Me example is achieved via the following code—a Form with a single Button object attached to it—which should be self-explanatory, based on our earlier discussions of assembling the look of a GUI:
// PushMe.cs -- Take 1

using System;
using System.Windows.Forms;
using System.Drawing;

public class PushMe : Form
{
  Button pushMeButton;

  public PushMe() {
    // Create the Button.
    pushMeButton = new Button();
    pushMeButton.Text = "Push Me";
    pushMeButton.Height = 60;
    pushMeButton.Width = 80;
    pushMeButton.Top = 60;
    pushMeButton.Left = 60;

    // Add the Button to the Form.
    this.Controls.Add(pushMeButton);

    // Size the Form and make it visible.
    this.Height = 200;
    this.Width = 200;
    this.StartPosition = FormStartPosition.CenterScreen;
    this.Visible = true;
  }

  // For simplicity, we'll place a Main method inside of the PushMe.cs
  // file, to use as a "test scaffold" driver.
  static void Main() {
    Application.Run(new PushMe());
  }
}
When the PushMe.cs file is compiled and the resulting executable run, the GUI in Figure 16-47 should appear on the screen.
The concept of operations for our Push Me example is quite simple: the button will start out with a label that says "Push Me". When the button is first clicked, its label will change to read "Ouch!!!". When clicked a second time, the button's label will change back to "Push Me"; repeated clicks of the button will toggle its label back and forth.
As the application currently stands, however, we can indeed "click" the button, but while various types of events will automatically be generated in response to our clicks (Click events, MouseDown events, MouseUp events, etc.), nothing will change visually on our GUI as a result because we're not yet recognizing and responding to the Click events in particular.
Let's now add event handling to the Push Me button for Click events.
First, let's write an event handler method that will change the label of the Button from "Push Me" to "Ouch!!!", or vice versa, when the Button is clicked. The precise header of an event handler method is mandated by the FCL based on the type of event that we wish to handle; different types of events mandate different event handler signatures.
The Click event of the Button class requires a method with the following header:
public void MethodName(object source, EventArgs e)
wherein only the method name and parameter names are up to us to specify; the method must have a return type and argument signature as shown.
Two arguments are passed into a method associated with an EventHandler delegate—an object reference representing the event source, and an instance of an EventArgs object, which will contain some additional information about the event, such as where on the screen the event occurred, how many mouse clicks caused the event, and so on.
Arguments are passed automatically by the C# runtime; we needn't concern ourselves with these, just as we didn't have to worry about how the reference to an Exception object gets "handed" to a catch block when performing exception handling.
| Note?/td> |
As it turns out, the previous header pattern is known as the generic EventHandler header. Many event types, belonging to many different classes—for example, the Button class's Click, BackColorChanged, and SizeChanged event types, among many others—require this same header pattern when writing event handler methods. Other event types—for example, the MouseUp event type of the Button class— require slightly different header patterns; MouseUp, for example, requires a MouseEventHandler header pattern:
public void MethodName(object source, MouseEventArgs e)
An exhaustive discussion of all of the various event types and their corresponding handler header syntax is beyond the scope of this book to address; once you've gotten a grasp on the general concepts of C# event handling, however, we encourage you to consult the .NET Framework SDK documentation to study all of the variations that event handling can take for various FCL GUI classes and event types. |
An important consequence of the plug-in nature of the delegation event model used by C# is that an event handling method doesn't have to be declared within the class of the component that generates the event—e.g., a method for handling a button click doesn't have to be declared within the Button class. This is fortunate, as we wouldn't want to have to modify/extend the predefined Button class simply to include an event handling method! Event handling methods can be (and usually are) placed in a different class entirely; for the SRS GUI as well as for our simple PushMe example, all of the event handling methods will be placed in the main Form class to which a given component is attached.
| Note?/td> |
Architecturally, we have several different options with respect to where we insert the event handling method code—in fact, event handlers can even be declared in a class by themselves. This facilitates reuse of the event handling logic across multiple forms in a given application and, for that matter, across multiple applications. The mechanics of doing so are beyond the scope of this book to address, however. |
Here's a revised version of the PushMe class, expanded to include an appropriate event handler method (highlighted in the following code):
// PushMe.cs -- Take 2

using System;
using System.Windows.Forms;
using System.Drawing;

public class PushMe : Form
{
  Button pushMeButton;

  public PushMe() {
    // Create the Button.
    pushMeButton = new Button();
    pushMeButton.Text = "Push Me";
    pushMeButton.Height = 60;
    pushMeButton.Width = 80;
    pushMeButton.Top = 60;
    pushMeButton.Left = 60;

    // Add the Button to the Form.
    this.Controls.Add(pushMeButton);

    // Size the Form and make it visible.
    this.Height = 200;
    this.Width = 200;
    this.StartPosition = FormStartPosition.CenterScreen;
    this.Visible = true;
  }

  // Event handling method for the "Push Me" button's Click events.
  public void ButtonClicked(object source, EventArgs e) {
    // If the button label currently says "Push Me" ...
    if (pushMeButton.Text == "Push Me") {
      // ... switch the label to "Ouch!!!" ...
      pushMeButton.Text = "Ouch!!!";
       }
    // Otherwise, do the reverse!
    else {
      pushMeButton.Text = "Push Me";
    }
  }

  // Test scaffold driver.
  static void Main() {
    Application.Run(new PushMe());
  }
}
Note that because the ButtonClicked method is declared at the class scope level of the PushMe class as a method, as is the reference variable pushMeButton as an attribute, we're able to refer to the Button object by reference as pushMeButton within the ButtonClicked method, thereby ignoring the availability of the source parameter that is being passed into the method:
  // We're ignoring the "source" parameter in this method.
  public void ButtonClicked(object source, EventArgs e) {
    // If the button label currently says "Push Me" ...
    if (pushMeButton.Text == "Push Me") {
      // etc.
We can rewrite this method to take advantage of the source object reference as shown here:
  public void ButtonClicked(object source, EventArgs e) {
    // We'll obtain a reference to the Button that generated the event by casting
    // the generic object reference "source" to a Button reference.
    Button b = (Button) source;

  // Everything else about the event handling method is the same, except
  // that we're now referring to "b" rather than "pushMeButton".
  if (b.Text == "Push Me") {
    b.Text = "Ouch!!!";
  }
  else {
    b.Text = "Push Me";
  }
}
While doing so certainly isn't necessary based on how we've crafted the PushMe class, if we were to use a different architectural approach to providing event handling methods (as discussed in an earlier background comment), such that the pushMeButton reference variable was not in scope, then this would be the preferred means of referencing the source object, and so we encourage you to get into the habit of using the second, more generic approach in all cases.
If we compile and run our "Take 2" version of the program, we still won't see the button label change as we click it. Why is this? Because it isn't sufficient to merely write an event handling method; we must also associate this event handling method with the PushMe button specifically, as described in the next section.
All FCL GUI event delegates, including the Button class's Click delegate, are multicast delegates, which as we explained earlier means that we can associate more than one event handling method with a given event type for a given component instance at run time. To associate a ButtonClicked event handling method with the Click multicast delegate for a particular Button reference, we therefore use the following syntax to add an event handler to the list of event handlers already acknowledged by the component:
// Associate an event handler method with a button.
// Pseudocode.
buttonReference.Click += new EventHandler(methodName);
(If no such event handlers have previously been associated with the delegate in question, the one we're currently attaching becomes the first such event handler in the list.)
Specifically, to associate our ButtonClicked event handling method with the Click multicast delegate for the pushMeButton, we use the following syntax in the PushMe class constructor:
// Associate an event handler method with the button.
pushMeButton.Click += new EventHandler(ButtonClicked);
Because event delegates are given public access as members of the associated class (Click is a public member of the Button class), we can access an event delegate of a GUI object from client code via dot notation, as shown earlier.
Our ButtonClicked method is now associated with Click type events for the pushMe button. Whenever this button is clicked, the runtime will automatically invoke every event handler method in the Click event's invocation list—in this case, our ButtonClicked method will be called. All this activity happens automatically "behind the scenes," without us having to worry about any of the invocation details.
Here is the entire listing of the completed PushMe class, with the preceding logic placed in context and highlighted:
// PushMe.cs -- Take 3

using System;
using System.Windows.Forms;
using System.Drawing;

public class PushMe : Form
{
  Button pushMeButton;

  public PushMe() {
    // Create a Button.
    pushMeButton = new Button();
    pushMeButton.Text = "Push Me";
    pushMeButton.Height = 60;
    pushMeButton.Width = 80;
    pushMeButton.Top = 60;
    pushMeButton.Left = 60;
   // Associate an event handler with the Button.
   pushMeButton.Click += new EventHandler(ButtonClicked);

   // Add the Button to the Form.
   this.Controls.Add(pushMeButton);

   // Size the Form and make it visible
   this.Height = 200;
   this.Width = 200;
   this.StartPosition = FormStartPosition.CenterScreen;
   this.Visible = true;
}
   // Event handling method for the "Push Me" button.
   public void ButtonClicked(object source, EventArgs e) {
     if (pushMeButton.Text == "Push Me") {
       pushMeButton.Text = " Ouch!!!";
     }
     else {
       pushMeButton.Text = "Push Me";
     }
   }

   static void Main() {
     Application.Run(new PushMe());
   }
}
Now when the PushMe application is run, the text of the Button will indeed change from "Push Me" to "Ouch!!!" and back again every time the button is clicked.
Simple though it is, the PushMe example nonetheless illustrates how easy it is to take advantage of C# event handling. We'll use the exact same concepts and approach, with only slightly more complexity, in implementing event handling for the SRS GUI. Before we do so, however, let's revisit our model classes.
Many of the classes used in the Chapter 15 version of the SRS application remain unchanged in the solution to Chapter 16—that's the beauty of separating the model from the view! Because the model is, for the most part, blissfully ignorant that there even is a view (the view knows about the model, but the model doesn't know about the view), the model classes needn't change to accommodate it. So, the following classes (as presented in Chapter 15) are unaltered in the GUI version of the SRS:
CollectionWrapper.cs
Course.cs
CourseCatalog.cs
Faculty.cs
Professor.cs
Transcript.cs
TranscriptEntry.cs
and therefore we won't revisit any of these classes' code in this chapter.
The following classes have been modified from the versions used in Chapter 15 so as to add a method or two in support of the GUI; we'll study their code in detail one by one:
ScheduleOfClasses.cs: We've added a single method, GetSortedSections, to support our use of ListBox objects.
Student.cs: We've added a single attribute—string password—to handle the requirement for a user to log on to the SRS system, and then made a few changes to the Student methods to recognize this new attribute. We also added a few other data retrieval methods needed to support the GUI; we'll discuss all of these changes in depth shortly.
Section.cs: We made only one minor change, which as it turns out wasn't related to the GUI at all, but rather was simply an improvement in the logic from that used in Chapter 15.
And, of course, we had to significantly revamp the main SRS.cs "driver" code to accommodate the newly added GUI. As it turns out, we were able to significantly streamline the code of the SRS class, as you'll soon see.
Despite the fact that we did go back to make a few enhancements to the domain classes to accommodate the GUI, these enhancements involved business logic only, and were made in such a way as to keep the model loosely coupled from the view; that is, we could easily swap out the SRS GUI that we're building and add a completely new GUI down the road, and our domain classes would remain intact. In the worst case, our domain classes would contain a few methods (those that we added for use by the first GUI) that would no longer get used.
As we've already discussed in this chapter, we've added two new classes to the SRS application to take care of the GUI "view."
MainForm.cs, a type of Form, used as our main application window
PasswordForm.cs, which provides a password dialog box used when logging a student on to the SRS
We'll need to make some minor additional changes to these classes, as well.
| Note?/td> |
Recommendation: if you haven't already done so, please consider downloading and printing a copy of all of the SRS program files related to Chapter 16, so that you have them handy to refer to when following along with the discussion that follows. Download instructions are provided in Appendix D. |
The only change that we need to make to the ScheduleOfClasses class as originally presented in Chapter 15 is related to our decision to use a ListBox to display the schedule of classes in our SRS GUI.
We learned earlier in this chapter how to add elements to a ListBox. We would like to add the schedule of classes to the ListBox in alphabetical order.
However, as originally designed, the ScheduleOfClasses class maintains information on what sections are available for student registration as a Hashtable of Section objects. In the section titled "Stepping Through Collections with Enumerators" in Chapter 13, we learned how to use an IEnumerator object to step one-by-one through all of the objects contained within a collection such as an ArrayList or a Hashtable. But, the Section objects are stored in no particular order in the Hashtable—the nature of Hashtables doesn't guarantee sorted ordering—and so stepping through the Hashtable with an IDictionaryEnumerator wouldn't necessarily yield an alphabetically sorted list of Sections. All things being equal, we would prefer to display the schedule of classes sorted in order by course number.
By adding a single method, GetSortedSections, to return an alphabetically sorted ArrayList of Section objects based on this Hashtable, we're then able to use this method from within MainForm.cs to add an alphabetically sorted list of Section elements to the scheduleListBox.
First, we'll present the new GetSortedSections method in its entirety; then, we'll review what the new method does in depth. (Because the code for the entire ScheduleOfClasses class is rather lengthy, and because you've seen much of the class code in previous chapters, we're only going to present those chunks of code that are new as of the Chapter 16 version. Again, we encourage you to have a printed copy of the complete class available for comparison purposes.)
  // This next method was added to the ScheduleOfClasses
  // class for use with the SRS GUI.
  // Convert the contents of the sectionsOffered Hashtable
  // into an ArrayList of Section objects that is sorted in
  // alphabetical order.

  public ArrayList GetSortedSections() {
    ArrayList sortedKeys = new ArrayList();
    ArrayList sortedSections = new ArrayList();

    // Get an IDictionaryEnumerator of the key-value pairs
    // contained in the sectionsOffered Hashtable. Load the
    // sortedKeys ArrayList with these keys.

    IDictionaryEnumerator e = sectionsOffered.GetEnumerator();

    while (e.MoveNext()) {
      string key = (string) e.Key;
      sortedKeys.Add(key);
    }

    // Sort the keys in the ArrayList alphabetically.

    sortedKeys.Sort();

    // Load the value corresponding to the sorted keys into
    // the sortedSections ArrayList.

    for (int i = 0; i < sortedKeys.Count; i++) {
      string key = (string) sortedKeys[i];
      Section s = (Section) sectionsOffered[key];
      sortedSections.Add(s);
    }

    // Return the ArrayList containing the sorted Sections.

    return sortedSections;
  }
Let's step through the code for this new method:
We begin by creating two empty ArrayLists, which will be used to store the results of our sorting efforts:
public ArrayList GetSortedSections() {
  ArrayList sortedKeys = new ArrayList();
  ArrayList sortedSections = new ArrayList();
We'll put IEnumerators to good use now. Using the GetEnumerator method defined for Hashtable objects, we're able to obtain an IDictionaryEnumerator object representing all of the key-value pairs from the sectionsOffered Hashtable as we discussed in Chapter 13. (Recall from Chapter 13 that the keys in our sectionsOffered Hashtable are string objects representing the various course names.)
IDictionaryEnumerator e = sectionsOffered.GetEnumerator();
Stepping through this IDictionaryEnumerator until it's exhausted, we cast each key as it's retrieved back to its string representation. The unsorted keys are added (still in unsorted order) to the sortedKeys ArrayList.
    while (e.MoveNext()) {
      string key = (string) e.Key;
      sortedKeys.Add(key);
    }
The keys are then sorted by calling the Sort method on the sortedKeys ArrayList. As we discussed in Chapter 13, the default behavior for the Sort method is to sort a collection of strings alphabetically.
sortedKeys.Sort();
Now that sortedKeys ArrayList contains all of the keys in alphabetical order, we'll step through this ArrayList and use it to pull the Section objects themselves out of the Hashtable in sorted order! As we pull them out of the Hashtable, we'll stick them into a second ArrayList called sortedSections.
    for (int i = 0; i < sortedKeys.Count; i++) {
      string key = (string) sortedKeys[i];
      Section s = (Section) sectionsOffered[key];
      sortedSections.Add(s);
    }
We now have an ArrayList containing all Sections that were originally in the Hashtable, but in alphabetically sorted order.
    return sortedSections;
  }
When we first modeled the SRS in Part Two of the book, it didn't occur to us to allow for a Student to have a password field, since this is more of a computer-related artifact than it is a real-world attribute of a student. But, as is frequently the case, we find that we often must expand the features of a class once we begin implementation to accommodate what we often refer to as "solution space" or "implementation space" features. Such is the case with the password attribute of Student.
Because the Student class code is so long (over six pages when printed!), and because you've seen much of the Student class code in previous chapters, we're only going to present those segments of code that are new as of the Chapter 16 version. Again, we encourage you to have a printed copy of the complete class available for comparison purposes.
First, we add the attribute
private string password;
Next, we acknowledge the existence of this new attribute by adding initialization code to both versions of the Student constructor. Most of the constructor code is unaltered from its Chapter 15 version; we've repeated it all here, but have highlighted only the changes that were necessary:
  public Student(string ssn) : this() {
    // First, construct a "dummy" Student object. Then,
    // attempt to pull this Student's information from the
    // appropriate file (ssn.dat: e.g., 111-11-1111.dat).
    // The file consists of a header record, containing
    // the student's basic info. (ssn, name, etc.), and
    // 0 or more subsequent records representing a list of
    // the sections that he/she is currently registered for.

    string line = null;
    StreamReader srIn = null;

    // Formulate the file name.

    string pathToFile = ssn + ".dat";

    try {
      // Open the file.

      srIn = new StreamReader(new FileStream(pathToFile,FileMode.Open));
    // The first line in the file contains the header
    // information, so we use ParseData() to process it.

    line = srIn.ReadLine();
    if (line != null) {
      ParseData(line);
    }

    // Remaining lines (if there are any) contain
    // section references. Note that we must
    // instantiate an empty vector so that the
    // ParseData2() method may insert
    // items into the ArrayList.

    attends = new ArrayList();
    line = srIn.ReadLine();

    // If there were no secondary records in the file,
    // this "while" loop won't execute at all.

    while (line != null) {
      ParseData2(line);
      line = srIn.ReadLine();
    }

    srIn.Close();
  }
  catch (FileNotFoundException f) {
    // Since we are encoding a "dummy" Student to begin
    // with, the fact that his/her name will be equal
    // to "???" flags an error. We have included
    // a boolean method SuccessfullyInitialized()
    // which allows client code to verify the success
    // or failure of this constructor (see code below).
    // So, we needn't do anything special in this
    // "catch" clause!
  }
  catch (IOException i) {
    // See comments for FileNotFoundException above;
    // we needn't do anything special in this
    // "catch" clause, either!
  }
    // Initialize the password to be the first three digits
    // of the student's ssn.
    this.Password = this.Ssn.Substring(0,3); // added for GUI purposes

    // Create a brand new Transcript.
    // (Ideally, we'd read in an existing Transcript from
    // a file, but we're not bothering to do so in this
    // example).

    this.Transcript = new Transcript(this);
  }
  // A second form of constructor, used when a Student's data
  // file cannot be found for some reason.

  public Student() : base("???", "???") {
    // Reuse the code of the parent's (Person) constructor.
    // Question marks indicate that something went wrong!

    this.Major = "???";
    this.Degree = "???";

    // Placeholders for the remaining fields (this
    // Student is invalid anyway).

    this.Password = "???"; // added for GUI purposes
    this.Transcript = new Transcript(this);
    attends = new ArrayList();
  }
Then, we added a property for the password field:
// Added for GUI purposes.
public string Password {
  get {
    return password;
  }
  set {
    password = value;
  }
}
  //-----------------------------
  // Miscellaneous other methods.
  //-----------------------------
we've added a method that will be used to validate the password that a user types in when logging into the GUI against his or her "official" password. The argument pw represents the value that a user has typed in (we'll see how this is determined when we visit the event handling code of the PasswordForm class), and of course password represents the "authentic" password for this student user.
  // This next method was added for use with the GUI.
  public bool ValidatePassword(string pw) {
    if (pw == null) {
      return false;
    }
    if (pw.Equals(password)) {
      return true;
    }
    else {
      return false;
    }
  }
As it turns out, there are a few more information retrieval methods that we're going to need in support of the GUI—methods that we didn't anticipate needing when we modeled the SRS in Part Two of the book, but which only surfaced when we designed the SRS GUI.
We want a method that will enable the MainForm to retrieve an ArrayList of all Section objects that the Student is currently enrolled in, so that it may be used to populate the studentCourseList ListBox:
  // This next method was added for use with the GUI.
  public ArrayList GetSectionsEnrolled() {
    return attends;
  }
We also need a method to use in retrieving the total number of Sections that a Student is registered for, so that we may use this value to update the totalTextBox object on the GUI:
  // This next method was added for use with the GUI.
  public int GetCourseTotal() {
    return attends.Count;
}
Again, while we'll add such methods to the class, we won't have compromised our model-view separation in doing so, because they essentially represent business logic only (e.g., what it means for a password to be valid).
The Section class for this chapter differs from the version that we presented in Chapter 15 in the way that a section enrolls a student. In the previous version of the SRS, we created a Section object and then called the Enroll method on the Section object, passing a reference to a Student object in as an argument. If all of the "business logic" requirements for enrolling in the section were met, the Student was added to the enrolledStudents Hashtable of the Section object using the value of the Student object's ssn attribute as the Hashtable key.
But now the access to the SRS is through the GUI that we've developed in this chapter. When a student logs on to the SRS, a Student object is created with data read from the student's data file. The GUI will read the sections the student has enrolled in and will call the Enroll method of the corresponding Section object. However, there is a potential problem with this procedure. What happens if a student logs on to the SRS, logs off, and then changes his or her mind and logs on again without ever closing the SRS application? Every time the student logs on, the GUI will have the appropriate Section objects enroll the student. The upshot will be that the student will wind up being enrolled in all of the sections twice! In fact, the student won't even get this far, because an attempt to add a duplicate key to a C# Hashtable causes an exception to be thrown.
| Note?/td> |
This is an example of a bug that managed to make its way undetected through the testing that we performed via the command-line version of the SRS driver as presented in Chapter 14. Despite our best efforts, some usage scenario problems will invariably escape detection when we're using a command line–driven application, because we essentially have to try to simulate all possible permutations and combinations of user interactions as "hardwired" Main method code sequences, which is virtually impossible. Once we have a working GUI connected to the application, on the other hand, we can explore a much broader range of usage patterns. Nonetheless, the fact that we've only found one such bug in our SRS model code after adding on the GUI speaks highly for the value in using a command line–driven application to flush out many bugs before GUI coding has begun. |
Fortunately, the solution to this problem is quite simple. In the Enroll method of the Section class we need to check to see if the Student object is already in the enrolledStudents Hashtable. The ContainsKey method can be used to determine if a Hashtable contains a specified key. We need to change the original Enroll method syntax logic:
    // If we made it to here in the code, we're ready to
    // officially enroll the Student.

    // Note bidirectionality: this Section holds
    // onto the Student via the Hashtable, and then
    // the Student is given a handle on this Section.

    enrolledStudents.Add(s.Ssn, s);
    s.AddSection(this);
    return SUCCESSFULLY_ENROLLED;
to the following:
    // If we made it to here in the code, we're ready to
    // officially enroll the Student.

    // Note bidirectionality: this Section holds
    // onto the Student via the Hashtable, and then
    // the Student is given a handle on this Section.

    // When using the GUI, it's possible for a student to log
    // on, log off, and then log on again while the SRS is
    // still running. This prevents a student from being
    // enrolled in the same class more than one time.

    if (!enrolledStudents.ContainsKey(s.Ssn)) {
      enrolledStudents.Add(s.Ssn, s);
    }

    s.AddSection(this);
    return SUCCESSFULLY_ENROLLED;
Along with the changes we made to the ScheduleOfClasses and Student classes, several minor changes need to be made to the MainForm class. The first thing we need to add is a reference to the Student currently logged on to the SRS. This reference is declared as an attribute of the MainForm class.
  // Maintain a handle on the Student who is logged in.
  // (Whenever this is set to null, nobody is officially logged on.)
  private Student currentUser;
We'll use this handle when we retrieve a student's list of registered courses so as to display them, as well as to save a student's data to a file.
Another new attribute of the MainForm class will be a reference to a PasswordForm object:
private PasswordForm passwordDialog;
When a user tries to log in to the SRS, the passwordDialog object will be displayed; we want to maintain a handle to this object so that we may "talk" to the dialog box to determine what was typed into the passwordDialog TextBox.
The other change to the MainForm class is to load the course catalog into the scheduleListBox object when the SRS is launched. To list the course catalog alphabetically, we make use of GetSortedSections method described earlier in this chapter.
    // Create "Schedule of Classes" ListBox Object.
    scheduleListBox = new ListBox();
    scheduleListBox.Width = 210;
    scheduleListBox.Height = 225;
    scheduleListBox.Top = classScheduleLabel.Bottom + 5;
    scheduleListBox.Left = ssnTextBox.Right + 30;

    // Display an alphabetically sorted course catalog list
    // in the scheduleListBox object.
    ArrayList sortedSections = SRS.scheduleOfClasses.GetSortedSections();
    for (int i = 0; i < sortedSections.Count; i++) {
      scheduleListBox.Items.Add(sortedSections[i]);
    }
Once again, we're only showing snippets of the MainForm.cs code listing. Once you've downloaded the source file from the Apress web site, you can review the snippets within the context of the entire code listing.
Now that we have a GUI to use in interacting with the SRS, many of the extra steps that we went through in the Chapter 15 version of the SRS driver class to initialize the application are now unnecessary. Let's run through the code segments that we've been able to remove.
We no longer need to create Student objects to simulate logons, since we now have a GUI for this purpose, so we'll remove the code that instantiates Students:
    // Let's temporarily create Students this way as a test,
    // to simulate Students logging on. Note that only the
    // first Student has "preregistered" for courses based
    // on the content of his/her ssn.dat file (see Student.cs
    // for details).

    Student s1 = new Student("111-11-1111");
    Student s2 = new Student("222-22-2222");
    Student s3 = new Student("333-33-3333");
Neither do we need to simulate a student enrolling in a section, since we can perform that function via the GUI now, too, so we'll remove the following:
    // Let's have one Student try enrolling in something, so
    // that we can simulate his/her logging off and persisting
    // the enrollment data in the ssn.dat file (see Student.cs
    // for details).

    Section sec = scheduleOfClasses.FindSection("ART101 - 1");
    sec.Enroll(s2);
    s2.Persist(); // Check contents of 222-22-2222.dat!
And, since we can now verify the outcome of our interactions with the SRS simply by viewing the state of the GUI, we no longer need to use Console.WriteLine() calls to display the internal state of objects (although we may wish to retain this code, and simply comment it out in our SRS program, to help us with debugging the application at a later date).
The only new logic that we've had to add to the SRS class was the code needed to create and display an instance of the main GUI window:
      // Create and display an instance of the main GUI window.
    Application.Run(new MainForm());
  }
}
The resultant streamlined SRS class is as follows:
// SRS.cs -  Chapter 16 version.
// A main driver for the GUI version of the SRS.
using System;
using System.Collections;
using System.Windows.Forms;

public class SRS
{
  // We can effectively create "global" data by declaring
  // public static fields in the main class.

  // Entry points/"roots" for getting at objects.
  public static Faculty faculty = new Faculty();
  public static CourseCatalog courseCatalog = new CourseCatalog();
  public static ScheduleOfClasses scheduleOfClasses =
                            new ScheduleOfClasses("SP2004");

  // We don't create a collection for Student objects, because
  // we're only going to handle one Student at a time -- namely,
  // whichever Student is logged on.

  static void Main() {
    // Initialize the key objects by reading data from files.
    // Setting the second argument to true causes the
    // InitializeObjects() method to use the ParseData()
    // method instead of ParseData2().
    faculty.InitializeObjects("Faculty.dat", true);
    courseCatalog.InitializeObjects("CourseCatalog.dat", true);
    scheduleOfClasses.InitializeObjects("SoC_SP2004.dat", true);

    // We'll handle the students differently: that is,
    // rather than loading them all in at application outset,
    // we'll pull in the data that we need just for one
    // Student when that Student logs on -- see the Student
    // class constructor for the details.

    // Establish prerequisites.
    // Setting the second argument to false causes the
    // InitializeObjects() method to use the ParseData2()
    // method instead of ParseData().
    courseCatalog.InitializeObjects("Prerequisites.dat", false);

    // Recruit a professor to teach each of the sections.
    faculty.InitializeObjects("TeachingAssignments.dat", false);
    // Create and display an instance of the main GUI window.
    Application.Run(new MainForm());
  }
}
The SRS application is compiled as before with the following command:
csc /out:SRS.exe *.cs /main:SRS
This generates an executable file named SRS.exe that can be run from MS DOS Prompt with the following command:
SRS
We're now ready to complete the development of the SRS GUI. We've already created a GUI view—comprised of the SRS MainForm and PasswordForm classes—of our model—that is, our domain objects Student, Professor, Course, Section, and so on. The last thing that remains to be done, then, is to complete our SRS application by adding event handling, the "controller" aspect, to our GUI.
By way of review, we stated earlier in the chapter that we were going to need to provide listeners for each of the following GUI objects, as these are the objects that the user will be interacting with:
We'll need the GUI to recognize when a user has typed his or her student ID number into the ssnTextBox as a signal that he or she wishes to log on.
We'll need to program the logic for what is to happen behind the scenes when each of the four buttons at the bottom of the GUI—addButton, dropButton, saveButton, and logOffButton—is clicked.
We'll need to recognize when a user has made a selection in either the registeredListBox or scheduleListBox.
Because the MainForm.cs code listing has become so long (10+ pages!), we won't clutter up this chapter by repeating elements we've covered earlier in the chapter, but once again encourage you to download and print the entire file from the Apress web site. We'll provide editorial comments on those segments of code that are most unusual or complex, but please do take the time to read through all of the in-line documentation, as well.
The first thing we'll do is to register event handling methods with various SRS GUI objects. We want to respond to events generated by various ListBox, Button, and TextBox components, and so we'll associate an event handler with the public events of interest for each component using the += operator:
The ssnTextBox is the object that the user types his or her student ID into, such that the SRS system can recognize that a student wishes to log on. We therefore need to listen for events that are generated when a user presses the Enter key after typing in this field. The KeyUp event of the TextBox class is designed to do just that; as its name suggests, it's an event that is triggered whenever a key is released.
For the ListBox objects, we'll provide event handling logic to react whenever the element selected by the user inside the ListBox changes. The SelectedIndexChanged event of the ListBox class will serve our purposes.
For the Button objects, we want event handling to respond when a Button is clicked, and so we'll associate event handling methods with the Click event of the Button class.
To associate event handling methods with the desired type of event as generated by each of our components, we'll add the following code to the MainForm class constructor:
    // Assign an event handler to the SSN TextBox.
    ssnTextBox.KeyUp += new KeyEventHandler(SsnTextBoxKeyUp);

    // Add event handlers to the ListBox components.
    scheduleListBox.SelectedIndexChanged +=
                 new EventHandler(ScheduleSelectionChanged);
    registeredListBox.SelectedIndexChanged +=
                 new EventHandler(RegisteredSelectionChanged);

    // Assign event handlers to the Buttons.
    addButton.Click += new EventHandler(AddButtonClicked);
    dropButton.Click += new EventHandler(DropButtonClicked);
    saveButton.Click += new EventHandler(SaveButtonClicked);
    logOffButton.Click += new EventHandler(LogOffButtonClicked);
Of course, we haven't written the SsnTextBoxKeyUp, xxxSelectionChanged, or xxxButtonClicked event handler methods yet—we'll do so shortly.
The passwordTextBox object of the PasswordForm class will also implement event handling in a similar manner to the ssnTextBox, in that we want to respond to the event that occurs when the Enter key is pressed while typing into the TextBox. Specifically, when the Enter key is pressed, we'll assume that the user has finished typing his or her password. We'll enable our application to respond to KeyUp events in this TextBox by adding the following code to the PasswordForm class constructor:
    // Assign an event handler to the TextBox.
    passwordTextBox.KeyUp += new KeyEventHandler(PasswordKeyUp);
Now that we've associated event handling methods with all GUI object events of interest, the next step is to implement those events.
The SsnTextBoxKeyUp method is declared as a method in the MainForm class. The method's header syntax is prescribed by the KeyEventHandler delegate that it's associated with, and is as follows:
// Event handling method for the ssnTextBox.
public void SsnTextBoxKeyUp(object source, KeyEventArgs e) {
Note that the SsnTextBoxKeyUp method will be invoked every time a key is released while typing inside the TextBox, including the key presses of each digit in the user's password, but we only want to respond if the Enter key in particular is released. We can determine which key was released for a particular KeyEvent by inspecting the KeyEventArgs argument passed to the SsnTextBoxKeyUp method, as follows:
Every character on the keyboard has an integer value called a key code associated with it.
The KeyEventArgs object maintains a property called KeyCode that contains the key code value of whatever keystroke caused the event.
So, we'll add logic to the SsnTextBoxKeyUp method to first check whether the KeyCode value of the current KeyEvent is equal to the key code of the Enter key. If it is, we'll proceed with the event handling; if not, the if test fails, and we ultimately return from the method without doing any further processing.
    // We only want to act if the Enter key is pressed
    if (e.KeyCode == Keys.Enter) {
Next, assuming that the Enter key has indeed been pressed, we want to clear any information left over from a previous student's SRS session. We've created a private "housekeeping" method, ClearFields, which steps through the three objects on the GUI that represent student-specific information—nameTextBox, totalTextBox, and registeredListBox—clearing them of any information that is still being displayed for a previously logged-on student. You'll see the code for this method, along with the code for several other housekeeping methods, later in the chapter.
      // First, clear the fields reflecting the
      // previous student's information.
      ClearFields();
We use the Text property of the ssnTextBox object to pull whatever string value the user has typed into the field, and attempt to instantiate a new Student object representing the "real" student user (an example of a boundary class, as we discussed in Chapter 11):
      // We'll try to construct a Student based on
      // the ssn we read, and if a file containing
      // Student's information cannot be found,
      // we have a problem.

      currentUser = new Student(ssnTextBox.Text);
There are three possible outcomes when a user types an SSN number into the ssnTextBox, and we must account for all three.
A user may type an invalid SSN;
A user may type a valid SSN, but an invalid password; or
A user may type a valid SSN and a valid password.
The first possibility is that the user typed in an invalid SSN. To determine whether an SSN is valid, we use the StudentSuccessfullyInitialized method that was added to the Student class in Chapter 15; recall that this method was defined to return a bool value: true if the Student contructor was able to open the associated student's data file (for example, 111-11-1111.dat for a Student with a student ID of 111-11-1111), and false otherwise.
If the result of this method call was false, we reset the currentUser attribute of the MainForm class to null, to signify that no user is logged on; this has the added effect of causing reference variable currentUser to drop any handle that it might still have been holding on a previously logged-in Student object.
      if (!currentUser.StudentSuccessfullyInitialized()) {
        // Drat! The ID was invalid.
        currentUser = null;
Then, we formulate a warning message dialog box to that effect using the Show method of the MessageBox class, a technique that we discussed earlier in this chapter.
        // Let the user know that login failed.
        string message = "Invalid student ID; please try again";
        MessageBox.Show(message, "Invalid Student ID",
                  MessageBoxButtons.OK, MessageBoxIcon.Warning);
      }
If, on the other hand, the StudentSuccessfullyInitialized method returned a value of true, then we know that the Student class's constructor successfully read in the contents of the student's data file, populating all of the Student object's attributes, and that his or her password attribute has been initialized, as well. So, it's time to ask the user to provide a password, for us to check against this student's correct password. (It's conceivable that someone might be trying to impersonate a particular student by typing in his or her ID number, which would indeed retrieve that student's data from a file; but, if this student is an impostor who doesn't know the correct password, we want to find out before revealing/displaying the student's private information.)
      else {
        // Hooray! We found one! Now, we need
        // to request and validate the password.
        passwordDialog = new PasswordForm();
        passwordDialog.ShowDialog(this);
The preceding two lines of code are responsible for instantiating and displaying a PasswordForm object. We introduced the PasswordForm class earlier in this chapter, and will show the event handling code associated with it in the next section.
When the ShowDialog method is called on the passwordDialog object, the PasswordForm is displayed as a modal dialog box, which means that as long as the dialog box is displayed on the screen, the user will be unable to interact with the rest of the SRS GUI. More importantly, though, as long as the dialog box is displayed on the screen, the runtime will be awaiting events from that dialog box, and the code for the MainForm method that we're in the middle of executing is also suspended.
By the time we reach the line of code following the call to the ShowDialog method, we know that the password dialog box has been dismissed by the user, so we can use a property that we've declared for the PasswordForm class called Password to retrieve whatever the user has typed into the dialog box.
string password = passwordDialog.Password;
After we fetch the value of whatever password the user typed in, we can dispose of the dialog box, because we no longer need to "talk" with it to request any of its services:
passwordDialog.Dispose();
We next attempt to validate the password, and if the attempt succeeds, we display another MessageBox informing the user that the login succeeded. We then use another housekeeping method, SetFields, to populate the various objects on the GUI with this student's information so that he or she can see it. (We'll see that method code in a moment.)
        if (currentUser.ValidatePassword(password)) {
          // Let the user know that the
          // login succeeded.
          string message =
               "Log in succeeded for " + currentUser.Name + "";
          MessageBox.Show(message, "Log In Succeeded",
                MessageBoxButtons.OK, MessageBoxIcon.Information);

          // Load the data for the current user into the TextBox and
          // ListBox objects.
          SetFields(currentUser);
        }
The other possible failure mode of the ssnTextBox "Enter" event is that the student ID was correct, but an invalid password was entered. In this case, the login operation is deemed to have failed, and we notify the user of this as follows:
        else {
          // The ssn was okay, but the password validation failed;
          // notify the user of this.
          string message = "Invalid password; please try again";
          MessageBox.Show(message, "Invalid Password",
                  MessageBoxButtons.OK, MessageBoxIcon.Warning);
        }
      }
The final thing the event handling method does is to use a third housekeeping method to enable/disable the buttons at the bottom of the screen, as appropriate. (We'll see the code for ResetButtons toward the end of our discussion of the MainForm class.)
      // Check states of the various buttons.
      ResetButtons();
    }
  }
The addButton object is used to add a selected course to a student's registered course list, and the AddButtonClicked method will be called every time the addButton object is clicked to provide this functionality.
The method is declared in the MainForm class; the method's header syntax is prescribed by the EventHandler delegate that it's associated with, and is as follows:
  // Event handling method for the "Add" Button.
  public void AddButtonClicked(object source, EventArgs e) {
The first thing the method does is to pull the user-selected item from the scheduleListBox via the SelectedItem property. The get accessor of the SelectedItem property returns a generic object, so we must cast it back into a Section object; we maintain a handle on that Section object via the selected reference variable.
    // Determine which section is selected (note that we must
    // cast it, as it is returned as an object reference).
    Section selected = (Section) scheduleListBox.SelectedItem;
The AddButtonClicked method now attempts to enroll the student in the selected Section. The return value of the Enroll method, which indicates the success or failure of the enrollment, is saved in a local variable called status.
    // Attempt to enroll the student in the section, noting
    // the status code that is returned.
    int status = selected.Enroll(currentUser);
There are four possible outcomes when a Section attempts to enroll a Student, as was discussed in Chapter 14, and we need to account for and respond to every possibility. The return value from the Enroll method will be one of the constant variables Section.PREREQ_NOT_SATISFIED, Section.PREVIOUSLY_ENROLLED, Section. SUCCESSFULLY_ENROLLED, or Section.SECTION_FULL. Based on which constant is returned, the appropriate dialog box message is formulated and displayed inside a MessageBox.
We'll start with the code for the three failure modes: a section was full, a prerequisite wasn't satisfied, or a student was already enrolled in the current or similar section.
    // Report the status to the user.
    if (status == Section.SECTION_FULL) {
      MessageBox.Show("Sorry - that section is full", "Request Denied",
                MessageBoxButtons.OK, MessageBoxIcon.Warning);
    }
    else {
      if (status == Section.PREREQ_NOT_SATISFIED) {
        string message = "You haven't satisfied all " +
               "of the prerequisites for this course.";
        MessageBox.Show(message, "Request Denied",
               MessageBoxButtons.OK, MessageBoxIcon.Warning);
      }
      else {
        if (status == Section.PREVIOUSLY_ENROLLED) {
          string message = "You are enrolled in or have successfully " +
               "completed a section of this course.";
          MessageBox.Show(message, "Request Denied",
               MessageBoxButtons.OK, MessageBoxIcon.Warning);
        }
If we make it to this point in the code, we've indeed succeeded in getting this student enrolled in the selected class!
        else { // Success!
          string message = "Seat confirmed in " +
                 selected.RepresentedCourse.CourseNo + ".";
          MessageBox.Show(message, "Request Successful",
                 MessageBoxButtons.OK, MessageBoxIcon.Information);
We must reflect the newly added section to the student's course list on the GUI; it's easy enough to just repopulate the entire list with all of the sections for which this student is enrolled presently. We also update the TextBox representing the total enrolled course count.
        // Update the list of sections that this
        // student is registered for.
        registeredListBox.Items.Clear();
        IEnumerator ie = currentUser.GetEnrolledSections();
        while (ie.MoveNext()) {
          registeredListBox.Items.Add((Section) ie.Current);
        }

        // Update the field representing student's course total.
        totalTextBox.Text = "" + currentUser.GetCourseTotal();
And, as a housekeeping measure, we clear out the user's "clicked" entry in the scheduleListBox, so that it's ready for another selection to be made:
          // Clear the selection in the schedule of classes list.
          scheduleListBox.SelectedItem = null;
        }
      }
    }
The ResetButtons method is a housekeeping method that we'll describe in more detail later in this chapter. It ensures that only buttons that should be enabled given the current state of the application are enabled. For example, if there are no sections listed in the registeredListBox, then the ResetButtons method will disable the DropButton, since a user can't drop a section if he or she isn't registered for anything.
    // Check states of the various buttons.
    ResetButtons();
  }
The dropButton object is used by a student to drop a course for which he or she is registered, and the DropButtonClicked method is called every time the dropButton object is clicked. The method is declared in the MainForm class, and its header is as follows:
public void DropButtonClicked(object source, EventArgs e)
The code for responding to a press of the Drop button is quite similar to that for the Add button, albeit a bit less elaborate; here, all we need to do is
Determine which item the user selected in his or her registeredListBox.
Display a confirmation message.
Refresh the user-related information displayed on the screen.
Because it's so similar to the AddButtonClicked method, we present the dropButtonClicked method code without further discussion; please refer to inline comments in the code for details.
  // Event handling method for the "Drop" Button.
  public void DropButtonClicked(object source, EventArgs e) {
    // Determine which section is selected (note that we must
    // cast it, as it is returned as an object reference).
    Section selected = (Section) registeredListBox.SelectedItem;

    // Drop the course.
    selected.Drop(currentUser);

    // Display a confirmation message.
    string message = "Course " +
       selected.RepresentedCourse.CourseNo + " dropped.";
    MessageBox.Show(message, "Request Successful",
       MessageBoxButtons.OK, MessageBoxIcon.Information);

    // Update the list of sections that
    // this student is registered for.
    registeredListBox.Items.Clear();
    IEnumerator ie = currentUser.GetEnrolledSections();
    while (ie.MoveNext()) {
      registeredListBox.Items.Add((Section) ie.Current);
    }

    // Update the field representing student's course total.
    totalTextBox.Text = "" + currentUser.GetCourseTotal();

    // Check states of the various buttons.
    ResetButtons();
  }
The SaveButtonClicked method is invoked whenever the saveButton object is clicked. The method is a means of invoking the Student class's Persist method on the currentUser Student reference, a method that we studied in depth in Chapter 15. In a nutshell, this method saves all information about the student, including all sections in which he or she is enrolled, to a file by the name of ssn.dat, for example, 111-11-1111.dat. The method is declared in the MainForm class, and its code is as follows:
  // Event handling method for the "Save" button.
  public void SaveButtonClicked(object source, EventArgs e) {
    bool success = currentUser.Persist();

    if (success) {
      // Let the user know that his/her
      // schedule was successfully saved.
      MessageBox.Show("Schedule saved", "Schedule Saved",
             MessageBoxButtons.OK, MessageBoxIcon.Information);
    }
    else {
      // Let the user know that there was a problem.
      string message = "Problem saving your " +
                       "schedule; please contact " +
                       "SRS Support Staff for assistance.";
      MessageBox.Show(message, "Problem Saving Schedule",
                MessageBoxButtons.OK, MessageBoxIcon.Warning);
    }
  }
This method is called whenever the logOffButton object is clicked, to clear out various GUI objects and to reset the value of the currentUser Student reference to null. The LogOffButtonClicked method is implemented in the MainForm class, and its code is as follows:
  // Event handling method for "Log Off" button.
  public void LogOffButtonClicked(object source, EventArgs e) {
    ClearFields();
    ssnTextBox.Text = "";
    currentUser = null;

    // Clear the selection in the
    // schedule of classes list.
    scheduleListBox.SelectedItem = null;

    // Check states of the various buttons.
    ResetButtons();
  }
The RegisteredSelectionChanged and ScheduleSelectionChanged methods are called whenever the selected item in either the registeredListBox or scheduleListBox objects changes, respectively. These two objects don't need much in the way of event handling:
We want them to be mutually exclusive, such that when an element is selected in one of them, the selections in the other one are cleared.
We also want to reset the enabled state of various buttons when an element is selected. For example, when a student selects a section in the scheduleListBox, the Add button should become enabled and the Drop button should be disabled. The ResetButtons method can be called to reset the enabled state of both buttons.
The ScheduleSelectionChanged and RegisteredSelectionChanged methods are declared in the MainForm class. Their respective code listings are as follows:
  // Event handling method for the "Schedule of Classes" ListBox.
  public void ScheduleSelectionChanged(object source, EventArgs e) {
    // When an item is selected in this list,
    // we clear the selection in the other list.
    if (scheduleListBox.SelectedItem != null) {
      registeredListBox.SelectedItem = null;
    }

    // Reset the enabled state of the buttons.
    ResetButtons();
  }

  // Event handling method for the "Registered For:" ListBox.
  public void RegisteredSelectionChanged(object source, EventArgs e) {
    // When an item is selected in this list,
    // we clear the selection in the other list.
    if (registeredListBox.SelectedItem != null) {
      scheduleListBox.SelectedItem = null;
    }

    // Reset the enabled state of the buttons.
    ResetButtons();
  }
Unlike the other SRS event handling methods that we've discussed so far, which are all declared in the MainForm class, the PasswordKeyUp method is implemented in the PasswordForm class. It responds to KeyUp events that occur when a key is released inside the passwordTextBox. The PasswordKeyUp method is declared as follows:
public void PasswordKeyUp(object source, KeyEventArgs e) {
Once again, we want to act if the Enter key is released inside the passwordTextBox. We use the KeyCode property of the KeyEventArgs argument to determine if the Enter key caused the event.
if (e.KeyCode == Keys.Enter) {
If it was indeed the Enter key, we assign the text inside the passwordTextBox to the password attribute. The Trim method, defined by the String class, is called to remove and leading or trailing white space.
password = passwordTextBox.Text.Trim();
Finally, the visibility of the PasswordForm is set to be false, so that the password dialog box will "vanish" from the display without being garbage collected; we want to be able to communicate with the PasswordForm to retrieve what was typed inside the passwordTextBox.
      this.Visible = false;
    }
  }
When this method finishes executing, program execution returns to the MainForm class.
As mentioned throughout this discussion, we've outfitted the MainForm class with a few housekeeping methods; note that these are all declared to be private, meaning that they are only used within MainForm. Note, in particular, our approach to the ResetButtons method (please read in-line comments that follow):
  // Because there are so many different situations in which one or
  // more buttons need to be (de)activated, and because the logic is
  // so complex, we centralize it here and then just call this method
  // whenever we need to check the state of one or more of the buttons.
  // It is a trade-off of code elegance for execution efficiency:
  // we are doing a bit more work each time (because we don't need to
  // reset all four buttons every time), but since the execution time
  // is minimal, this seems like a reasonable trade-off.
  private void ResetButtons() {
    // There are four conditions which collectively govern the
    // state of each button:
    //
    // 1: Whether a user is logged on or not.
    bool isLoggedOn;
    if (currentUser != null) {
      isLoggedOn = true;
    }
    else {
      isLoggedOn = false;
    }

    // 2: Whether the user is registered for at least one course.
    bool atLeastOne;
    if (currentUser != null && currentUser.GetCourseTotal() > 0) {
      atLeastOne = true;
    }
    else {
      atLeastOne = false;
    }


    // 3: Whether a registered course has been selected.
    bool courseSelected;
    if (registeredListBox.SelectedItem == null) {
      courseSelected = false;
    }
    else {
      courseSelected = true;
    }

    // 4: Whether an item is selected in the Schedule of Classes.
    bool catalogSelected;
    if (scheduleListBox.SelectedItem == null) {
      catalogSelected = false;
    }
    else {
      catalogSelected = true;
    }
    // Now, verify the conditions on a button-by-button basis.

    // Drop button:
    if (isLoggedOn && atLeastOne && courseSelected) {
      dropButton.Enabled = true;
    }
    else {
      dropButton.Enabled = false;
    }

    // Add button:
    if (isLoggedOn && catalogSelected) {
      addButton.Enabled = true;
    }
    else {
      addButton.Enabled = false;
    }

    // Save My Schedule button:
    if (isLoggedOn) {
      saveButton.Enabled = true;
    }
    else {
      saveButton.Enabled = false;
    }

    // Log Off button:
    if (isLoggedOn) {
      logOffButton.Enabled = true;
    }
    else {
      logOffButton.Enabled = false;
    }
  }

  // Called whenever a user is logged off.
  private void ClearFields() {
    nameTextBox.Text = "";
    totalTextBox.Text = "";
    registeredListBox.Items.Clear();
  }
  // Set the various fields, lists, etc. to reflect the information
  // associated with a particular student. (Used when logging in.)
  private void SetFields(Student theStudent) {
    nameTextBox.Text = theStudent.Name;
    int total = theStudent.GetCourseTotal();
    totalTextBox.Text = "" + total;

    // If the student is registered for any courses, list these, too.
    if (total > 0) {
      // Use the GetEnrolledSections() method to obtain a list
      // of the sections that the student is registered for and
      // add the sections to the registered ListBox.

      IEnumerator e = theStudent.GetEnrolledSections();
      while (e.MoveNext()) {
        registeredListBox.Items.Add((Section) e.Current);
      }
    }
  }