Let's look at each of the functional requirements of the GUI as specified by the concept of operations, and identify the GUI class best suited to each.
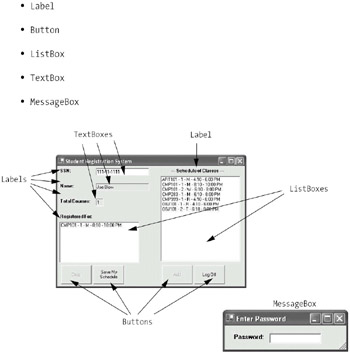
To log in to the SRS, the student will need to type his or her SSN into a field. The C# TextBox class will suit this requirement nicely. We can also use noneditable TextBox objects to display the student's name and the number of courses for which he or she is registered.
To display both the course catalog and the student's course list, we need an object that can display a multiline list of items. The object also has to allow the student to make a selection from the list and keep track of which item is selected. The ListBox class can fulfill all of these requirements.
One of the best ways to initiate an action is by having the user click a button. We'll use four Button objects to implement the Add, Drop, Save, and Log Off functionality.
The GUI would be somewhat confusing if we didn't include labels to describe what the various objects were to be used for. We'll use several instances of the Label class to achieve this goal.
We'll need a container to organize all of these objects into a main window for the GUI; we'll use the Form class for this purpose.
Finally, we'll need a way to pop up various warning/confirmation messages; we'll use the MessageBox class to do so.
All of these classes—Button, Form, Label, ListBox, MessageBox, and TextBox— are defined within the System.Windows.Forms namespace.
Now that we've proposed the objects that we'll use for the SRS GUI, we'll describe each of the chosen classes in more detail, creating the objects and adding them to our SRS GUI as we go. By the end of this section, we'll have completed building the look of the SRS GUI.
One thing to remember with GUI development is that there are multiple ways to achieve the same functional goals. That is, there is nothing "sacred" about the classes that we've chosen for the SRS GUI. We could have, for example, implemented the Add, Drop, Save, and Log Off actions using menu items rather than buttons.
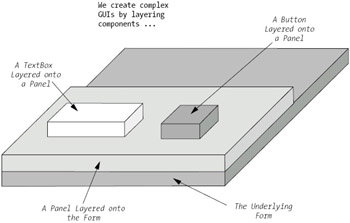
Earlier in this chapter, we discussed how a container is used to organize, manage, and present other objects in a GUI. We can think of a top-level container as a surface onto which all of the other GUI objects are arranged (see Figure 16-27).
In building the SRS GUI, we'll use an instance of the Form class as our main container. A Form object serves as a stand-alone window; note that a Form may not be contained in/attached to any other type of GUI object.
A Form has a title bar, and may optionally be equipped with a menu bar (we won't be using a menu bar for the SRS GUI as designed, however). A Form also automatically provides window control buttons in its upper right-hand corner; from left to right, the three window control buttons are used to minimize the size of, maximize the size of, or close the Form and optionally exit the application (see Figure 16-28).
When building a C# GUI application, one main Form is created at a minimum to hold the objects necessary to provide the desired GUI appearance and functionality. Nontrivial GUI applications typically consist of multiple separate windows—one main Form and multiple other Form/MessageBox/Dialog objects that can represent such things as transient pop-up windows. (We'll use MessageBox objects when we build the SRS GUI, and will discuss them later in this chapter after we've explored event handling a bit.)
A Form object will serve as the primary container for the SRS GUI, but before we launch into actually building the SRS GUI, let's "get our feet wet" by building a simple Form.
First, we'll create a program/class called TestForm1, and will place using directives at the top of the program so we can refer to the appropriate GUI classes by their simple names.
// TestForm1.cs

using System;
using System.Windows.Forms;

public class TestForm1
{
  static void Main() {
Within the Main method of this class, we'll perform the bare minimum steps necessary to create and display a Form: namely, we'll instantiate a Form object by using the Form class's lone, parameterless constructor, and will maintain a handle on the newly created Form object with a reference variable named simpleForm:
Form simpleForm = new Form();
Most of the characteristics that define the state of a Form can be manipulated through properties declared by the Form class. There are several properties that allow us to specify the size of a Form; in this example, we'll use the Height and Width properties.
The width and height of GUI objects is expressed in pixels; a pixel is the smallest addressable graphical unit on a display screen. The default size for a Form is 300 pixels high by 300 pixels wide. We'll set the size of our form to be 200 ?200 pixels.
    simpleForm.Height = 200;
    simpleForm.Width = 200;
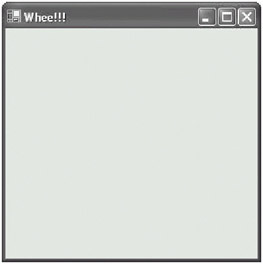
Next, we'll add a title to the Form by setting the value of the Text property. (The default is for a Form to be untitled.) We'll give our Form the title "Whee!!!".
simpleForm.Text = "Whee!!!";
We're now ready to display our simple Form on the screen. The Application class, also from the System.Windows.Forms namespace, defines static methods and properties that are used to manage an application, including methods to start and stop an application. We'll use the static Run method from the Application class to launch our Form.
Application.Run(simpleForm);
Here is the code for the TestForm1 class again, in its entirety:
// TestForm1.cs
using System;
using System.Windows.Forms;

public class TestForm1
{
  static void Main() {
    // Create a Form by calling the Form constructor.
    Form simpleForm = new Form();

    // Set the size of the Form using the Height
    // and Width properties.
    simpleForm.Height = 200;
    simpleForm.Width = 200;

    // Add a title to the Form using the Text property.
    simpleForm.Text = "Whee!!!";

    // Use the Application class Run() method to launch
    // the Form.
    Application.Run(simpleForm);
  }
}
| Note?/td> |
Reminder: the complete code for all of the examples in this chapter is available as a download from the Apress web site; see Appendix D for details. |
When we subsequently compile, then run, the program by typing the commands
csc TestForm1.cs
TestForm1
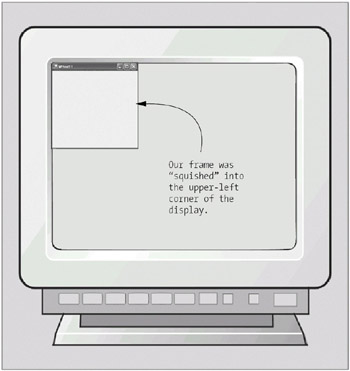
we see the window (form) shown in Figure 16-29 appear in the upper-left corner of the screen. Our form is blank because we haven't yet attached any objects (labels, buttons, etc.)—we'll do so in due time.
To dismiss this form and stop the TestForm1 program from executing, click the window close (X) button in the upper-right corner of the frame.
| Note?/td> |
Of course, C# programs may also be launched through other means; one of the most frequently used approaches is to create a Windows desktop shortcut. The shortcut should execute the same command that a user would have typed if launching the program from the command prompt. |
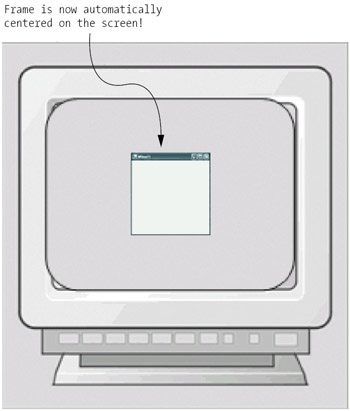
In our simple Form example, we specified the height, width, and title of the Form by setting the value of the Height, Width, and Text properties. The Form class declares a large number of properties that can be used to define the appearance and behavior of a Form. We'll use another one of the Form properties in the next section to center our simple form on the screen.
By default, a Form will appear in the upper-left corner of the computer screen, as shown in Figure 16-30.
Often, we would like to center a new Form in the middle of the screen when it first appears. To center a form, we simply need to set its StartPosition property value to the constant FormStartPosition.CenterScreen, also defined by the Form class.
Let's rewrite the previous example to take advantage of the StartPosition property:
// TestForm2.csusing System;
using System.Windows.Forms;
using System.Drawing;

public class TestForm2
{
   static void Main() {
     // Create a Form by calling the Form constructor.
     Form simpleForm = new Form();
     // Set the size of the Form using the Height
     // and Width properties.
     simpleForm.Height = 200;
     simpleForm.Width = 200;

     // Add a title to the Form using the Text property
     simpleForm.Text = "Whee!!!";
     // Center the Form on the Desktop.
     simpleForm.StartPosition = FormStartPosition.CenterScreen;

     simpleForm.Visible = true;

     // Use the Application class's Run method to launch
     // the Form.
     Application.Run(simpleForm);
   }
}
The Form will now appear in the center of the computer screen, regardless of the size of the monitor in question (see Figure 16-31).
The simple GUI examples that we've seen thus far all involve a single class whose Main method instantiates and displays a Form; TestForm1 and TestForm2 were both designed in this fashion. This single-class methodology isn't an appropriate architecture for anything but trivial applications, however.
A better architecture for a GUI application is to create a minimum of two classes:
A class, derived from Form, that defines the appearance (and ultimately, the behavior) of the main GUI window:
All objects to be attached to the frame become fields of this class.
The objects are instantiated and attached in the constructor for this class.
A separate application driver class that
Instantiates an instance of the main window/Form in its Main method
Handles any other application initialization steps—e.g., establishing database connectivity, perhaps with the help of a log-on dialog box
Houses any "global data" (as public static fields), constants, or convenience methods (as public static methods) for the application as a whole
If more than one window is needed for the GUI (as will be the case for the SRS GUI), additional classes are created to define the appearance and behavior of each of the other key windows, each of which is derived from an appropriate predefined GUI container class (usually another Form or a different type of container, such as a MessageBox, which we'll discuss later in this chapter).
Let's take another look at the TestForm2.cs example, redesigned as previously suggested.
First, we'll create a class called TestForm3, derived from the Form class, to represent the main window.
Secondly, we'll create the driver class, TestForm3Driver, in a separate file called TestForm3Driver.cs.
Let's start with TestForm3; we'll show the complete code listing for TestForm3.cs first, and will then comment on some of the differences between TestForm3 and TestForm2:
// TestForm3.cs

using System;
using System.Windows.Forms;
using System.Drawing;
public class TestForm3 : Form {
     // When we add eventually attach objects to the Form --
     // labels, buttons, and so forth -- they will be declared here,
     // as FIELDS of the TestForm4 class.

     // Constructor: we "assemble" the GUI here.
     public TestForm3() {
       // Set the size of the Form using the Height
       // and Width properties.
       this.Height = 200;
       this.Width = 200;

       // Add a title to the Form using the Text property.
       this.Text = "Whee!!!";

       // Center the Form on the desktop.
       this.StartPosition = FormStartPosition.CenterScreen;
       this.Visible = true;
     }

     // Note that there is no longer a Main method in this class!
}
The Form's properties are set as before, except now we're doing so from within the TestForm3 class—specifically, from within its constructor—rather than setting them externally to the Form instance from within the Main method. Note the use of the this. prefix when setting the Form property values:
this.Height = 200;
this.Width = 200;
Strictly speaking, the this. prefix isn't necessary, but can optionally be used as a reminder that we're setting the value of the property on the current object: namely, this Form, which we're currently assembling.
Now, let's look at the code for the driver class, TestForm3Driver. For this example, the Main method of the driver class simply calls the Application.Run method, passing the method a call to the TestForm3 constructor. The TestForm3 class constructor that we reviewed previously does all the work of assembling the GUI instance.
// TestForm3Driver.cs

using System;
using System.Windows.Forms;

public class TestForm3Driver {
  static void Main() {
    // The Main() method has become quite simple;
    // we simply call the Run() method to display
    // an (unnamed) instance of TestForm3.
    Application.Run(new TestForm3());
  }
}
| Note?/td> |
In the previous example, we created an unnamed TestForm3 object "on the fly," nested inside of the Run method call:
Application.Run(new TestForm3());
We could have accomplished the same result as a two-step process:
    TestForm3 form3 = new TestForm3();
    Application.Run(form3);
However, since we have no reason to maintain a named handle on the TestForm3 object—once it's passed as an argument to the Run method, we have no further need to address it by name in this application—we've collapsed what would have been two statements into one. This is a commonly used technique throughout the C# language, whenever an object A requires us to pass it an instance of a class B for its own private use. |
The previous Form example is significant, because the TestForm3 and TestForm3Driver classes will be the starting points for our SRS GUI—we'll rename them MainForm and SRS, respectively, as they evolve.
Now that we have our top-level container, we'll next learn about the various other objects needed to round out our GUI's main window (see Figure 16-32):
| Note?/td> |
Recommendation: While reading through the next several sections, it would be helpful to look at the entire MainForm.cs and PasswordForm.cs code listings. This will give you a sense of the "big picture" of how the GUI objects are incorporated into their underlying Form.You can download the Chapter 16 source code from the Apress web site. Details are provided in Appendix D. |
A GUI wouldn't be very useful if it simply displayed an assortment of GUI objects with no explanation of what the objects were supposed to do or be used for. Virtually every GUI application uses labels to describe the purpose of the various GUI objects that it presents, as well to provide other instructions/status information to the user. We'll define a number of informational labels for the SRS GUI using instances of the Label class.
The Label class represents a simple GUI object that can be used to display a single line of text. (A Label can also be used to display an image, but we won't be using that capability in building the SRS GUI.)
The Label class defines a single, parameterless constructor:
public Label()
This constructor creates a blank Label with default properties. As with the Form class, the state and appearance of a Label can be specified through properties declared by the Label class. To create the labels for the SRS GUI, we'll make use of the following Label properties:
public virtual string Text: The Text property is used to access the text that is displayed by the Label. The property defines both get and set accessors, so it can be used to retrieve or change Label text programmatically.
      Label name = new Label();
      name.Text = "Jackson";
      Console.WriteLine("name is " + name.Text);
Note that Label values can't be modified directly by a user, only indirectly by our application in response to a user's actions on some other object; for example:
      Label status = new Label(); // Create a blank label.
      // Later in the application (pseudocode):
      if (user presses the Submit button) {
         // Programmatically set the text on this label.
         status.Text = "Process underway ... please wait";
      }
public virtual Font Font: The Font property is used to get or set the font used to display the text of the Label on the screen. It can also be used to specify if the Label will be displayed using bold or italic font.
The value of the Font property is set by assigning it an instance of the Font class (from the System.Drawing namespace). The Font class defines a wide variety of constructors; the constructor we'll use in building the SRS is used to create a new font style based on an already existing font:
public Font(Font existingFont, FontStyle newStyle)
For example, to change the style of the student's name Label font to bold, we would access the existing (default) Font for the name label, and then set the Font property to a bolded version as follows:
name.Font = new Font(name.Font, FontStyle.Bold);
We could similarly change the font style to italic by using
name.Font = new Font(name.Font, FontStyle.Italic);
We can change the style to be both bold and italic in a single step using the | operator:
name.Font = new Font(name.Font, FontStyle.Bold | FontStyle.Italic);
public virtual bool AutoSize: If the AutoSize property is set to true, the width and height of the Label will be automatically set based on the textual content and font of the Label. The default value is false, meaning that the size of the Label will have to be explicitly changed using its Width and Height properties.
name.AutoSize = true; // the name Label will be automatically sized.
public int Top: The Top property is inherited from the Control class and is used to get or set the vertical position of the object inside its parent container. The value of the property is equal to the distance in pixels between the top edge of the Label and the top edge of its parent container.
      // The Label is positioned 200 pixels below the top of its container.
      name.Top = 200;
public int Left: The Left property is inherited from the Control class and is used to get or set the horizontal position of the object inside its parent container. The value of the property is equal to the distance in pixels between the left edge of the Label and the left edge of its parent container.
      // The Label is positioned 200 pixels from the container's left edge.
      name.Left = 200;
| Note?/td> |
There are many more Label properties that allow us to customize the look and behavior of a Label. For a complete list and description of all of the Label class properties, please consult the .NET Framework SDK documentation. |
We'll use Label objects in the SRS GUI to describe the other TextBox and ListBox objects comprising the SRS GUI so that the user knows what their intended purposes are. The first set of Label objects we'll add to the SRS GUI will be those that describe the TextBox objects that will appear on the left side of the Form. We'll add Labels for the other GUI objects a little later in the chapter.
| Note?/td> |
Important note: In this section and the other sections that follow, we won't overwhelm you with the entire MainForm class listing. Instead, we'll only show excerpts of the code to highlight the particular GUI component that we're discussing. It's therefore important that you download the MainForm.cs source code in its entirety from the Apress web site before proceeding, if you haven't already done so, so that you can follow along as you read these sections. |
To include Labels as part of the SRS GUI, we'll first declare reference variables for them as attributes of the MainForm class:
// MainForm.cs

using System;
using System.Windows.Forms;
using System.Drawing;

public class MainForm : Form
{
   // The GUI objects that will be placed on the Form are declared as
   // attributes of the MainForm class.
   private Label ssnLabel;
   private Label nameLabel;
   private Label totalCourseLabel;
   private Label registeredLabel;
The Label objects are then instantiated inside of the MainForm constructor. We'll use the Label class properties we previously described to define the appearance of each Label. We'll set the text of each Label and set the font style to be bold, as well as use the autosize feature to allow the system to size our labels for us. We'll position each Label on the Form using the Top and Left properties.
  // Constructor.
  public MainForm() {
     // Create left-hand side labels.
     // All labels are offset five pixels from the left-hand edge of the form.
   int labelLeft = 5;
   // The vertical spacing between the top edges of adjacent vertical labels
   // will be 40 pixels.
   int labelVertSpace = 40;

   ssnLabel = new Label();
   ssnLabel.Text = "SSN:";
   // Make this label bold.
   ssnLabel.Font = new Font(ssnLabel.Font, FontStyle.Bold);
   ssnLabel.AutoSize = true;
   ssnLabel.Top = 5;
   ssnLabel.Left = labelLeft;
and so on for the remaining three labels.
Now that we've created our Label objects and defined their appearance, we're ready to add the Label objects to the Form. The way to add objects to a Form is through the Controls property of the Form class. The Controls property has the following header:
public Controls.ControlCollection Controls
The Controls.ControlCollection class represents, as the name would suggest, a collection of controls (i.e., GUI objects that accept input or display information) associated with a Form. To add a control to a Form, the Add method is called on the Controls.ControlCollection object associated with the Form. It doesn't matter in which order the Label objects are added to the Form, as their position is determined by the value assigned to their Top and Left properties.
    // Add the controls to the form using the Controls property.
    this.Controls.Add(ssnLabel);
    this.Controls.Add(nameLabel);
    this.Controls.Add(totalCourseLabel);
    this.Controls.Add(registeredLabel);
Now it's time to size our Form and to make it visible on the screen. We'll specify the appearance of the SRS GUI form as a whole in a manner similar to that used in our previous TestFormx examples, with one exception. When the various TestFormx GUIs appeared on the screen, their size could be changed by "grabbing" one corner of the window and dragging the mouse inward or outward.
If the SRS GUI were to be resizable in this fashion, however—in particular, if users were able to reduce its size—some of the GUI objects might disappear from view, as illustrated in Figure 16-33.
To prevent this from occurring, we can set the MinimumSize property of the Form to be the current size of the Form.
    // Set some appearance properties for the Form.
    this.Text = "Student Registration System";
    this.Height = 350;
    this.Width = 500;
    this.MinimumSize = this.Size;
    this.StartPosition = FormStartPosition.CenterScreen;
    this.Visible = true;
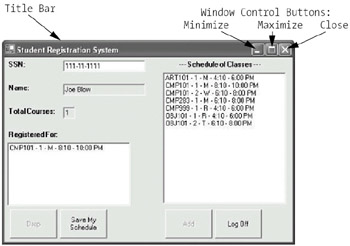
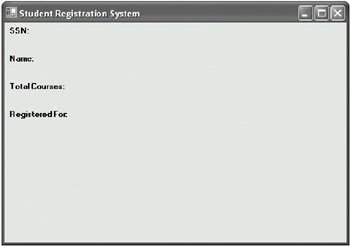
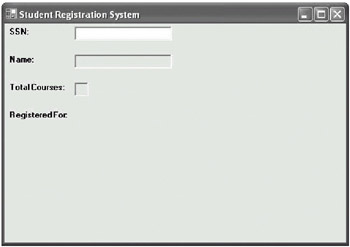
Figure 16-34 shows how the SRS GUI looks when the first four Label objects have been added to the Form.
GUIs frequently need to provide components that enable the user to input a line of text. For example, in the case of the SRS GUI, a user will need to type in his or her SSN number to log on to the SRS. A TextBox is a GUI object that is typically used to either accept as input, or to display, a single line of text. It's also possible to create a multiline TextBox, but by default TextBox objects accommodate a single line of text.
In addition to the TextBox used to accept the user's SSN number, the SRS GUI will also use read-only TextBox objects to display the student's name and the total number of courses in which the student is currently enrolled once he or she has logged on.
Similar to the Label class, the TextBox class declares only a single, parameterless constructor:
public TextBox()
Once a TextBox object has been instantiated, its state can be defined by setting the value of various properties declared by the TextBox class. In addition to the Top, Left, and AutoSize properties we learned about previously when discussing Labels, we'll also make use of two other properties when we create the TextBox objects.
public int Width: The value of the Width property represents the width of the TextBox in pixels. The AutoSize property works a little differently for TextBox objects than it does for Labels in that only the height of the TextBox is sized automatically based on the font used for the text; the width of a TextBox must be explicitly set through its Width property.
public bool ReadOnly: The ReadOnly property controls whether a TextBox will accept user input. If the value of this property is set to false, the TextBox will be used for display purposes only.
| Note?/td> |
As with the Label class, there are many more TextBox class properties that allow us to customize the look and behavior of a TextBox. For a complete list and description of all of the TextBox class properties, please consult the .NET Framework SDK documentation. |
The process for adding the three TextBox objects to the SRS GUI is similar in many respects to the process for adding the Labels. We'll revisit the MainForm.cs code, highlighting the significant additions made to the MainForm class to accommodate TextBox objects. The SRS.cs driver code needn't change at all from the previous version that we studied.
To include the TextBox objects as part of the SRS GUI, we'll first declare reference variables to them as attributes of the MainForm class.
public class MainForm : Form
{
   // Label declarations go here (omitted from this code listing).

   // Declare three TextBox objects as fields of the MainForm class.
   private TextBox ssnTextBox;
   private TextBox nameTextBox;
   private TextBox totalTextBox;
The TextBox objects are created inside the MainForm class constructor. The state of each TextBox is specified by setting the value of some of the TextBox class properties.
The width of each TextBox is explicitly set through its Width property.
The value of the AutoSize property is set to be true, so that the height of each TextBox will be set automatically.
We want the left edges of each TextBox to be aligned with one another vertically, and so we set the value of the Left property for each of the TextBox objects to be 15 pixels to the right of the right edge of the longest Label, the Total Courses label.
The position of the top edge of each TextBox is set to be the same as the top edge of its corresponding Label.
The Total Courses and Name TextBox objects are meant for display purposes only, so the value of their ReadOnly property is set to true.
  // Constructor.
  public MainForm() {
    // Create left-hand side labels.
    // Details omitted ... see code for previous example.

    // Create text box objects.
    ssnTextBox = new TextBox();
    ssnTextBox.Width = 140;
    ssnTextBox.AutoSize = true;
    ssnTextBox.Top = ssnLabel.Top;
    ssnTextBox.Left = totalCourseLabel.Right + 15;
    nameTextBox = new TextBox();
    nameTextBox.Width = 140;
    nameTextBox.AutoSize = true;
    nameTextBox.Top = nameLabel.Top;
    nameTextBox.Left = totalCourseLabel.Right + 15;

    totalTextBox = new TextBox();
    totalTextBox.Width = 20;
    totalTextBox.AutoSize = true;
    totalTextBox.Top = totalCourseLabel.Top;
    totalTextBox.Left = totalCourseLabel.Right + 15;
    totalTextBox.ReadOnly = true;
The TextBox objects are then added to the GUI in the same manner that the Label objects were, by using the Add method on the Controls property of the Form:
    this.Controls.Add(ssnTextBox);
    this.Controls.Add(nameTextBox);
    this.Controls.Add(totalTextBox);
Figure 16-35 shows how our SRS GUI looks now, with the TextBox objects added to the Form.
The SRS GUI will need to display the schedule of classes for the semester and a list of the courses for which a given student is registered. We'll also want the user to be able to drop or add a class by selecting one of the classes in the appropriate list. An instance of the ListBox class will satisfy both of these requirements. A ListBox is a GUI object that displays a list of choices to the user; the user can select an item from the list simply by clicking it.
Elements of any type can be added to a ListBox. When the ListBox appears on the screen, the list elements are rendered visually as strings. In the case of the SRS GUI, Section object references will be added to both of the ListBox objects; the Section class's ToString method is used to render a string representation of each Section element. (We talked about overriding the ToString method to provide a meaningful, application-specific string representation of an object's data values in Chapter 13.)
To create a ListBox object, the ListBox class provides a single, parameterless constructor:
public ListBox()
Once a ListBox object has been created, its state can be defined by setting the value of properties declared by the ListBox class. The only property we'll use that we haven't seen before for other GUI types is the Height property:
public int Height
A ListBox object doesn't have an AutoSize property, and so we must explicitly set both the width and height of a ListBox.
If the list of elements to be displayed by a ListBox is longer than the visible display area the ListBox can accommodate, a vertical scrollbar will automatically appear on the right-hand side of the ListBox, allowing the user to scroll up or down so as to access the entire list.
To add elements to a ListBox, we make use of the Items property of the ListBox class. This property is of type ListBox.ObjectCollections—a class that is used to store the elements contained in a ListBox.
To add an element to a ListBox, we use the Add method from the ListBox.ObjectCollections class, as illustrated in the following example:
ListBox aListBox = new ListBox();
aListBox.Items.Add("Sample Entry");
As we can see by the Add method header:
public int Add(object item)
any type of element can be added to a ListBox:
ListBox xBox = new ListBox();
Person p = new Person("Steve");
xBox.Items.Add(p); // the ToString method of the Person class will
                   // be used to render a string representation of p
In the SRS GUI, the Add method will be used to add Section objects to the ListBox.
To clear all of the elements stored by a ListBox, we again make use of the Items property, invoking the Clear method of the ListBox.ObjectCollections class:
public virtual void Clear()
For example:
ListBox xBox = new ListBox();
// Add items ... details omitted.
xBox.Items.Clear();
We'll make use of the Clear method to refresh the SRS GUI display when a user logs off of the SRS.
We now have enough information to create the two ListBox objects we'll need and to add them to the SRS GUI. We'll also create an additional Label to describe the Schedule of Courses ListBox. As before, we won't display the entire MainForm class code listing, just the segments that we're adding in this iteration.
The first thing we'll do is to add references to the new ListBox and Label objects as private fields of the MainForm class.
public class MainForm : Form
{
  // Other GUI component declarations omitted from this example.

  // Declare the ListBox objects and a Label as private fields.
  private Label classScheduleLabel;
  private ListBox scheduleListBox,
  private ListBox registeredListBox;
The ListBox and Label objects are instantiated inside the MainForm constructor. The objects' states are defined by setting the value of selected properties.
The properties for the classScheduleLabel object are set in similar fashion to the Label objects that we added earlier. The appearance of the ListBox objects is defined using properties from the ListBox class.
The top edge of each ListBox object is positioned to be 5 pixels below the bottom edge of its corresponding Label.
The value of the Width and Height properties are explicitly set. The Height of the registeredListBox is set so that the bottom edges of the two ListBox objects will align visually.
The left edge of the registeredListBox is set to line up with the left-hand side Labels. The left edge of the scheduleListBox is set to be 30 pixels to the right of the right edge of the SSN TextBox.
    // Create class schedule ListBox object.
    scheduleListBox = new ListBox();
    scheduleListBox.Width = 210;
    scheduleListBox.Height = 225;
    scheduleListBox.Top = classScheduleLabel.Bottom + 5;
    scheduleListBox.Left = ssnTextBox.Right + 30;

    // Create "Registered For" ListBox Object
    registeredListBox = new ListBox();
    registeredListBox.Width = 210;
    registeredListBox.Height = scheduleListBox.Bottom -
                                 registeredListBox.Top + 3;
    registeredListBox.Top = registeredLabel.Bottom + 5;
    registeredListBox.Left = labelLeft;
For now, we'll leave the ListBoxes empty, but will eventually populate them by reading in class schedule and student class list data from local files.
The Label and ListBox objects are then added to the Form:
    this.Controls.Add(classScheduleLabel);
    this.Controls.Add(scheduleListBox);
    this.Controls.Add(registeredListBox);
and the Form object's visual properties are set as before.
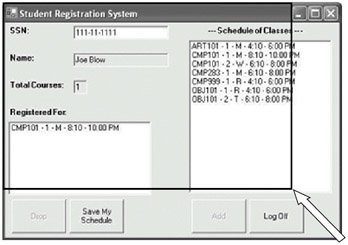
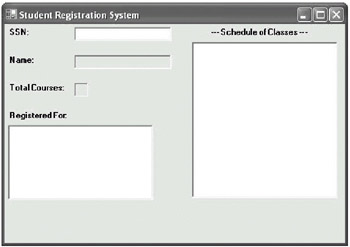
With the ListBox objects included, the SRS Form now looks as shown in Figure 16-36.
Our SRS GUI is really beginning to take shape! The only objects left to add are the buttons that will initiate the various actions of the GUI.
A Button is a GUI object that allows a user to initiate an action by "clicking" what appears to be a three-dimensional button on the GUI. We have to program an event handler to define what we actually want the button to do when it's clicked (you'll learn about event handlers later in the chapter), but the button is inherently "clickable" just by virtue of creating it—it appears to move in and out of the computer screen.
The Button class declares a single, parameterless constructor:
public Button()
As with the other objects we've discussed in this chapter, the appearance of a Button can be specified by setting the value of properties declared by the Button class. We've already discussed most of the properties that we'll use for our Button objects before, in the context of other types of object.
The Text property is used to set the text label that is displayed on the Button.
The Width and Height properties are used to specify the dimensions of the Button as it will appear on the screen.
The Top and Left properties are used to position the Button in its underlying container.
The Button class has one more property that we'll take advantage of a little later in the chapter—the Enabled property:
public bool Enabled
A Button is enabled by default when it's created, meaning that it can respond to user input. There are times, however, when we may want to temporarily disable a Button. For example, it doesn't make sense to allow an SRS user to click the Drop button if that student hasn't yet registered for any classes. A Button can be disabled by setting the value of its Enabled property to false. The appearance of a Button will change, indicating that it's disabled, and clicking the Button will have no effect.
The TextBox and ListBox classes (and all other C# GUI classes, for that matter) also declare an Enabled property that functions in a similar manner.
To add Drop, Save, Add, and Log Off buttons to the SRS GUI, we declare references to them as attributes of the MainForm class:
public class MainForm : Form
{
  // Other GUI component declarations omitted from this example.

  // References to four Button objects are declared as private fields.
  private Button dropButton;
  private Button saveButton;
  private Button addButton;
  private Button logOffButton;
In the MainForm constructor, we create the Button objects and define their state by setting the value of some of the Button class properties.
Each Button is given the same width and height.
We want the four Button objects to appear aligned horizontally, so the value of the Top property for each Button is set to the same value.
The left margin of the Drop Button is set to be 10 pixels from the left edge of the Form.
The left margin of each subsequent Button in the row is set to be a certain distance from the right edge of the Button to its left.
    // Create buttons; all will be of the same size, and at the same
    // vertical distance from the top of the form.
    int buttonHeight = 50;
    int buttonWidth = 80;
    int buttonTop = 260;

    dropButton = new Button();
    dropButton.Text = "Drop";
    dropButton.Height = buttonHeight;
    dropButton.Width = buttonWidth;
    dropButton.Top = buttonTop;
    dropButton.Left = 10;

    saveButton = new Button();
    saveButton.Text = "Save My Schedule";
    saveButton.Height = buttonHeight;
    saveButton.Width = buttonWidth;
    saveButton.Top = buttonTop;
    saveButton.Left = dropButton.Right + 5;

    addButton = new Button();
    addButton.Text = "Add";
    addButton.Height = buttonHeight;
    addButton.Width = buttonWidth;
    addButton.Top = buttonTop;
    addButton.Left = saveButton.Right + 100;

    logOffButton = new Button();
    logOffButton.Text = "Log Off";
    logOffButton.Height = buttonHeight;
    logOffButton.Width = buttonWidth;
    logOffButton.Top = buttonTop;
    logOffButton.Left = addButton.Right + 5;
The Button objects are then added to the Form.
    this.Controls.Add(dropButton);
    this.Controls.Add(saveButton);
    this.Controls.Add(addButton);
    this.Controls.Add(logOffButton);
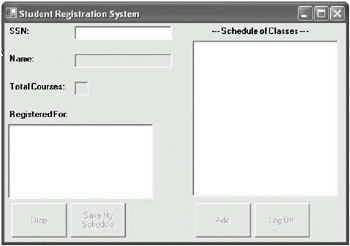
When the new code is compiled and the driver code executed, the GUI shown in Figure 16-37 will appear on the screen.
Note that the four Button objects are initially enabled, in that each button label appears in black and each button is "clickable." We're going to want the Button objects to initially be disabled, until a user successfully logs on; when disabled, the button labels would appear to be grayed out as shown in Figure 16-38, and clicking on them would have no effect. We'll add the logic for programmatically enabling/disabling the buttons a bit later in this chapter.
The SRS GUI will use modal message dialog boxes at certain points in the SRS processing scenario to help guide the user along. The term "modal" means that any other interactions with the GUI are suspended until the message dialog box is dismissed by the user. That is, the user won't be able to click any of the other buttons, type into any of the fields, etc., of the GUI until he or she acknowledges and responds to the modal dialog box.
Recalling our SRS concept of operations from earlier in the chapter, one example of how we'll be using message dialog boxes with the SRS GUI will be to alert the user if he or she mistypes his or her password. In such a situation, a message dialog box will appear to inform the student what has happened; without displaying such a message, the GUI would seemingly just sit there, leaving the user to guess as to what had gone wrong.
| Note?/td> |
As an alternative, we could simply display an error message in a read-only TextBox field on the main form. Message dialog boxes are a much better way to alert the user to a problem, however, in that while a user can potentially ignore or overlook a message that appears in a field, he or she can't ignore a message dialog box because it must be closed before continuing. |
Modal message dialog boxes are easily implemented in C# using the MessageBox class. A MessageBox is a dialog box that can have a title, display text along with an icon, and include one or more buttons used for responding to the dialog box. We can associate a MessageBox with another GUI object such that the MessageBox will appear automatically centered in front of its associated object.
There are no constructors declared by the MessageBox class. The way to create and display MessageBox objects is by invoking the static Show method on the MessageBox class as a whole. There are many overloaded versions of the Show method, used to create dialog boxes with different title, caption, and button combinations; the version of the Show method that we'll use with the SRS has the following header:
public static DialogResult Show(string text, string caption,
                                MessageBoxButtons buttons,
                                MessageBoxIcon icon)
The return value of the Show method is one of eight DialogResult constants that indicate how the MessageBox was closed. By inspecting the returned value from a call to MessageBox.Show, we can ascertain how the user responded to any questions posed by the MessageBox. We won't do anything with the return value of this method for purposes of the SRS GUI.
The text parameter is the text that will be displayed by the MessageBox.
The caption serves as the title of the MessageBox.
We can add one or more buttons to the MessageBox by specifying one of the MessageBoxButtons constants. The one we'll use is the following:
MessageBoxButtons.OK
Supplying this constant as an argument to the Show method results in a button marked OK being placed inside the MessageBox. When the OK button is subsequently clicked to indicate that the user has acknowledged the message being displayed, the MessageBox closes.
We'll use two of the various MessageBoxIcon constants to define what icon will be displayed with a given MessageBox instance. The MessageBoxIcon.Information icon is a lowercase "i" inside a circle. It will be used to provide general information to the user. The MessageBoxIcon.Warning icon consists of an exclamation mark inside a triangle. It will be used to warn the user that an issue needs to be addressed.
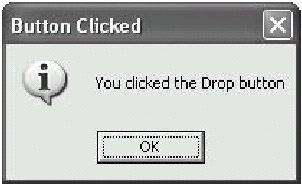
As a simple example of using a MessageBox, the following code could be used to display an informational MessageBox with the text "You clicked the Drop button":
    MessageBox.Show("You clicked the Drop button", "Button Clicked",
             MessageBoxButtons.OK, MessageBoxIcon.Information);
When the previous line of code is executed, the MessageBox shown in Figure 16-39 appears on the screen.
We've already seen one technique for sharing data throughout the various classes of an application, through the use of public static attributes of the main class/window (or, for that matter, any class/window), as we did with the various collections declared by the SRS driver program in Chapter 14. Another approach to application-wide data sharing is to allow a class/window A to collect data from the user, and to then have that class A provide state retrieval methods/properties for other classes/windows B, C, etc. to use in requesting access to the data that A has collected. We'll use this approach to obtain the user's password when he or she attempts to log on to the SRS.
The first thing a student will do when running the SRS application will be to log on by typing in his or her SSN. When the student finishes typing and presses the Enter key, we want a separate window to appear that will ask the student for his or her password, and which will then "remember" the password until we retrieve it a bit later in our application. The easiest way to accomplish this objective is to declare another class called PasswordForm, derived from Form, to serve as a password dialog box.
The PasswordForm class will be designed using many of the same features that we've already discussed for Forms in general. The PasswordForm class will collect the user's password as it's typed, and will subsequently make the password available to client code (specifically, to methods of the MainForm class in our application) through a public Password property.
One new security feature will be added for the password dialog box. When a user types in his or her password, it's common practice to hide the characters that are being typed using an echo character—a character that will be shown instead of the characters that are actually typed. The TextBox class implements this feature via the PasswordChar property.
public char PasswordChar
Whatever character is assigned to the PasswordChar property will visibly replace the characters typed into the TextBox. The system will still know what the actual characters are, but passersby won't be able to see them on the computer screen.
Here is the code listing for the PasswordForm class. We'll defer building the event handling capability of the PasswordForm class until a little later in the chapter.
// PasswordForm.cs

using System;
using System.Collections;
using System.Windows.Forms;
using System.Drawing;

public class PasswordForm : Form
{
  private TextBox passwordTextBox;
  private Label passwordLabel;
  private string password;

  public PasswordForm() {
    int componentTop = 15;

    // Create a Label component.
    passwordLabel = new Label();
    passwordLabel.Text = "Password:";
    passwordLabel.Top = componentTop;
    passwordLabel.Left = 15;
    passwordLabel.Width = 70;
    passwordLabel.Font = new Font(passwordLabel.Font, FontStyle.Bold);

    // Create a TextBox component.
    passwordTextBox = new TextBox();
    passwordTextBox.Height = 40;
    passwordTextBox.Width = 100;
    passwordTextBox.Top = componentTop;
    passwordTextBox.Left = passwordLabel.Right;
    // Establish the echo character as an asterisk.
    passwordTextBox.PasswordChar = '*';

    // Add the GUI objects to the form.
    this.Controls.Add(passwordLabel);
    this.Controls.Add(passwordTextBox);

    this.Text = "Enter Password";
    this.Height = 80;
    this.Width = 240;
    this.MinimumSize = this.Size;
    this.StartPosition = FormStartPosition.CenterScreen;
  }

  // Property.
  public string Password {
    get {
      return password;
    }
    // Note: a set accessor is not necessary, as the
    // student's password is predefined based on his/her
    // student ID number, and is unchangeable.
  }
}
The PasswordForm class is quite simple—it consists of a Label and a TextBox placed on a Form. There is a private field named password that, after we've implemented event handling, will store what was typed into the TextBox. The echo character for the TextBox is set to be an asterisk character (note the use of single quotes: '*'). The get accessor of the Password property can be used to access the value of password; a set accessor has been deemed unnecessary, as the value will always be set by typing into the TextBox field. Later in this chapter we'll provide the event handling logic necessary for this to occur.
We're now finished with constructing the "view" of our SRS GUI. All of the GUI objects we'll need in order to accomplish the functionality as described in the SRS concept of operations have been created and placed onto the underlying Form. There is still some work to be done, however, because while our SRS GUI looks as it should, it doesn't actually do anything useful yet. Users can click the buttons or type something into the SSN text box, but nothing useful will happen, at least as far as student registration is concerned.
To make our GUI fully functional, we need to engage the "controller" aspect of the Model-View-Controller paradigm to connect our model and view classes together. Through a process known as event handling, we'll program the logic necessary to achieve the desired results for various user interactions with the GUI. In particular
We'll need the GUI to recognize when a user has typed his or her student ID number into the ssnTextBox as a signal that he or she wishes to log on.
We'll need to program the logic for what is to happen behind the scenes when each of the four buttons at the bottom of the GUI—addButton, dropButton, saveButton, and logOffButton—is clicked.
We'll need to recognize when a user has made a selection in either the registeredListBox or scheduleListBox.
We'll provide all of these behaviors a bit later in this chapter, after we've touched on the other C# classes that these behaviors will be reliant upon.