|
|
< Day Day Up > |
|
23.3 Dynamic Form FieldsForms don't have to be empty. When a Web browser loads a form page, one or more fields may already be filled with information from a database. You can use this feature for update forms on your site. It can also come in handy when, for example, you've created an Employee Directory section for your company's site. Suppose that, on the Insert New Employee page, you built a pop-up menu that lets the Human Resources department select a department for the new employee. You, the designer, could create a menu like this by manually typing the name of each department. But what if the names of the departments change, or new departments are added? You'd have to reopen the page and edit the form field each time. But if you opted for a dynamic menu instead, the page would build the Departments pop-up menu automatically by retrieving the current list of departments from the database (see Figure 23-9). Dreamweaver's Insert Record Update Form wizard creates these kinds of dynamic form fields automatically. In essence, a dynamic form field is a form element whose value comes from dynamic data in the Bindings panel. The dynamic data can come from a recordset (as with an update form), a form or URL parameter, or even a cookie or session variable (see Section 24.2). Dynamic form fields come in handy with update forms. Form fields are already filled out with database information that's ready to be edited. Menus can also be dynamically generated from records in a recordset. In this case, the menu (shown open) lists records retrieved directly from a database table containing the product categories for the National Exasperater online store.
Whenever you wish to use a dynamic form field, start by creating a form. Add all form fields that might include dynamic content. (Not all the fields have to be dynamic, however. In the employee directory example discussed earlier, only the Department menu on the Insert New Employee form would be dynamic. The other fields for entering an employee's information would be empty.) Next, add a recordset, request variable, session variable, or application variable to the Bindings panel (see Section 22.2.1). Then finally, attach the dynamic data to the form field. The process for binding dynamic data depends on the type of form field. 23.3.1 Dynamic Text Form FieldsAny form field that accepts typing梩ext, text area, and password fields梒an be dynamic. For example, if a site requires a user login, you could include a "remember me" feature, so that when a visitor who's previously signed in returns to the site, the user name and password will already be filled out.
You can add dynamic data to a text field (also called binding data to the field) using any of the methods described below. (Remember, you must first have added the form field to the page and added the dynamic data to the Bindings panel. This means adding a recordset to a page, as described in Section 22.1.2, or creating additional data sources [like cookies or session variables] as described in Section 24.2).
After binding the data to the field, the name of the data item appears inside the field梴rsDetails.adName}, for example. If you're using Live Data view (Section 22.5), the actual data from the database appears inside the field. Dreamweaver lets you format dynamic data in a form field just like dynamic text you add to a page (see Section 22.2.2). Be careful with this option, though. If the form is submitting to a database, data may sometimes have to be in a certain format. For example, prices are often stored as numbers inside a database. But using Dreamweaver's currency format, you can make a price appear as $34.00 in a form field. When your visitor submits the form, the $ sign goes along for the ride, causing the database to spit out a horrible error message upon encountering this nonnumeric character. To remove dynamic data from a text field, just select the field and click the Unbind button in the Bindings panel. (Deleting the contents of the field's Init Value box in the Property inspector also works.) 23.3.2 Dynamic Checkboxes and Radio ButtonsWith a text field, you can dynamically change the value of the field. With checkboxes and radio buttons, however, you can control only their status (checked or unchecked) dynamically. You can use this value to select one radio button in a group based on a value in the database. For example, as part of a product ordering system, shoppers could select a particular shipping option: USPS, FedEx, or UPS. But after reviewing their orders, what if they change their minds and choose a different shipping option? When they return to the order page, you'd want the Shipping Option radio button to reflect the choice the shopper had made earlier. In other words, you want the page to read the shipping option for the order from the database, and highlight the radio button that matches. (You'll find an example of this in the "Building a Page for Editing Database Records" section of the tutorial starting in Section 23.5.3). 23.3.2.1 Dynamic radio buttonsYou add dynamic radio buttons like this:
Open the Server Behaviors panel (Window The Dynamic Radio Buttons window appears (see Figure 23-10). The Dynamic Radio Buttons window lists the values of each button in the group. By selecting a button from the list, you can change its value in the Value field.
From the first menu, choose the radio button group. If your form has more than one group of radio buttons, select the one you wish to be dynamic. Click the dynamic data button (the lightning bolt) to the right of the Select Value Equal To field. The Dynamic Data window opens (see Figure 23-7). Select the dynamic data item for this radio group. In a nutshell, the radio button whose value matches the dynamic data will be selected. If no radio buttons contain the same value, then no buttons will be selected. NOTE
You only set the Select Value Equal To field once per radio group (not once per button in the group). Click OK to close the window. Dreamweaver adds a Dynamic Radio Buttons server behavior to the page. 23.3.2.2 Dynamic checkboxesDynamic Checkboxes work almost the same way:
To remove the dynamic properties from a group of radio buttons or a checkbox,
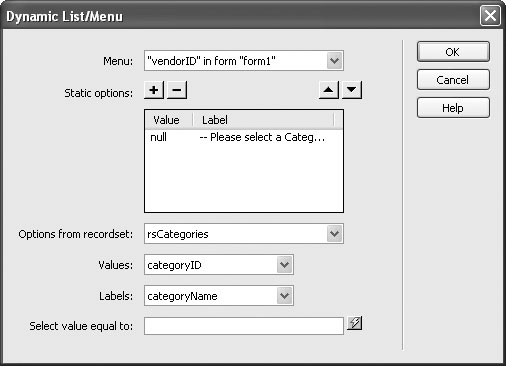
open the Server Behaviors panel (Window 23.3.3 Dynamic Menus and ListsDynamic menus and lists are among the most-used form elements. They save you the effort of having to rebuild traditional menus or lists every time your company opens a store in a new state, adds a new employee department, or whatever. To create a dynamic menu or list, proceed as follows:
You can remove the dynamic menu or list, by selecting and deleting it. To leave the
menu but remove its dynamic properties, open the Server Behaviors panel (Window To edit the behavior, just select the menu in the document window and once again click the Dynamic button in the Property inspector. |
|
|
< Day Day Up > |
|

 Dynamic Text Field. In the window that appears, you'll see a Text field
menu. Select the text field you wish to add dynamic data to; then click the lightning
bolt button to open the dynamic data window. Select the dynamic data item from
the list and click OK.
Dynamic Text Field. In the window that appears, you'll see a Text field
menu. Select the text field you wish to add dynamic data to; then click the lightning
bolt button to open the dynamic data window. Select the dynamic data item from
the list and click OK.