|
|
< Day Day Up > |
|
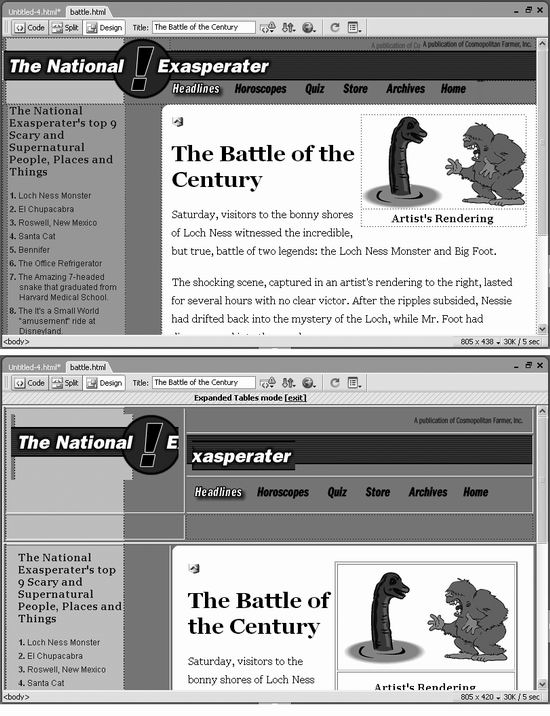
7.6 Formatting TablesWhen you first insert a table, you set the number of rows and columns, as well as the table's cell padding, cell spacing, width, and borders. You're not stuck, however, with the properties you first give the table; you can change any or all of these properties, and set a few additional ones, using the Property inspector. When you select a table in Standard view, the Property inspector changes to reflect that table's settings (see Figure 7-15). You can adjust the table by entering different values for height, width, rows, columns, and so on in the appropriate fields. Expanded Table mode lets you clearly view the structure of table-based layouts. In Standard view (top), it can be difficult to distinguish tables, rows, columns, and cells. With Expanded Table mode turned on (bottom), Dreamweaver displays tables with extra borders and cell spacing to make selecting and working with tables and cells easier. (Expanded Table mode is just an extension of the Standard mode. You can't use any of the Layout mode tools梒ell or table drawing tools, for example梚n Expanded Table mode.)
When you select a table, you can do everything from adjust its basic structure to fine-tune its appearance in the Property inspector. Dreamweaver MX 2004 adds two new menus桾able Id and Class梬hich let you apply a CSS ID selector (Section 6.6.2) or a class style (Section 6.1.3) to a table.
In addition, the Property inspector lets you set alignment options and add colors or a background image, as described next. 7.6.1 Aligning TablesIn the normal flow of a Web page, a table acts like a paragraph, header, or any other HTML block-level element. It's aligned to the left of the page, with other elements placed either above it or below it. But you can make several useful changes to the way a table interacts with the text and other elements around it. After selecting the table, use one of the three alignment options in the pop-up menu at the right of the Property inspector:
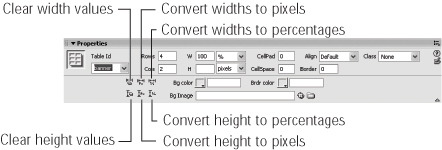
7.6.2 Clearing Height and Width ValuesSix tools hide behind the obscure-looking buttons in the bottom half of the Property inspector (see Figure 7-14).
When creating complex table designs, it's easy to get yourself into a situation where width and height measurements conflict and produce unreliable results. For example, it's possible to set one cell to 300 pixels wide, and later set another cell in the same column to 400 pixels wide. Since a Web browser can't do both (how can one column be both 300 and 400 pixels wide?), you'll get unpredictable results. In tables with many cells, these kinds of problems are tough to ferret out. That's when you'll find these timesaving tools handy. You can delete the width and height measurements and start from scratch (see "Tips for Surviving Table Making" in Section 7.7.6). Four additional buttons let you convert pixel-based measurements to percentage measurements and vice versa. In other words, if a table is 600 pixels wide, and you click the Convert Widths to Percentages button, Dreamweaver assigns percentages to the table and each cell whose width is specified using pixels. These percentages depend on how much of the document window your table takes up when you click the button. If the document window is 1200 pixels wide, that 600-pixel-wide table changes to a 50-percent width. Because you'll rarely do this, don't waste your brain cells memorizing such tools. (See "Resizing a Table" below in Section 7.6.4 for more information.) 7.6.3 Decorating a TableTo spruce up a table, you can add color to its background and borders, and even add a background image. As usual in Dreamweaver, you make these changes in the Property inspector. First select the table (see Section 7.4.1), then click the appropriate box in the Property inspector桞g color (background) or Brdr color (border)梐nd select a color from the color palette. (See Section 1.3.3 for more on choosing colors in Dreamweaver.) To add a graphic image to the background of a selected table, click the folder icon next to Bg Image in the Property inspector. Browse to and open an image in your Web site folder; it appears immediately as a background image for the selected table. NOTE
The CSS background properties (Section 6.7.2) offer more control over setting background colors and images than the HTML equivalents described here. In addition, you can achieve more border effects梕ven different sizes, colors, and styles for each border梪sing the CSS Border properties described in Section 6.7.5. 7.6.4 Resizing a TableWhile you define the width of a table when you first insert it, you can always change your mind later. To do so, first select the table, and then take either of these steps:
In theory, you can also convert a table from a fixed unit of measurement, such as pixels, to the stretchy, percentage-style width setting梠r vice versa梪sing four buttons at the bottom of the Property inspector (see Figure 7-15). NOTE
The HTML <table> tag doesn't officially have a Height property. Dreamweaver, however will add a Height property if you use the Property inspector or drag the bottom of the table to resize it. Some Web browsers understand this Height property and obey your wishes, but most newer browsers obey the official HTML standard and ignore any height setting for a table. In other words, don't rely on a table's Height property. You have several alternatives: First, you could decide not to worry about height. After all, it's difficult to control the height of a table precisely, especially if there's text in it. Since text sizes differently on different operating systems and browsers, the table may grow taller if the text is larger, no matter where you set the height. Or you could use the CSS Height property (Section 8.3.1.2) to set a height for a table. Finally, you can always insert a graphic in a table cell to pop it up to the height you want. (See "The Contents Take Priority" in Section 7.7.6.1.) These options depend on the size of the current document window in Dreamweaver. For example, suppose the document window is 700 pixels wide, and you've inserted a table that's 100 percent wide. Clicking the Convert Widths to Pixels button sets the table's width to around 700 pixels (the exact value depends on the margins of the page). However, if your document window were 500 pixels wide, clicking the same button would produce a fixed-width table around 500 pixels wide. Two buttons let you control this separately for the height and width of the table and its cells (see Figure 7-15). The Convert Width to Percentages buttons take the opposite tack. They set the width or height of a table and its cells to percentages based on the amount of the document window's width and height they cover at the moment. The bigger the window, the smaller the percentage. Because the effects of these buttons depend upon the size of the document window, you'll find yourself rarely, if ever, using these two tools. |
|
|
< Day Day Up > |
|