|
|
< Day Day Up > |
|
7.7 Modifying Cell and Row Properties in Standard ViewCells have their own properties, separate from the properties of the table itself. So do table rowsbut not columns (see Section 7.7.1). When you click inside a cell, the top half of the Property inspector displays the cell's text formatting properties; the bottom half shows the properties for that particular cell (see top image in Figure 7-16). 7.7.1 Alignment PropertiesAt the outset, a cell's contents hug the left wall of the cell and float halfway between the top and bottom of the cell. After selecting a row, a cell, or several cells, you can change these alignments using the Property inspector. For example, the Horz (Horizontal) menu in the Property inspector (see Figure 7-16) offers Left, Center, Right, and Default alignment options. (Default produces the same effect as Center without adding any extra HTML code.) Note that these options are distinct from the paragraph alignment options discussed in Chapter 3. In fact, you can mix and match the two. Suppose, for example, that you have a table cell containing four paragraphs. You want all but one paragraph to be center-aligned; you want the last paragraph to be right-aligned. To do so, you could set the alignment of the cell to Center, then select just the last paragraph and set its alignment to Right. The paragraph's alignment overrides the alignment applied by the cell.
The Property inspector displays the properties of a cell (top) or a row (bottom). Rows have distinct properties that you can set independently of a cell. For example, a row can have a background and border color that are different from the individual cells in that row. (Still, when a row is selected, the Width, Height, No Wrap, or Header options affect the individual cells in the row.)
You can set the vertical alignment property in the same manner. Select the cells and then use one of the five options available in the Vert (Vertical) menu of the Property inspector: Default (the same as Middle), Top, Middle, Bottom, or Baseline.
(The Baseline option aligns the bottom of the first line of text in the cell to the baseline of text in all the other cells in the row. This option works only in Netscape browsers, so avoid it if you want your Web pages to look the same on all browsers.) 7.7.2 Table HeaderThe Table Header option lets you convert a <td> tag to a <th> tag for specifying a table header. It's a similar scheme to the column or row headers available in the Insert Table dialog box described in Section 7.3. You can use it to format a heading for the table as a whole, and it also adds to the accessibility of your table. You'll usually use this option for tables that include actual tabular data, like a spreadsheet, to indicate the meaning of the data that appears in the other cells in a row or column. For example, you might have a table containing data from different years; each cell in the top row might identify the year of the data in the cells below it. While Dreamweaver lets you change a single cell into a header, you'll most likely apply this to a row of cells or the left hand column of cells. 7.7.3 A Property to ForgetThe No Wrap options is of such little value that you'll probably go your entire Web career without using it. But for sake of thoroughnessand in case you may actually find a use for ithere's a description. The No Wrap property prevents a Web browser from wrapping a line of text within a cell onto multiple lines. The browser instead widens the cell so that it can include the line without line breaks. The result is almost never useful or attractive. Furthermore, if you specify a width for the cell, this property doesn't work at all! 7.7.4 Cell DecorationCells needn't be drab. As with tables, you can give individual cells background colors or even background graphics (see Figure 7-17). 7.7.4.1 Adding cell background colorsTo set the background color of one or more selected table cells or rows, do one of the following:
You also have the option to set a color for the cell's border using the color box or Brdr field in the Property inspector. However, only Internet Explorer recognizes this property, and, since it is not officially part of HTML, it's unlikely that other browsers will ever support it.
Add impact with background color. The home page for the Los Angeles County Arts Commission (www. lacountyarts.org) makes a big visual statement without being a bandwidth hog. The trick? There are only a few graphics on this page. The colorful squares are simply table cells with a variety of background colors.
7.7.4.2 Adding cell background imagesYou can also add an image to the background of a cell. In this instance, the cell acts much like a miniature document window; the graphic tiles (repeats endlessly) within the cell to completely cover the cell's background. To add a background image to selected cells, try either of these steps:
You can also set a background image for a table row (<tr> tag) using Dreamweaver, but it involves some coding that isn't officially part of HTML. In fact, only Netscape versions 4 and higher can display a background image for a table row at all. NOTE
Here's another instance where CSS outshines HTML. You can control a background image's placement inside of a table or cell and how it tiles (if at all). See Section 6.7.2. 7.7.5 Setting Cell DimensionsSpecifying the width or height of a particular cell works just as it does when you set the width or height of a table: select one or more cells and type a value in the W (width) or H (height) field in the Property inspector. This value can be either specified in pixels or percentage. For instance, if you want a particular cell to be 50 pixels wide, type 50. For a cell that you want to be 50 percent of the total table width, type 50%. Read "Tips for Surviving Table Making" in Section 7.7.6 for detail on the tricky business of controlling cell and table dimensions. You can also resize a column or row of cells by dragging a cell border. As your cursor approaches the cell's border, it changes shape to indicate that you can begin dragging. Dreamweaver MX 2004 adds an interactive display of cell widths (Figure 7-18) when you use this method. This helpful new feature shows you know exactly what width your cells are at all times so you can drag a cell to the exact width you're seeking. As you drag the border between cells, Dreamweaver shows you the changing widths of the two adjacent cells in real time. The width values change to blue and update themselves as you move the mouse.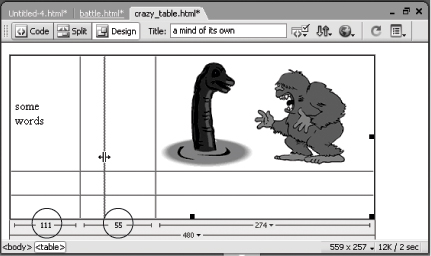
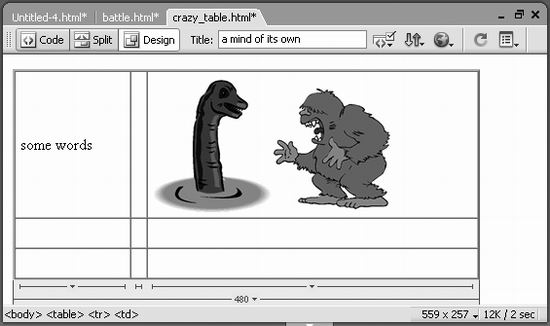
7.7.6 Tips for Surviving Table MakingNothing can be more confounding than trying to get your tables laid out exactly as you want them. Many beginning Web designers throw their hands up in despair when working with tables, which often seem to have minds of their own. The Layout mode eliminates many of the hassles associated with using tables for page layout, but here are a few problems that often confuse designersand some tips to make working with tables more straightforward. 7.7.6.1 The contents take priorityYou've created a 300-pixel-wide table and set each cell in the first row to 100 pixels wide. You insert a larger graphic into the first cell, and suddenlyKablooie! Even though you set each cell to 100 pixels wide, as shown in Figure 7-19, the column with the graphic is much wider than the other two. That's because a cell can't be smaller than the largest piece of content inside it. In this case, although you told the cell to be 100 pixels wide, the image is 174 pixels wide, and forces the first column to grow (and the others to shrink) accordingly. Because a Web browser can't shrink the image or hide part of it, the cell has to grow to fit it. That first column of cells is now 174 pixels wide; the other two columns must shrink in order to keep the table 300 pixels wide.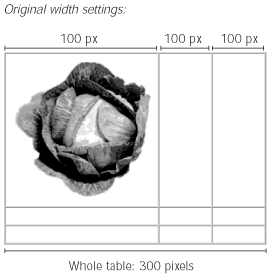
7.7.6.2 Set each column manuallySuppose you've created a 580-pixel-wide table with three columns. You've set the width of a cell in each of the first two columns to 150 pixels and 50 pixels. You assume that the Web browser is smart enough to figure out what size the remaining column should be: 380 pixels, of course, which is exactly what's left over if you subtract the first two column widths from 580. But you'd be wrong, as explained in Figure 7-20. In the top table, the designer set widths for the first two columns; the last column wound up with no width set. In the lower table, the designer manually set the width of the third column to 380 pixels; this time, the browser displays it correctly.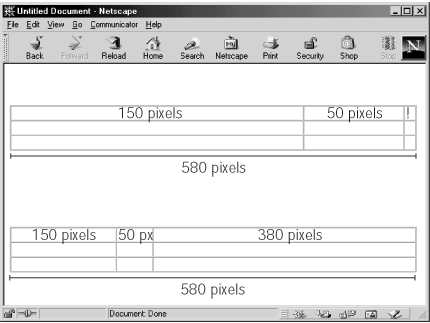
Web browsers aren't so smart. As you can see in Figure 7-20, Netscape Navigator 4.0 needs more information to display a table correctly. 7.7.6.3 There is no such thing as column width, only cell widthTo set the width of a column of cells, you have to set the width of only one cell in that column. For example, in the second table in Figure 7-20, the first cell in the top row has a width set to 150. You don't have to set the widths of the two cells below it. This principle can save a lot of time, and, because it reduces the amount of code on a Web page, and makes your pages load and appear faster. For consistency, it's a good idea to pick either the first or last row of a table for width-setting. The same holds true for the height of a row. You only need to set the height of a single cell to define the height for its entire row. Fortunately, Dreamweaver MX 2004 is smart. When you resize one or more cells, it adds width and height values only where they're needed, without filling every cell with needless height and width values. 7.7.6.4 Do the mathCalculators can be really useful when you're building tables. Although you could create a 400-pixel-wide table with three 700-pixel-wide columns, the results you'll get on
the screen can be unpredictable (700 + 700 + 700 As it turns out, Web browsers' loyalty is to table width first, then column widths. If you make the widths of your columns add up to the width of your table, you'll save yourself a lot of headache. 7.7.6.5 The Spacer Image RevisitedUnfortunately, even if you explicitly set cell widths, some browsers still don't do a good job at controlling the width of cells. Remembering that a cell can't be smaller than the largest item inside it, as noted previously, is half the battle. For even more control, use a spacer image, just as Dreamweaver does when you use the Autostretch option in Layout mode (see Section 7.2.6). For example, suppose you want to create a table that's 580 pixels wide, with two rows and three columns. The widths of the columns will be 150 pixels, 20 pixels, and 410 pixels, respectively. Specifying the widths of each cell in one of the rows would be a good start, but a more reliable approach would be to use a transparent GIF image to reinforce the column widths:
Now you can see the advantages of Dreamweaver's Layout mode, which eliminates the need for many of these workarounds. It takes care of a lot of the headaches of building table-based layouts. |
|
|
< Day Day Up > |
|

 400).
400). Image and
selecting the spacer file in your site folder.
Image and
selecting the spacer file in your site folder.