Previous Section  < Day Day Up >  Next Section

7.8 Adding and Removing Rows and Columns

Even after inserting a table into a Web page, you can add and subtract rows and columns from your table. The text or images in the columns move right or down to accommodate their new next-door neighbor.

7.8.1 Adding One Row or Column

To add a single row to the table, you can use any of these approaches:

  • Click inside a cell. Choose ModifyTableInsert Row, or press Ctrl+M (figs/command.jpg-M), to insert a new row of cells above the current row. Alternatively, you can right-click (Control-click) a cell and choose TableInsert Row from the contextual menu.

  • To add a new row at the end of a table, click inside the last cell in the table and then press Tab.

The new columns inherit the properties (width, height, background color, and so on) as the column you originally clicked.

To add a single column of cells:

  • Click inside a cell and then choose ModifyTableInsert Column.

  • Click inside a cell and then press Shift+Ctrl+A (Shift-figs/command.jpg-A).

  • Right-click (Control-click) a cell, and then choose TableInsert Column from the contextual menu that appears.

In each case, a new column appears to the right of the current column.

7.8.2 Adding Multiple Rows or Columns

When you need to expand your table more rapidly, you can use a special dialog box that lets you add many rows or columns at once.

  1. Click inside a cell. Choose ModifyTableInsert Rows or Columns.

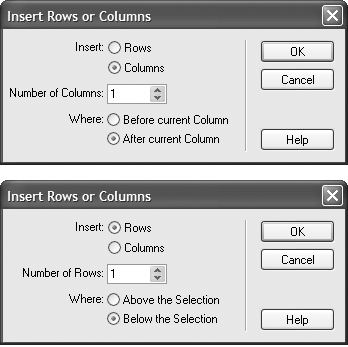
    The Insert Rows or Columns dialog box appears (see Figure 7-21).

  2. Click either Rows or Columns. Type the number of rows or columns you wish to add.

    You can also click the tiny up or down arrow buttons next to the Number of Rows field.

  3. Indicate where you wish the new rows or columns to appear, relative to the cell you selected, by clicking Above or Below (for rows) or Before or After (for columns). Click OK to insert them.

Using the dialog box gives you the advantage of choosing whether you want the new row or column to come before or after the selected information in your table, as shown in Figure 7-21.

The Insert Rows or Columns dialog box lets you add multiple rows or columns to a table. The wording of the options changes depending on whether you're inserting rows or columns. Note that this dialog box offers the only way to add a column to the right edge of a table.
figs/07_21.jpg

7.8.3 Deleting Rows and Columns

To delete a row from your table, you can use one of the following techniques.

When you remove a row or column, Dreamweaver also eliminates everything inside. So before you start hacking away, it's a good idea to save a copy of the page with the table.


  • Select the row (see Section 7.4.2); press Delete to delete all of the cells梐nd everything in them梖or the selected row.

  • Click a cell. Choose ModifyTableDelete Row, or use the keyboard shortcut Shift+ Ctrl+M (Shift-figs/command.jpg-M).

  • Right-click (Control-click) inside a cell, and then choose TableDelete Row from the contextual menu.

Deleting a column is equally straightforward.

  • Select the column (Section 7.4.2), and then press Delete. You've just eliminated all the selected cells and everything in them.

  • Click inside a cell and choose ModifyTableDelete Column, or use the keyboard shortcut Shift+Ctrl+Hyphen (Shift-c-Hyphen).

  • Right-click (Control-click) inside a cell, and then choose TableDelete Column from the contextual menu.

NOTE

Dreamweaver doesn't let you delete a row if one of its cells is merged with a cell in another row. Nor can you delete a column if it contains a cell that's merged with a cell in an adjacent column. (Merged cells are discussed in the next section.)

Deleting a column in this way is actually quite a feat. Since there is no column tag in HTML, Dreamweaver, behind the scenes, has to select individual cells in multiple rows梐 task you wouldn't wish on your worst enemy if you had to do it by editing the raw HTML code.

    Previous Section  < Day Day Up >  Next Section