


You create and manage Time Intervals using the Interval Bar (the pale line along the top of each selected Lifeline element). Time Intervals enable you to perform various operations on transitions, such as copy and paste. They also enable you to compress sections of the timeline so that they are not visible.
Each Time Interval displays across all Timeline elements down to the last element on the diagram.
To create a Time Interval, follow one of the three sets of steps below:
Interval Bar - Context Menu
| 1. | Right-click on the Interval Bar at approximately the point at which to start or finish the Time Interval.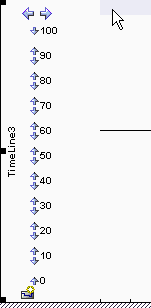 The context menu displays. |
| 2. | Select the Create Time Interval option. The Time Interval displays down all the timeline elements, as a narrow pale band with a blue compression box at the top.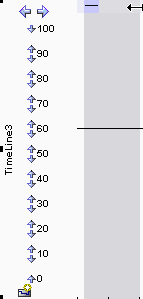 |
| 3. | Move the cursor to the edge of the Time Interval in the Interval Bar so that the cursor changes to the drag form ( |
Interval Bar - [Shift] key
| 1. | Move the cursor over the Interval Bar and press [Shift]. The cursor changes shape ( |
| 2. | Click to create the Time Interval. |
| 3. | Move the cursor to the edge of the Time Interval in the Interval Bar so that the cursor changes to the drag form ( |
Timeline - Context menu
| 1. | Right-click on the timeline just after a transition. The context menu displays. |
| 2. | Click on the Select menu option. Enterprise Architect creates a Time Interval covering the period from the selected transition up to the next transition. |
Note: If there are other Time Intervals in this period, Enterprise Architect replaces them with the single Time Interval for the transition state. You should consider this when creating the Time Interval, as it extends across the other Timeline Elements in the diagram.
Note: A value of this method is that it creates a Time Interval for a period in which no transitions occur, which could be lengthy. You can then compress this Time Interval (see below) to hide the period of inactivity. See also Compress Timeline.
Compress Time Intervals
You can compress Time Intervals to conserve space on long timelines.
Uncompressed Time Intervals
Compressed Time Intervals
Notice:
Item |
Description |
||||
|
The compression toggle boxes:
|
||||
|
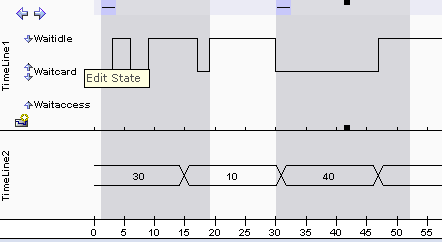
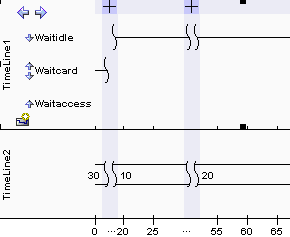
The compressed sections of the timelines themselves, in all elements. If there is space between the paired symbols, there are transitions within the compressed section. If the timeline continues through the paired symbols there are no transitions in the compressed section. |
||||
25 ... 55 |
The compressed sections in the time range underneath the elements. |
You can also compress and expand Time Intervals using context menu options; see Time Interval Operations on Transitions.
| · | To select a Time Interval across all elements on the diagram, click on the Interval Bar within the Time Interval. |
| · | To select a number of individual Time Intervals, press and hold [Ctrl] while clicking on the Interval Bar within each Time Interval. |
| · | To select all Time Intervals in a range, click on the Interval Bar within the first Time Interval in the range, then press and hold [Shift] and click on the Interval Bar within the last Time Interval in the range. All Time Intervals between the two are selected. |
After you have selected one or more Time Intervals, you can modify the selection in the following ways:
| · | To exclude Lifeline elements from the selection, press and hold [Ctrl] and click on any part of the selection within that element. In the diagram below, the Value Lifeline is excluded from selection.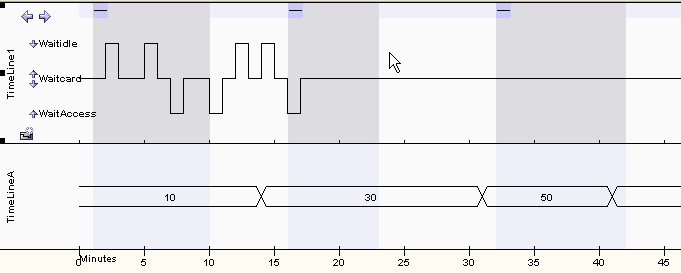 Repeat the step to toggle the selection and re-include the element. See also Toggle Interval Selection. |
| · | To select only one Lifeline element and exclude all others, press and hold [Shift] and click on any part of the selection within that element. |
Note: Selection is useful for cutting, copying and pasting transitions.
Move and Resize Time Intervals
To move a Time Interval, move the cursor over the Interval bar within the Time Interval, hold down the mouse button and drag the interval left or right.
To resize a Time Interval, move the cursor over the Interval Bar at the start or end edge of the Time Interval, hold down the mouse button and move the edge left or right.
Note: Time Intervals can meet, but cannot overlap.
Delete Time Intervals
Select each Time Interval to be deleted and press [Delete].
Note: Deleting the Time Interval does not delete transitions within that interval.
See Also